FIX: Lenovo B590 sound not working on Windows 10
7 min. read
Updated on
Read our disclosure page to find out how can you help Windows Report sustain the editorial team. Read more
Key notes
- If the sound is not working on your Lenovo B590 laptop, you may experience driver issues.
- You will need to check the cables and connections first as they might get damaged often.
- Updating the drivers with a third-party tool may also fix this problem quickly.
- You could also try running the dedicated audio troubleshooters to fix the audio problem.
If you tried the Windows 10 OS for 64 bit on your Lenovo B590 (or if you’re still running Windows 8.1), then you may have stumbled upon some issues, one of them being the sound.
So, seeing that many users are having this sound problem, we will explain to you in the guide below how you can fix your sound on Lenovo B590 in just a few easy steps.
Most of the time, the audio drivers you use for the Lenovo 590 in Windows 10 (including the sound driver) are not always compatible with the newest versions of Windows available.
But we will try to update your sound driver to the latest version and also run the Audio Troubleshooter in your Windows 8.1 or Windows 10 and see how it goes from there.
How can I fix Lenovo B590 audio problems on Windows 10?
- Check your cable connection
- Update the audio driver
- Run the Audio troubleshooter
- Install Lenovo’s troubleshooting tool
- Use a different media player
- Install pending OS updates
- Make sure that your audio device is enabled
1. Check your cable connection
First of all, you need to check all the cable connections for the sound system. If you have any issues there, you won’t be able to continue with the steps below.
That includes checking if the jacks are plugged in correctly and if the cables are all in order. You can also try using other audio cables if you have any around.
2. Update the audio driver
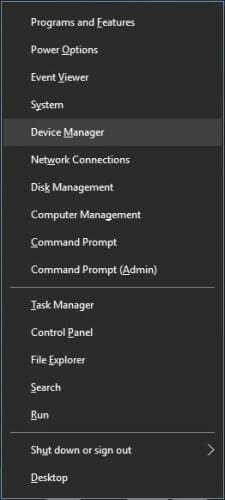
- Right-click the Start button and select Device Manager from the list.
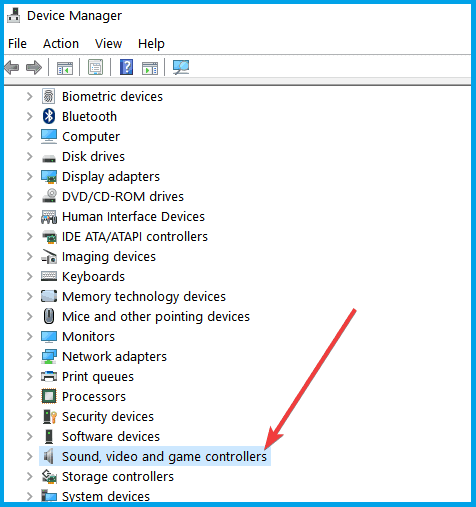
- On the left side panel, find and double click on the Sound, video and game controllers feature.
- In the sub-menu, check if your sound card is listed there and also if it hasn’t got any yellow exclamation mark beside it.
- If it isn’t, then you will have to go on the manufacturer’s website and download the latest driver from there.
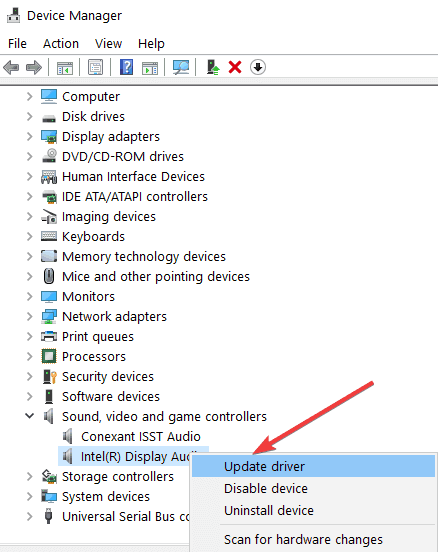
- If you have the yellow exclamations mark next to the driver, then right-click or hold tap on the driver.
- Click or tap on the Properties feature from the menu.
- Now click on the Driver tab from the upper side of the Properties window.
- Select Update driver from the menu.
- Follow the instructions on the screen to finish the update.
- Reboot your system and check if your sound is working.
You need to know that by updating the audio drivers, the system will find and install a default driver for your device and that doesn’t always work.
An alternative is to navigate to the manufacturer’s website and download the correct driver. However, that process can be time-consuming and tedious.
You can also try the easy method, using a dedicated third-party tool that will update and repair all your drivers in one go automatically. The tool recommended below is absolutely safe and easy to use.
It scans your PC and detects whether your drivers need to be updated. Then, using its own driver database, it finds the best version available that matches your driver.
In just a few minutes, the automatic driver updater will download and install your drivers. It can also help you repair corrupt drivers and detect if you have any missing drivers and install them as well.
3. Run the audio troubleshooters
3.1 Run the Playing Audio troubleshooter
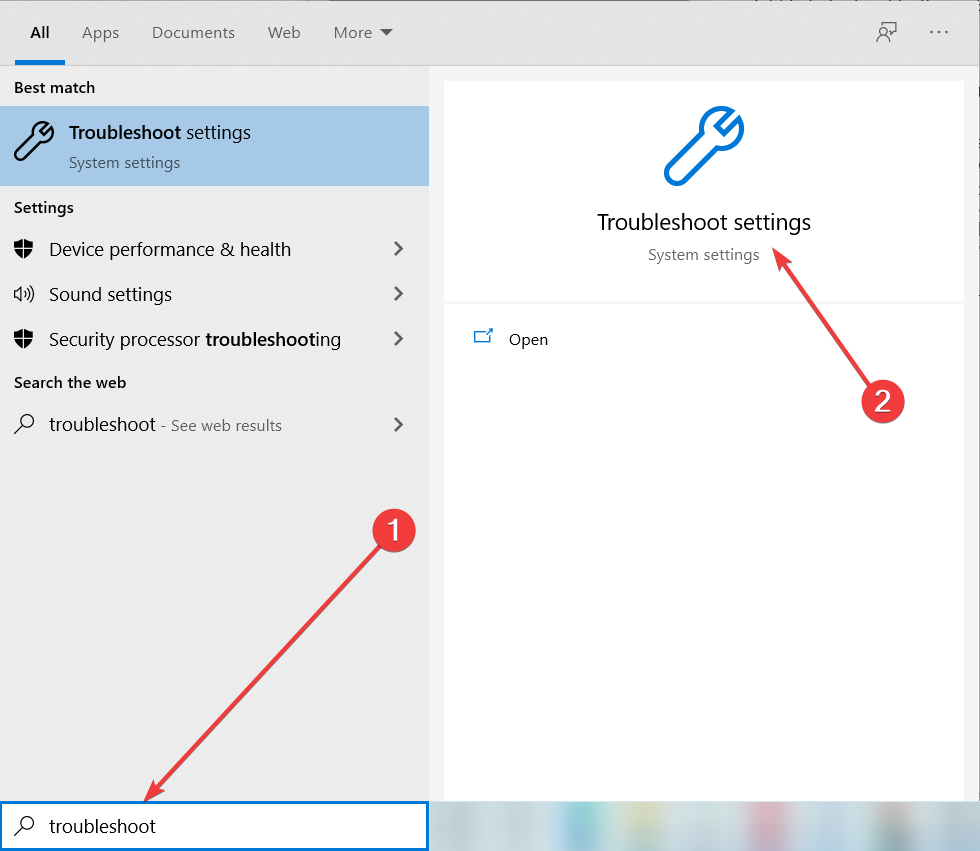
- Type troubleshooter in Windows search and click on Troubleshoot settings from results.
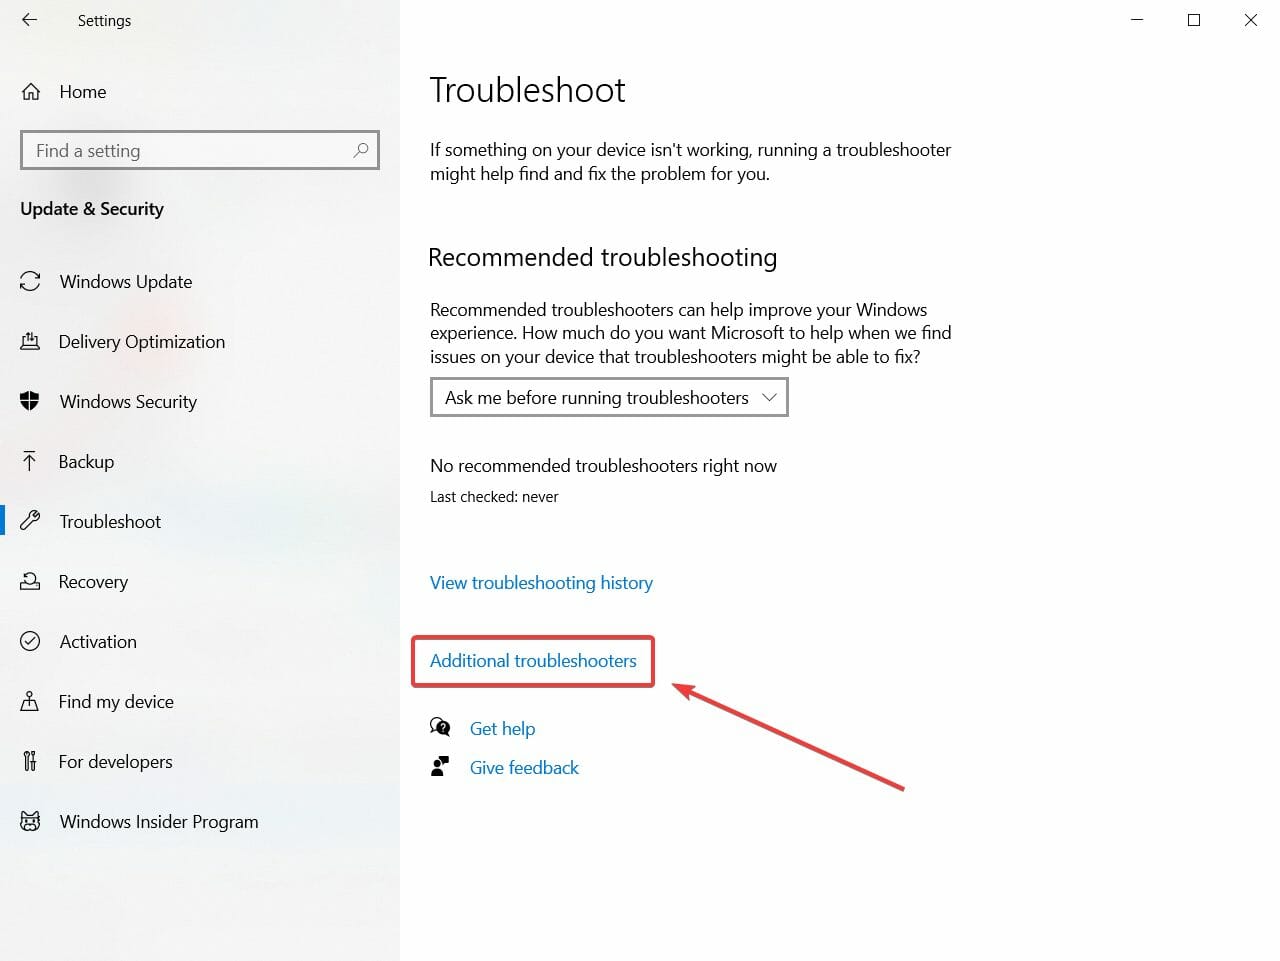
- In the next windows, click on Additional troubleshooters.
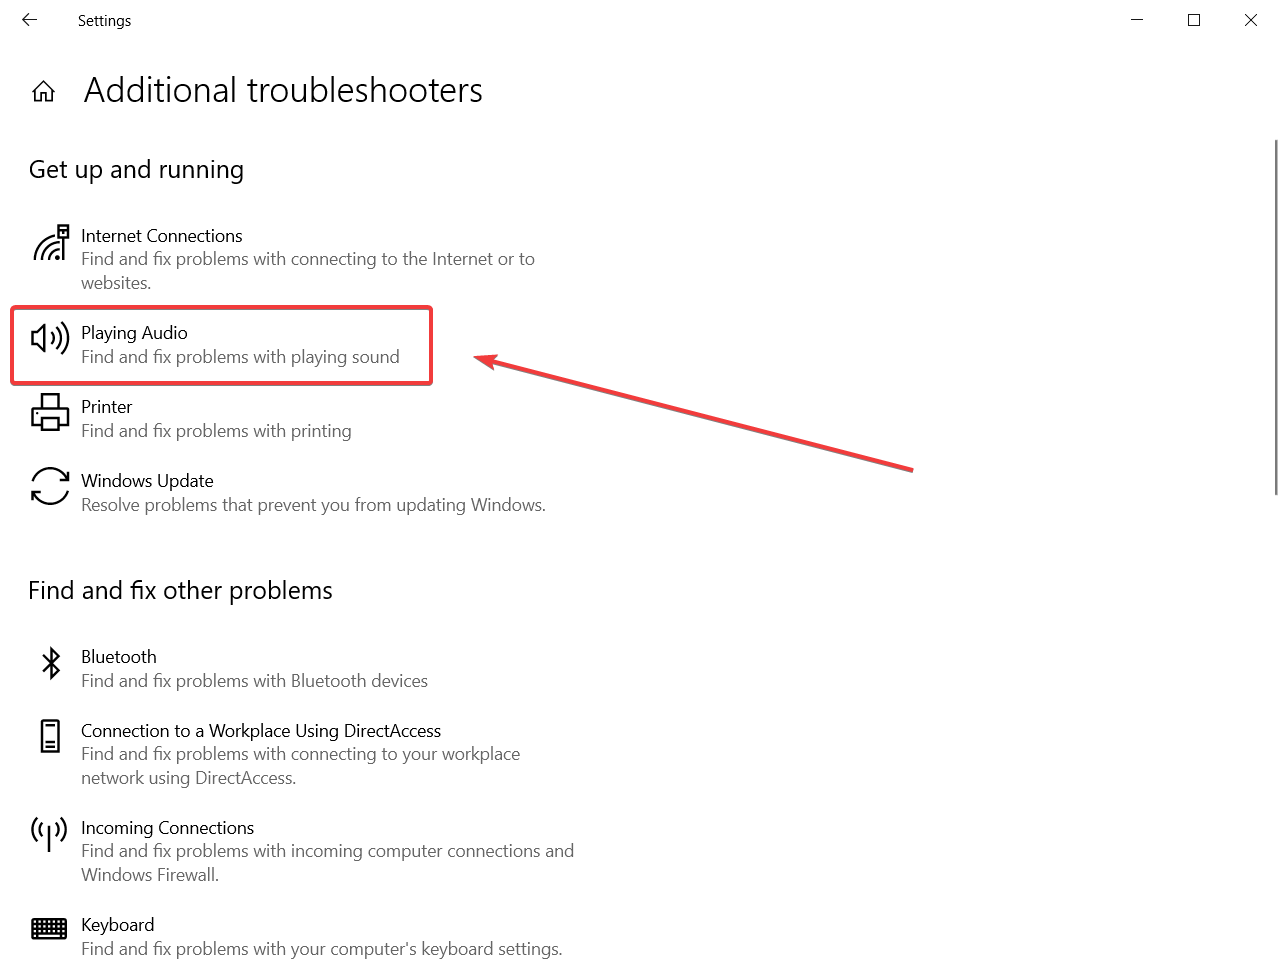
- There are two audio troubleshooters but let’s start with the Playing Audio troubleshooter from the next window. Click on it and then click on the Run the troubleshooter button.
- In the next window, you will have to select the device that you want to troubleshoot.
- If you are asked if you want to turn off audio enhancements, do that also.
- You will also be asked if you want to set that audio device as default so you should click on Apply this fix if it shows up.
- The system will scan for any problems with your playback device and will fix them.
3.2 Run the Recording Audio troubleshooter
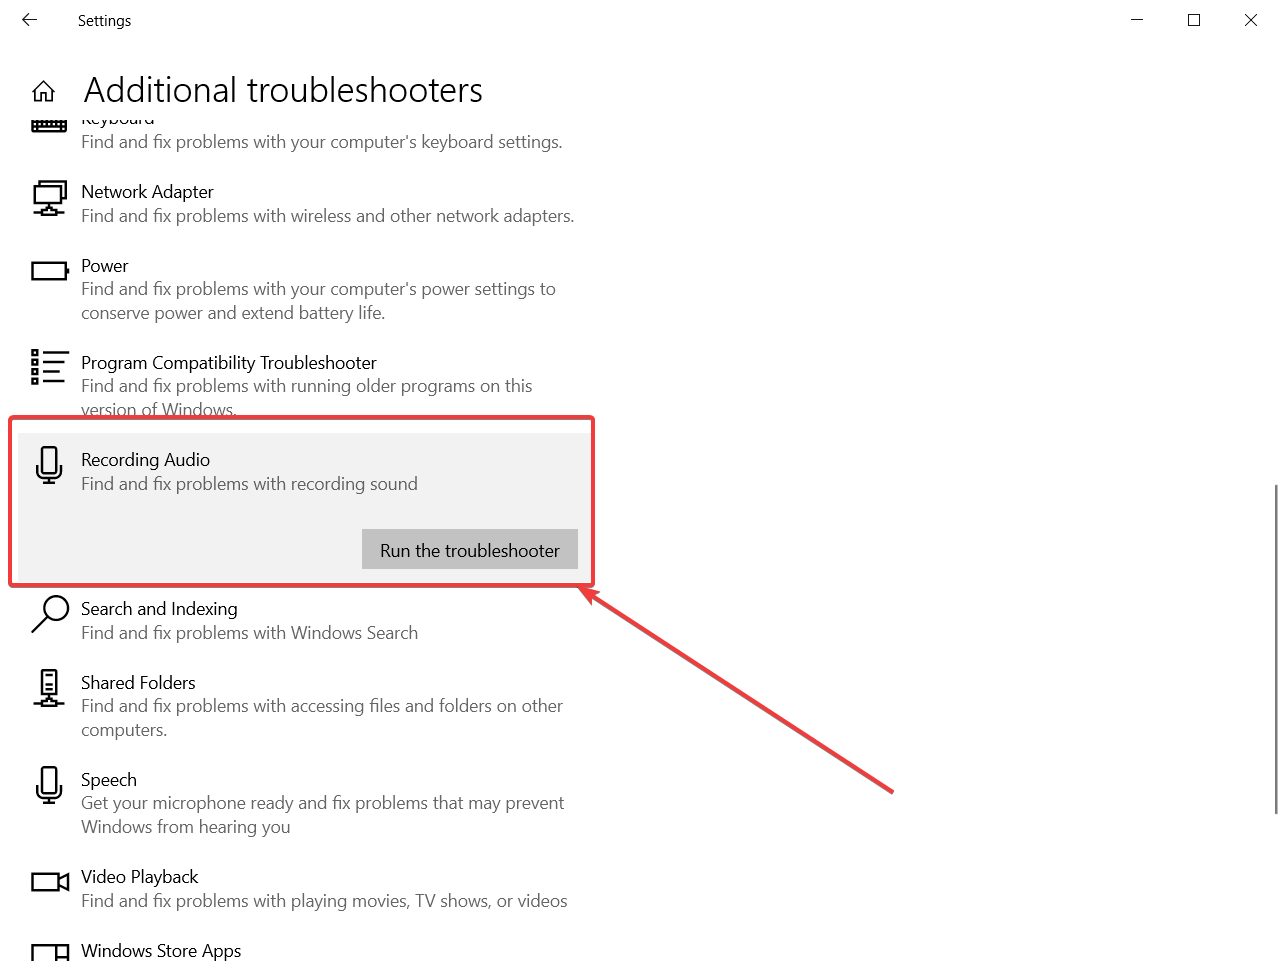
- In the additional troubleshooters page, scroll down to find the Recording Audio troubleshooter.
- Click on it, then click on the Run this troubleshooter button.
- Follow the steps to fix any problems with the audio recording devices, just like you did with the Playing Audio troubleshooter from the solution above.
You only need to use this troubleshooter if you have any problems with your Lenovo B590 microphone.
3.3 Use the Microsoft audio troubleshooter for older Windows versions
- Download the audio troubleshooting app for Windows from Microsoft’s web page.
- Left-click or tap on the Save File feature.
- Left-click or tap on the OK button.
- After the download is finished, you need to go to the folder where you saved the executable and run it.
- Follow the instructions on the screen to finish the troubleshooting for the Audio system.
Running the audio troubleshooters is a basic procedure to learn about any possible issues with your sound devices so make sure you try doing that.
4. Install Lenovo’s troubleshooting tool
- Download Lenovo Solution Center app for Windows.
- You will have to open the Readme file after the download in order to finish the installation.
- Follow the procedure to troubleshoot any possible issues.
After you installed the application, reboot your PC and see how the sound is working. The problem should be solved but if not, try the next solution.
5. Use a different media player
Check on several applications if your sound is working. You might have an issue with a particular application and the others might work.
We have an excellent list with the best media players for Windows 10 so it wouldn’t hurt trying to see if others don’t have this problem.
6. Install pending OS updates
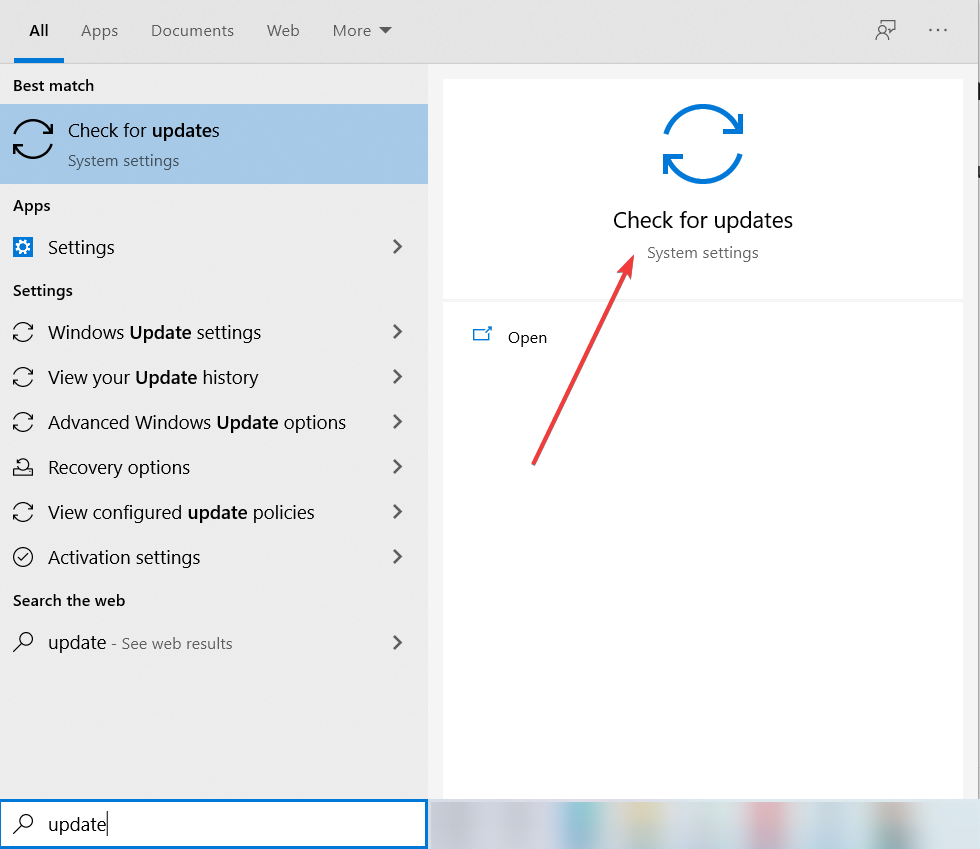
- Type update in Windows search and select Check for updates from the results.
- Click or tap on the Check for updates button.
- After the check is finished, install all the available updates by following the instructions on the screen.
- Reboot the device after the updates have finished installing.
- Check again if you have your sound back.
Installing any new pending updates to your OS can also fix this problem so make sure you try the steps above. Keeping your system up to date is recommended anyway.
7. Make sure that your audio device is enable
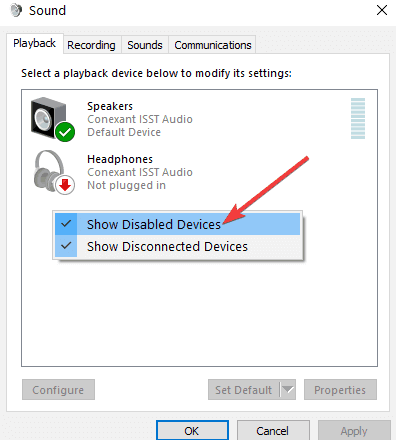
- Right-click on the Volume icon in the Taskbar and go to Playback devices.
- Right-click the empty space and choose Show Disabled Devices.
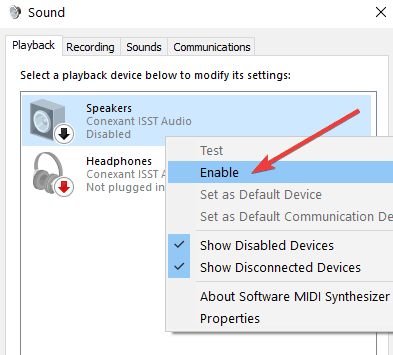
- Check if your Playback device is on the list. If your audio device is grayed out, this indicated that it has been disabled. Right-click on it and select Enable, as shown in the screenshot below.
- Check if this workaround solved the problem.
Sometimes, third-party apps and programs automatically disable your audio devices. This may explain why there is no sound on your Lenovo B590 speakers.
If your audio device is indeed disabled, all you need to do to solve this issue is to simply re-enable your audio device. If you don’t know how to do that, we have an expert guide that will help you deal with that problem.
We also have a great guide that will help you fix any audio issues on your Windows 10 device so make sure you check it out.
If you own a Lenovo laptop, here’s another useful guide that can help you fix the sound problems.
There you go, we hope these solutions helped you fix the problem with the Lenovo B590 sound in Windows 10.
If we have any new information on this subject or further questions, for that matter, you can contact us using the comment section below.





User forum
0 messages