Here are the Best Ways to Use Steam Screenshot Manager
Capture and share screenshots while playing on Steam
Key notes
- The Steam screenshot manager stores all your gaming screenshots in one place and allows you to easily access them in one go.
- Read below to find out where the Steam screenshot manager is located.
- You'll also learn how to change the default folder to store your screenshots.

Steam is one of the most used gaming platforms in the world. The service offers a wide range of game genres, and it has become the go-to option for people wanting to download new games or even try the trial versions before the game is officially released.
If you’ve ever played online games, you know how important it is for you to be able to take a screenshot of the action happening on the screen.
This can be useful in various cases, but it is mainly used to keep a visual record of game bugs, gather useful information, etc.
In today’s article, we’ll explore how to use the Steam Screenshot feature, so make sure you read it thoroughly.
How to save Steam screenshots?
To take a screenshot in Steam, you can press the F12 key or Fn + F12 on your keyboard, depending on whether the Function key is locked or unlocked. This will take a screenshot, a thumbnail of it will be displayed near the bottom-right, and the screenshots will be saved.
This handy tool comes as a new addition to the Steam gaming platform, and it allows you to take screenshots, manage, and share them without needing to exit the program.
After you’ve created your screenshots, they can be sorted into specific folders for each game, and you can choose between saving them on your hard drive or sharing them with the Steam community.
You also have the option to keep your screenshots private if you choose to do so.
Where is the Steam screenshot folder on Windows 10?
The screenshots are stored in the Steam folder in Program Files (x86). But since Steam creates a folder with your Account ID, the path is different for all users. Here’s the path for the Steam screenshot folder:C:\Program Files (x86)\Steam\userdata\AccountID\760\remote

Once you navigate the path, there will be several folders in Remote, each with screenshots for a particular game denoted by the game number.
There’s also a simpler way to find the screenshots for any game on your computer listed in the next section.
How can I use the Steam Screenshot Manager?
1. Find screenshots
- Launch the Steam app, click on the View menu near the top-left corner, and then select Screenshots.

- Click on the Show dropdown menu, and then select the game on which you have captured screenshots.

- Now, click the Show On Disk button.

- The folder with the screenshots for the selected game will now launch.

This method is more straightforward than manually navigating through the Steam folder in File Explorer looking for screenshots.
2. Change the visibility of screenshots while uploading
- Click on the View menu, and then select Screenshots.

- Select the desired game from the Show dropdown menu.

- Click on the Select All button or manually select the ones you want to upload while holding the Shift key.

- Click on Upload.

- Now, select Private, Friends only, or Public from the Visibility dropdown menu, and then click on the Upload button.

That’s how you can change the visibility of the screenshots. Setting the visibility to Public will share the screenshots on the web.
How to change the Steam screenshot folder?
- Press Windows + E to launch the File Explorer, and navigate to the following path where AccountID is the one for your Steam account:
C:\Program Files (x86)\Steam\userdata\AccountID\760 - Select the remote folder, and hit the Del key.

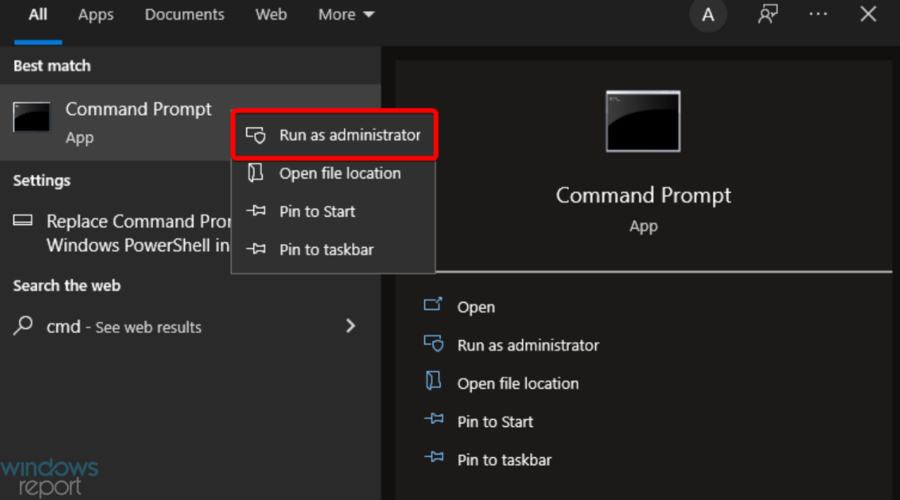
- After you’ve deleted the folder, hit the Windows + S key, type Command Prompt, and then choose to Run as administrator.

- Click Yes in the UAC prompt that appears.

- Type in this command, making sure to change the path of your Steam screenshot folder to fit your needs, then hit Enter:
mklink /D "C:\Program Files (x86)\Steam\userdata\AccountID\760\remote" "path_to_custom_screenshot_folder"
In this article, we explored some of the best ways to get access, create, and also manage all the screenshots you took while playing your favorite Steam game. Also, you now know how to change the location of the Steam screenshot folder in Windows 10.
Besides, find out how to optimize the PC for gaming and get the best performance.
Feel free to let us know if the information in this article was helpful to you by using the comment section below.
Read our disclosure page to find out how can you help Windows Report sustain the editorial team. Read more


Improve this guide


User forum
0 messages