How to Turn Off Sleep Mode in Windows 10 [Quick Guide]
You can use Settings or Control Panel to disable sleep mode.
4 min. read
Updated on
Read our disclosure page to find out how can you help Windows Report sustain the editorial team. Read more
Key notes
- Disabling sleep mode means your computer will consume more power and may take longer to start up from a shutdown state.
- This guide will mention various ways to turn off sleep mode.
![How to Turn Off Sleep Mode in Windows 10 [Quick Guide]](https://cdn.windowsreport.com/wp-content/uploads/2023/03/How-to-Turn-Off-Sleep-Mode-in-Windows-10-Quick-Guide-886x590.png)
Sleep mode is a power-saving feature that helps conserve energy by putting your Windows 10 computer into a low-power state.
While this feature can be helpful, there may be times when you want to disable sleep mode to prevent interruptions or complete maintenance tasks.
In this guide, we will walk you through different methods to turn off sleep mode in Windows 10. Let’s start!
What are the different ways to turn off sleep on Windows 10?
1. Use the Settings
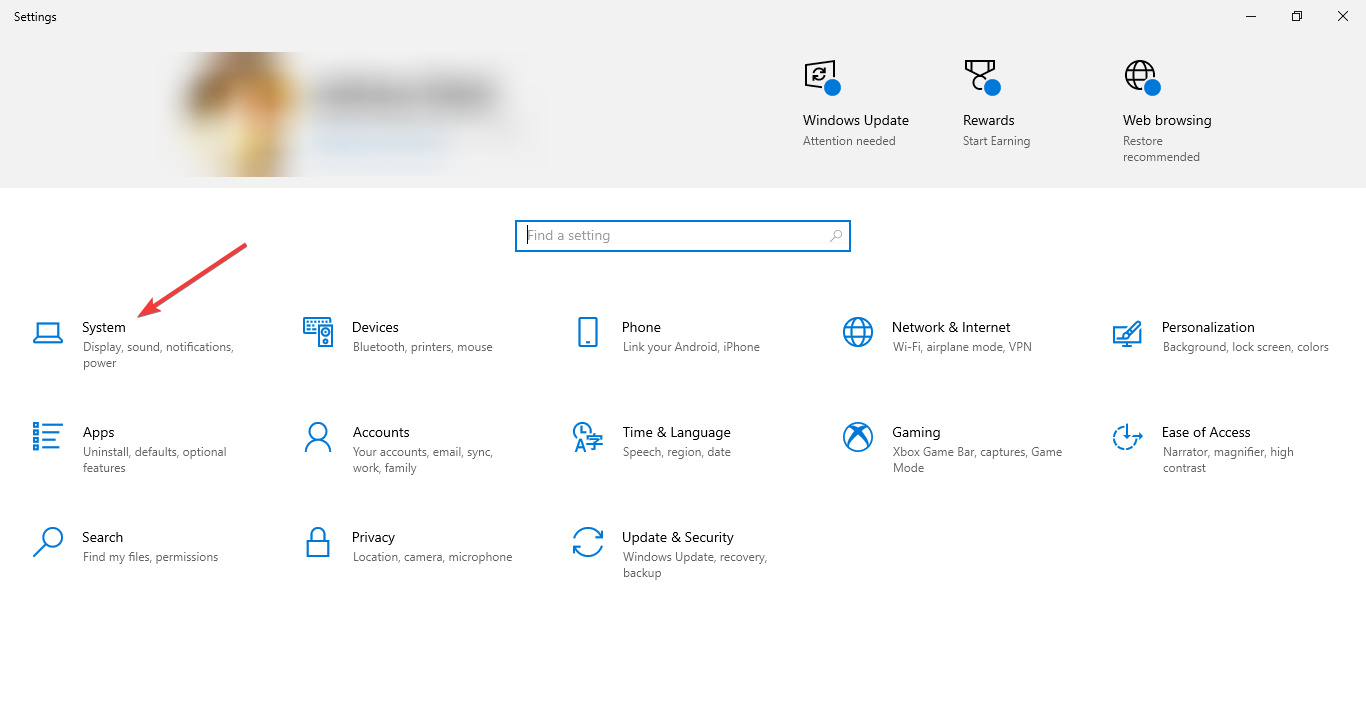
- Press Windows + I to open the Settings app.
- Click System.
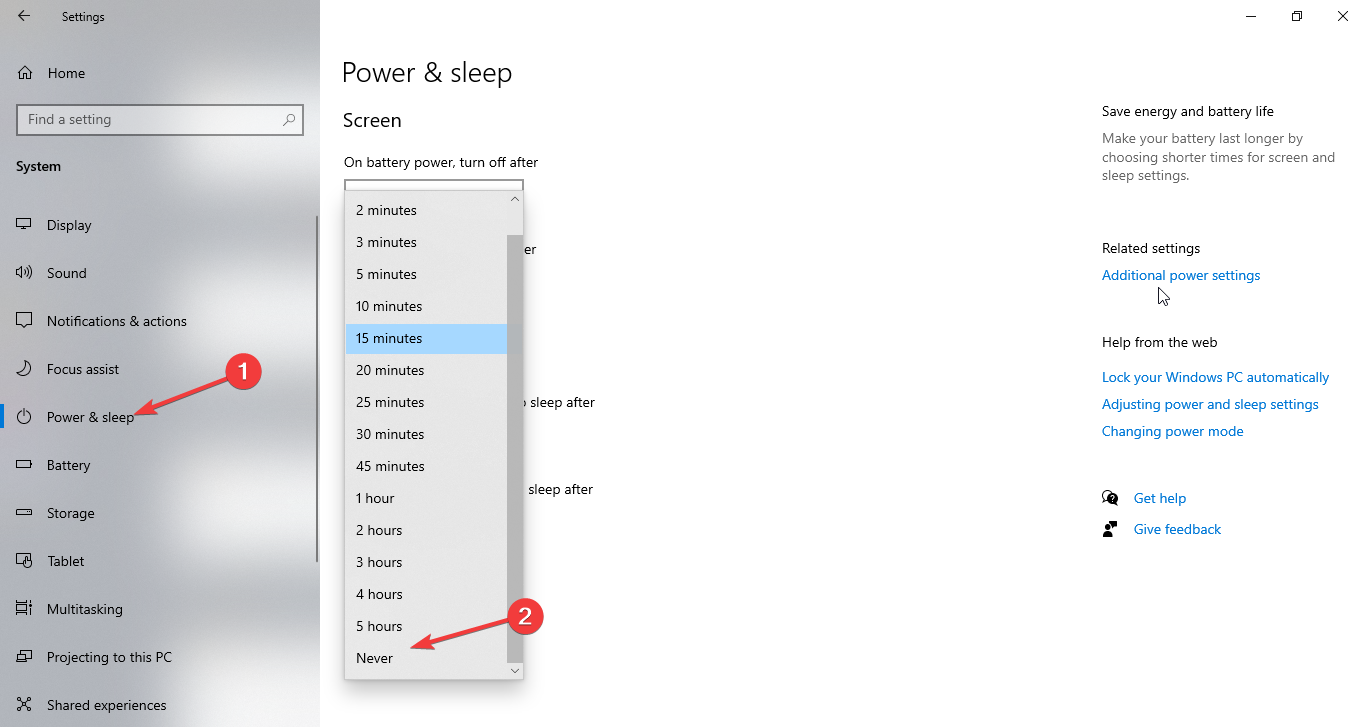
- Now select Power & sleep.
- Under Sleep, choose Never from the dropdown menu.
2. Use the Control Panel
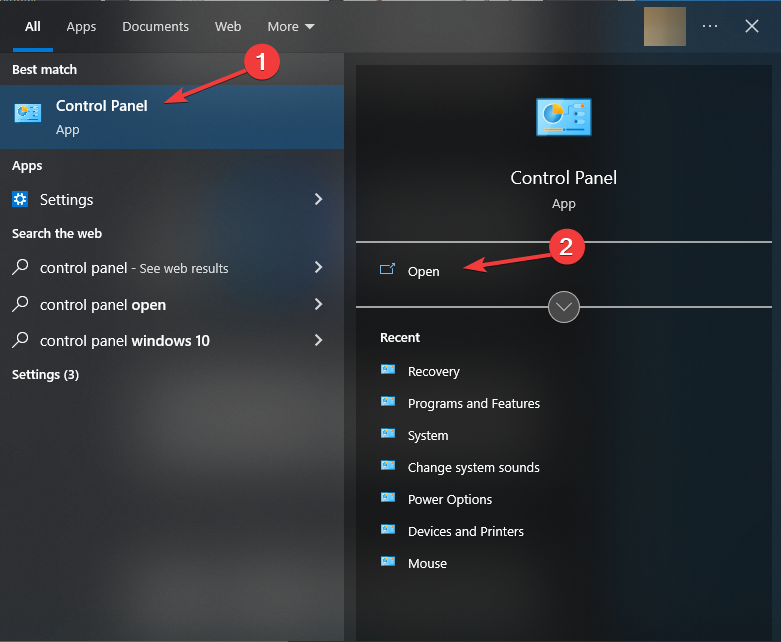
- Press the Windows, type Control Panel, and click Open.
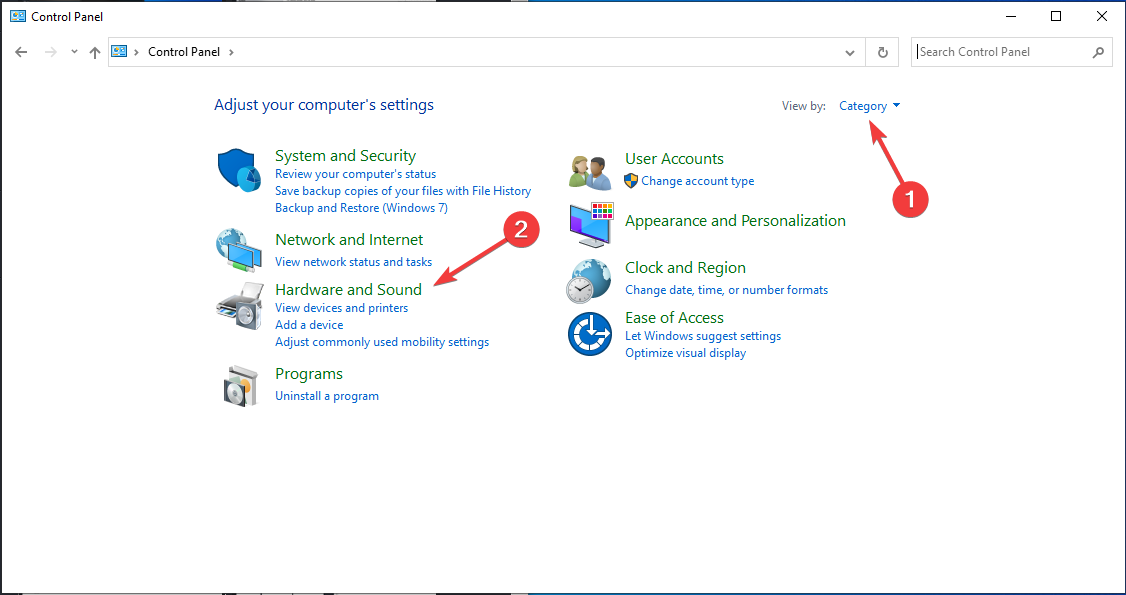
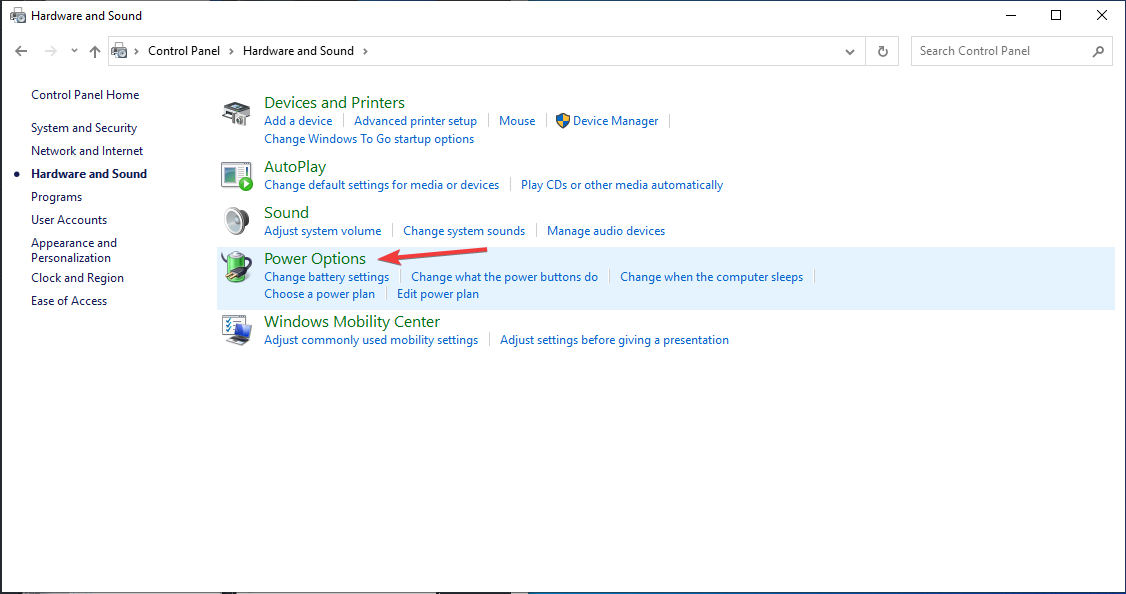
- Select Category for View as and click Hardware and Sound.
- Choose Power Options.
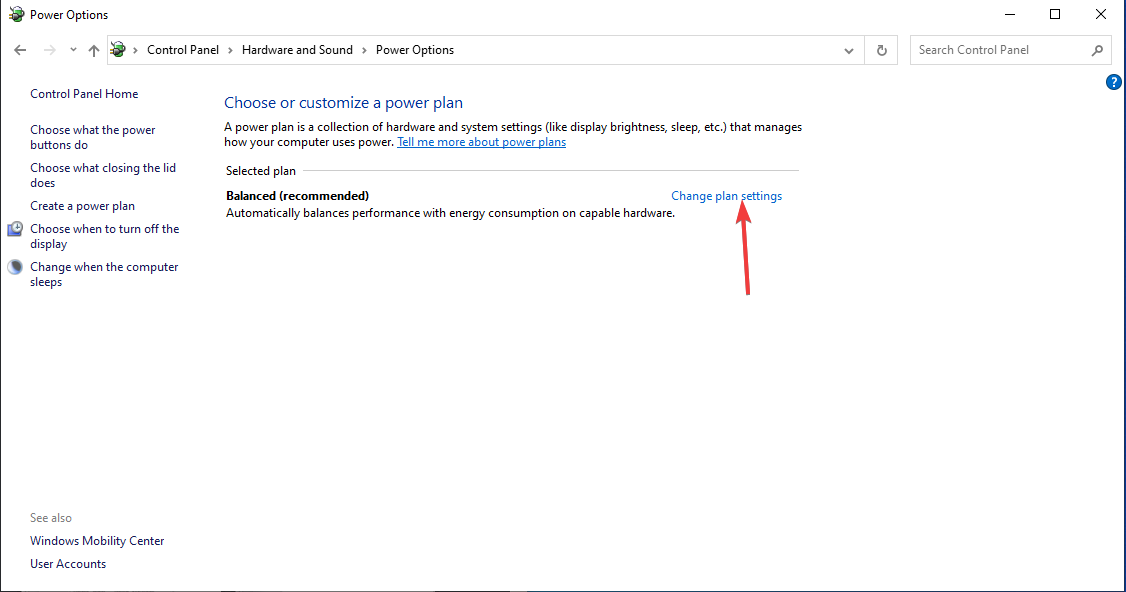
- Locate the current power plan, and click Change plan settings.
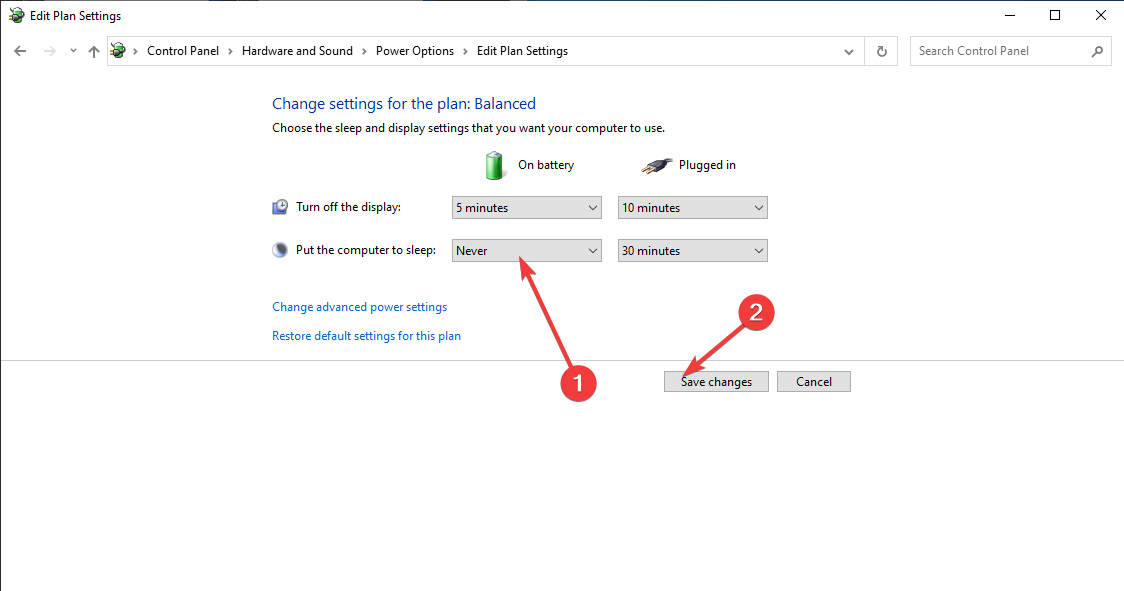
- Now click the Put the computer to sleep option and choose Never from the dropdown list.
3. Use the Command Prompt
- Press the Windows key, type Cmd, and click Run as administrator.
- Type the following command to disable hibernation & turn off sleep mode, and press Enter:
powercfg -h off
4. Use the Group Policy Editor
- Press Windows + R to open the Run window.
- Type gpedit.msc and click OK to open Group Policy Editor.
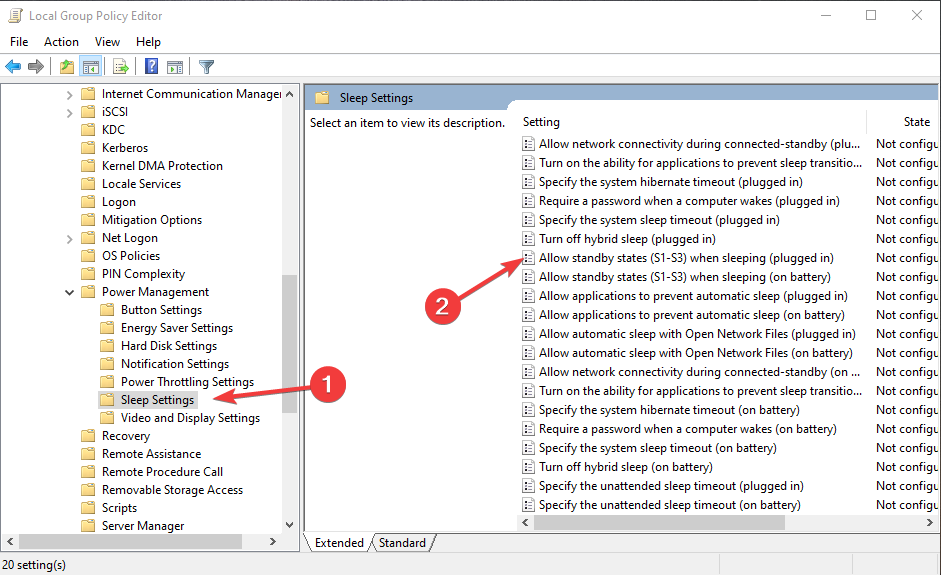
- Navigate to this path:
Computer Configuration \Administrative Templates\System\Power Management\Sleep Settings - Select and double-click Allow Standby States (S1-S3) When Sleeping (Plugged In)
- Select Enabled and set the time to Never.
- Click Apply and OK.
5. Use the Registry Editor
- Press Windows+ R to open the Run dialog box.
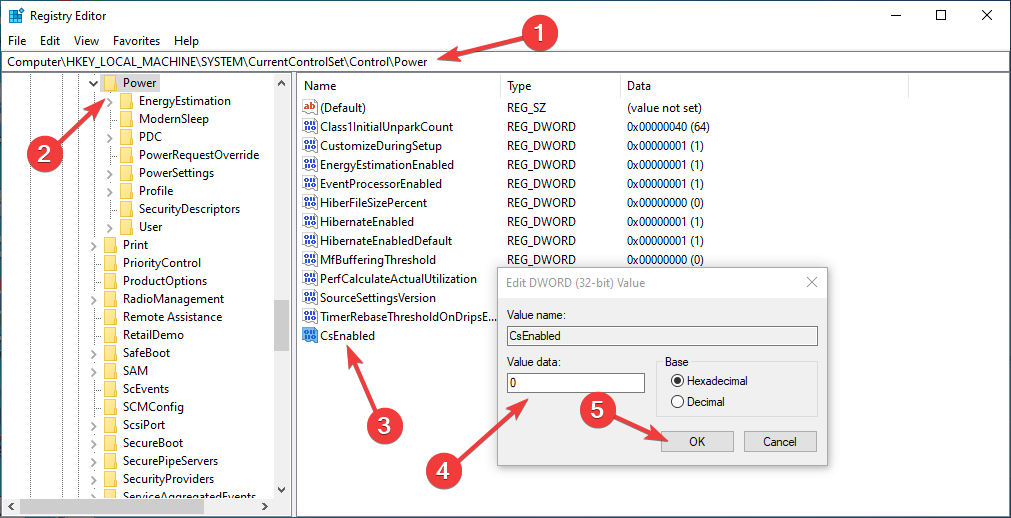
- Type regedit and click OK to open Registry Editor.
- Navigate to this path:
Computer\HKEY_LOCAL_MACHINE\SYSTEM\CurrentControlSet\Control\Power - Double-click CsEnabled and change the Value data from 1 to 0.
- Restart your computer.
6. Use the Device Manager
- Press Windows + R to open the Run console.
- Type devmgmt.msc and click OK to open Device Manager.
- Double-click to expand System devices.
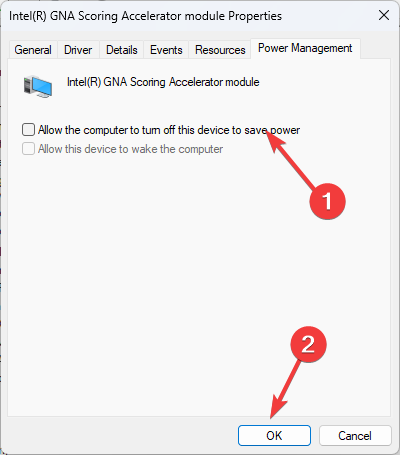
- Go to system devices and double-click it to open Properties.
- Switch to the Power Management tab.
- Removed the checkmark next to Allow the computer to turn off this device to save power.
- Click Apply and then OK.
7. Use the BIOS settings
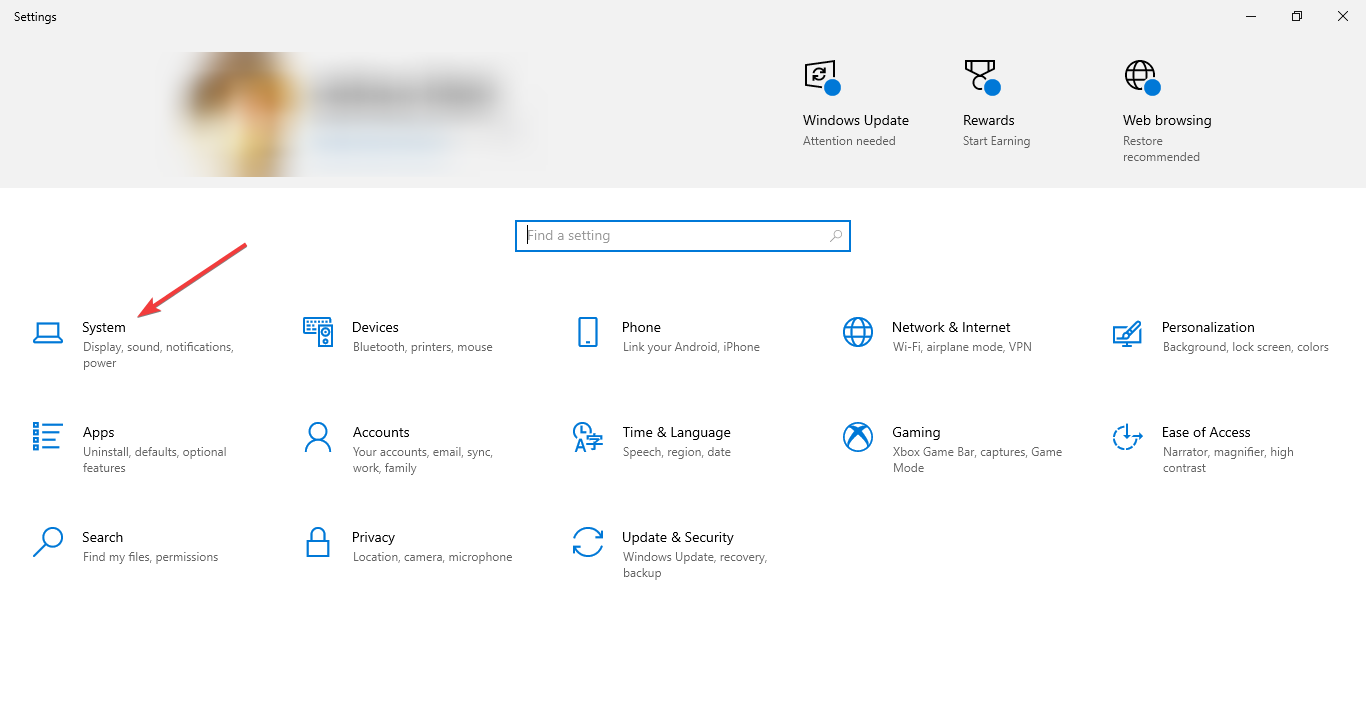
- Press Windows + I to open Settings.
- Go to System.
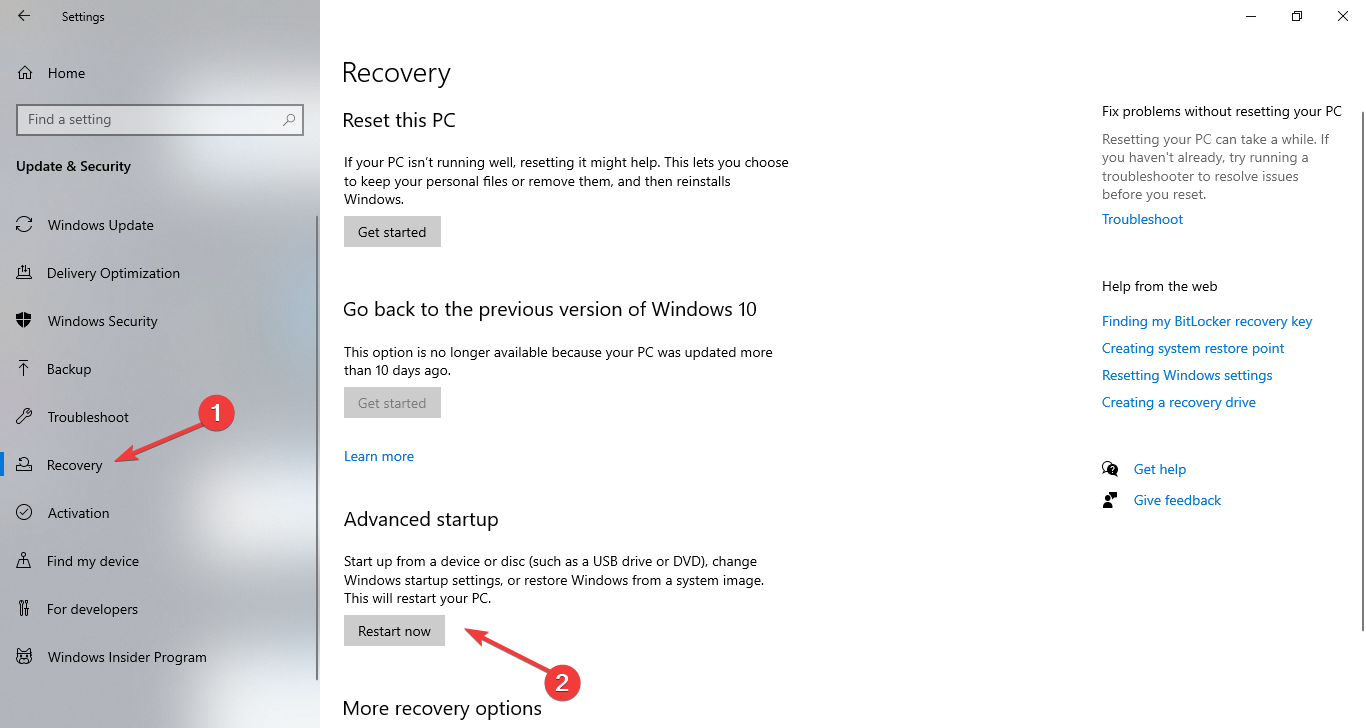
- Go to Recovery, under Advanced options, and click Restart now.
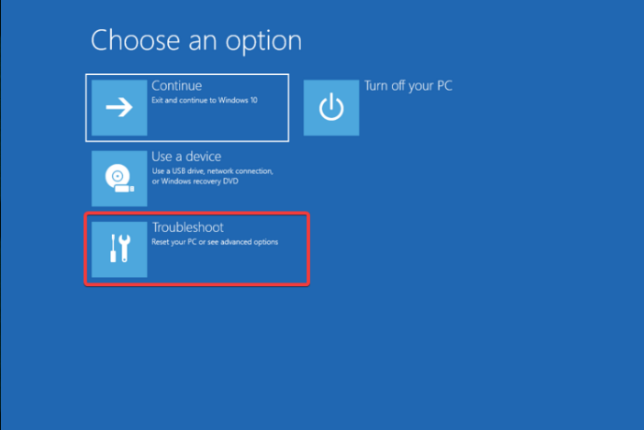
- Now under Choose an option page, click Troubleshoot.
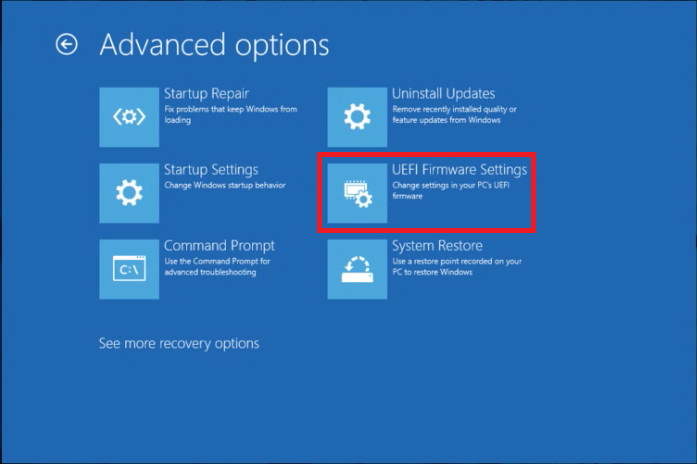
- Select Advanced options.
- On the Advanced options page, select UEFI Firmware Settings.
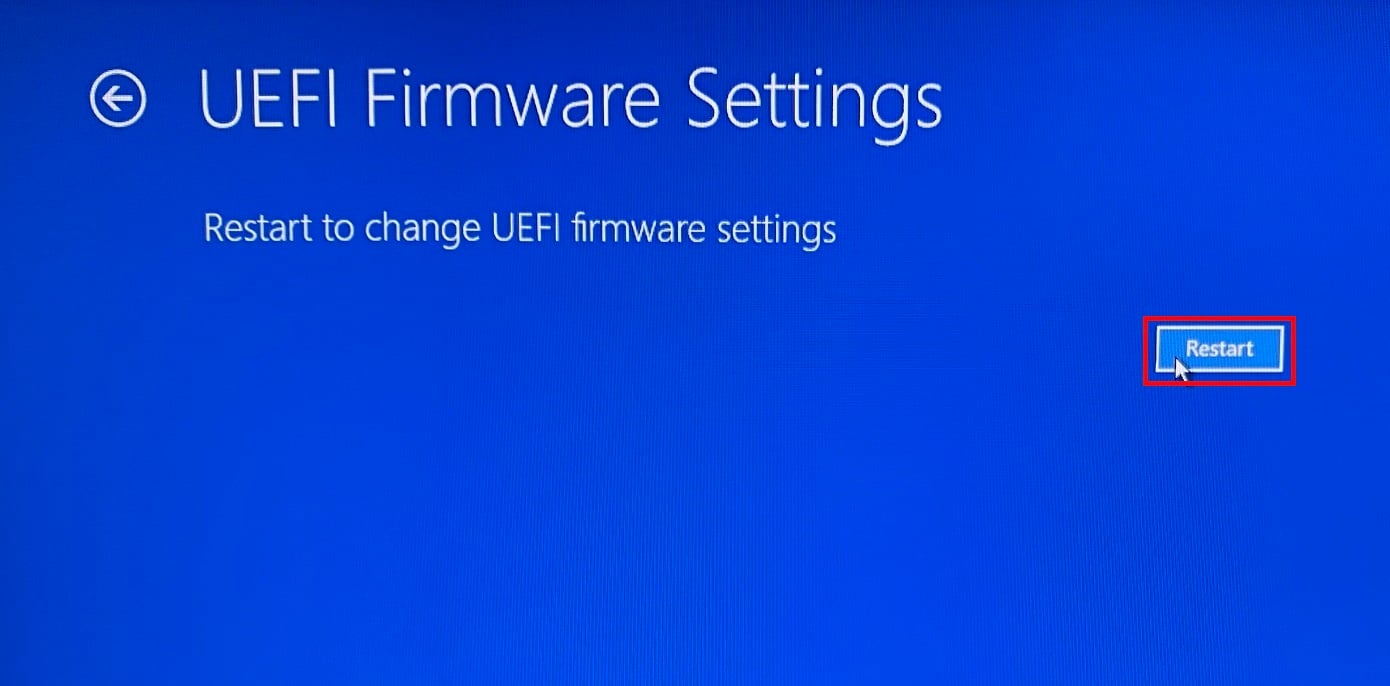
- Click Restart.
- Select the appropriate option to reach BIOS. For example, go to Power Management or ACPI settings.
- Locate Sleep Mode or Suspend Mode.
- Choose Disabled or Off.
8. Use the Task Scheduler
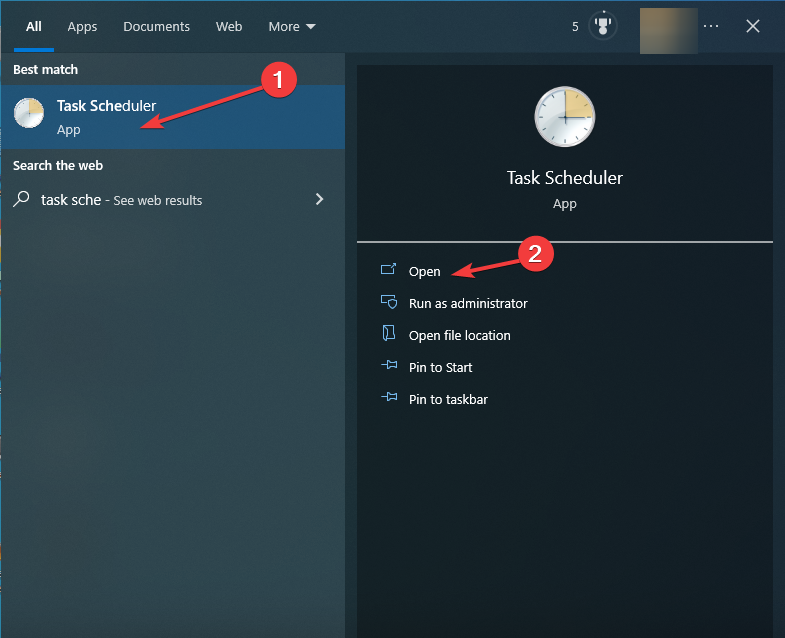
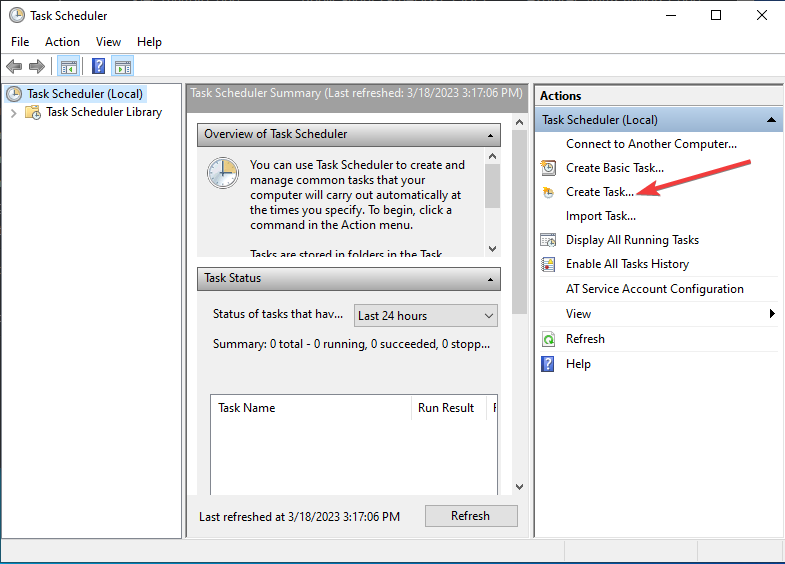
- Press the Windows key, Task Scheduler, and click Open.
- Click Create Task.
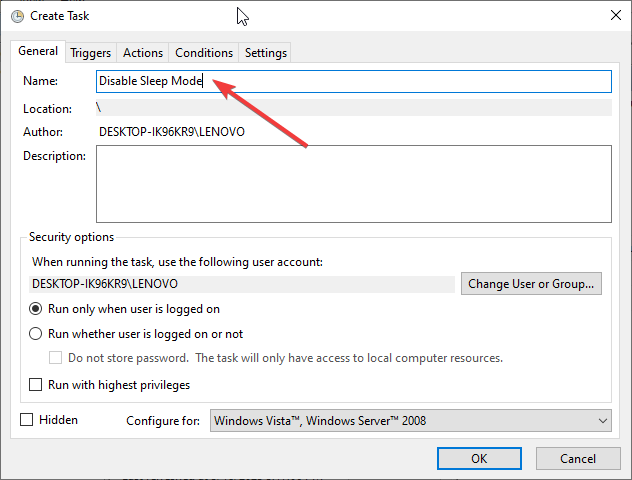
- Name the task Disable Sleep Mode.
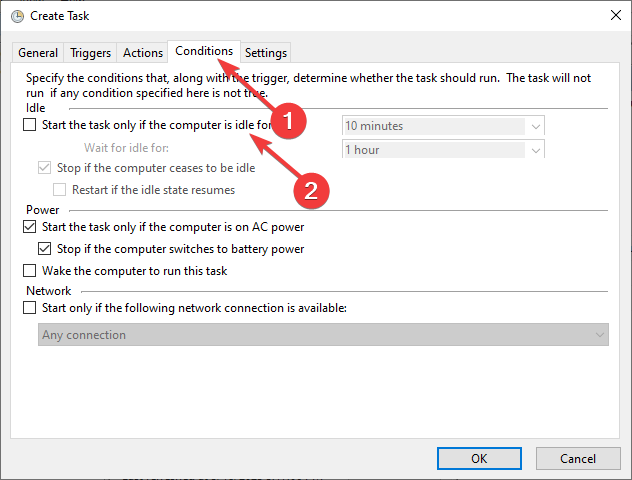
- Go to the Conditions tab, and remove the checkmark next to Start the task only if the computer is idle for.
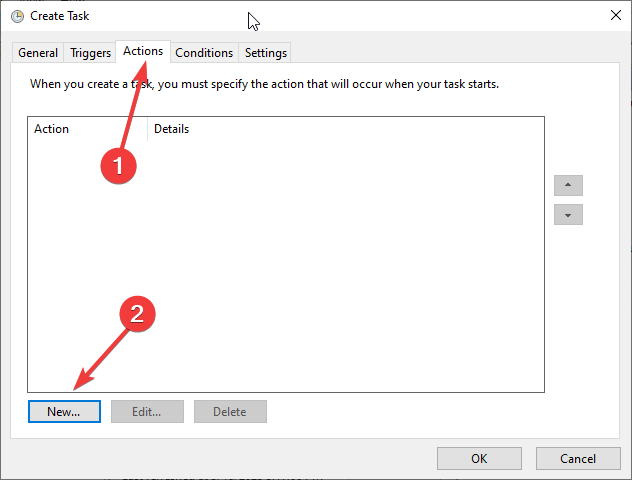
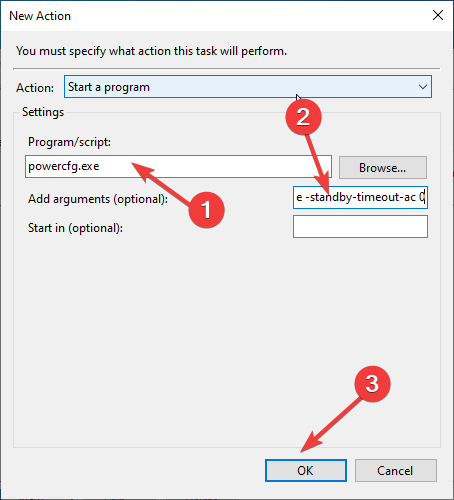
- Under the Actions tab, click New.
- In the Program/script field, type powercfg.exe
- For Add arguments field, type change -standby-timeout-ac 0
- Click OK.
9. Use the Windows PowerShell
- Go to the search bar, type Powershell, and click Run as administrator.
- Copy and paste the following command to change the standby timeout for when the computer is plugged into 0 and press Enter:
powercfg -change -standby-timeout-ac 0
10. Use the Windows Registry
- Press Windows + R to open the Run console.
- Type regedit and click OK to open Registry Editor.
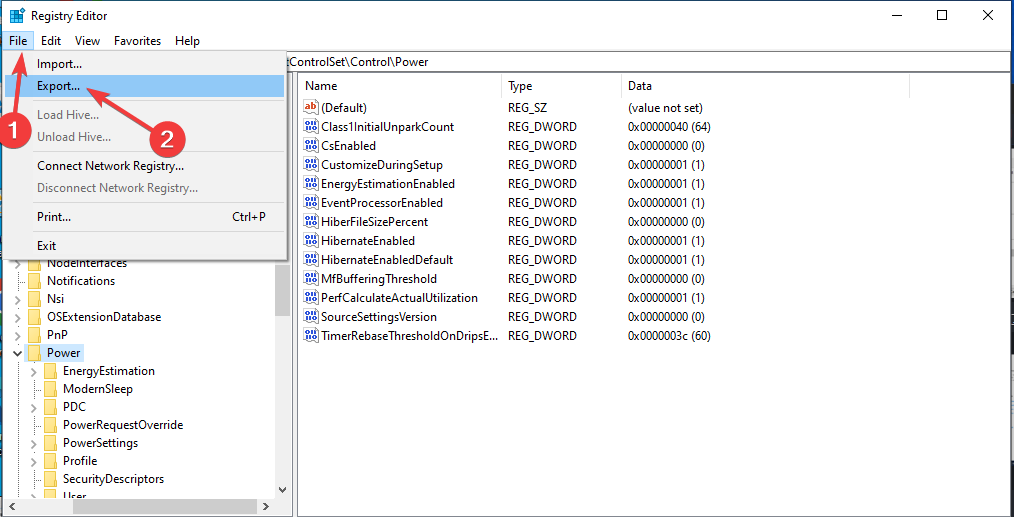
- Click File, then click Export. Finally, save the .reg file in a desired location to back the registry entries.
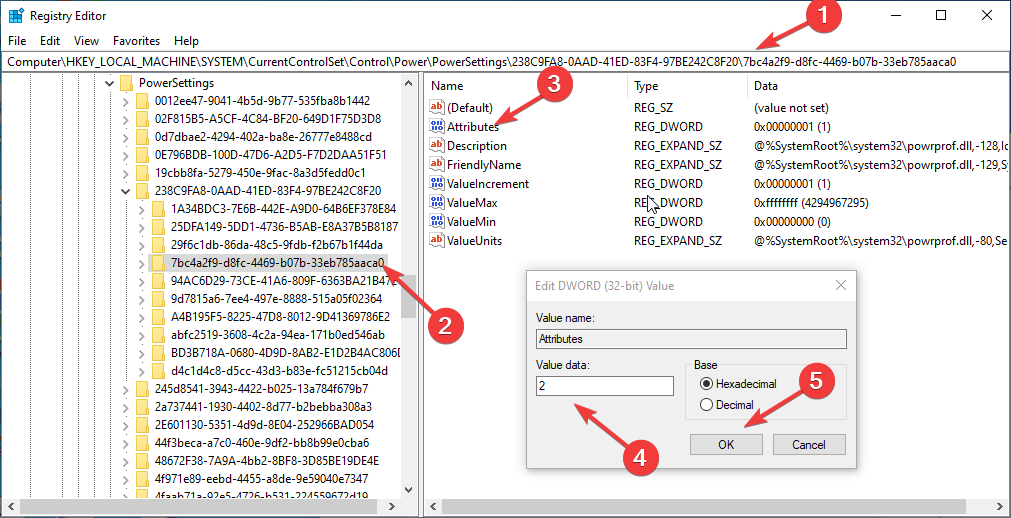
- Navigate to this path:
Computer\HKEY_LOCAL_MACHINE\SYSTEM\CurrentControlSet\Control\Power\PowerSettings\238C9FA8-0AAD-41ED-83F4-97BE242C8F20\7bc4a2f9-d8fc-4469-b07b-33eb785aaca0 - Double-click on Attributes and change the Value data to 2.
- Restart your computer for the changes to take effect.
So, these are different ways to turn off sleep mode on Windows 10. Try them and let us know what worked for you in the comments section below.









User forum
0 messages