Name Not Available in Volume Mixer: 5 Ways to Fix it
Give a try to our confirmed solutions right away
Key notes
- The Name not available section in the volume mixer either sits on the system tray with no sound or constantly plays sound in the background even when there are no programs open.
- It could occur due to audio driver issues, damaged external playback devices, corrupted system files, and more.
- Alternatively, it could also be the Name not available virus that invades through the Potentially Unwanted Programs.
Sometimes, when you open the sound mixer to modify the volume settings, you may find a section that says Name not available. That’s exactly what we’re going to show you how to solve today.
If it’s your volume control that’s not working on Windows 11 instead, you can follow the troubleshooting methods in our detailed post here.
Why is there a Name not available section in volume mixer?
The Name not available error on the volume mixer may appear due to the following reasons:
- Interference caused by third-party apps -These are computer programs created by a different company than the one that developed the computer’s OS. Note that such apps running in the background may cause several audio issues and not only.
- Windows Audio Endpoint Builder service – This can happen if the Windows Audio Endpoint Builder service is not running, so make sure to double-check that.
- Broken audio drivers – The error might appear if the audio drivers are outdated. Take a closer look at our guide on how to update drivers on Windows 11.
- Corrupted system files – A system file plays an essential role in the operating system and when it gets damaged and cannot complete its function, it may lead to further issues. That’s why we encourage you to check out this article on how to repair and restore corrupted system files.
- A possible virus – To improve your security and make sure that no virus can damage your PC, make sure to use the best antivirus software for Windows 11.
However, fortunately, we have a few effective workarounds to help you fix the Name not available issue.
How do I fix Name not available in volume mixer?
Before you proceed with the primary troubleshooting methods, perform the below checks:
- Make sure that no external speakers/headphones are attached to the computer. If connected, unplug them to check if it solves the problem.
- Run a virus scan using the built-in Windows antivirus, a third-party solution, or use a reliable antivirus tool for online scans.
If you still encounter the problem, let’s go through the below solutions.
1. Check the playback devices
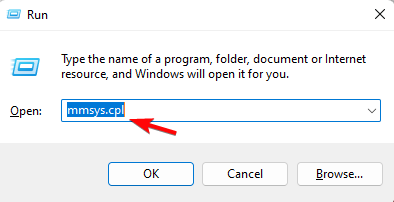
- Press the Win + R keys together to open the Run console.
- Type mmsys.cpl and hit Enter.
- Select the Playback tab, right-click on the audio device, and select either Show Disabled devices or Show Disconnected devices.
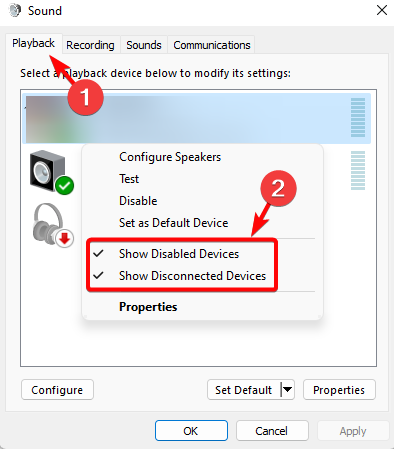
- This will display any previously connected devices. Reboot your PC and check if this may be causing the issue.
- If yes, then follow steps 1 and 2, go to the Playback tab, right-click on the device, and select Disable.
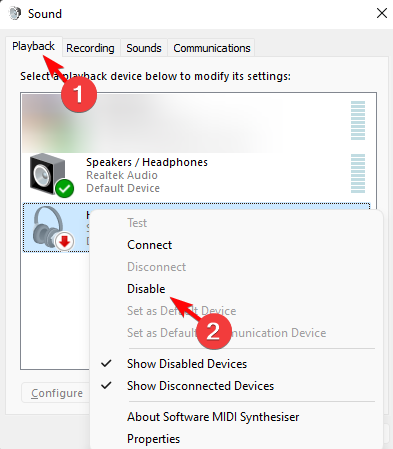
Once done, you can now check the volume mixer and you should not see the additional section.
2. Update the audio drivers
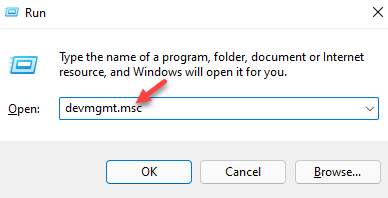
- Open the Run console by pressing the Win + R keys at the same time.
- Type devmgmt.msc in the search bar and hit Enter.
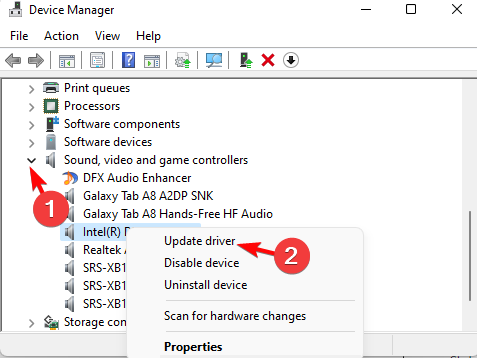
- Expand the Sound, video, and game controllers section, right-click on the audio device and select Update driver.
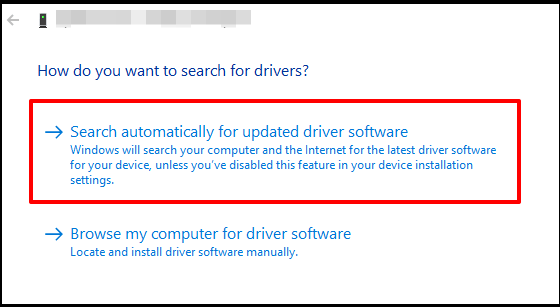
- In the Update Drivers window, click on Search automatically for drivers, and now wait till Windows finds the latest drivers and installs them automatically.
Now, restart your PC and check if you still see the Name not available section in the volume mixer. This method is also useful if there are no system sounds in the volume mixer.
Besides, you can also download the latest drivers from the manufacturer’s website and manually install them on your Windows 11 PC.
You can prevent these problems by using an automatic tool that will search and install the correct drivers on your computer with just a few clicks. That's why we recommend you use Outbyte Driver Updater. Here's how to do it:
- Download and install the Outbyte Driver Updater app.
- Launch the software.
- Wait for the app to detect all incompatible drivers.

- Afterward, it will show you a list of the drivers found to select the ones to Update or Ignore.
- Click on Update & Apply Selected to download and install the newest versions.
- Restart your PC to ensure the applied changes.

Outbyte Driver Updater
Use this software and solve all driver-related issues from your PC.3. Restart the Windows Audio Endpoint Builder service
- Press the Win + R hotkey to launch the Run console.
- In the search field, type services.msc and hit Enter to open the Services window.
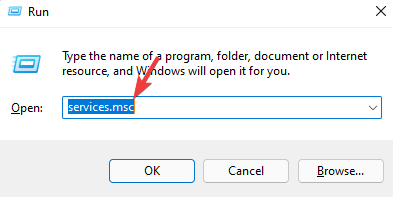
- Go to the Names column on the right and look for the Windows Audio Endpoint Builder service.
- Now, right-click on it and select Restart.
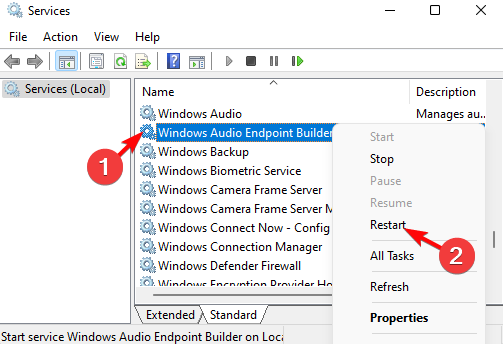
As the service restarts, open the volume mixer and the Name not available section should be gone.
4. Run an SFC scan
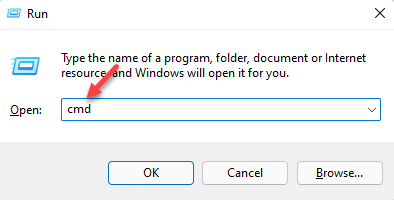
- To open the Run console, press the Win + R keys simultaneously.
- Type cmd in the search bar and press the Ctrl + Shift + Enter keys together to launch the elevated Command Prompt window.
- Run the below command in the Command Prompt window and hit Enter:
sfc / scannow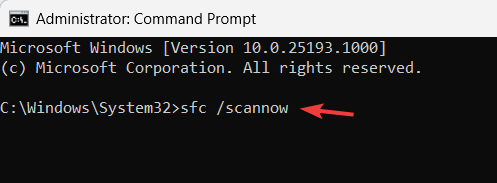
- The process takes a while and hence, wait patiently till it’s over.
Once done, restart your PC and check if the volume mixer issue is resolved.
But if the audio device is disabled on your Windows PC, you can follow the troubleshooting methods in our detailed post here.
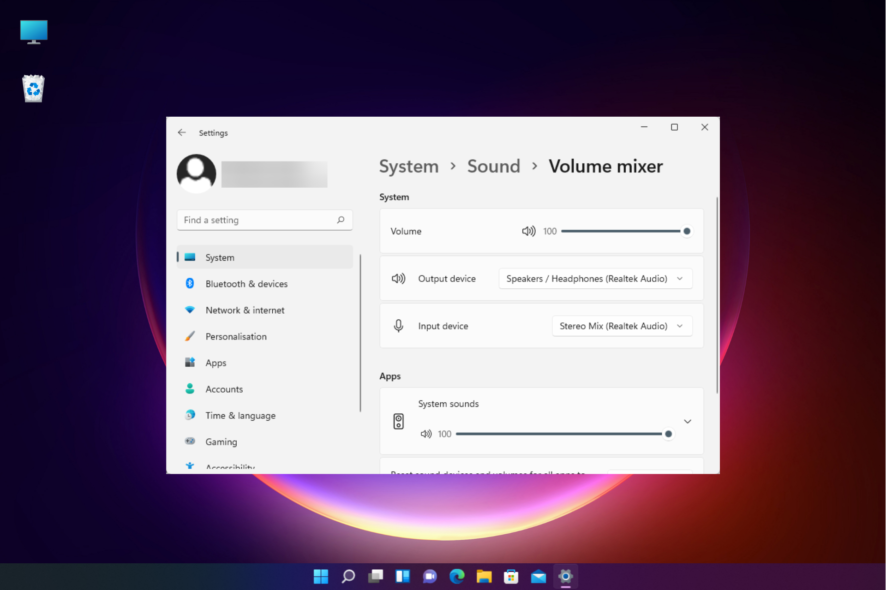
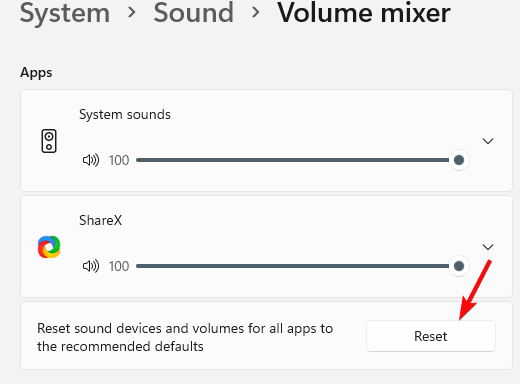
5. Reset sound devices and volumes
- Press the Win + I keys together to open Windows Settings, click on System, then click on Sound.
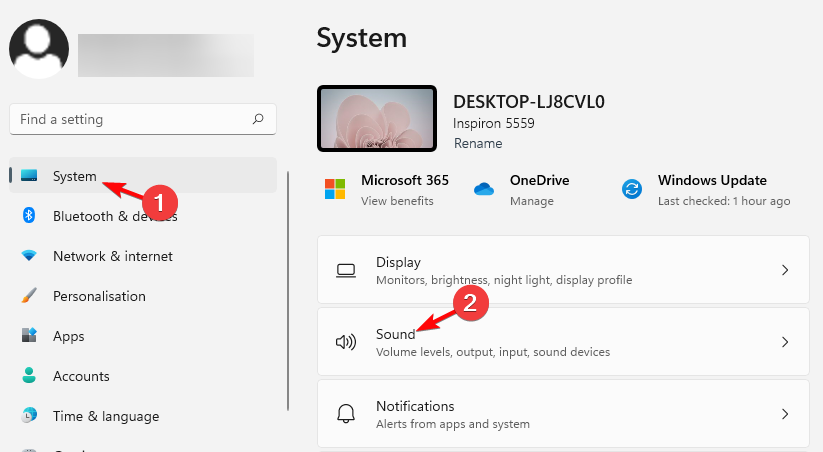
- Next, click on Volume mixer.
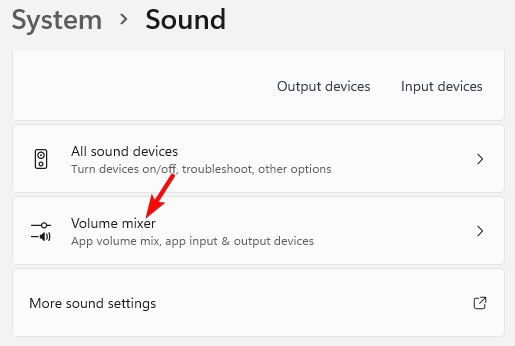
- On the next page, navigate to Reset sound devices and volumes for all apps to the recommended defaults, and click on Reset.
At the same time, make sure to check if there are any third-party apps running in the background. If yes, then close them all to check if this helps fix the problem.
But, if you are facing an issue like the volume mixer not showing all programs, you can follow our guide for some quick solutions.
If you have any other queries related to sound issues on your computer, leave a message in the comments box below.
Read our disclosure page to find out how can you help Windows Report sustain the editorial team. Read more


Improve this guide


User forum
0 messages