Fix: Windows 10 Update Error 0x800736b3
This problem can happen due to corrupt .NET or system file corruption
Key notes
- If you encountered the 0x800736b3 error when attempting to update your operating system, we got you covered.
- This error prevents Windows 10 users from completing their updates, hence imposing the risk of performance and security issues in the future.
- We tracked down the most common causes of this error and gathered easy-to-follow guides on how to overcome them.
- Read on to see how to repair your system, check your hardware, update your dotNet Framework, and more!
Windows Update feature is the essential part of the Windows 10 surrounding. In addition to regular updates, Windows 10 users can expect a lot from the major updates that are scheduled for release twice per year.
Nonetheless, even though the timely support has brought a lot of improvements, users still a multitude of issues with Windows Update and its features. One of those numerous issues is followed by the error code 0x800736b3. This specific error prevents downloading certain cumulative updates and mainly affects dotNet Framework. So, if you have an issue with this error code, we prepared a few workarounds worth checking out.
How to resolve update error 0x800736b3 in Windows 10
- Use a third-party system repair tool
- Use DISM and system installation drive
- Download offline dotNet Framework installer
- Check your hardware
- Run the Update troubleshooter
- Run the SFC scan
- Reset Windows Update components
- Make sure the Windows Update service is running
- Make sure the BITS service is running
- Change DNS settings
- Reinstall Windows 10 from scratch
1. Use a third-party system repair tool
An effective solution would be to install a trustworthy program designed to repair all Windows files in critical condition.
Let this software scan your PC and detect errors, malware, as well as other bugs that affect your PC’s performance and security.
Use the automatic repair function to enable it to start fixing all the files and compromised system settings.
2. Use DISM and system installation drive
Deployment Image Servicing and Management (DISM) is a built-in Windows tool whose main function is to scan and repair corrupted files. In order to repair this specific error, you’ll need to obtain a USB/DVD with Windows 10 setup. Some users tried with the standard update through DISM, but the SXS file was missing. That is why you’ll need the setup media or ISO. Follow these instructions to resolve this issue:
- Insert USB or DVD with Windows 10 installation (the same architecture as your current version).
- Right-click Start and run Command Prompt (Admin).
- In the command line, type the following command:
- Dism /online /enable-feature /featurename:NetFx3 /Source:X:sourcessxs /all /LimitAccess
- Replace the X with the drive letter of the destination media setup.
- The process will take the needed file and your issue should be resolved.
3. Download offline dotNet Framework installer
On some occasions, the mentioned error can be related to the dotNet Framework’s failed installation. Besides updates, the lack of DotNet Framework can cause a lot of troubles with the all-around system behavior. So, your first step is to try and download the offline installer of the latest version.
- Find the corresponding version here.
- Download and save file.
- Start the file and confirm.
- The process may be a bit long.
Once the process is installed, check out the applications that utilize dotNet and see if the process is functioning.
If you are not sure where to start and need more help, we have an extended guide that explains how to download and install .NET Framework to your Windows PC.
4. Check your hardware
While the software is the probable culprit for this issue, you should check out your RAM and HDD, also. There is a large variety of third-party tools you can use to check on HDD life and boot sector errors. Furthermore, you can use similar tools to check the RAM health.
5. Run the Update troubleshooter
Microsoft introduced a handy tool for resolving various system issues including update errors simply called the Troubleshooter. This tool is certainly something you should try when resolving these problems because it can tweak the problem for you without big efforts from your side.
Here’s how to run the Update Troubleshooter in Windows 10:
- Go to Settings.
- Head over to Updates & Security > Troubleshoot.
- Select Windows Update, and go to Run the Troubleshooter.

- Follow further on-screen instructions and let the process finish.
- Restart your computer.
6. Run the SFC scan
If none of the previous solutions worked, let’s try a few troubleshooting tools. The first one is the SFC scan. This command-line tool scans your computer for potential issues and resolves them if possible. So, it might be helpful in this case, as well.
Here’s how to run the SFC scan in Windows 10:
- Right-click on the Start Menu button, and open Command Prompt (Admin).
- Enter the following line and press Enter: sfc/scannow

- Wait until the process is done (it may take a while).
- If the solution is found, it will automatically be applied.
- Now, close the Command Prompt and restart your computer.
7. Reset Windows Update components
According to users, sometimes this problem can be caused by Windows Update components. To fix the issue, you need to restart all Windows Update components manually. To do this, you just need to run a couple of commands in Command Prompt. To do that, just follow these steps:
- Start Command Prompt as administrator.
- When Command Prompt starts, run the following commands:
- net stop wuauserv

- net stop cryptSvc
- net stop msiserver
- ren C:WindowsSoftwareDistribution SoftwareDistribution.old
- ren C:WindowsSystem32catroot2 Catroot2.old
- net start wuauserv
- net start cryptSvc
- net start msiserver
8. Make sure the Windows Update service is running
The Windows Update service is an essential service for receiving updates. But on some occasions, it can crash and stop working. What you need to do is restart the service and see if there is an improvement in the Update protocol. Here’s how:
- Go to Search, type services.msc, and open Services.
- Find the Windows Update service. Right-click and open Properties.
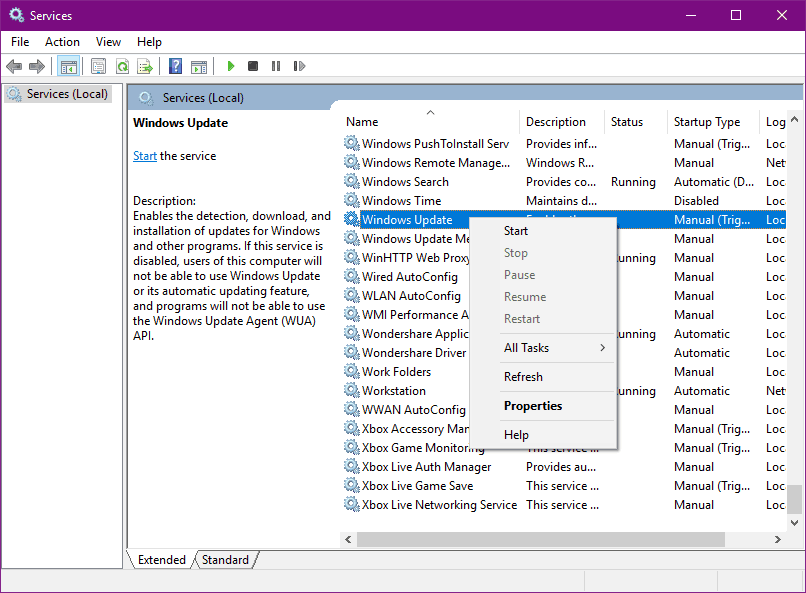
- On the General tab, find Startup type and choose Automatic.
- If the service is not running, right-click and choose Start.
- Confirm selection and close window.
9. Make sure the BITS service is running
The same thing goes for another crucial service for delivering Windows Updates, Background Intelligent Transfer Service:
- Press Windows key + R. In search line type services.mscand press Enter.
- Look for Background Intelligent Transfer Service (BITS) and double-click it to open its properties.
- If the service isn’t running, click the Start button.
- Choose Recovery tab and make sure that First failure and Second failure are set to Restart service.
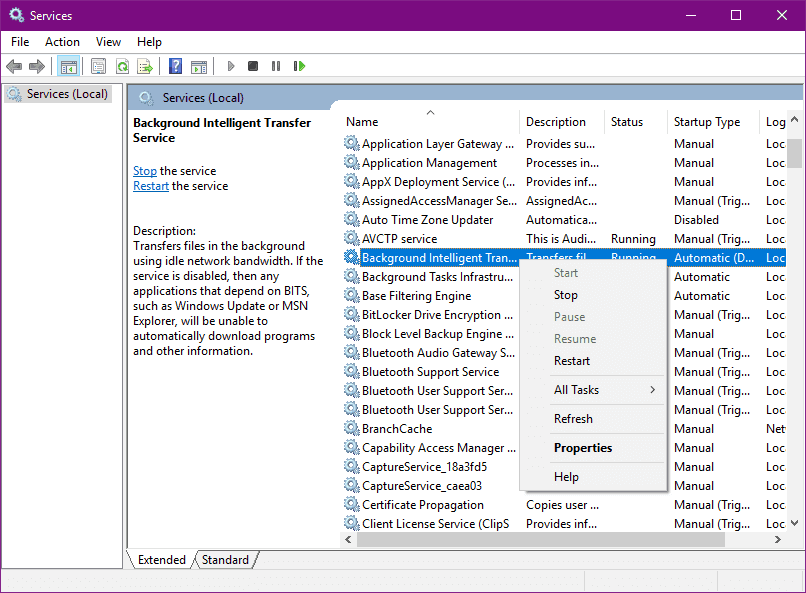
- Confirm selection and check for updates.
10. Change DNS settings
According to Microsoft’s community forums, changing the DNS server address could be the solution. So, that’s the workaround we’re going to try first. Here’s what you need to do:
- Go to Windows Search, type control panel, and open Control Panel.
- Go to Network and Sharing Center, and click on Change adapter settings from the left pane.
- Choose the network you’re currently using, right-click it, and choose Properties.
- Scroll down to Internet protocol version 4 (TCP/IPv4), and choose Properties.
- Now, choose Use the following DNS Server addresses
- Enter the following values: DNS Server – 8.8.8.8 and Alternate DNS Server – 8.8.4.4
- Save changes, and restart your computer
11. Reinstall Windows 10 from scratch
In case your system shows signs of performance drop and the previous steps proved inadequate, you should reinstall the system from the scratch. You can use Media Creation Tool and create a bootable USB or DVD drive setup. However, make sure you back up files from the system partition and license key. The process is not lengthy as it looks and you don’t need any advanced knowledge to perform the reinstall.
What is Windows update error 0x800736b3
The Windows update download error 0x800736b3 error does not allow the newest system updates to install on your machine.
This can be caused by several culprits, including corrupt .NET Framework files or corrupt system files.
The issue may also come as a direct indicator of malware infection, so make sure to run a thorough antivirus scan.
In most cases, the problem is not major and can be easily fixed in just a few steps.
It is however essential to make sure that your updates are enabled and well-functioning, otherwise you will not be able to benefit from the latest Windows applications updates and security implementations.
Those were our solutions for this issue. In case you are having any thoughts or questions, please be free to share them with us in the comments.
Read our disclosure page to find out how can you help Windows Report sustain the editorial team. Read more


Improve this guide


User forum
0 messages