EASY Fix: DNS Server Not Responding in Windows 10 [2026 Guide]
Learn to get your Ethernet & WiFi working properly again
Key notes
- The DNS server not responding error in Windows 10 will prevent you from browsing the Internet.
- If the DNS server isn’t responding in Windows 10, you can try changing the server manually.
- You can also reconfigure your connection to fix this discomforting error.
- Installing the latest drivers can be also a great solution for this problem.

The DNS server is a crucial component of the Internet. Its a sort of phonebook that connects your browser with the website you want to access. Unfortunately, DNS issues on Windows 10 are often encountered, with users reporting a DNS server is not responding error message on their PCs.
What causes a DNS server not to respond?
Below are some of the common causes of DNS server not responding on your Windows PC:
- Outdated or faulty drivers
- Issues with DNS server address
- Antivirus interference
- Outdated router firmware
- Browser issues (such as DNS net internals on Chrome)
How do I fix the DNS server not responding Windows 10 error?
What to do if the DNS server is not responding in Windows 10? The quickest fix is to change the DNS server settings manually. Then disable your firewall, reset your router, and test the connection again. Let’s get to the list of methods to fix it, starting with the video below.
1. Change the DNS server manually
- Press Windows key + R, type ncpa.cpl, and click the OK button.

- Right-click your network and choose Properties.

- Select Internet Protocol Version 4 (TCP/IPv4) and click the Properties button.

- Now, select the Use the following DNS server addresses option.
- Set the Preferred DNS server to 8.8.8.8. and the Alternate DNS server to 8.8.4.4.
- You can also use 208.67.222.222 as Preferred and 208.67.220.220 as the Alternate DNS server.
- After you’re done, click OK to save the changes.

- Optional: Disconnect from the Internet and connect back again.
When you try to access a particular website, you’ll automatically connect to your ISP’s DNS server.
However, it can happen that your DNS server is not available. If that’s the case, you’ll see the DNS server is not responding error on Lenovo and other PCs.
One way to fix this problem is to change your DNS server to OpenDNS or Google DNS. This is a simple procedure that you can perform it by following the steps above.
After changing the DNS server, check if the problem is resolved. You should be able to browse the Internet without any issues.
Remember that changing your DNS server might make your Internet connection a bit slower depending on your location, so you might want to experiment with different servers.
Changing the DNS server can help you fix network problems when playing games, like the Dark and Darker server error; read this guide to learn more.
2. Enter your MAC address manually
2.1. Locate the physical address of your PC
- Type cmd in the search tab and click on Run as administrator under Command Prompt.
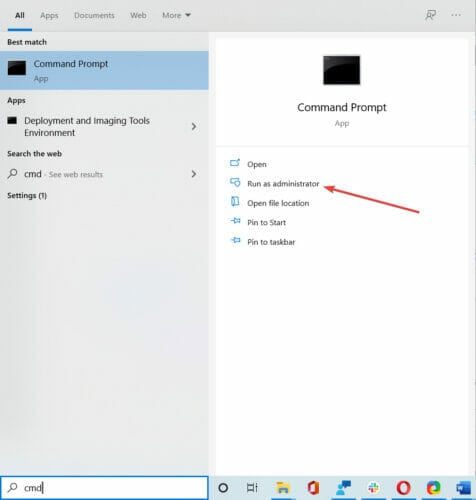
- Enter ipconfig /all and press Enter.

- Locate the Physical Address and write it down.

- Close Command Prompt.
2.2. Configure your network connection
- Open the Network Connections window.
- Locate your connection and open its properties.
- When the Properties window opens, click on Configure.

- Go to the Advanced tab and select Network Address from the Property list.
- Now select Value and enter the MAC address you got from Command Prompt (Be sure not to enter any dashes while entering your MAC address).

- Click OK to save the changes.
According to users, you can sometimes have DNS failure simply by manually entering your network adapter’s MAC address.
This is a simple procedure. To enter your MAC address, you need to find it first. To do that, follow the steps above.
Users report that this solution works best after switching to Google DNS or OpenDNS, so be sure to try it.
If you need to change your MAC address, you can use one of these MAC address changer tools.
3. Install the latest drivers
3.1. Update your drivers manually
- Press Windows key + X and choose Device Manager from the list.

- When Device Manager opens, locate your network adapter, right-click on it and choose Uninstall.

- If available, click on Delete driver software for this device, followed by Uninstall.

- After you delete the driver, restart your PC.
- When your PC restarts, the default network driver will be installed.
Your network adapter relies on drivers to work correctly, and if you have any problems with it, it might be due to your drivers.
To fix DNS server errors on Windows 10, you need to visit your network adapter manufacturer’s website, download the latest drivers and install them on your PC.
If you can’t access the Internet at all, it might be caused by the DNS server not being unavailable, so download the drivers on a different device and install them on your PC.
Some users also recommend uninstalling your network drivers before installing the new drivers.
3.2. Update drivers automatically
Downloading drivers manually can cause damage to your computer in case you download the wrong version. We strongly suggest doing it automatically by using a third-party driver updating tool.
These tools are exceptionally light and will automatically repair or update your drivers in just a few seconds and in just one go. You only need to invest a few clicks, and the problem will disappear.
4. Disable your antivirus and firewall
Antivirus and firewall solutions are necessary to protect your PC from malicious users, but sometimes your antivirus and firewall can interfere with your Internet connection.
To fix DNS server connection issues on Windows 10, try temporarily disabling your antivirus and firewall client.
Remember that your PC will still be protected by Windows Defender even if you disable your antivirus, so there’s no need to worry about your safety.
If your antivirus or firewall client was causing this issue, be sure to change its configuration or switch to a different client.
Users reported that Bitdefender Total Security could sometimes cause this problem to appear. If you’re using Bitdefender, you need to go to Firewall settings and disable the Block Internet connection sharing option.
After that, the problem should be resolved. Users reported that Avast could also cause this problem. To fix it, open Avast settings and disable the Secure DNS option.
You can also try disabling the firewall on your router. This is a bit advanced and potentially dangerous solution, so keep that in mind. By disabling your router’s firewall, your PC will be completely vulnerable.
If you decide to do that, temporarily disable your router’s firewall and check if that fixes the problem.
If the problem was your firewall, you need to turn it back on again and check your firewall configuration for the source of the problem.
To see how to disable your router’s firewall, be sure to check its instruction manual.
5. Update your router’s firmware
A few users reported that DNS servers might not respond while using wireless networks like WiFi. However, you can fix that simply by updating your router’s firmware.
We must warn you that this is an advanced process, so you must be extra cautious to avoid causing damage.
Before updating your router’s firmware, you must back up its settings. We advise you to check your instruction manual to see how to update the firmware correctly.
If your DNS server is not responding on WiFi/wireless, you may also want to check the channels you’re using.
6. Use the netsh command
- Open Command Prompt as administrator.
- Type the commands below and press Enter after each:
netsh int ip resetnetsh winsock resetipconfig /flushdnsipconfig /renew - After all the commands are executed, restart your computer.
According to users, you can fix DNS failure simply by running a few commands from Command Prompt. To do that, follow the steps above.
You’ll reset your IP and clear the DNS cache by performing these commands, so be sure to try this method.
7. Restart your modem
One way to fix the DNS server not responding error on Windows 10 is by restarting your modem. To do that, press the power button on your modem to turn it off.
Wait 30 seconds and press the power button again to turn it on. Wait until the modem turns on entirely and check if the problem persists.
8. Start your PC in Safe Mode
- Open the Start Menu and click the Power button.
- Hold down the Shift key on your keyboard and click Restart.

- Choose Troubleshoot.
- Select Advanced options, select Startup Settings, and click the Restart button.
- When your PC restarts, you’ll see a list of options available. Select Safe Mode with Networking by pressing F5 on the keyboard.
- Safe Mode will now start.
Sometimes third-party applications such as antivirus or VPN can interfere with your Internet connection.
To fix the DNS server not responding error on Windows 10, try accessing the Internet from Safe Mode.
If you’re not familiar, Safe Mode is a special mode in Windows that runs only with essential software and drivers.
When Safe Mode starts, check if your network connection is working. If there are no problems with your Internet connection in Safe Mode, third-party software interferes with your network connection.
You need to find and remove the problematic application from your PC to fix this issue.
9. Disable Microsoft Virtual WiFi Miniport Adapter
- Open Device Manager.
- When Device Manager opens, go to View and select Show hidden devices.

- Locate Microsoft Virtual W-iFi Miniport Adapter, right-click it, and choose Disable. Repeat this step for all available Virtual Miniport Adapters.
- After you’re done, close Device Manager and check if the problem is resolved.
If the DNS server is not responding on WiFi connections, the problem might be caused by Microsoft Virtual WiFi Miniport Adapter. To fix this issue, you need to find and disable these adapters.
10. Disable Internet Protocol Version 6
- Open Network Connections.
- Right-click your connection and choose Properties.
- Now, locate Internet Protocol Version 6 (TCP/IPv6) and unmark it.

- Click the OK button to save changes.
There are two types of IP addresses, v4 and v6. If your DNS server is not responding on your PC, you might be able to fix it by disabling Internet Protocol Version 6.
Disabling IPv6 won’t affect your computer negatively, but hopefully, it should fix the problem with the DNS server.
11. Disable all additional connections
- Open the Network Connections window.
- Right-click the connection that you want to disable.
- Choose Disable from the menu.

You might have multiple connections on your PC, which can sometimes cause DNS server issues while using WiFi connections.
To fix this issue, you need to disable those connections from the Network Connections window.
12. Check for third-party applications
Some third-party applications can affect your DNS and cause this problem to appear. Users reported that their DNS changes automatically to a specific address.
The problem was caused by a third-party application called ColdTurkey.
After disabling or uninstalling the problematic application, the DNS server is not responding error was resolved entirely.
Remember that almost any network-related or security application can interfere with your DNS, so keep a close eye on all installed applications.
13. Change the DNS address on your router
According to users, you might be able to fix this problem by setting a different DNS address on your router. To do that, you need to access your router’s configuration page and look for the DNS setting.
Change the DNS server to Google DNS or OpenDNS and check if the problem is resolved. For detailed instructions on how to change your DNS, be sure to check your router’s instruction manual.
14. Reset your router
Your router configuration can sometimes cause DNS problems to appear. If the DNS server is not responding on the router, you need to reset your device to default settings.
To do that, you need to open your router’s configuration page and select the Reset option.
You can export your configuration if you want, so you don’t have to configure wireless networks again.
Another way to reset your router is to hold the reset button on it for a few seconds. Both methods work the same, and you should use the one you’re most comfortable with.
If you’re unsure how to reset your router, check your instruction manual for step-by-step instructions.
15. Turn off the peer-to-peer update feature
- Open the Settings app by pressing the Windows key + I.
- Navigate to the Update & security section.

- Click on Advanced options.

- Click the Delivery optimization option.

- Toggle the switch for Allow downloads from other PCs backward to set it Off.

Windows 10 has a great feature that allows you to download updates using peer-to-peer technology.
This feature allows you to download Windows updates directly from other users in your area.
This is a valuable and innovative feature, but it seems that this feature can sometimes cause DNS failure. One potential solution for DNS problems is to disable this feature.
After turning this feature off, check if the problem with the DNS server is resolved.
16. Wait for your ISP to fix the problem
Sometimes DNS server is not responding error can be caused by your ISP. Your ISP might have some problems, so you might have to wait a few hours while your ISP resolves technical difficulties.
The DNS server is not responding error will prevent you from accessing the Internet, but you should be able to fix it by using one of our solutions.
17. Fix Comcast DNS server not responding
We noticed many reports about the Comcast DNS server not responding when users try to get online using WiFi.
To fix this issue as quickly as possible, go to the GW GUI, select Troubleshooting and then Reset/Restore Gateway. Reset your WiFi router and check if the problem persists.
What can I do if Windows 11 DNS server is not responding?
The DNS server is not responding on Windows 11 issue is caused by issues with antivirus and drivers. Also, it might be caused by problems with your DNS server address.
You can fix the issue effectively by applying the solutions listed guide.
Is it safe to flush DNS cache?
Any invalid addresses, whether they are obsolete or have been altered, will be removed by clearing the DNS server. It’s also crucial to remember that clearing the cache has no unfavorable consequences.
So yes, if you are wondering how safe it is, it is indeed safe.
How do I find my DNS server?
- Press the Windows key + R to open the Run utility.
- Type cmd and hit Enter.

- Type the command below and press Enter:
ipconfig/all
- Look for DNS servers from the list.

How do you check if DNS is working?
- Go to the DNS leak test website.
- Click the Standard test button.

- Check the ISP column if it contains the correct DNS.

If the DNS shown on the site above is correct, it means your DNS is working perfectly. Using Command Prompt as admin, you can also check whether your DNS server is working.
You only need to run the command below: nslookup <client name> <server IP address>
Note that you need to replace the client name and server IP address with the correct value. If the command returns Request to server timed out or No response from server, your DNS server is probably not working.
That’s it! We hope you fixed the DNS server not responding error on Windows 10 by using one of our solutions.
If you face other issues like the DNS server unavailable error on Windows 11, check our detailed guide to fix it quickly.
Do you have other suggestions or thoughts regarding the DNS not responding Windows 10 issue? Write them in a comment below.
Read our disclosure page to find out how can you help Windows Report sustain the editorial team. Read more


Improve this guide


User forum
7 messages