How to fix Windows 10/11 Update CPU not supported errors

4 solutions to fix Windows 10 Update CPU not supported
- Check Windows 10 Minimum Hardware requirements
- Update the Compatibility Appraiser
- Turn On the NX (No-eXecute) Bit
- Disable CPU Overclocking
If you have been receiving the error “Windows 10 update CPU not supported” when attempting to upgrade to Windows 10, don’t fret because you are not alone.
Well, the problem has been a bother since the earliest days of Windows 10 but now there are multiple solutions. And there is a good chance that one of them will work for you.
In this guide, we will take you through the foolproof solutions that work for the Windows 10 Update CPU not supported issue when updating from Windows 8/8.1. Let’s delve right into this.
Steps to fix Windows 10 Update CPU not supported
Fix 1: Check Windows 10 hardware requirements
Like every other Windows, Windows 10 may not install on machines which doesn’t meet its least hardware requirements (or may install but run inefficiently) so you may have to reconfirm your machine’s hardware specifications before anything else.
Specifically, your CPU should have a minimum speed of 1 GHz. You should thus start by going to your windows properties windows to verify this.
Steps to follow:
Windows 7
- Click Start then type “system” in the provided search box from the menu.
- Click System (near the top of the results)
- The system specifications are displayed.
Windows 8
- Press the WIN key and the pause break key simultaneously on the keyboard.
- The system specifications are displayed.
You will, of course, need to upgrade the CPU before restarting the update. Otherwise, skip to the rest of the suggested fixes if your CPU turns out okay.
- ALSO READ: How to uninstall Windows 10 Update Assistant
Fix 2: Update the Compatibility Appraiser
One of the causes of this error is a bug in the compatibility appraiser that comes with Windows 10 update files. Microsoft has since released the relevant updates to upgrade the tool and the error should disappear as soon as you run the updates.
Here are the required updates depending on the Windows you are currently running:
Steps To Install The Update:
Windows 7
- Click Start then type “update” in the provided search box from the menu.
- Click Windows Update (near the top of the results)
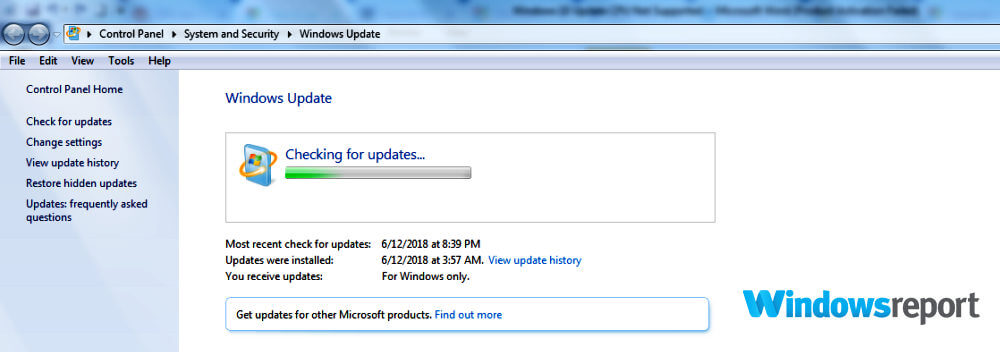
- In the subsequent pane click on the Check for updates. Windows will look for the recent applicable updates for your PC. Wait as it may take some moments.
- To progress, click the message that pops up alerting you that some optional/ important updates are available, or requiring you to review optional/ important updates.
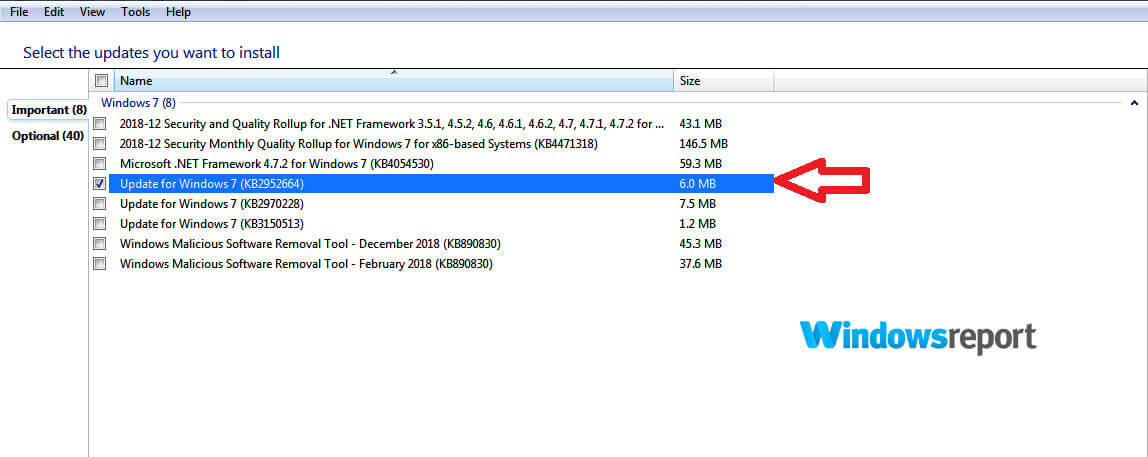
- In the displayed list (important updates), select the check box next to KB/2952664 then click OK (important updates).
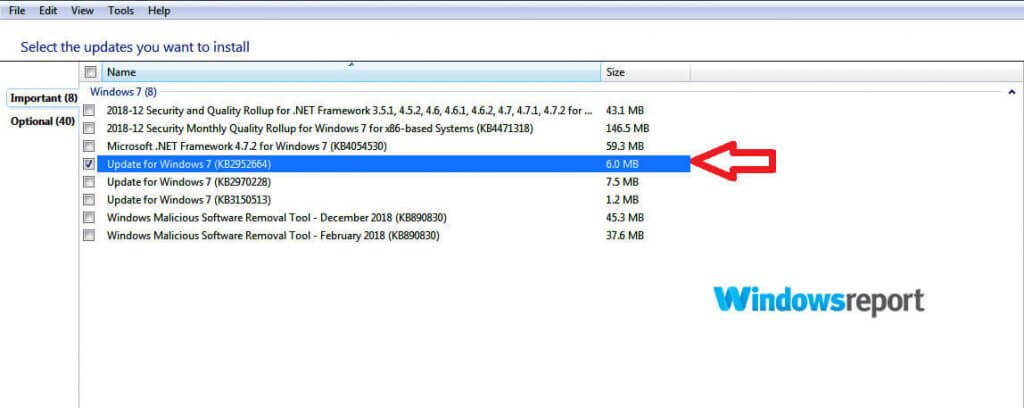
- Lastly, click Install updates.
Windows 8/8.1
- Point to the bottom-right corner of your screen with your mouse then click Search. You can also swipe into Windows from the right end of your screen then tap Search.
- Click/ tap Settings.
- Type Windows Update in the search dialog box area.
- Click/ tap install optional updates.
- Click Check for updates and wait.
- The various updates will again be shown. Click/tap the message to access all the updates.
- In the displayed list (important updates), select the check box next to KB/2976978 then click/tap OK. Finally, click Install updates
Wait for the update to run then reboot your computer. You can now turn on the PC and make a fresh attempt to update to Windows 10.
If all went well, the system should no longer report this error.
Fix 3: Turn On the NX (No-eXecute) Bit
The NX technology allows the processor to segregate areas in the memory where program code including Windows can or cannot run and can cause the annoying Windows 10 update CPU not supported error.
The solution is to disable the technology either via the settings or the BIOS.
Turn Off The NX Bits from the Windows settings
On Windows 7:
- Click start then type “control panel” in the provided search box from the menu.
- Click control panel (near the top of the results).
- Click system and security.
- Click system in the next window.
- Click advanced system settings.
- Click the advanced tab.
- Now select performance.
- Click data execution prevention option.
- Choose turn on DEP for all programs and services except those I select.
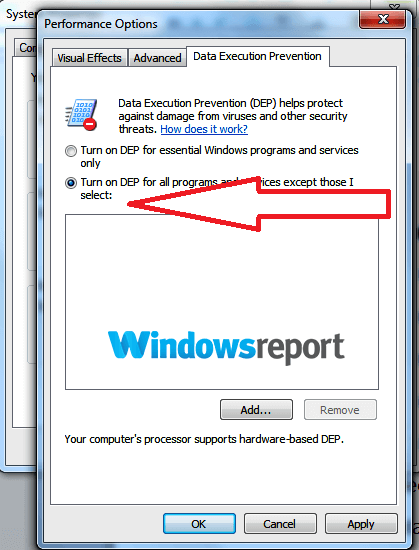
- Click ok now to close.
- Retry the Windows 10 installer.
On Windows 8 or 8.1:
- Pressthe WIN key and the pause break key simultaneously on the keyboard.
- Click the advanced system settings tab on the left-hand side.
- Click the advanced
- Now select performance.
- Click data execution prevention
- Choose turn on DEP for all programs and services except those i select.
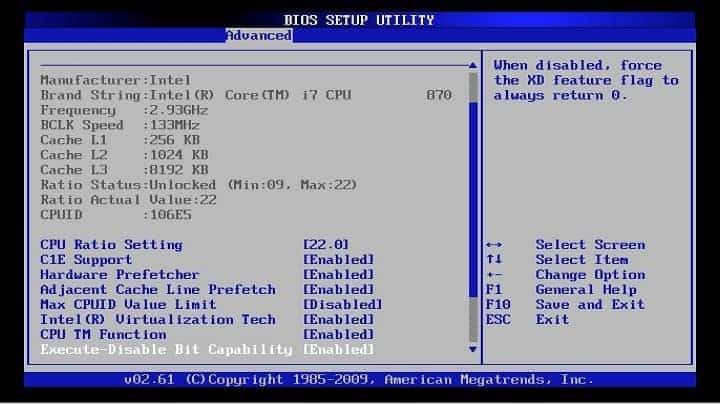
Turn Off The NX Bits From BIOS
For most machines, changing the setting from the BIOS works like a charm. Here are the steps to boot to the BIOS:
- Turn off your computer.
- Press the power button to bring the computer on. Start pressing the correct key immediately the manufacturer logo has appeared and until the BIOS screen appears. For example, for HP/Compaq computers, pressing F10 takes you to BIOS. For others, it’s the F2/Esc keys.
- Locate for the NX settings under the BIOS advanced configuration
Enable this setting by pressing the indicated key to change. - Save the changes as you exit BIOS.
- Proceed to boot the computer and try to update.
TIP: NX can also be labeled EDB (execute disabled bit), Execute Disabled Memory Protection, EVP (enhanced virus protection), or even No Execute Memory Protect so enable whatever option your system provides.
Some laptops/desktops don’t provide the enable NX settings BIOS option so you may have to retry the earlier method or raise a ticket with the manufacturer.
Hopefully, the Windows 10 update program will be happy with your CPU so restart the upgrade.
- ALSO READ: Windows 10 update error 0x8024200D [Fix]
Fix 4: Disable CPU Overclocking
Sometimes the windows update program will refuse to work because of an overclocked CPU.
To maneuver this problem, you will need to reverse the overclocking.
Here are the steps:
- Turn off your computer.
- Press the power button to bring the computer on and then repeatedly press the correct key immediately the manufacturer logo has appeared (Until the BIOS screen comes up). The right keys are still as aforementioned.
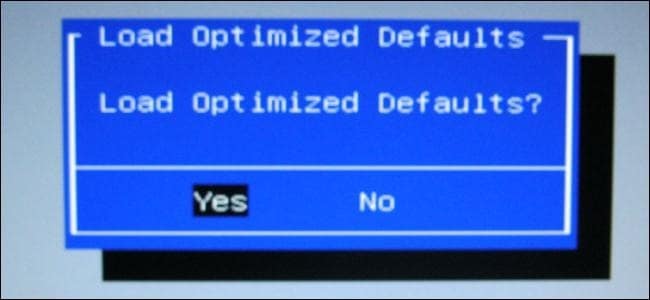
- Look for the option to reset the BIOS back to the factory settings.
- Save the changes as you exit.
- Restart the Windows 10 upgrade process.
Wrapping It Up
The Windows 10 update CPU not supported error can be caused by an unsatisfactory CPU (below 1.0GHz) so start there. Other causes include an outdated Windows 7/8.0/8.1 so try to install the highlighted updates.
Other triggers include overclocking your CPU or disabled NX bits so also try the specified solutions if the first ideas fail.
MORE RESOURCES:
Read our disclosure page to find out how can you help Windows Report sustain the editorial team. Read more


Improve this guide


User forum
0 messages