Windows 11 25H2 Official ISO 64-bit: How to Download & Install

Microsoft has officially released Windows 11 version 25H2 ISOs for users in the Release Preview Insider channel. While the company initially promised availability earlier, delays pushed the release back. The good news is that the ISOs are now ready for download, giving Windows Insiders and enthusiasts the opportunity to upgrade or perform fresh installations at their convenience.
Table of contents
- How to Download & Install Windows 11 25H2 ISO file (preview)
- Step 1: Download Windows 11 25H2 ISO from Insider Preview
- Step 2: Download and Launch Rufus
- Step 3: Prepare the USB Drive
- Step 4: Configure Rufus Settings
- Step 5: Create the Bootable USB
- Step 6: Insert the Bootable USB
- Step 7: Boot From the USB
- Step 8: Begin Windows 11 Installation
- Step 9: Partition Selection
- Step 10: Windows Installation Process
- Step 11: Set up Windows 11
- FAQs
How to Download & Install Windows 11 25H2 ISO file (preview)
Step 1: Download Windows 11 25H2 ISO from Insider Preview
- Visit the official Windows Insider Preview Downloads page.
- Make sure to sign in with your account that is registered in the Windows Insider Program.
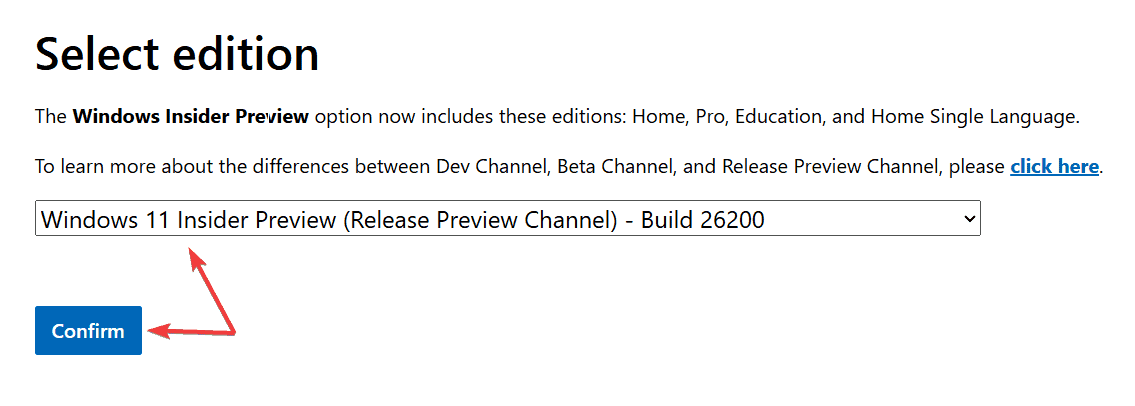
- When selecting the edition, choose “Windows 11 Insider Preview (Release Preview Channel) – Build 26200.xxxx.” And click Confirm to proceed.
(Note: If you’re not sure which channel your device is opted into, verify in the Settings Page by going to Settings > Windows Update > Windows Insider Program)
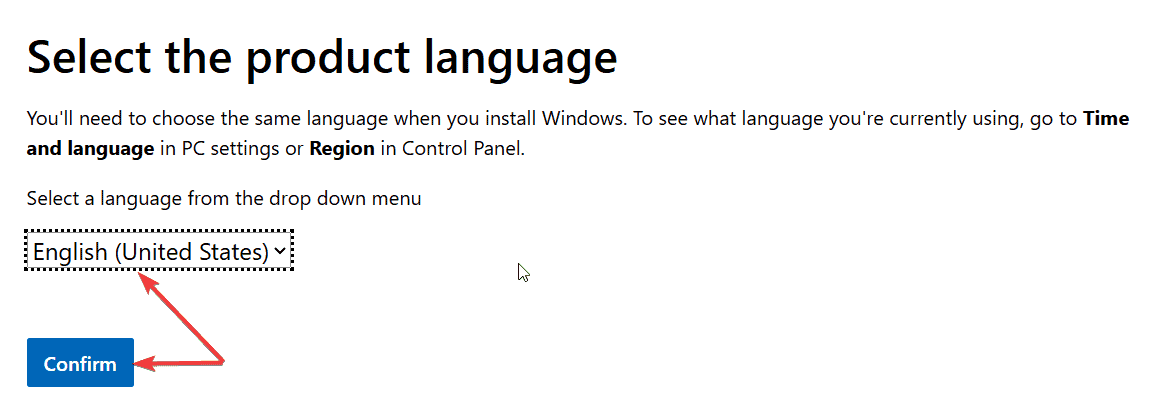
- Select your preferred language and click Confirm again.
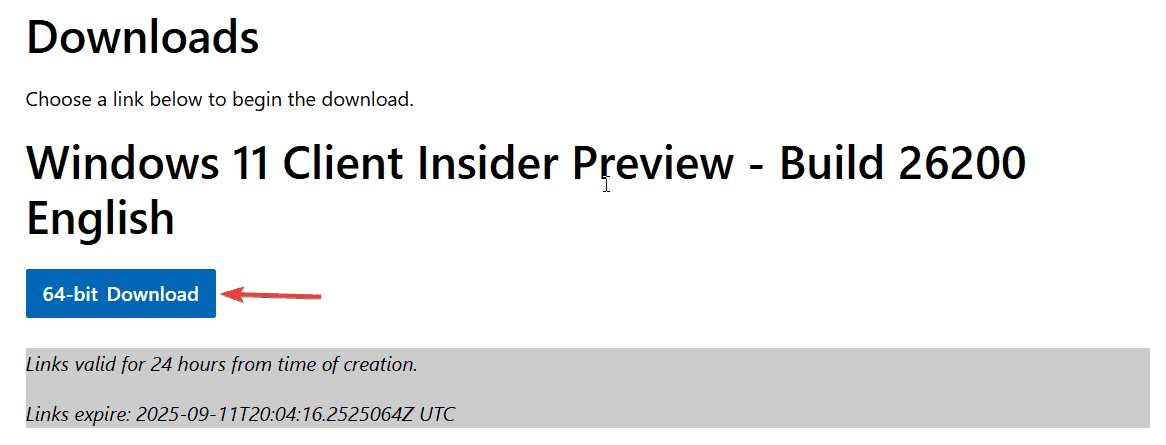
- Download the ISO by clicking the 64-bit Download button to start downloading the Windows 11 25H2 ISO file.
If you wish, you can also download the Windows 11 25H2 ISO file from UUP dump, but we recommend the official method.
You can also explore an alternative download path by following the guide on the Windows 11 Enterprise ISO Media Creation Tool method, which helps when standard Insider downloads are unavailable or restricted.
Step 2: Download and Launch Rufus
- Go to the Rufus website and download the latest version.
- Double-click the downloaded .exe file to launch the tool.
Step 3: Prepare the USB Drive
- Insert a USB flash drive into your PC with at least 8 GB of free space.
- In Rufus, select your USB drive under the “Device” dropdown.
- Click Select and choose the Windows 11 25H2 ISO file you downloaded.
Step 4: Configure Rufus Settings
- Under the Image option, select Standard Windows 11 Installation.
- Choose GPT under “Partition scheme” and UEFI (non-CSM) under “Target system.”
- Set a descriptive name in the Volume label field, e.g., “Windows 11 25H2 Setup.”
- Keep the default options for the File system and Cluster size.
- Check the Quick format and create extended label and icon files.
Step 5: Create the Bootable USB
- Click Start.
- Confirm the deletion warning to proceed.
- Wait for Rufus to finish creating the bootable USB drive.
Once Rufus has finished creating the bootable USB, you’ve to use the USB to install or upgrade Windows 11 25H2. You can continue by following the steps given below.
Step 6: Insert the Bootable USB
- Plug the USB drive into the PC where you want to install Windows 11.
- Ensure the PC is powered off before proceeding (optional but recommended).
Step 7: Boot From the USB
- Turn on the PC and immediately press the boot menu key (usually F12, F10, F2, Esc, or Del, depending on your motherboard).
- Select your USB drive from the boot menu.
- The PC will boot into the Windows 11 setup environment.
Step 8: Begin Windows 11 Installation
- Choose your language, time, and keyboard layout, then click Next.
- Click Install now.
- If you are upgrading, select ‘Keep personal files and apps.’ For a fresh installation, select ‘Custom: Install Windows only (advanced).’
Step 9: Partition Selection
- Choose the drive where Windows 11 will be installed.
- For fresh installs, you can delete existing partitions to start clean (backup your data first!).
- Click Next to continue.
Step 10: Windows Installation Process
- Windows will copy files, install features, and configure settings automatically.
- The PC may restart several times during this process.
Step 11: Set up Windows 11
- After installation, follow the on-screen prompts to configure:
- Region & keyboard
- Microsoft account / local account
- Privacy settings
- Wi-Fi/network settings
- Complete the setup and reach the desktop.
Once done, Windows 11 25H2 will be fully installed and ready to use. You can now remove the USB drive or keep it for future installs.
FAQs
You can download it from the Windows Insider Preview Downloads page. Sign in with your Microsoft account, select the Release Preview Channel, choose your edition and language, then download the 64-bit ISO.
Yes, the Windows 11 version 25H2 ISOs are now officially available for Insider Preview users through the Release Preview channel.
The official ISO files are available on Microsoft’s Windows Insider Preview Downloads page. You must be signed in with a Microsoft account registered in the Windows Insider Program to access them.
Yes, you can either upgrade your existing Windows installation or perform a fresh install using a bootable USB created from the ISO.
Rufus is recommended for creating a bootable USB, but you can also mount the ISO in Windows to start an upgrade without additional tools.
Read our disclosure page to find out how can you help Windows Report sustain the editorial team. Read more


Improve this guide


User forum
0 messages