Windows 11 L2TP VPN Not Working: How to Fix it
7 min. read
Updated on
Read our disclosure page to find out how can you help Windows Report sustain the editorial team. Read more
Key notes
- The L2TP error occurs when the VPN fails to establish a secure connection to a server.
- You can resolve this issue by uninstalling the latest Windows security pack, i.e., KB5009543, or disabling the vendor ID.
- Alternatively, you can reinstall the VPN Network Adapter to troubleshoot this problem.
VPNs are excellent services to provide an encrypted connection over the Internet. Unfortunately, L2TP VPN not working on Windows 11 has become a prevalent problem recently, and many users encountered the Can’t connect to VPN. The L2TP connection attempt failed error when they tried to connect to VPN.
This error occurs just after installing the new Microsoft KB5009543 update patch. In this case, Windows VPN fails to establish a secured connection to the server through Layer Two Tunneling Protocol (L2TP). ISPs use this protocol to trigger VPN connections.
The error arises from both VPN and Windows. So, it is vital to check the errors’ sources and causes before taking any measure. This guide shows you how to troubleshoot this problem.
Why does the L2TP connection error message appear?
This error message is one of the most common errors when connecting to L2TP. The main reason why this error appears is that you haven’t configured the connection properly to connect to the L2TP server.
Correspondingly, the server fails to respond. Another possible cause is that CHAP v2 Protocol is disabled. The L2TP connection error message also appears due to the following reasons:
- Improper server settings
- Blocked connection by anti-virus or firewall
- An absent machine certificate on the VPN server
- VPN or client is behind NAT
This error is reported by many users when they try connecting their VPN. If you set the VPN configuration manually, check that you use a pre-shared key.
So, make sure that you enable L2TP configurations in the router. If none of them works, we provide you with solutions to fix Windows 11 L2TP VPN not working. Let’s get started.
Several users complain that this error message appears when they recently used a built-in Microsoft VPN, after Microsoft’s update pack.
So, the solutions to resolve this issue are straightforward. In fact, there are six methods to fix this issue. Let’s dive into them.
What can I do if Windows 11’s L2TP VPN is not working?
1. Uninstall the KB5009543 update pack
 NOTE
NOTE
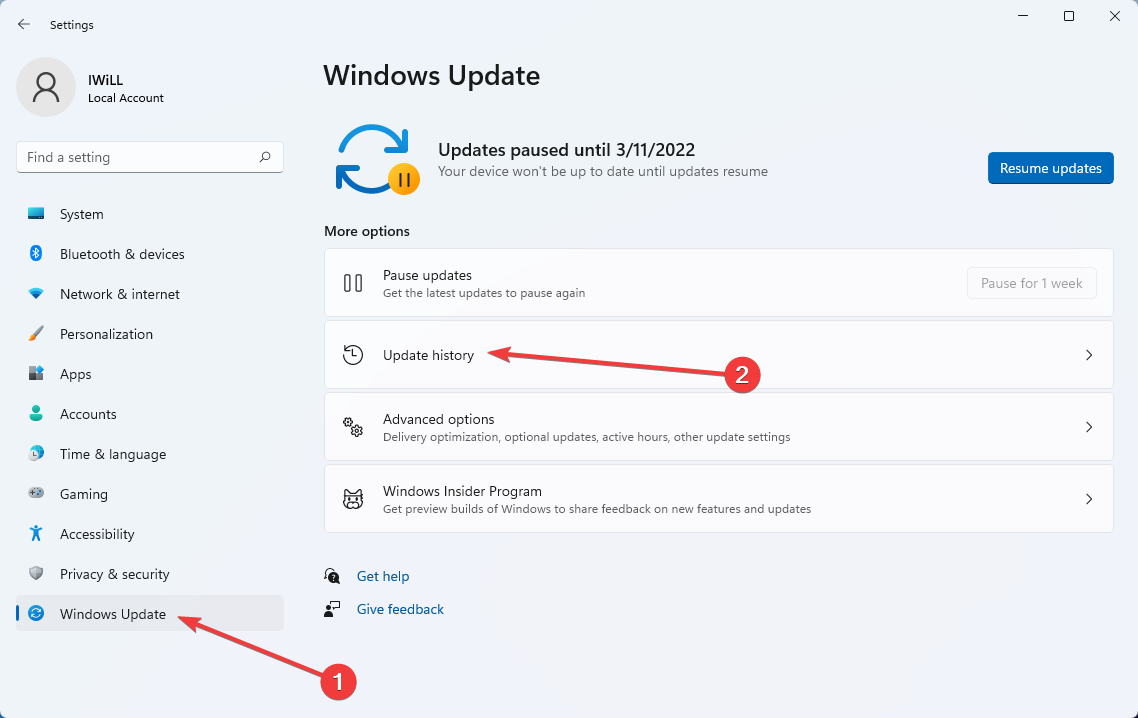
- First, open the Settings by pressing Windows + I keys or by right-clicking on the Start menu and selecting the Settings.
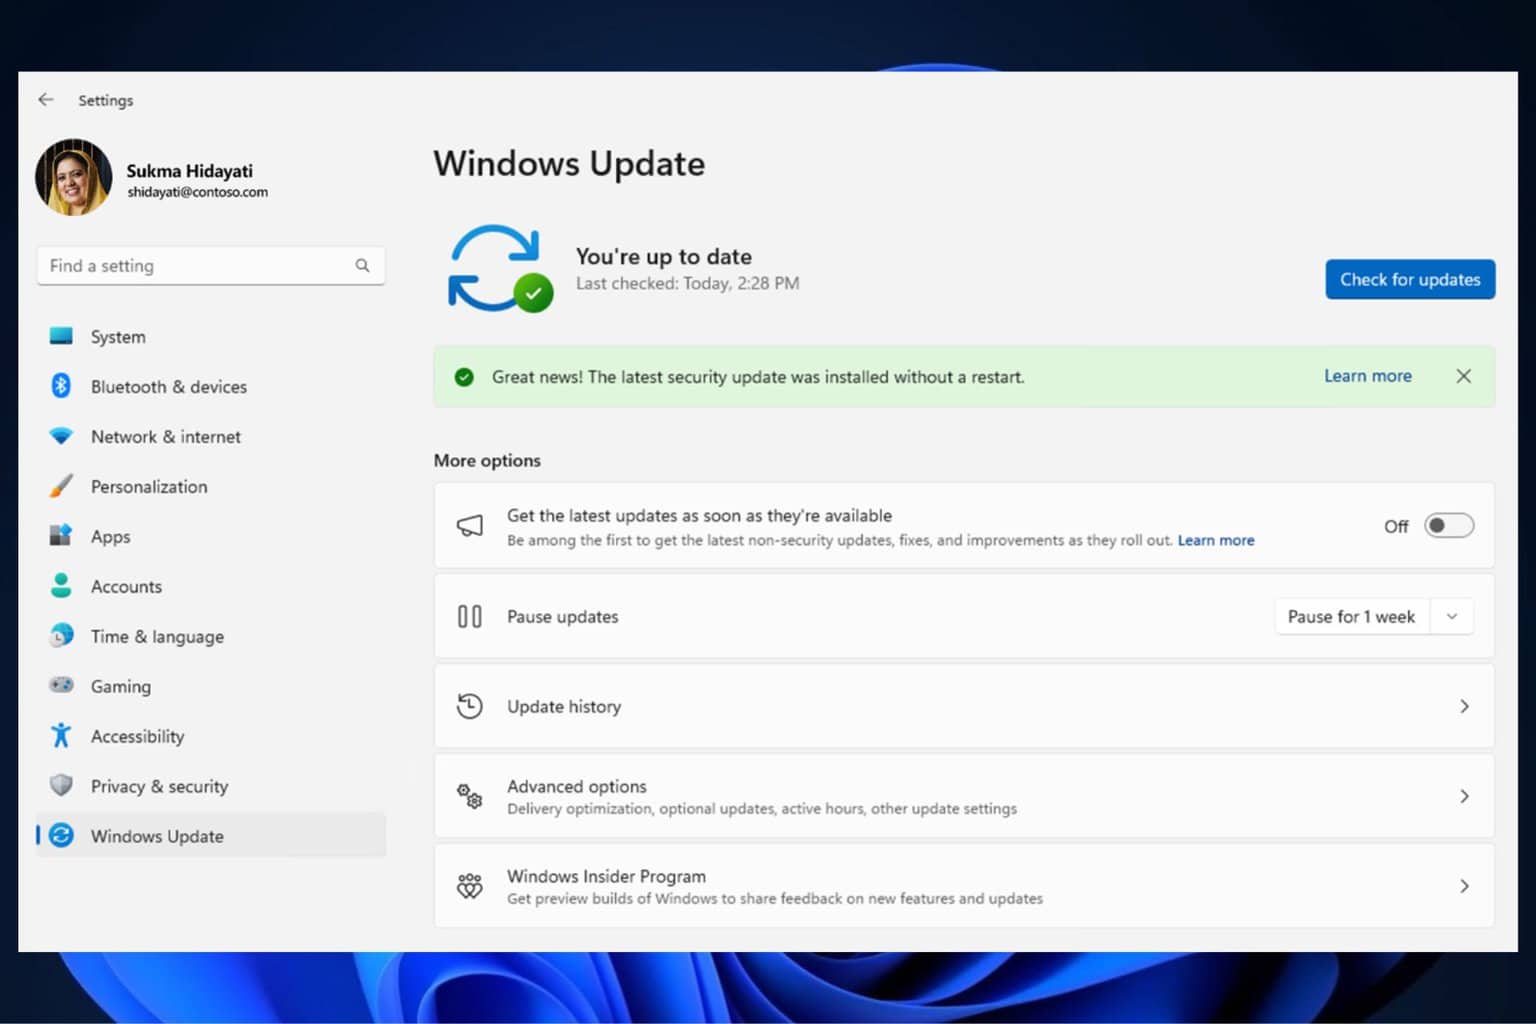
- Now opt for Windows Update then select Update history.
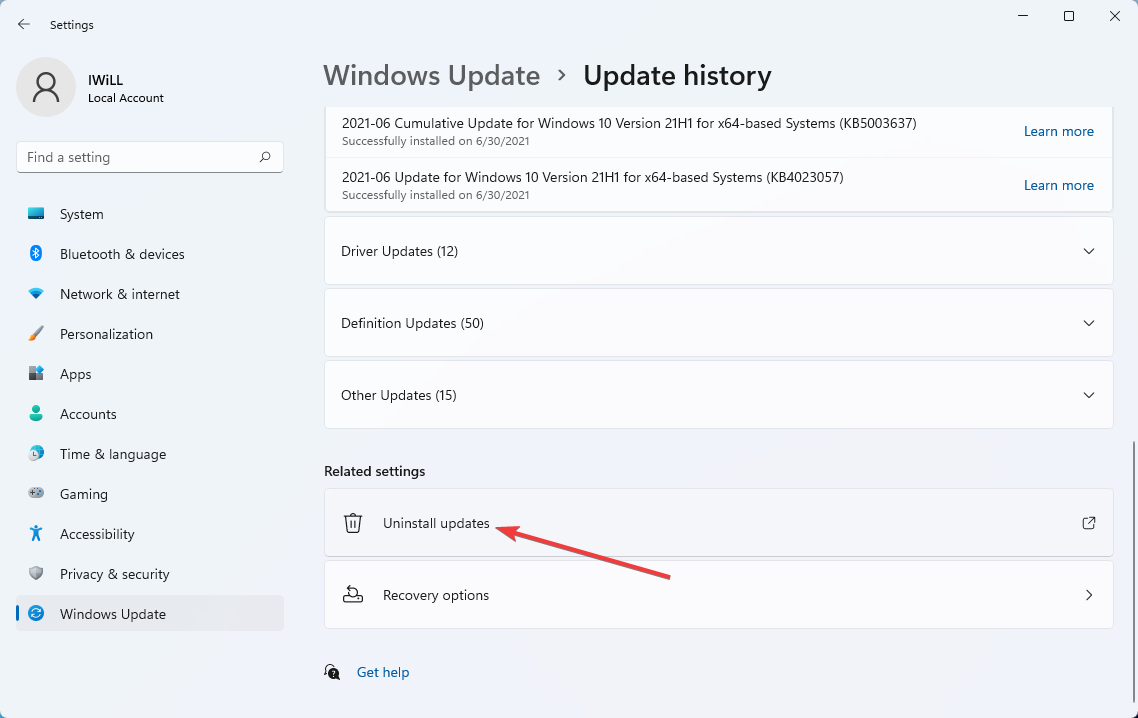
- By selecting this option, you will see a list of Windows updates. Scroll down the list and click on Uninstall updates.
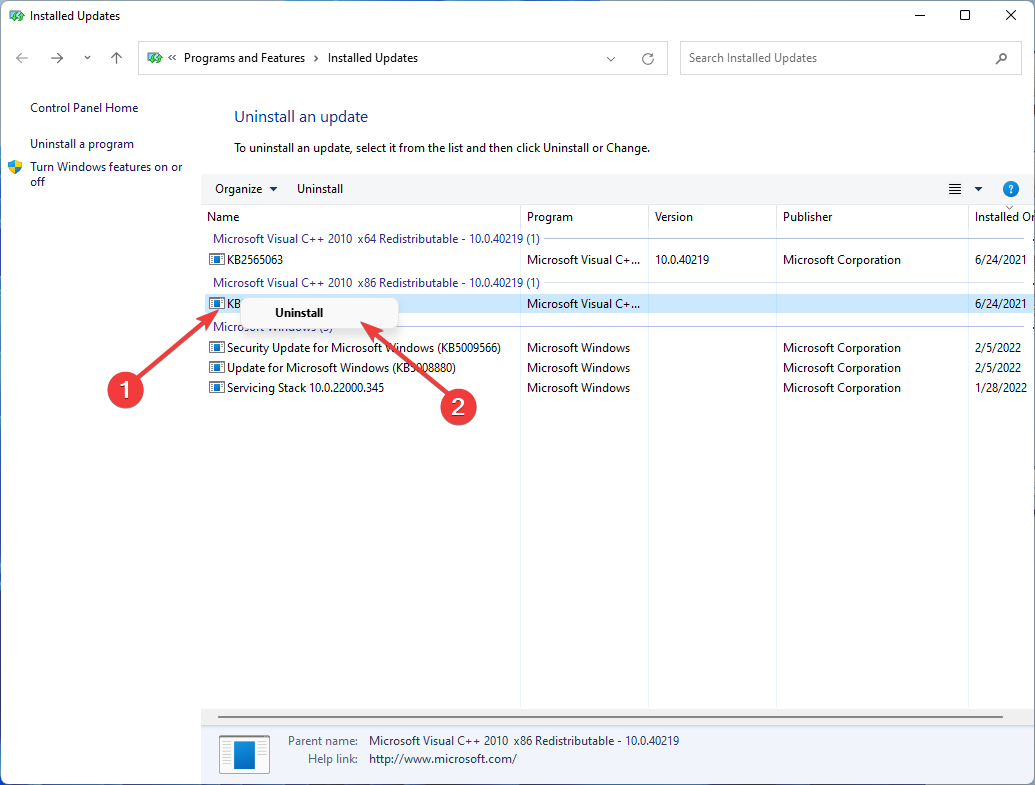
- Right-click on the KB5009543 update pack and select Uninstall.
- Reboot your computer.
Because the issue arises from the latest update that Windows offers for security updates, this method is the simplest way to fix L2TP VPN not working issues.
2. Reinstall the VPN Network Adapter
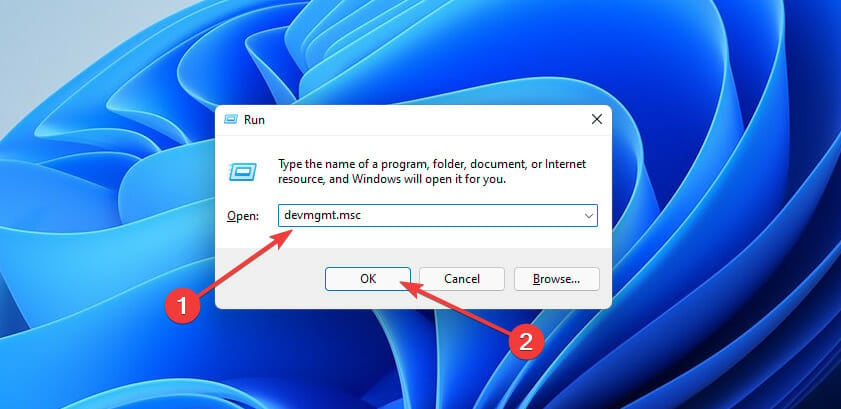
- Open the Run dialogue box by pressing Windows + R shortcut keys.
- To open Device Manager, type devmgmt.msc into the box and click OK.
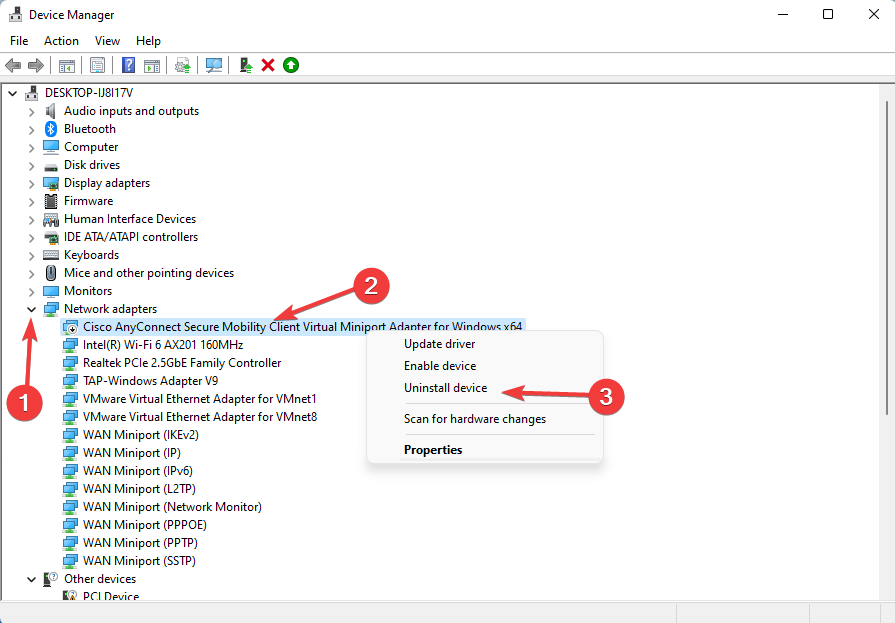
- Look for your VPN Network Adapter in the Network Adapters list, then right-click on it and choose Uninstall device.
- Restart your computer.
- Reinstall your VPN.
The network adapter is one of the causes of the L2TP connection attempt failed error. You can fix this issue simply by reinstalling the Network Adapter drivers. Now check to see if the problem has been resolved. If not, proceed to the next solution.
3. Activate the Microsoft MS-CHAP v2 Protocol
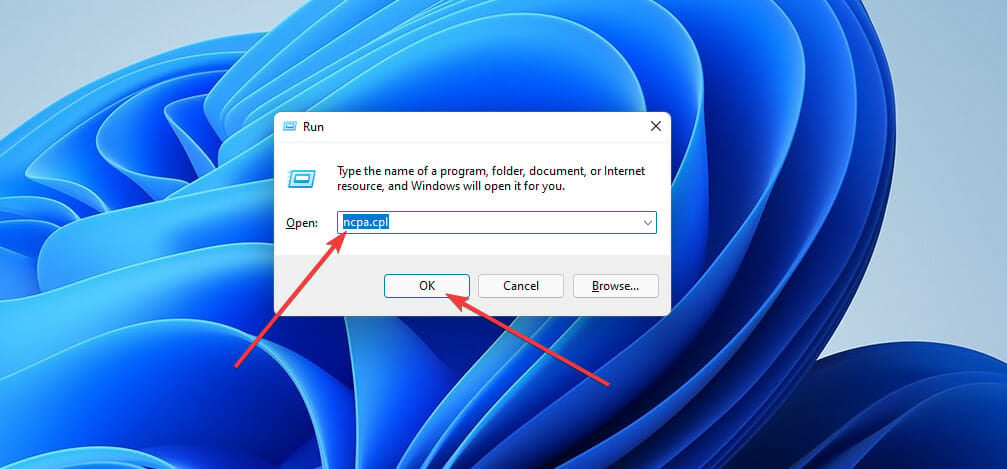
- Press Windows + R hotkeys to open Run dialogue box.
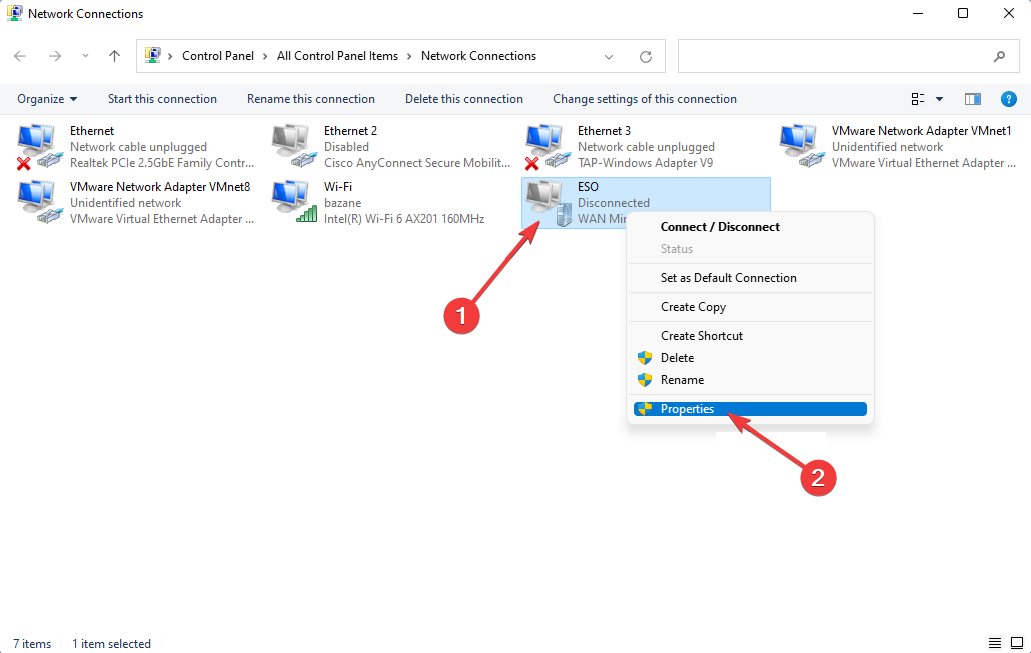
- Then, type ncpa.cpl and press the Enter key.
- On Network Connections window, right-click your VPN connection and select the Properties option.
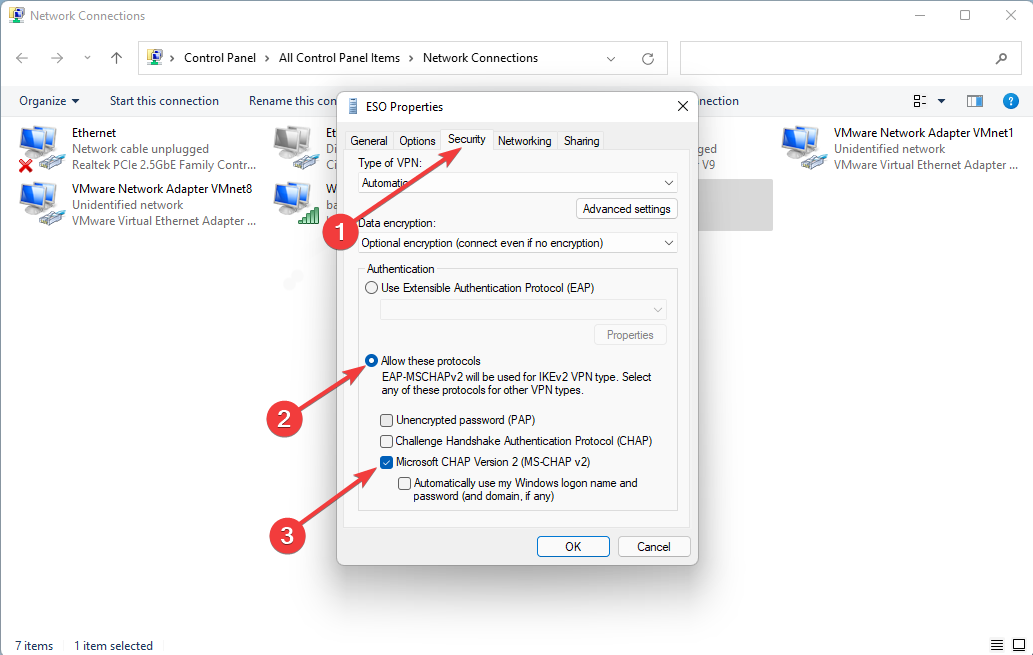
- Go to the Security tab and select the Allow these protocols option, then tick the Microsoft-CHAP Version 2 box.
- Select OK and reconnect to your VPN.
Challenge-Handshake Authentication Protocol (CHAP) is an authentication protocol that verifies users or hosts to prevent network replay attacks. Sometimes activating this protocol would enable us to resolve Windows 11 L2TP VPN not working issue.
4. Use a third party VPN
Private Internet Access (PIA) is a VPN with a number of key features, one of which is compatibility with every operating system and platform. This compatibility has allowed PIA customers to use the software without encountering Windows-related errors such as L2TP on Windows 11.
Not to mention that it has a no-logs policy, which means it does not collect data or keep any browsing history from customers, making it one of the safest VPNs available.
Furthermore, the PIA software has a very simple user interface that is easy to configure. Last but not least, this VPN includes a kill switch, split tunneling, torrenting support, and other features that ensure that the user can use it without any concern.
5. Create a new UDP registry key
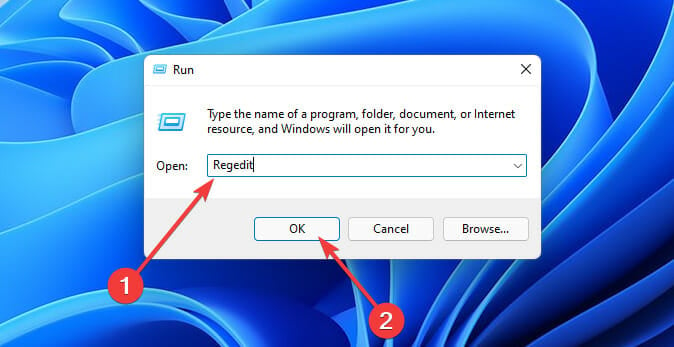
- Open Run by pressing Windows + R key combination.
- After that, type Regedit and select OK to open the Windows Registry.
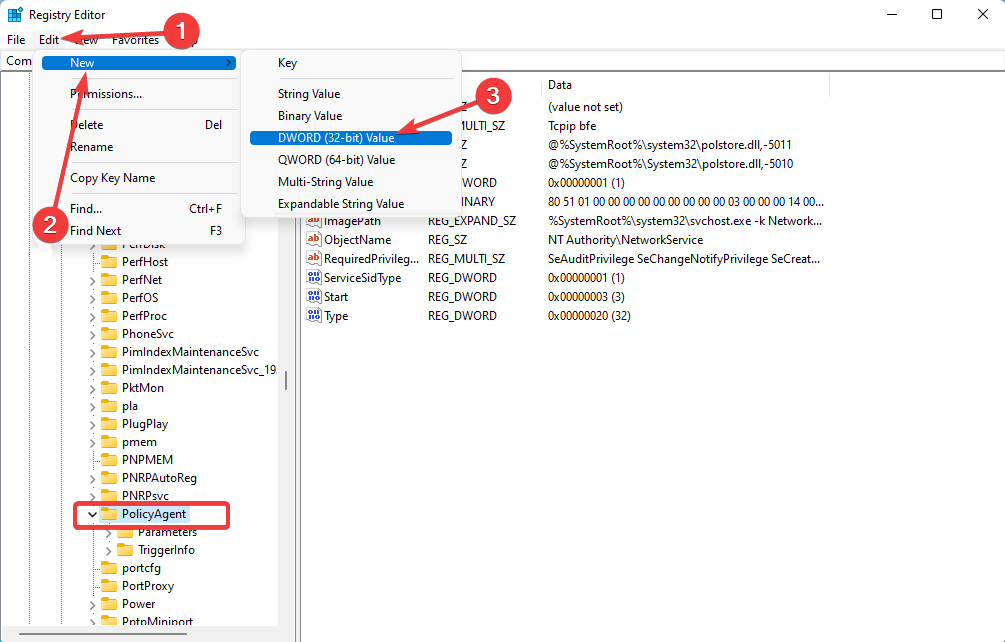
- When the Registry Editor window pops up go to the following directory:
HKEY_LOCAL_MACHINE\SYSTEM\CurrentControlSet\Services\PolicyAgent - Now, click the Edit menu, select New, and then opt for DWORD (32-bit) Value.
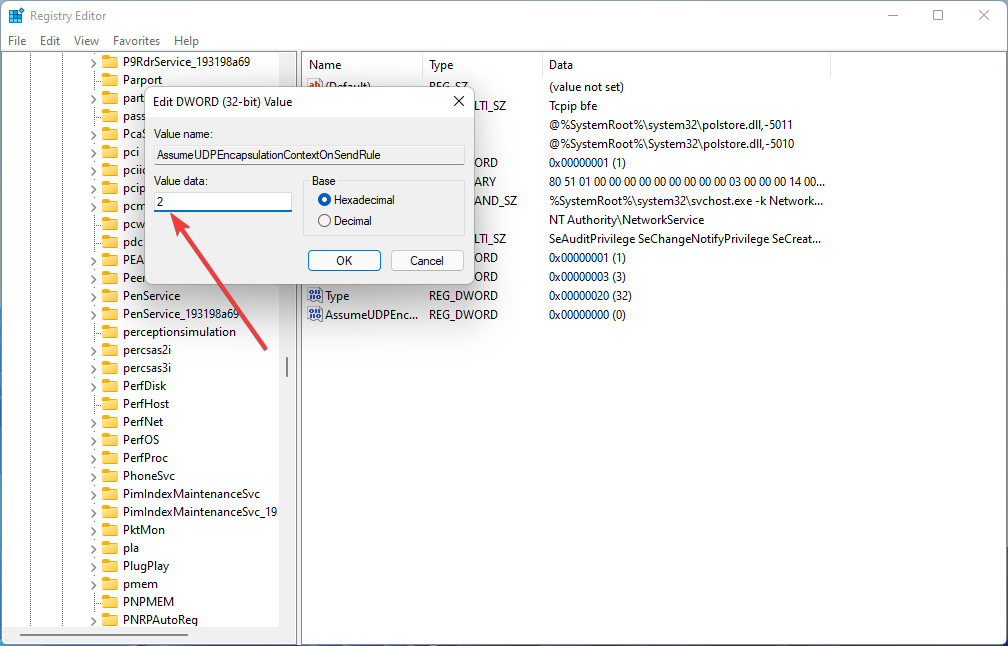
- After that, rename the value to AssumeUDPEncapsulationContextOnSendRule and press the Enter key.
- Now double click on the value you just created, set Value data to 2, and hit Enter.
- Restart your computer.
Sometimes VPN cannot connect because of the registry key. This is because all essential information and settings related to VPN are stored in registry keys.
So, the solution is to modify them by creating a new UDP Encapsulation registry. Now check to see if the L2TP VPN not working error in your Windows 11 PC has been fixed.
6. Disable vendor ID
When your computer installs the Windows KB5009543 package, IPSEC connections no longer work. Microsoft recommends disabling Vendor ID in the server-side setting to fix this issue.
Depending on which VPN you use, disabling Vendor ID varies from one server to another.
7. Enable the LCP protocol extensions
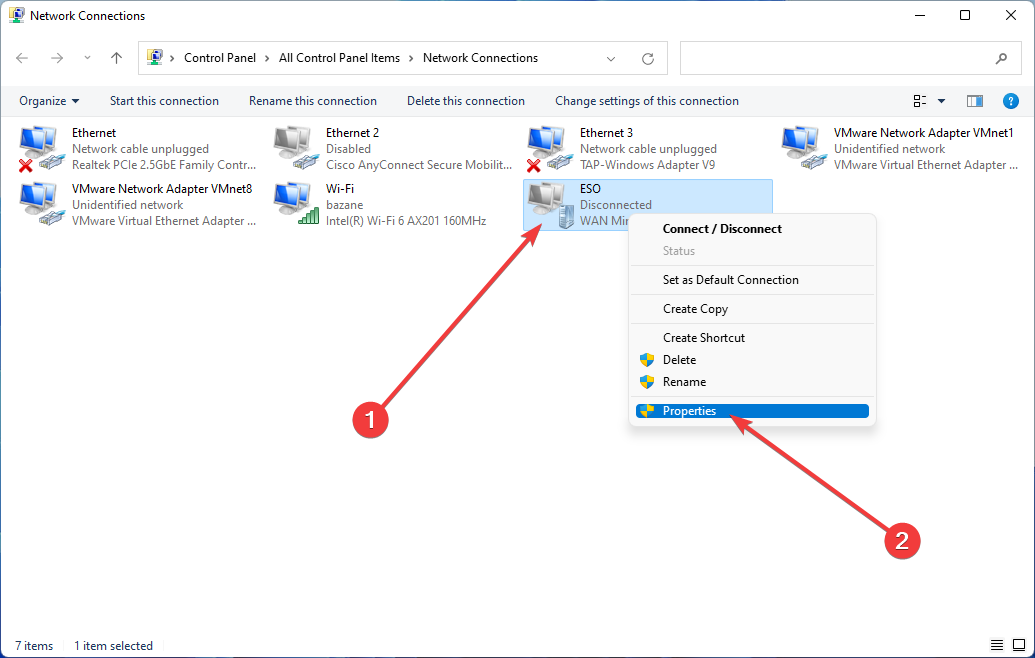
- Press the Windows + R key combination to open Run, then type ncpa.cpl and click OK.
- Now, on the Network connection window, right-click on your VPN connection and select Properties.
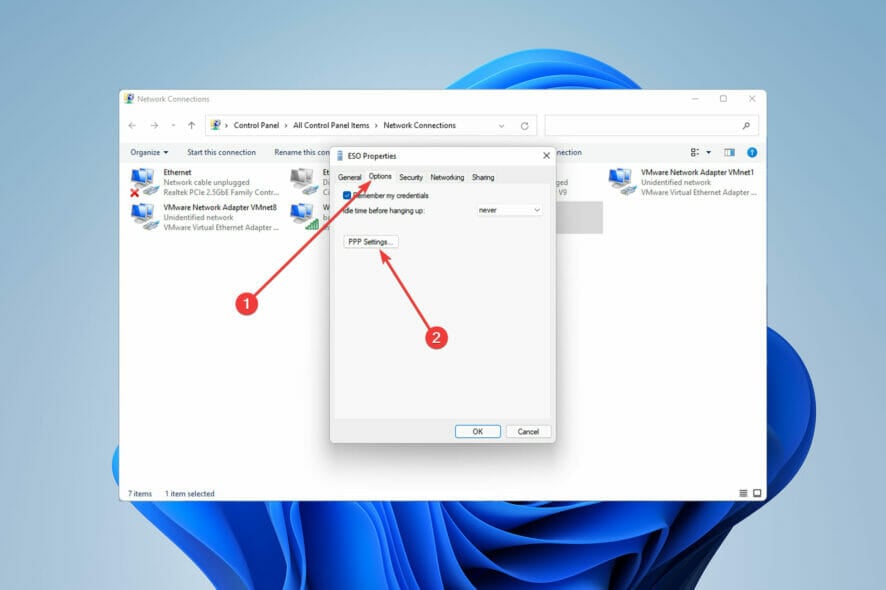
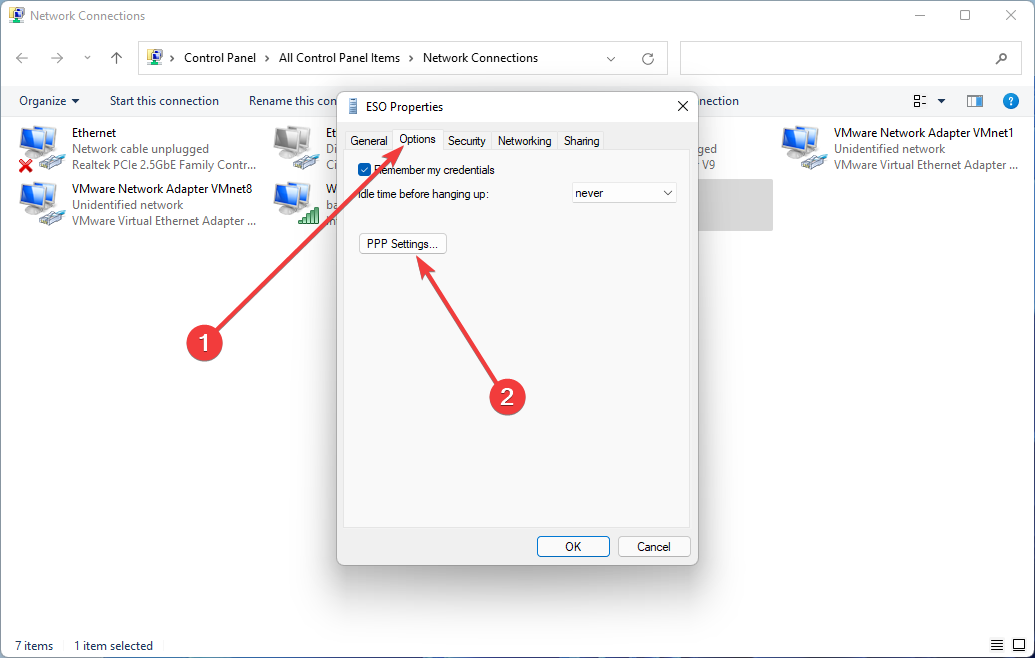
- In this step, navigate to the Option tab and click the PPP settings button.
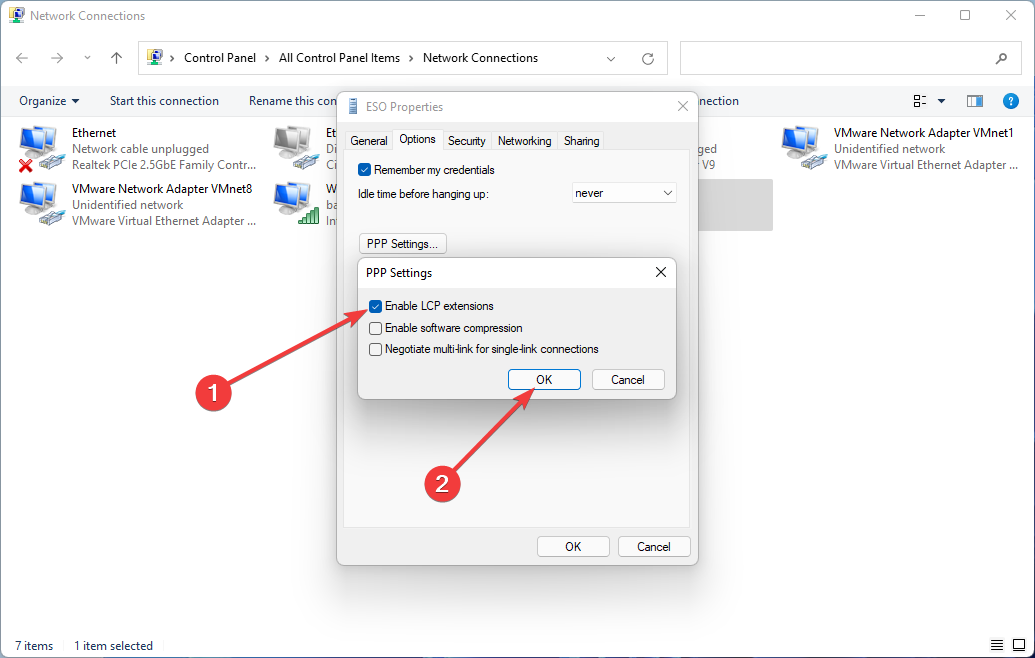
- Check Enable LCP Extensions box then click OK and head for the final step.
- Reconnect to your VPN and check whether the problem is resolved.
Link Control Protocol (LCP) is used to establish, configure, and test data in the PPP setting. However, sometimes due to reasons such as third-party, L2TP connection fails.
How does L2TP work?
Layer 2 Tunneling Protocol connects VPN client to VPN server by assigning an IP address to every user. It uses two endpoints to establish a tunnel.
Once the connection between the two endpoints is established, the PPP layer is encapsulated to transmit multi-protocol data. Next, ISP triggers a PPP connection.
After initiation of the PPP connection, one endpoint accepts the connection. Then a slot is allocated in the tunnel. So, the connection waits for the other endpoint to respond.
Meanwhile, the connection is verified, and a virtual PPP interface is made. When this process is finished, the link frames move through the tunnel. Finally, the other endpoint accepts the frames and removes L2TP encapsulation.
Windows 11 latest cumulative update KB5009543 stops VPN from establishing a connection and shows users The L2TP connection attempt failed error message.
Hopefully, there are some workarounds to solve this issue. However, the fastest way to fix Windows 11 L2TP VPN not working is by uninstalling the KB5009543 update pack.
Note that if you’re having trouble with L2TP on Windows 10, the solutions might be slightly different. Let us know which one worked for you in the comments area below.






User forum
0 messages