Windows 11 Camera Not Working: How to Reset or Unblock it
Check out these tested and confirmed solutions
Key notes
- Following the installation of Windows 11, our users noticed that their webcam was not working as expected.
- Webcam issues can occur both for built-in cameras and external ones.
- As a first step, you need to check if your camera is compatible with Windows 11.

The webcam is one of the most often used instruments on a computer nowadays, and any disruption in its operation is intolerably inconvenient.
In most cases, Windows 11 recognizes peripherals, automatically. Regardless of the operating system’s accuracy in detecting faults, we may encounter errors ourselves.
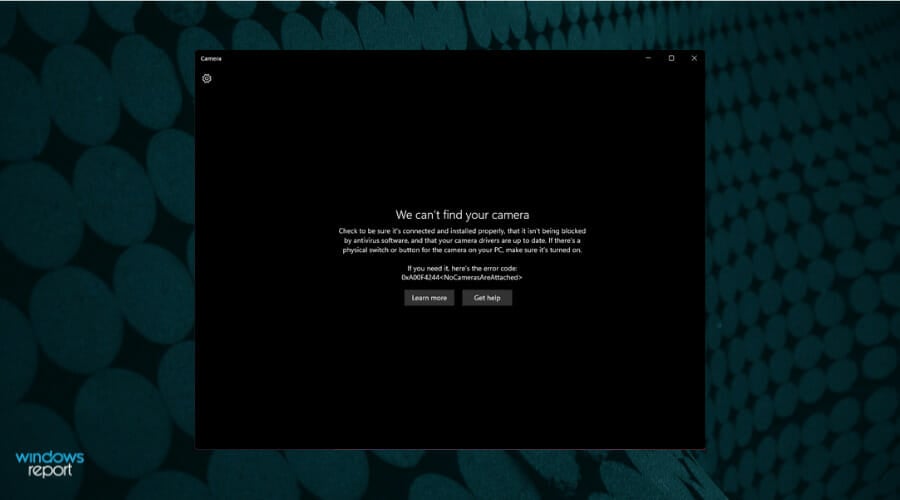
For instance, the Windows Camera app error code 0xA00F4244, which is notorious in Windows 10 is now also happening in Windows 11.
It doesn’t matter whether you are obtaining the Access denied error message when attempting to use your webcam or receiving any other issue; the remedies listed below will apply and work in all cases. Follow along!
Why is my webcam not working?
There are two primary categories of explanations for this: hardware and software. For example, unlike something that is malfunctioning within Windows, a webcam is a physical device.
As a result, it is possible that the issue stems from the device itself or from your computer’s inability to recognize how to connect to it. The majority of problems with the Windows webcam are caused by software.
That is, either Windows 11 does not recognize that a camera has been plugged in or the software you are using does not have the appropriate rights enabled, resulting in access to the camera being denied.
This problem can be caused by a variety of other factors, including recent system updates, privacy settings that restrict access, and hardware concerns.
It’s annoying, but the camera will become mandatory if you need to install Windows 11 on your device, so you have to fix this problem.
We may, however, quickly correct the problem by utilizing several often-used workarounds. We’re here to talk about them and figure out how to get the camera app to operate.
Similar issues that our readers encounter frequently include:
- Windows 11 Hello camera is not working – Our linked guide will fix the problem with the facial recognition option.
- Wecam not working on Team – The problem is most likely linked to the software’s permission through Windows.
- Skype camera not working – Fixing this issue is relatively simple as you probably have to update your webcam drivers and check your camera settings on Skype.
- LifeCam Studio webcam not working – Changing port connections and unplugging other devices often help you solve these Microsoft LifeCam inconveniences.
What can I do if the webcam isn’t working in Windows 11?
1. Unplug and plug the camera back in
If the webcam is connected to the computer through a cord, unplug it and then plug it back in again.
Take advantage of this opportunity to switch to a different port to rule out the initial port as the source of the problem. Also, unplug any USB devices that are not in use (e.g., external hard drive, printer).
Other gadgets that are plugged into the computer could be interfering with the camera’s ability to communicate with Windows, which is doubtful.
2. Give access to apps
- Press the Windows key + I to open the Settings app, then go to Privacy & security and choose Camera from the right side.

- First of all, make sure that both camera access switches are on.

- Next, enable all the apps that you want to access your camera by turning on the switch next to them.

It is this approach in particular that will resolve the Access denied issue that you may receive when attempting to use your webcam. Checking the app access also helps when the camera freezes in Windows 11.
3. Update the camera driver
- Click the Search icon from the taskbar, type device manager, and select the app from the results.

- Expand the Cameras section by clicking on it, then right-click the adapter and select Update driver.

- Now select Search automatically for drivers.

- The system will scan for new drivers and if it finds a new one, it will install it.
We strongly advocate using a specialist driver updating program to do automatic scans for out-of-date drivers.
4. Check for optional updates
- Press the Windows key + I to open the Settings app and click on Update & Security from the left panel followed by Advanced options on the right side.

- Scroll down until you find the Additional options section then click on Optional updates.

- Now click on the Driver Updates option then select all the driver updates you are presented and lastly click on the Download & install button.

Despite the fact that Windows is generally in charge of driver updates, if you are experiencing an issue, you can perform a manual search for updates.
5. Repair and reset the Camera app
- Press the Windows key + I to start the Settings app, then click on Apps from the left pane and select Installed apps from the right.

- Look for the Camera app in the list, click on its three points button and select Advanced options.

- Now scroll down until you find the Reset section, then click on the Repair button. Check if the app is detecting your webcam and if not, also hit the Reset button.

If the native Camera app from Windows 11 is not detecting your webcam, it’s a good idea to repair and reset it from the Settings menu.
You should also look at our complete guide on how to enable the camera in Windows 11 and see if you overlooked some details.
6. Run the built-in camera troubleshooter
- Use the Windows key + I shortcut to start the Settings app, scroll down on the right side of the window and select Troubleshoot from the list of options.

- Tap on Other troubleshooters.

- Locate the Camera troubleshooter and click on Run next to it.

- Go on with the troubleshooting to fix the problem.
Windows will discover and resolve any issues that may have arisen with the device or its configuration settings. Once the mistakes have been identified, instructions will be provided, so make sure to follow them carefully.
7. Test your webcam online
- Go to a website that tests your webcam like WebcamMicTest and click on the Test webcam button. Make sure you grant them access to your webcam and mic for the test.

- If it detects your webcam, you should be seeing an image right away. If not, you might have other hardware or software issues.

8. Temporarily disable your antivirus
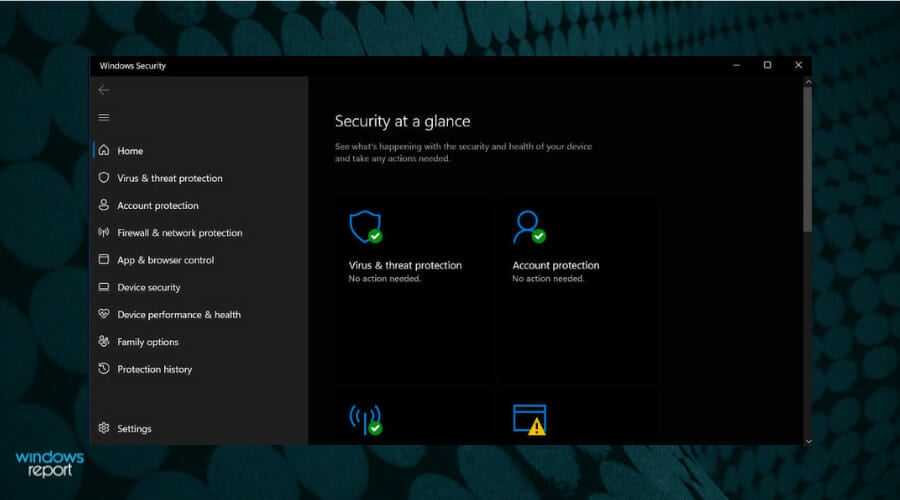
- Click the Search icon on the taskbar, type security and select Windows Security from the results.

- Now choose Virus & threat protection.

- Click on Manage settings unde Virus & threat protection settings.

- Turn the switch to off unde Real-time protection and check if the camera works now.

If the Windows 11 integrated camera is not working, disable your antivirus, firewall, and privacy applications for the time being.
Some programs feature built-in webcam protection, which could be the cause of the problem you’re experiencing.
We have shown you how to disable Windows Defender but if you have a third-party antivirus installed, you will have to go through its security menu and disable it from there.
If turning off these apps causes the camera to function properly, study their settings to determine what needs to be changed, and then immediately switch them back on.
A Webcam Protection option will prevent your apps from using your webcam so you should check the app that you installed for the camera.
9. Disable other cameras
- Click on the Search icon from the taskbar, type device manager, and select the app from the results.

- Look for the Cameras section, click on it to expand it, and if you have more than one installed, right-click on the one you’re not using and select Disable device.

If you have both an internal and an external webcam installed on your computer and the wrong one is being used, disable the webcam.
Windows will not allow you to utilize both webcams at the same time, and certain apps will not allow you to choose which webcam to prioritize.
Suppose you want to utilize the built-in camera but prefer to use the external one instead. In this case, you can disable the internal webcam in Device Manager.
Even if the camera is already activated and there is just one installation, you should take advantage of this opportunity to disable the webcam and enable it again.
10. Replace the webcam with a new one
Really old cameras are unlikely to work with newer versions of Windows and are slower to respond to any of the troubleshooting suggestions provided here.
In that scenario, your only choice is to upgrade to a more recent camera model. Take a look at our selection of the best 1080p webcams for PC and choose the one that fits your requirements.
Has my webcam been hacked?
One of the primary reasons so many people cover their computer webcams with tape or by using a dedicated cover to turn them off is to protect their privacy.
The ability to hack into webcams means that hackers may turn them on and record you whenever they want, usually with the help of a RAT (remote administration tool), that has been discreetly uploaded to the webserver.
Anyone could be the target of this type of attack. Ransomware attacks are generally directed at gaining control of anything that can be used to generate revenue.
Because of this, several malware programs attempt to infect webcams in order to obtain content suited for extortion from the cameras.
It’s critical to have strong anti-malware software to protect your webcam privacy, but also be aware of the indicators that someone has taken control of your webcam.
For example, you should be able to see a small indicator light next to your computer webcam. When a webcam is engaged for something like a video conference, you may see it turn on and become visible.
Although this indicator light may appear to be on at inconvenient times, especially when you aren’t using it, this is a telling sign that someone has gained control of your webcam from a distance and is utilizing it to have a look.
In order to learn more about how to protect yourself from hackers, we recommend that you read our article on the best webcam security software.
If you have not yet updated your operating system, check our guide on how to fix the camera app not working in Windows 10.
Alternatively, check out our guide on how to download the integrated camera driver for Windows 11 as you will definitely need one to make the best out of your webcam or download LifeCam drivers if it’s your webcam of choice.
For those who are using a laptop and have not found the suggestions above to be helpful, we have another post that describes different ways to fix your laptop’s camera.
Comment below and tell us which technique works best for you and whether you have already taped your camera or plan to do so.
Read our disclosure page to find out how can you help Windows Report sustain the editorial team. Read more


Improve this guide


User forum
0 messages