How to transfer Sticky Notes from Windows 7 to Windows 10
With the end of Windows 7, plenty of users are now forced to make a difficult choice: continue using an unprotected version of Windows, get the Extended Support (only for business), or upgrade to Windows 10.
Most of you will probably choose the latter, either now by choice, or later by lack of alternatives. Either way, the bottom line is you’ll need to find a way to migrate all of your personal data from one OS to another, and that also includes Sticky Notes.
Everyone knows what Sticky Notes is, and for those of you who’ve never tried Windows 10, you’ll be glad to know that it is a feature that is also present there.
However, migrating your Sticky Notes from Windows 7 to 10 isn’t as easy as doing a Copy and Paste. Luckily enough, we’ve compiled this step-by-step guide that will show you how you can migrate all of your Sticky Notes to Windows 10 in no time.
How do I transfer my Sticky Notes from Windows 7 to 10?
One thing you need to know is that there is a difference between the Windows 7 format of Sticky Notes, and the Windows 10 format.
Windows 7 Sticky Notes store the data in a .snt file, whereas the current Sticky Notes app stores the data in a .sqlite file. Therefore, you will need to know how to convert the files, before going through any actual migration.
1. Convert StickyNotes.snt to plum.sqlite
- Go to your Windows 10 PC
- Press Start
- Open Settings
- Go to Apps
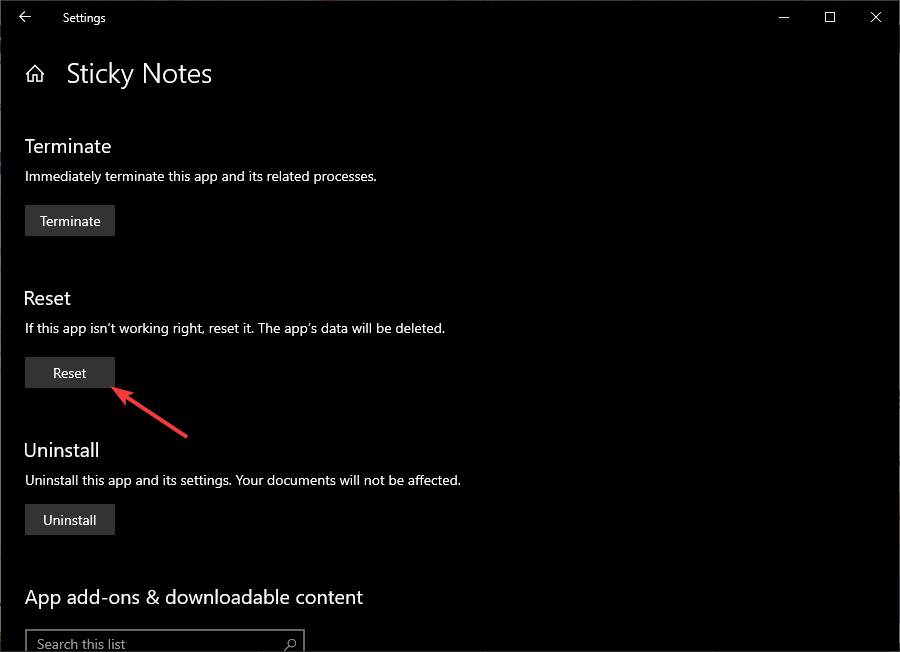
- Select Sticky Notes
- Choose Advanced Options
- Press the Reset button
- The app will be reset to default, and all app data will be deleted as well
- The app will be reset to default, and all app data will be deleted as well
- Open the File Explorer and navigate to the following file path:
C:UsersusernameAppDataLocalPackagesMicrosoft.MicrosoftStickyNotes_8wekyb3d8bbweLocalStateLegacy- If you cannot access the folder, make sure your File Explorer is set to view hidden files and folders
- Rename the StickyNotes.snt file to ThresholdNotes.snt.
- Start the Sticky Notes app
- The data in the .snt file will be automatically transferred to a new .sqlite data file
- Reinstall Sticky Notes
- Open PowerShell
- Run this line:
- Get-AppxPackage -Allusers | Select “PackageFullName”
- Write down the PackageFullName
- Now run this line:
Remove-AppxPackage Microsoft.MicrosoftStickyNotes_3.0.118.0_x64__8wekyb3d8bbwe- Include your Sticky Note package full name
- Reboot the PC
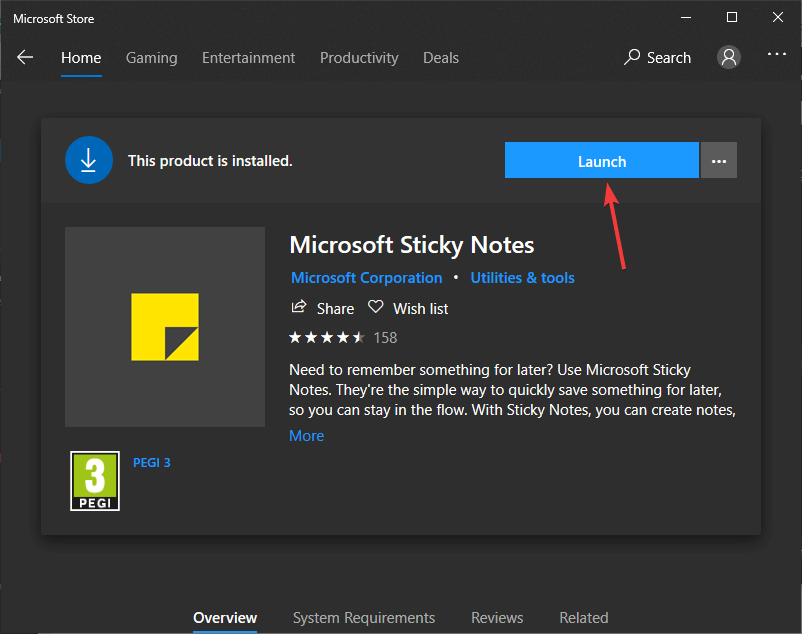
- Open the Microsoft Store App and reinstall Sticky Notes
- Do not open Sticky Notes, instead, open the File Explorer and go to this file path:
C:%LocalAppData%PackagesMicrosoft.MicrosoftStickyNotes_8wekyb3d8bbweLocalState
- Create a Legacy folder if it does not exist
- Copy your Stickynotes.snt file into the new Legacy folder and rename it to ThresholdNotes.snt.
- Open Sticky Notes and see if it worked
By following these steps, you should be able to migrate your Windows 7 Sticky Notes to Windows 10 without any further issues.
Did you find this article to be useful? Let us know in the comment section below.
RELATED ARTICLES YOU SHOULD CHECK OUT:
Read our disclosure page to find out how can you help Windows Report sustain the editorial team. Read more


Improve this guide


User forum
0 messages