Windows Update Error 8024401c [SOLVED]
Fixing your Internet is likely to solve the issue
6 min. read
Updated on
Read our disclosure page to find out how can you help Windows Report sustain the editorial team. Read more
Key notes
- Windows Update is vital to keep your OS up to date and running smoothly.
- It provides essential upgrades like service packs and patches and it also comes in handy to update drivers, plus it is all free and up for grabs.
- Now let's tackle a specific error code: 8024401C.
- You may come across it when Windows Update fails on a clean install of Windows 10 and we have gathered the right solutions to solve this in the article below.

Have you tried the Windows Update feature in Windows 10 and it failed to install a specific update? Well, in many cases we found that the error code 8024401C is the main error message that appears on your screen.
Follow the steps listed below and you will repair your system or at least find out why you have this issue in the first place and what to do next to solve it.
What causes the 8024401c Windows Update error?
The error code 8024401C is usually caused by a bad connection to the internet in your house or at work.
Also, in some cases, the culprit is a third-party application that restricts access to the Windows Update feature.
So, if you follow the instructions posted below in the order they are presented, you will be able to fix the Windows Update if it fails on a clean installation with the error code 8024401C.
How can I fix the error 8024401C?
1. Check your Internet connection
- Check your Internet Connection to see if it works, you can access any number of sites using an internet browser.
- If you have no internet connection, then you should use the built-in Network Troubleshooter. Otherwise, you will most likely have to call your internet service provider because the steps listed below will not work for you in this case.
Note: If you use a router, we suggest unplugging it from the power socket, waiting one minute and plugging it again to reset it.
2. Run the Windows Update troubleshooter
- Press and hold the Windows button and the W button.
- Now you will have the search feature in front of you.
- Write the following in the search box: Troubleshooting.
- Left-click or tap on the Settings feature after the search has finished.
- You will have a topic named Troubleshoot computer problem and under it left click or tap on the View all feature on the left side.
- Left-click or tap on the Windows Update troubleshooter and follow the instructions on the screen to finish the process.
- RebootWindows 10 after the process has finished and check again for the 8024401C error message.
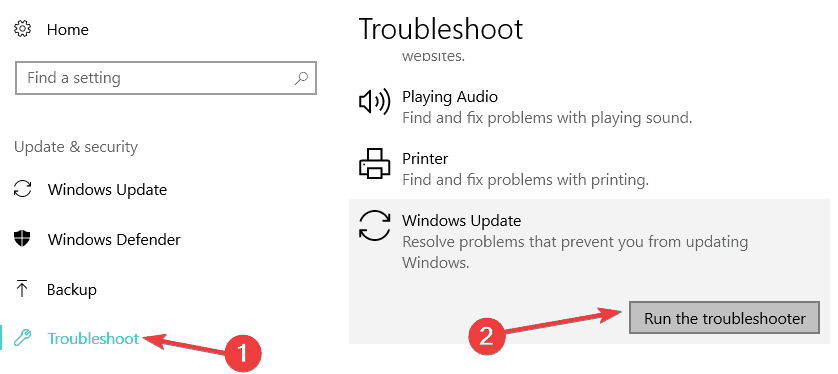
On Windows 10, you can also run the Update troubleshooter from the Settings page. Go to Settings > Update & Security > Troubleshoot > and launch the Windows Update troubleshooter.
3. Download Windows Update Diagnostic
If the step above did not work follow the lines below
- Left-click or tap on the link posted below to download the troubleshooting app.
- Left-click or tap on the Save File button.
- After the download has finished, go to the directory where you saved it and double click the executable file.
- Install it and follow the instructions on the screen to finish the troubleshooting process.
4. Disable your antivirus
- Whatever antivirus application you are using, try disabling it for the duration of this step.
- Reboot the Windows 10 device.
- After the device starts up with the antivirus disabled, check again for the error code 8024401C. If it doesn’t show again, then your antivirus is blocking your access to the Windows Update Server.
5. Disable Proxy server settings
- Open the Internet Explorer application in Windows 10.
- Left-click or tap on the Gearbox situated in the upper right side of Internet Explorer.
- Left-click or tap on the Tools button.
- Left-click or tap on the Internet Options feature.
- Left-click or tap on the Connections tab situated in the upper side of the window.
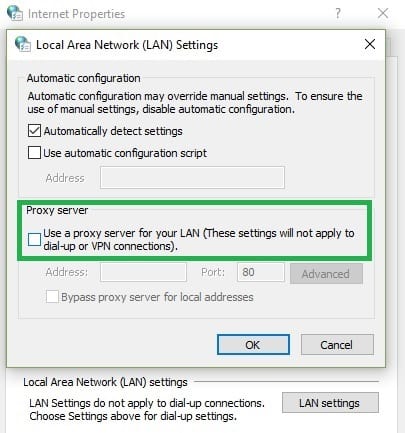
- Left-click or tap on the LAN settings feature.
- Uncheck the box next to Use a Proxy server for your LAN.
- Left-click or tap on the Apply button.
- Left-click or tap on the OK button to close the window.
- Reboot the Windows 10 device.
- Check again for the error message 8024401C.
6. Use System Recovery
- Move the mouse cursor over to the upper right side of the screen.
- From the menu that pops up left click or tap on the Search icon.
- In the search box write the following: Control Panel.
- After the search has finished left click or tap on the Control Panel icon.
- Now that you have the Control Panel window in front of you, left-click or tap on the search box in this window.
- Write in the search box the following: Recovery
- Left-click or tap on the Recovery feature after the search has finished.
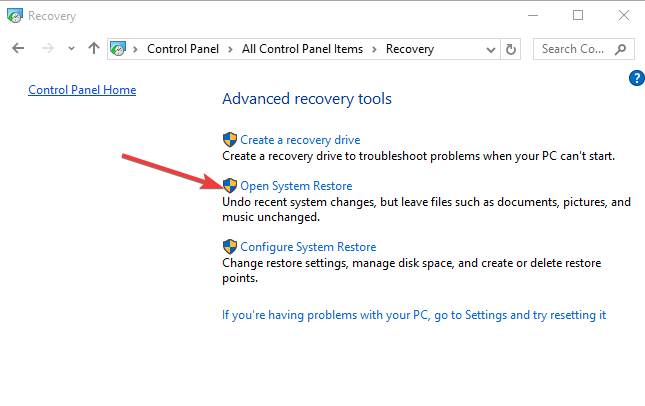
- Left-click or tap on the Open System Restore feature.
- Now you will need to follow the instructions on the screen to finish the system restore and bring back your Windows 10 device to a point where you did not have this issue.
7. Reset Windows Updates components
If the problem persists, try resetting your Windows Update components. Here are the steps to follow:
- Launch Command Prompt (Admin)
- Stop the Windows Update Services by typing the following commands (hit Enter after each one):
- net stop wuauserv
- net stop cryptSvc
- net stop bits
- net stop msiserver
- Rename the SoftwareDistribution and Catroot2 folder by typing the commands:
-
Ren C:WindowssoftwareDistribution SoftwareDistribution.old -
Ren C:WindowsSystem32catroot2 Catroot2.old
-
- Restart the Windows Update Services by typing the following commands:
- net start wuauserv
- net start cryptSvc
- net start bits
- net start msiserver
- Exit Command Prompt, restart your computer and check if you can install the latest updates.
8. Check date and time settings
Windows update errors often occur due to incorrect date and time settings. Make sure that Windows 10’s date and time are correctly set by following these steps:
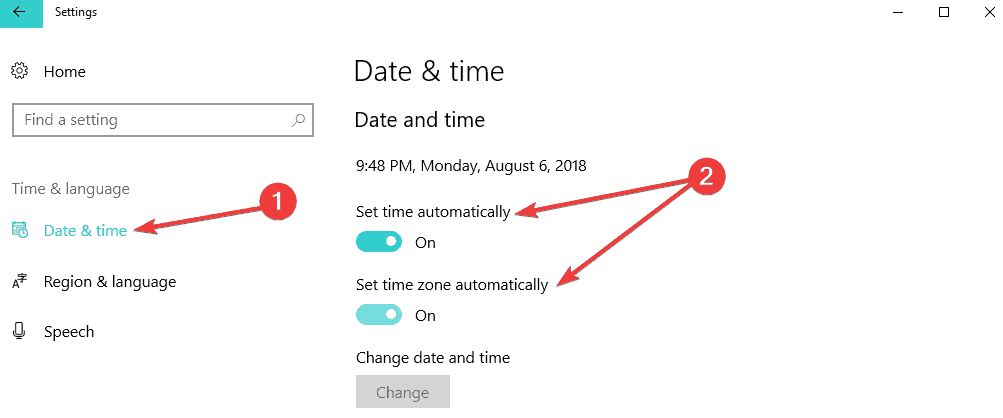
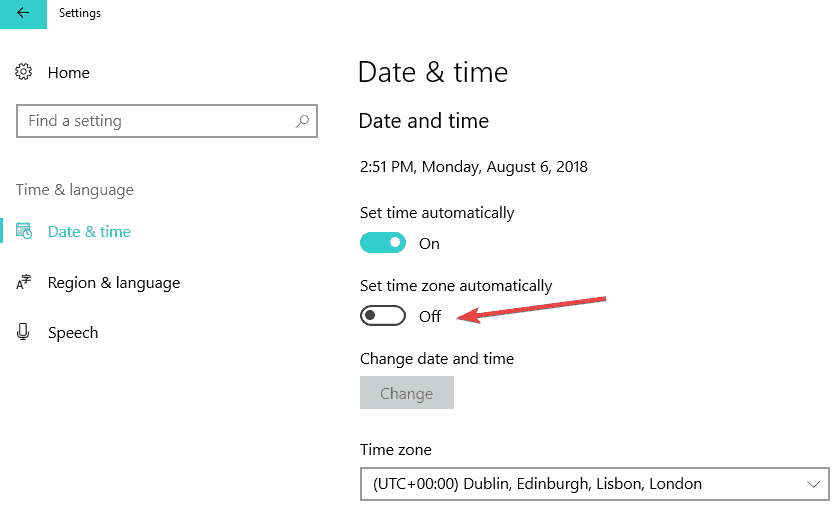
- Go to the Settings page > select Date & time settings
- Toggle the Set time automatically and Set time zone automatically options on. Restart your computer, and check for updates to see if the problem has been solved.
- Alternatively, you can also choose to select the time zone manually. To do this, you first need to toggle off Set time zone automatically.
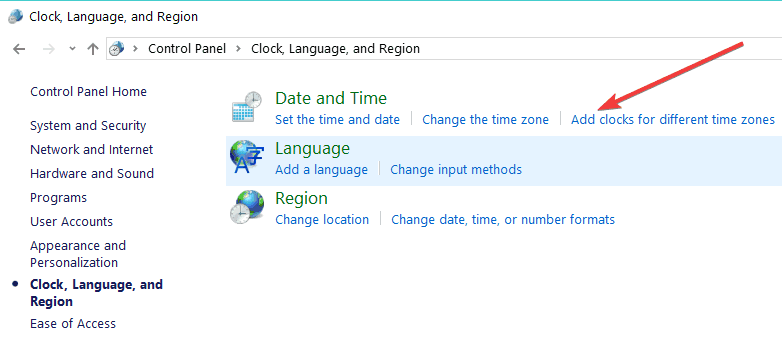
- You can also synchronize the clock with the server by clicking Add clocks for different time zones in Control Panel, as shown in the screenshot below.
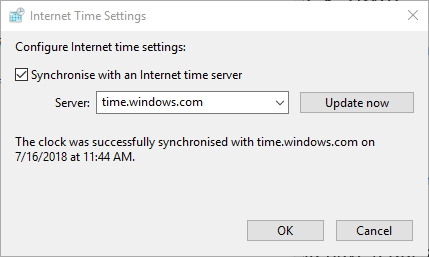
- Go to the Internet Time tab > Change settings
- Select the Synchronize with an internet time server check box > select a server from the drop-down menu and then hit the Update Now button.
There you have it. These methods can help you fix the Windows Update installation error 8024401C in Windows 10.
If you encounter other issues while following the steps listed in this guide, you can write to us in the comments section below.




User forum
0 messages