6 Fixes for Laptop Microphone Not Working [Built-in Mics]
Here's what to do if the internal microphone is not working
![]() 6 min. read
6 min. read
![]() Updated on
Updated on
Share this article

Improve this guide
Read our disclosure page to find out how can you help Windows Report sustain the editorial team Read more
Key notes
- If the laptop microphone is not working, you won't be able to communicate with your peers online correctly.
- Usually, the problem with the built-in microphone not working is caused by problematic drivers.
- A good solution for this problem is to run the Audio troubleshooter in Windows 10.

Several users have complained about microphone issues on Windows 10 devices, so, like always; we prepared a comprehensive guide to help them and yourself.
If your Windows 10 device presents this problem, this guide will help you fix your microphone. There are a few steps to do if the built-in mic is not working, but rest assured, they are easy and effective.
Why is my built-in microphone not working?
There are a lot of causes why the built-in microphone is not working. The most common of them is a corrupted driver. However, you should also check if the mic is muted or if the app you’re using it has enough permissions.
Here are some of the most common iterations of these problems, and for some of them, we already have comprehensive solutions:
- Internal/laptop microphone not working
- Lenovo/Samsung/Asus/Dell/HP laptop internal microphone not working
- Windows 7/10/11 microphone not working
- 0x800704ec microphone error
- Realtek microphone not working
- Your microphone isn’t ready
- Headset microphone not working in Windows 10
- Built-in or internal microphone not working
- Microphone not working Windows 10, Windows 11, Windows 7
- Lenovo, Dell (precision 7560), HP, Asus, Acer, MSI laptop microphone not working
- Laptop microphone not working on Zoom, Teams
- Gateway laptop microphone not working
- The laptop microphone not working when connected to the monitor or docking station
- Laptop microphone not working Discord
Here are a few methods for you to try, but before you start, if you have more than one audio port, try plugging your microphone in a different one and try it.
How do I turn my microphone back on my laptop?
1. Set your microphone as default
- Right-click on the volume icon and select Recording Devices.
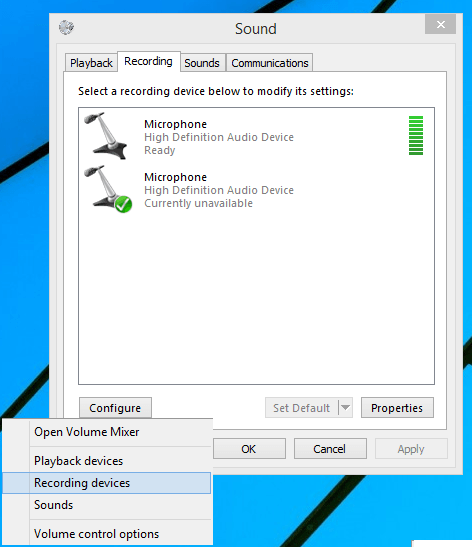
2. In the window that opens, select the device which has the status Ready.
3. Click on the Set Default from the bottom of the window.
4. If you’ve done this correctly you should see the green mark on the correct microphone and audio level reacting to sound.
To check if your microphone is set to the default value, you must check it from the Recording tab. To access this option, follow the steps above.
This quick fix is usually all you need, and your microphone should work properly now.
2. Use the Audio troubleshooter
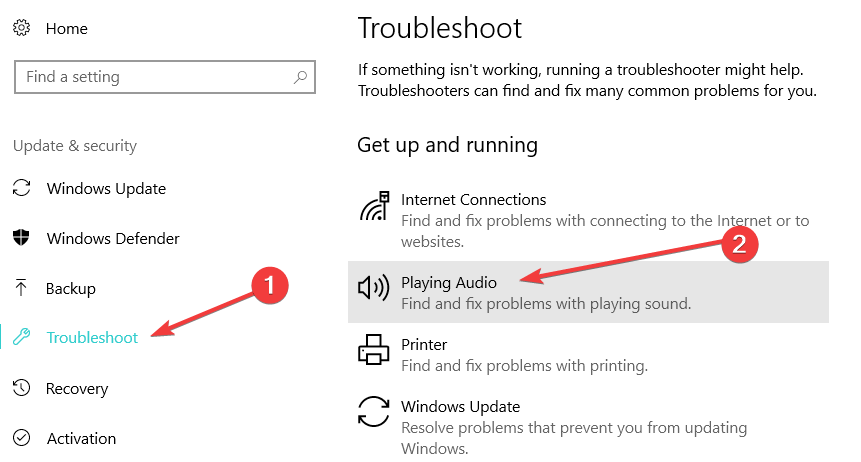
- Open Windows Search using the Windows key + S combination, type troubleshooting in the box, and select the utility from the results.
- The Troubleshooting window will now open. From the left menu, select View All.
- From the list that opens, select Recording Audio, and a new window will open.
- Follow the steps of the troubleshooter and apply the fixes that are provided.
If the first method did not fix your problem, then you should use the Windows audio troubleshooter, which might be of help in some cases. To do this, go through the steps above.
Windows 10 offers a series of dedicated troubleshooters that you can use to fix microphone issues.
To run these troubleshooters, go to Settings, click on Update & Security, then click on Troubleshoot and select and run the following troubleshooters: Playing Audio, Recording Audio, and Speech.
If the issue affects your headset, you can run the Hardware and Devices troubleshooter.
Granted that this isn’t as quick as the first method, the troubleshooting utility might provide the solution if your microphone isn’t working on your Windows 10 device.
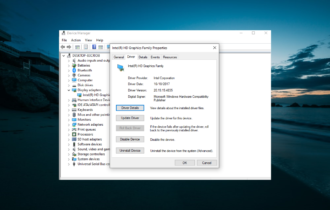
3. Update Audio Drivers
- Right-click the Start button and select Device Manager.
- Locate your audio device in the list, right-click it and select Properties.

- In the window that opens, select the Driver tab and click on Update Driver.
- Instruct the wizard to search on the Internet for a suitable driver and let it install the updates it finds (if any).
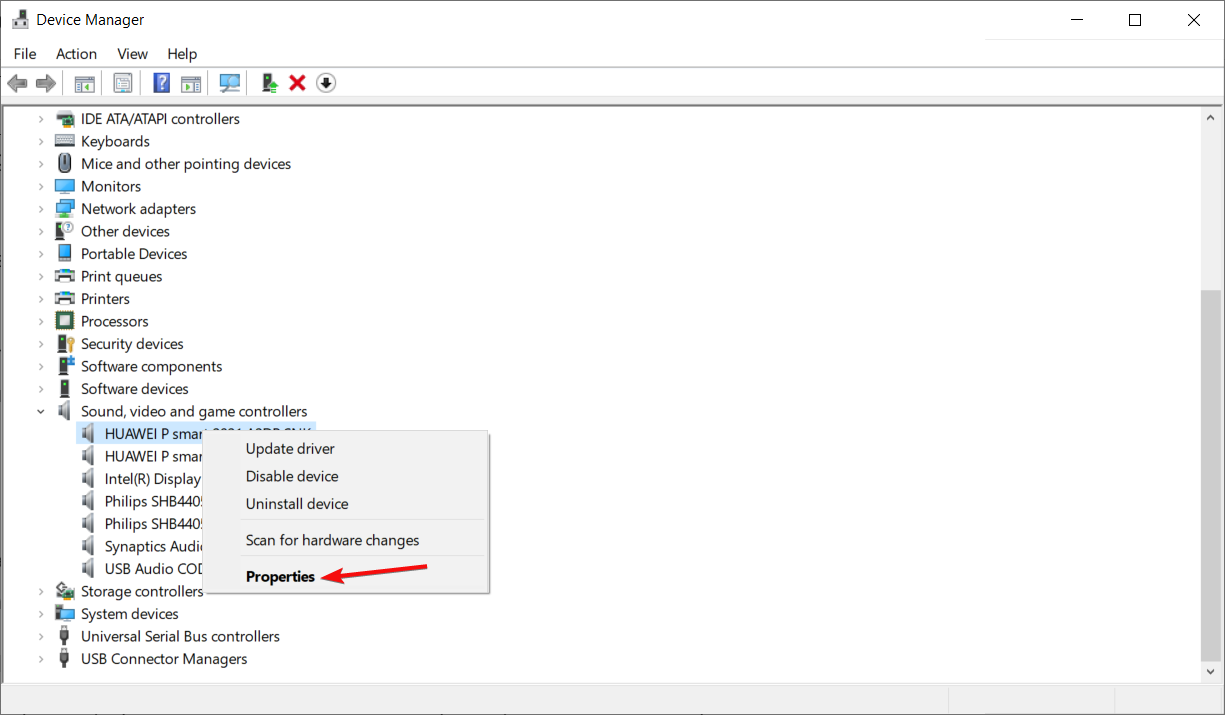
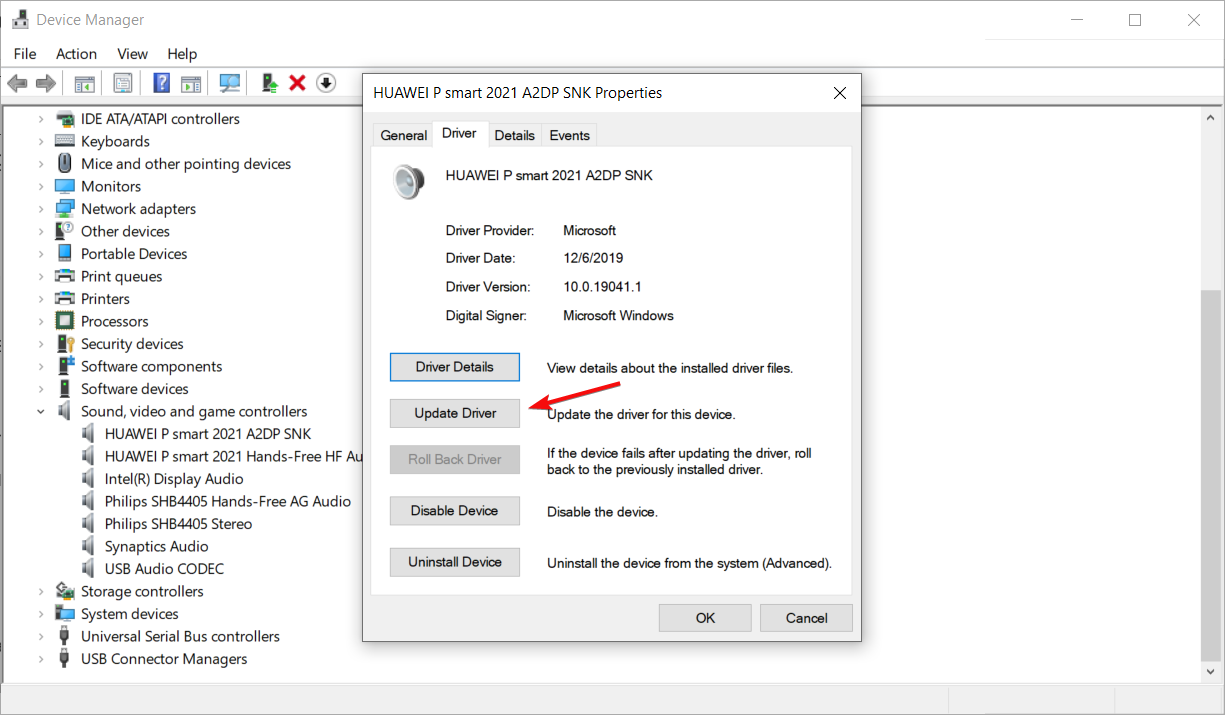
The third time’s a charm, right? If both of the methods above have failed, you might want to update your audio drivers, which might help if there is a problem with the installed drivers.
There are two methods of doing this, and we suggest you try them both. For the manual update, you can use the steps above.
If the default driver update utility does not find an update, visit the website of your sound card manufacturer and download from there the latest driver.
Install the driver, and that should fix your problem. Additionally, if none of the solutions are working, try the microphone (if you have a headset with a microphone) on a different computer.
We also recommend the tool below to download all the outdated drivers on your PC automatically.
This recommended solution can repair and update your drivers in just one go and just a few clicks. Don’t worry because it’s very simple to use.

Outbyte Driver Updater
Upkeep your drivers and fight off any corruption that prevents your microphone from working!4. Enable app access to the microphone
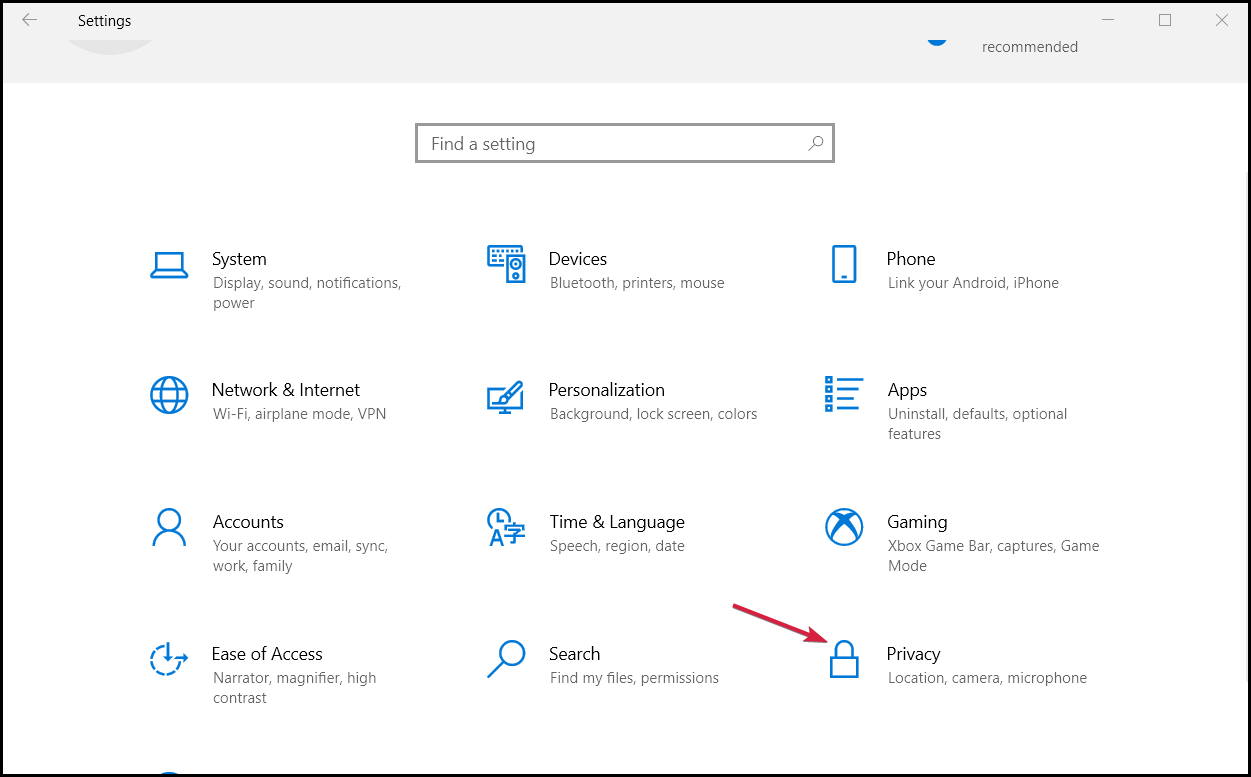
- Click the Windows button and select Settings.
- Now, go to Privacy.

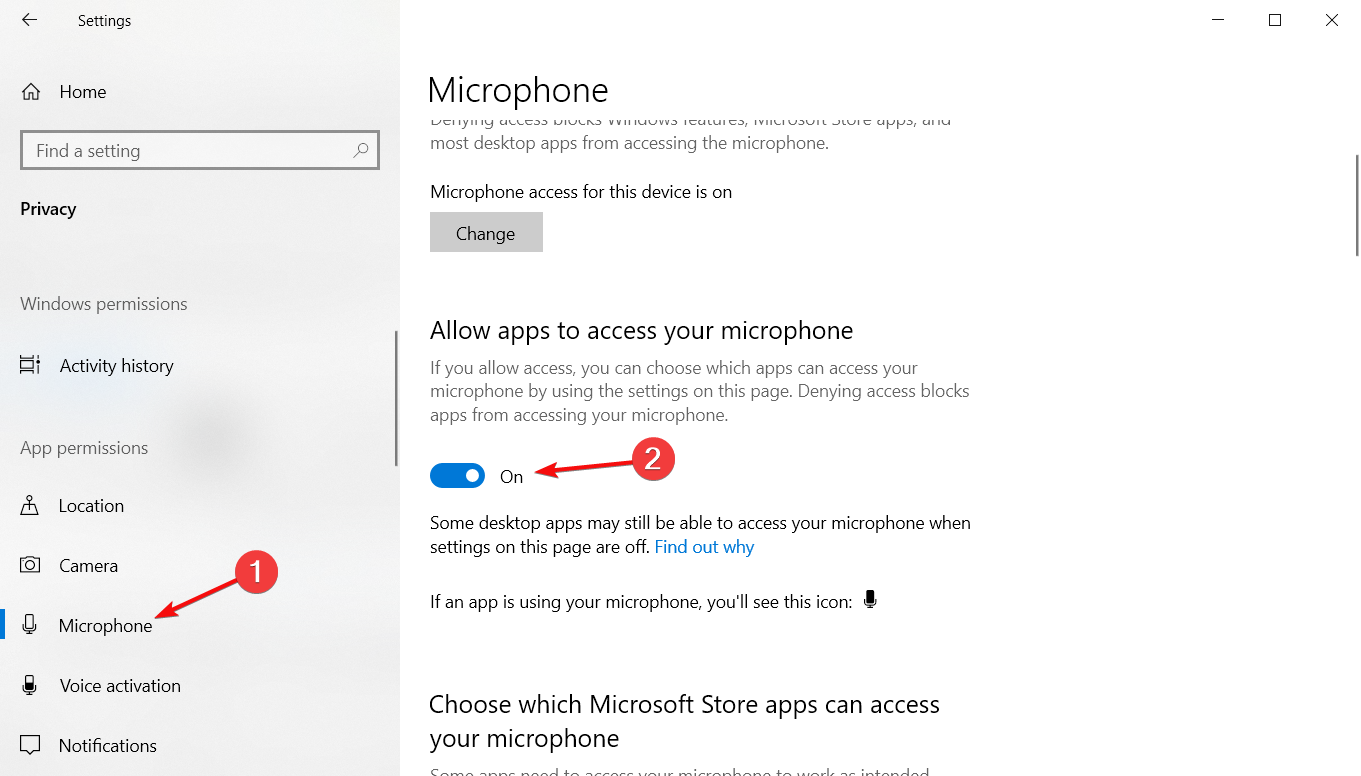
- Scroll down and select Microphone from the left, then check the option Allow apps to access your microphone.

If you’re running Windows 10 and noticed the built-in microphone is not working with particular apps and programs, ensure that the respective software can access your microphone.
The OS automatically blocks app access to your microphone due to privacy concerns. Luckily, we have a full guide on how to bypass the mic cam access issues.
5. Disable audio enhancements
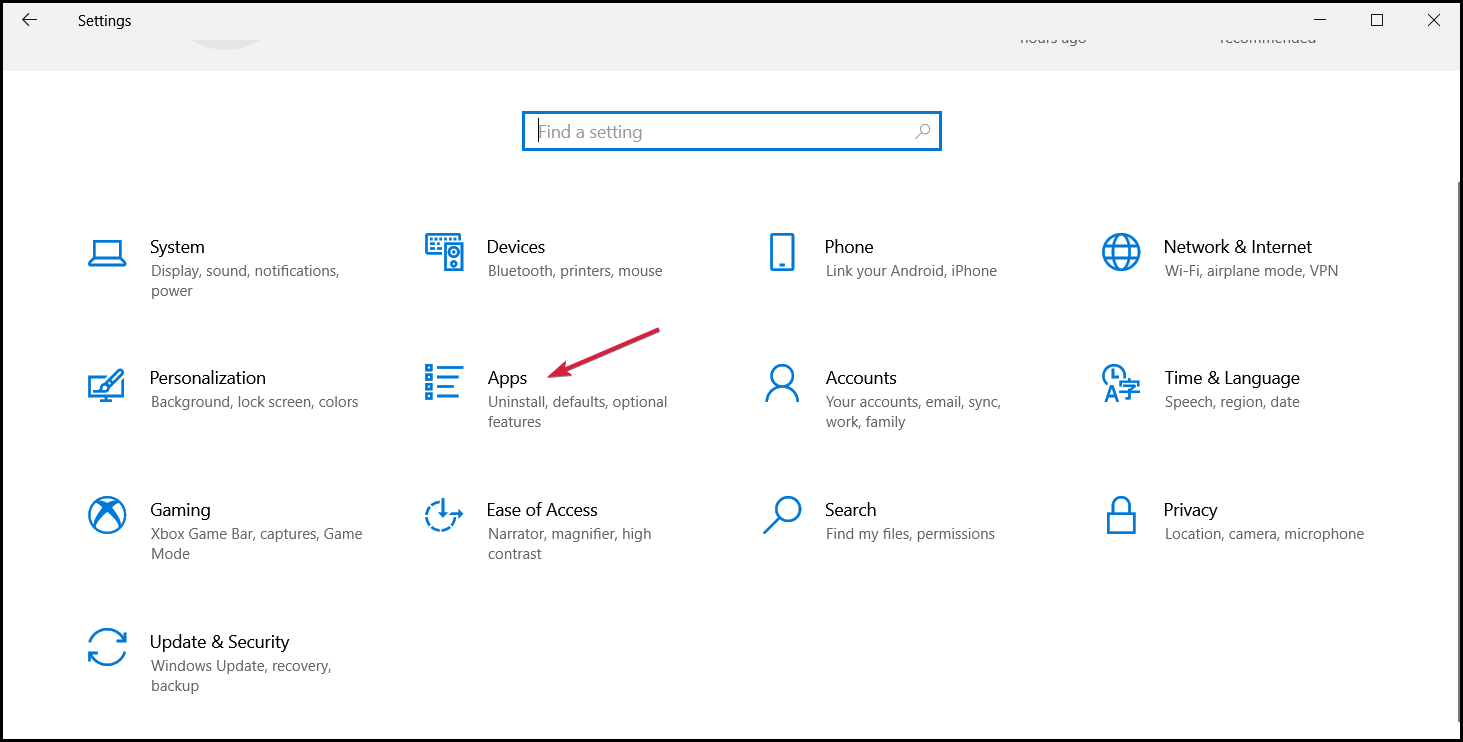
- Click the Start button and choose Settings.
- Now, click on Apps.

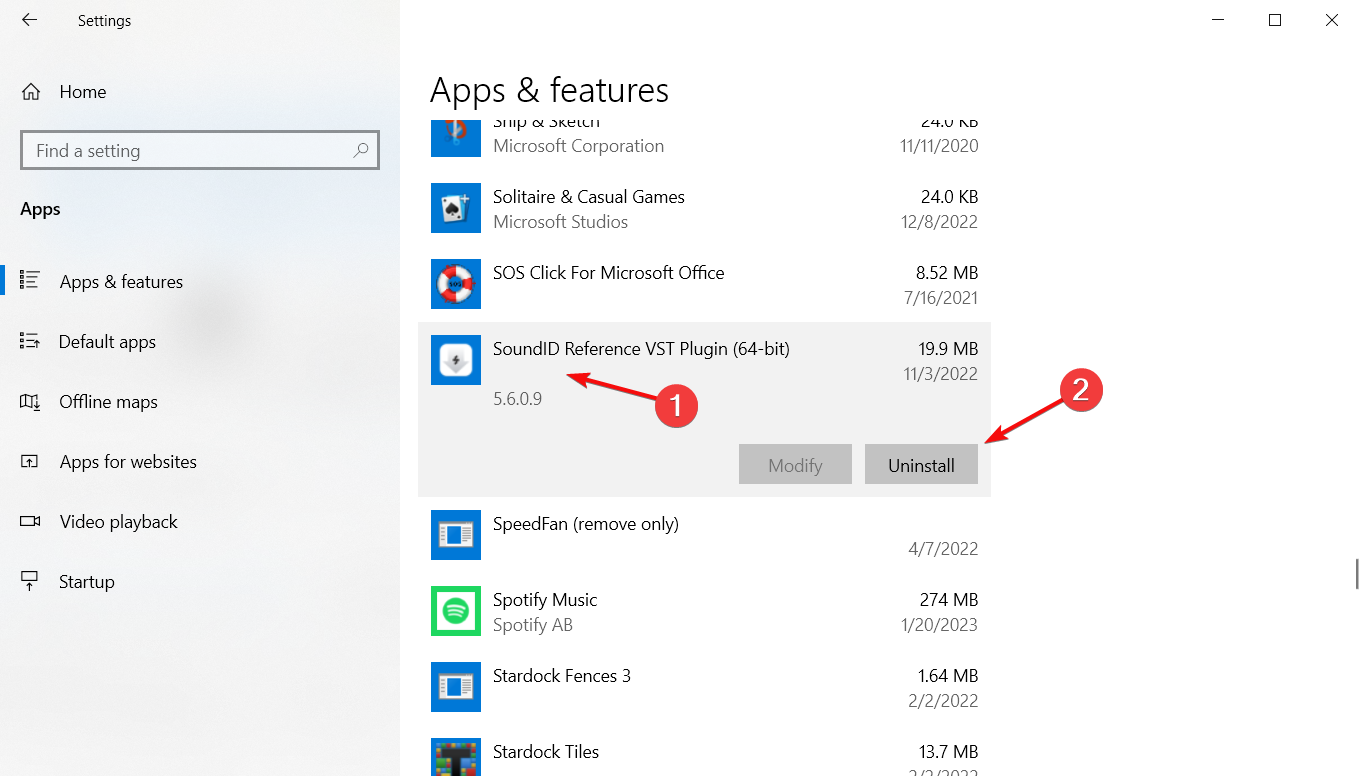
- Look for the audio enhancement app you installed recently, click on it, and hit the Uninstall button (The app shown in the image is just an example).
Audio enhancement software can help you improve the overall sound quality on your Windows 10 computer, but sometimes these programs can cause more harm than good and bring up issues like static noise in your microphone.
If your built-in laptop microphone stopped working after you installed or updated an audio enhancement software, try disabling it to see if this solves the problem.
6. Reset Windows Audio Service
- Go to Search, type services.msc, and hit Enter to launch the Services page.
- Locate the Windows Audio service.
- Right-click on it and select Start if the service is not enabled. If it’s enabled, then select Restart.

- Wait for a few seconds and restart your computer.

We hope our solutions helped you fix the internal microphone issues, and you can now communicate without any problems.
You might also be interested in reading our guide on what to do if the microphone level is too low.
If you have any other suggestions or questions, comment below, and we will get back to you as soon as possible.