Solved: It Looks Like Windows Didn't Load Correctly
Time for a tune-up before your PC checks out

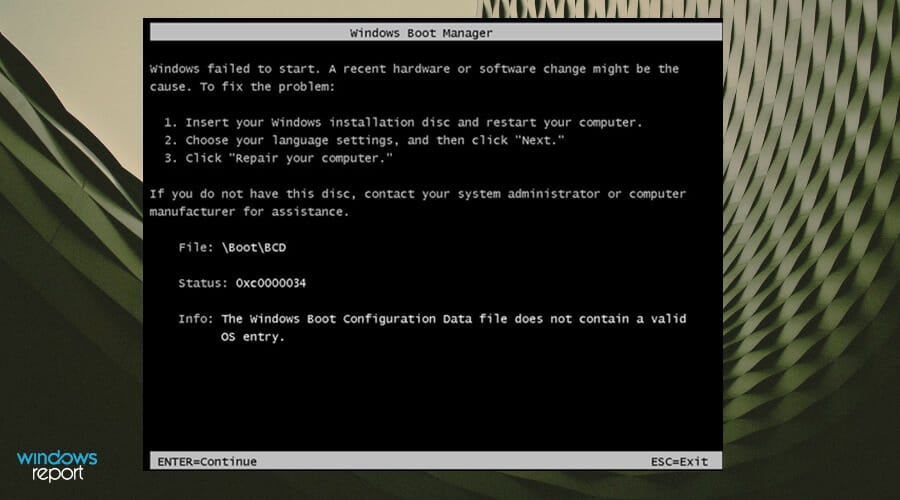
Switching off and switching on your Windows 11 PC should be a seamless process but if you consistently get a blue screen accompanied by the it looks like Windows didn’t load correctly message, you’ll need to address underlying issues before it becomes catastrophic.
Like many BSoD errors, incorrect or sudden shutdowns, corrupt system files, and outdated or incompatible drivers are the main causes of this error.
However, your hardware might also be failing and giving you early warning signs or you recently changed your hardware and there are some compatibility issues.
How do I fix Windows looks like it didn’t load correctly?
1. Rebuild the BCD
1.1 Create a bootable drive
- Navigate to Microsoft’s official website and download the Media Creation Tool.

- Connect a USB drive with at least 8GB storage and above.
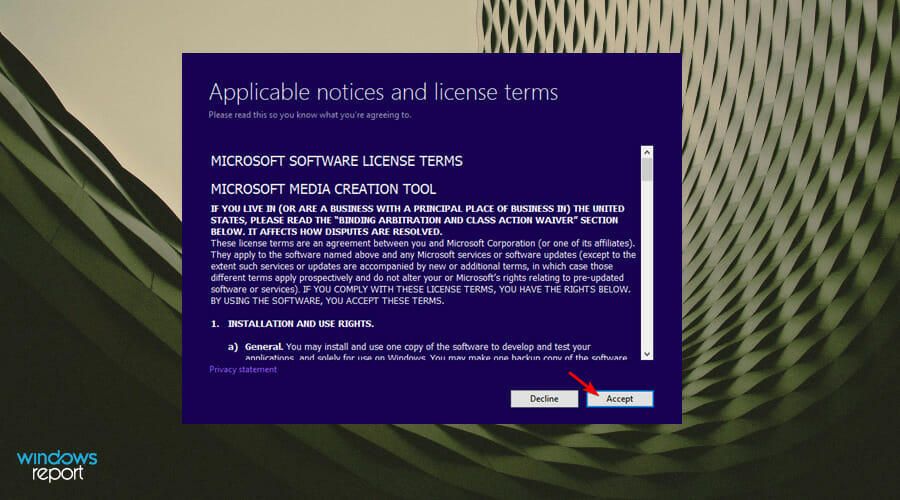
- Run the Media Creation Tool and click on Accept for the terms and agreement, then proceed.
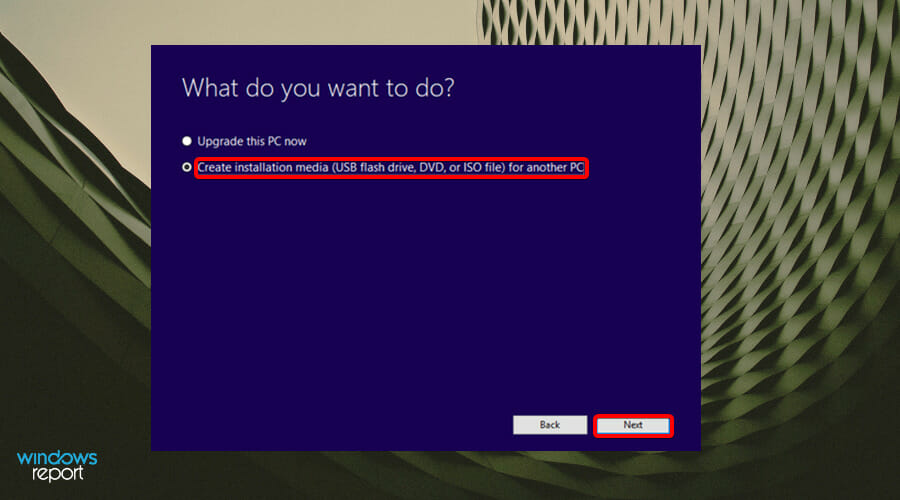
- Choose the Create installation media (USB flash drive, DVD, or ISO File) option and click Next to proceed.
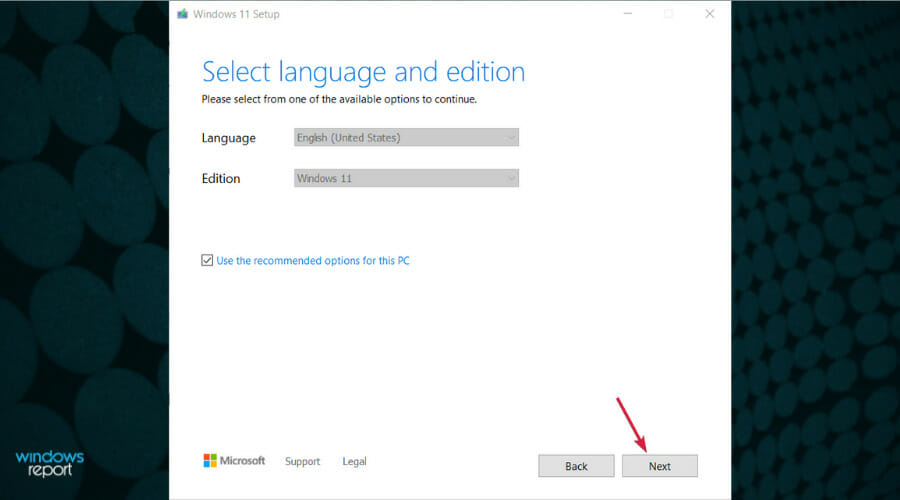
- Select language, architecture, and edition from the drop-down menus then click Next.
- Choose USB flash drive as the media to use.
- Wait for the process to be completed.
1.2 Rebuild BCD
- Connect the bootable USB to one of the available ports.
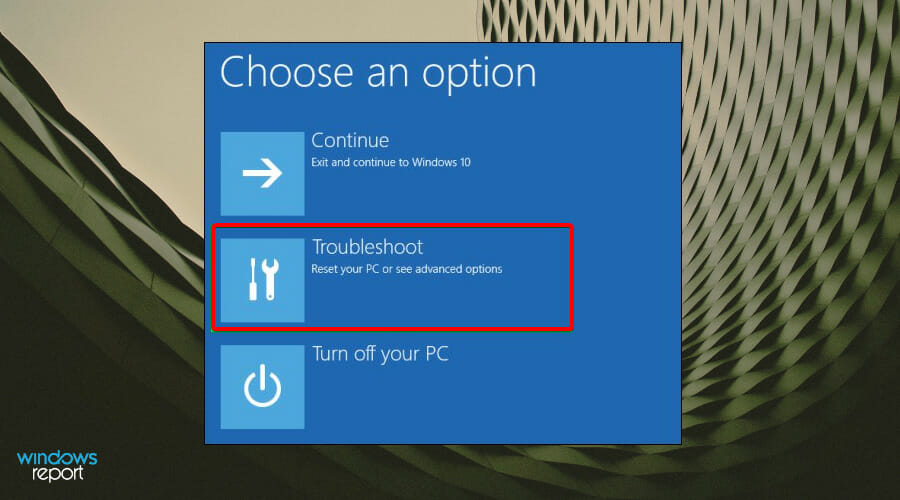
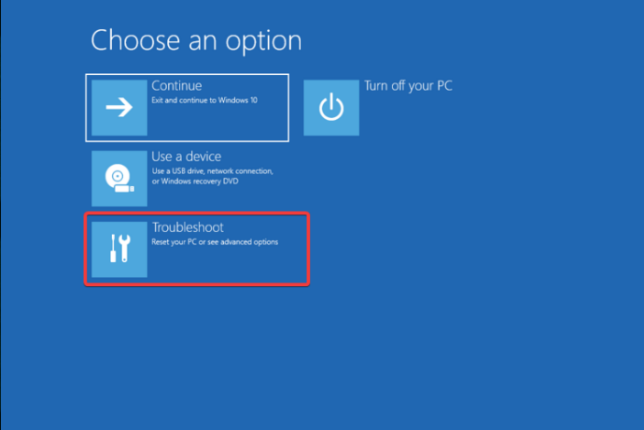
- Select the Windows key and press the Power button, then click on Restart to start the troubleshooting via the Advanced Startup option.
- A new window will appear with a set of options. Select Troubleshoot.
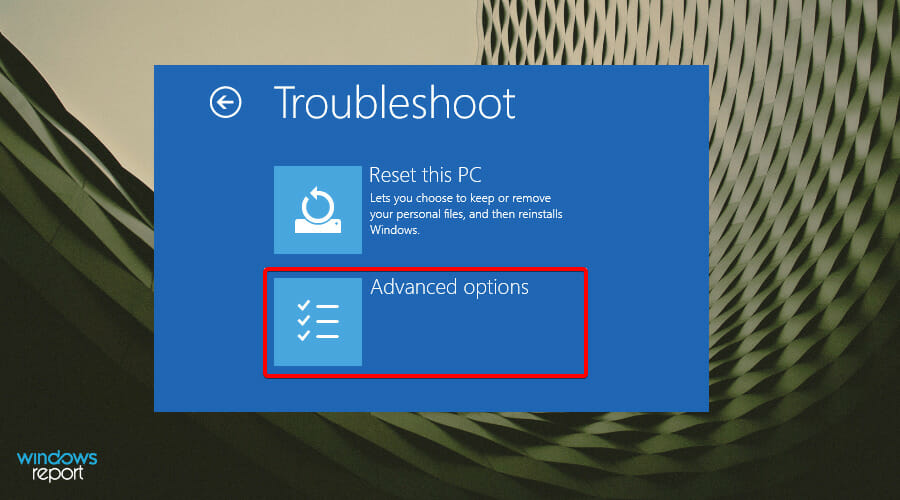
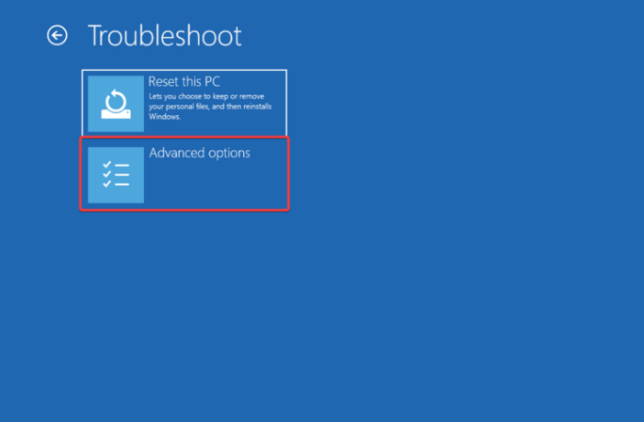
- Select Advanced options.
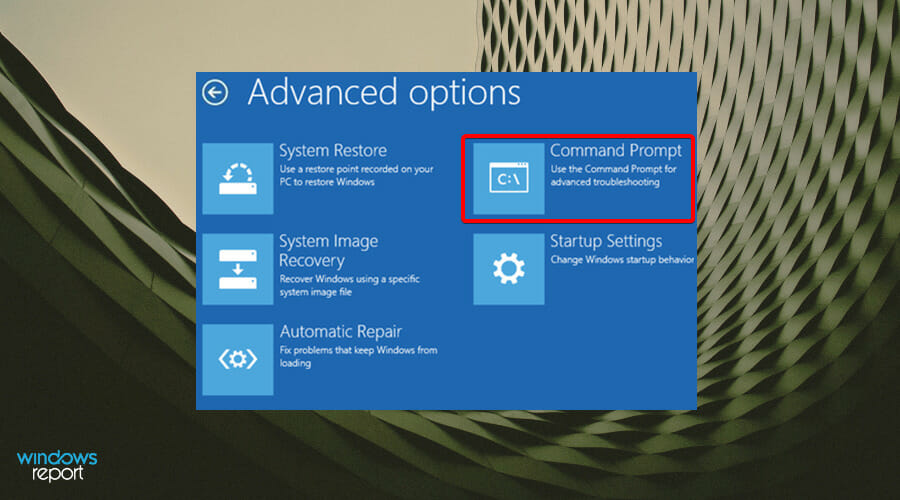
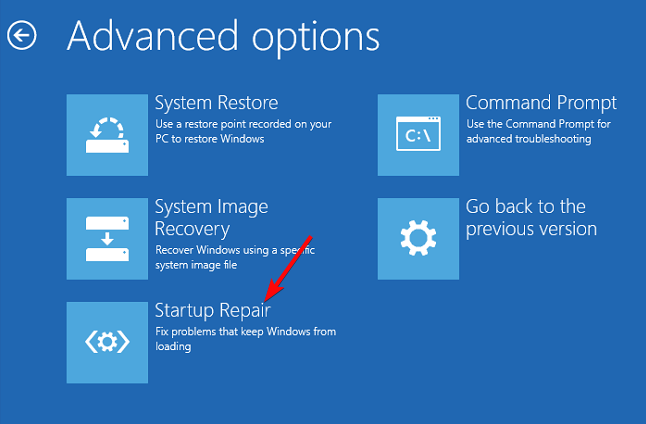
- Next, select Command Prompt.
- In the command window, type the following command prompt and press Enter when done:
bootrec /rebuildbcd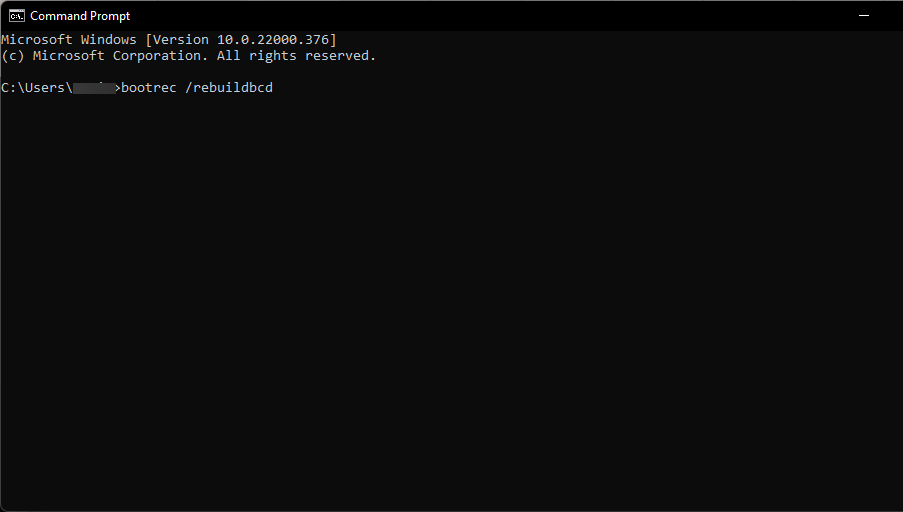


- After typing the command prompt, one of two screens will appear.
- If this screen appears, type the following command prompts pressing Enter after each one:
attrib c:\boot\bcd -s -h -rren c:\boot\bcd bcd.oldbootrec /rebuildbcd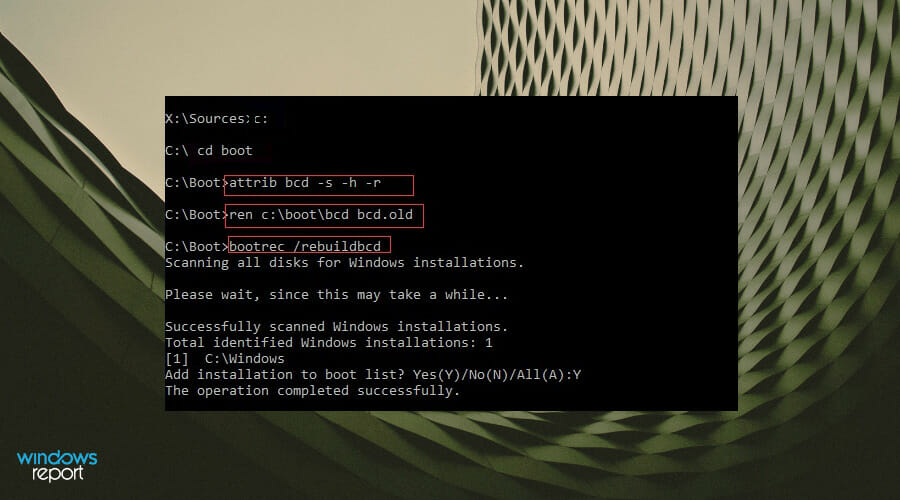

- If this screen appears, you will have to restart your PC.

2. Run the necessary troubleshooters
2.1 Run the Hardware and Devices troubleshooter
- Hit the Windows key, type cmd, and select Run as administrator.

- Type the following command and hit Enter:
msdt.exe -id DeviceDiagnostic
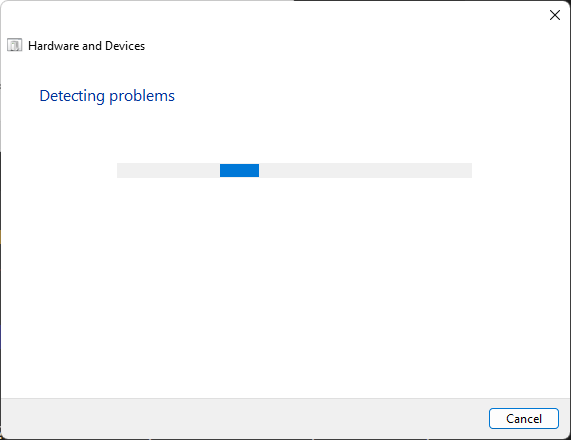
- In the Hardware and Devices dialog that appears, click Next.
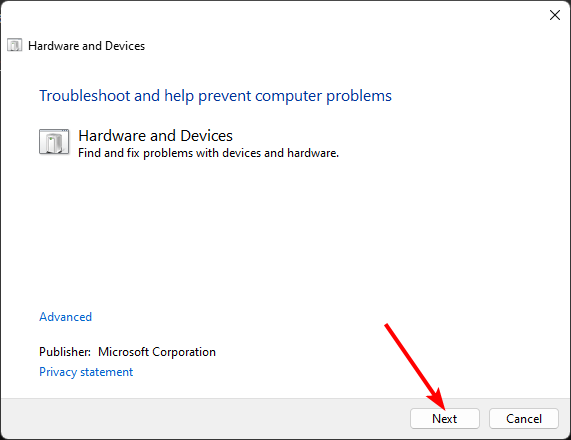
- The tool will start scanning for any problems with your hardware and recommend a fix. After it is done, try again with Windows update and check if the error persists.
If you’ve recently changed your hardware, your issue may be more related to the Windows failed start after hardware software change error.
2.2 Run the Power troubleshooter
- Press the Windows + I on your keyboard to open Settings, select the System tile, and scroll down to choose Troubleshoot on the right pane.
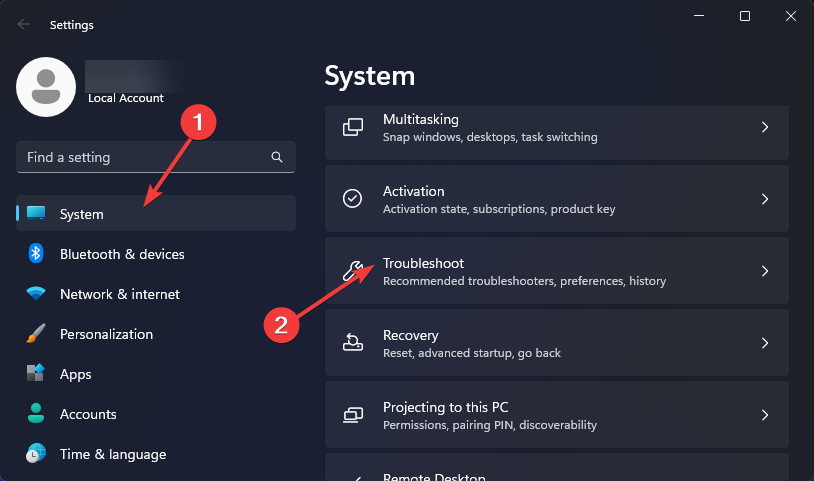
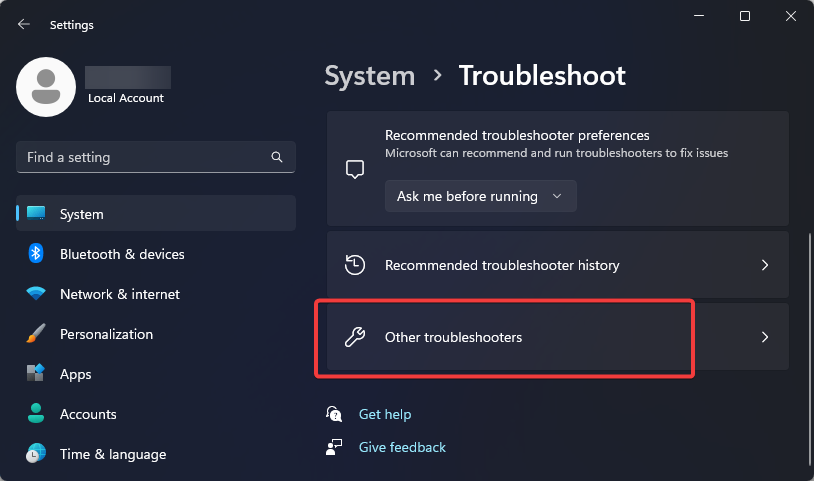
- Next, select Other troubleshooters.

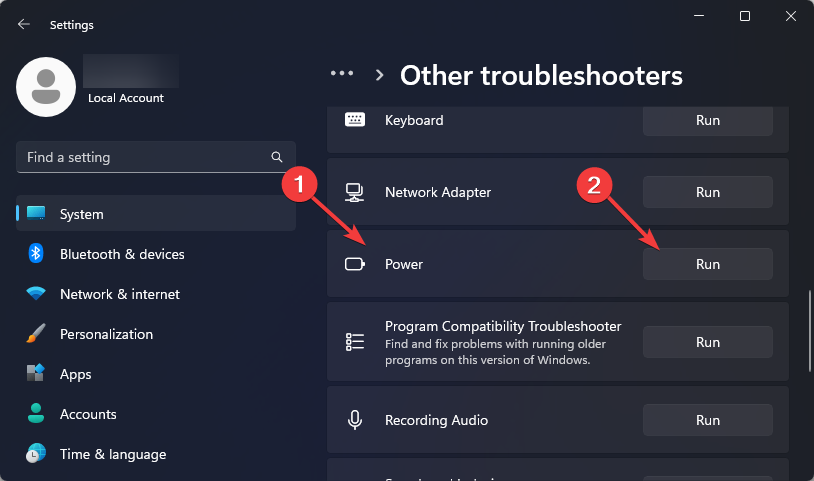
- Scroll down to locate Power and click on the Run button to start the troubleshooting.

- Wait for Windows to detect the issue, then follow the on-screen instructions to apply the fixes.
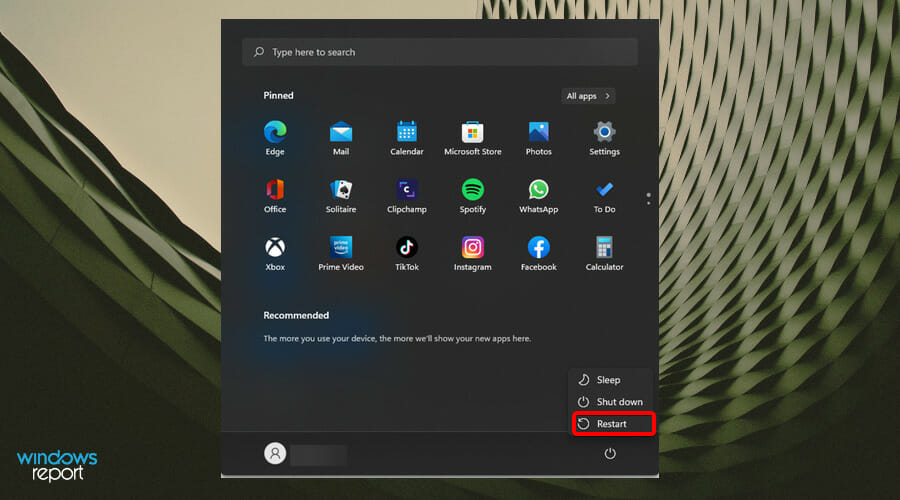
- Restart your PC.

Your power settings may have been misconfigured causing random shutdowns. For the best power efficiency settings, check out our article for improved overall performance.
2.3 Run the RAM health test
- Hit the Windows key, type cmd in the search bar, and click Run as administrator.
- Type in the following command and hit Enter:
MdSched
- The Windows Memory Diagnostic prompt will appear, then select between Restart now and check for problems or Check for problems the next time I start my computer to run the test.
If the built-in Windows test is insufficient, you can opt for an advanced RAM stress test software to do a thorough test and recommend solutions.
3. Perform DISM and SFC scans
- Hit the Start Menu icon, type cmd in the search bar, and click Run as administrator.
- Type the following commands and press Enter after each one:
DISM.exe /Online /Cleanup-Image /Restorehealthsfc /scannow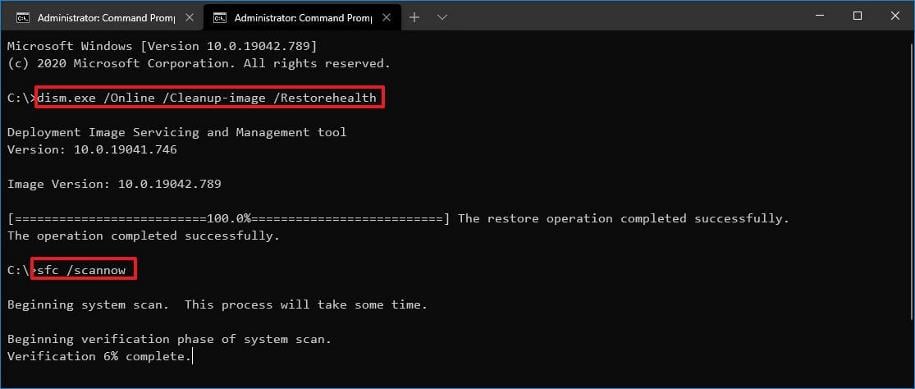
4. Run CHKDSK
- Press the Windows key, type cmd on the search bar, and click Run as administrator.

- Type in the following command, then press Enter:
chkdsk:/f
For more advanced results, use hard drive health test tools. They can do a more in-depth diagnosis and find errors that may be too complex for Windows built-in utility to find.
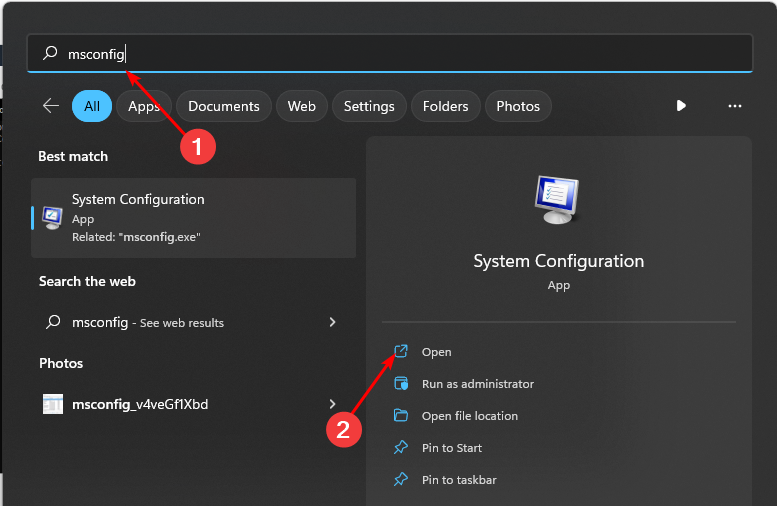
5. Perform a clean boot
- Hit the Windows key, type msconfig, and open System Configuration.
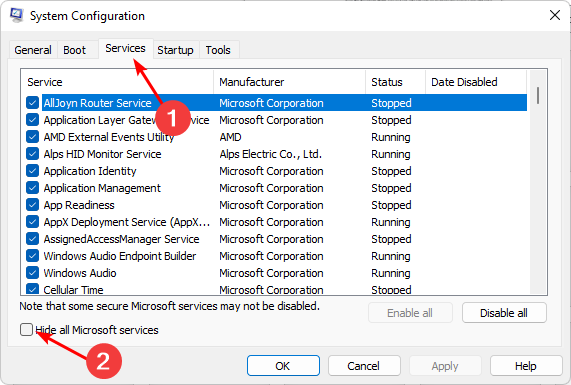
- Switch to the Services tab and select Hide all Microsoft services.
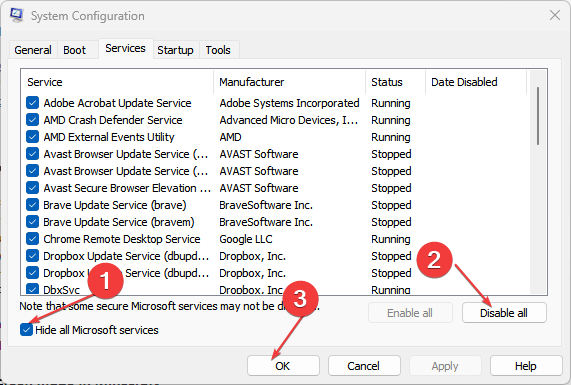
- Click on the Disable all button, then hit the Apply button to save the changes.
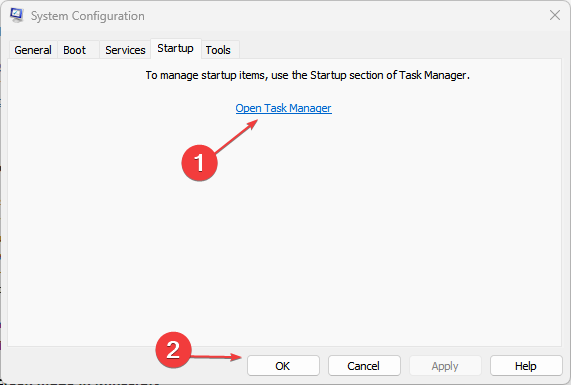
- Go back and click on the Startup tab, select Open Task Manager then click OK.
- In the Startup tab of the Task Manager, Disable all the Enabled startup items.
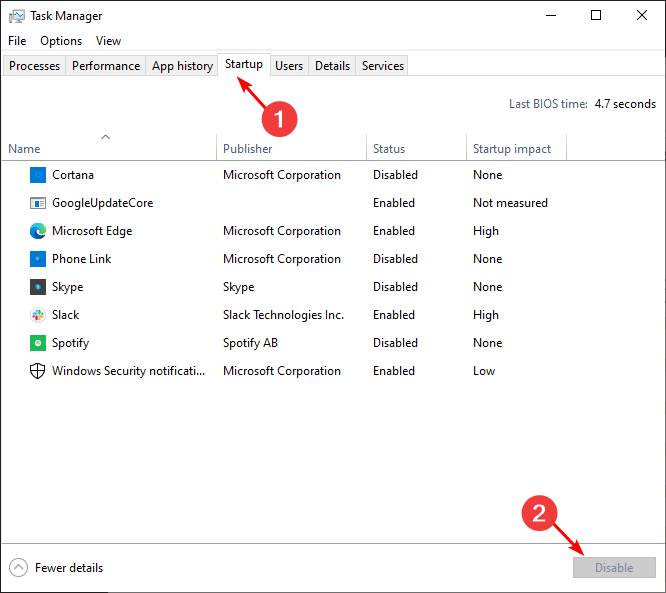
- Close Task Manager and restart your PC.
6. Run Startup repair
- Start your PC in Safe Mode, then navigate to the Advanced option from the blue screen and press the Enter key.
- Press the Troubleshoot button.
- Select Advanced options.
- Choose the Startup Repair option.
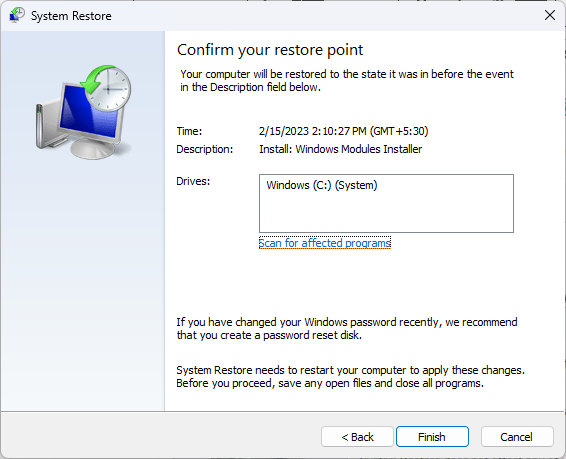
7. Perform a System Restore
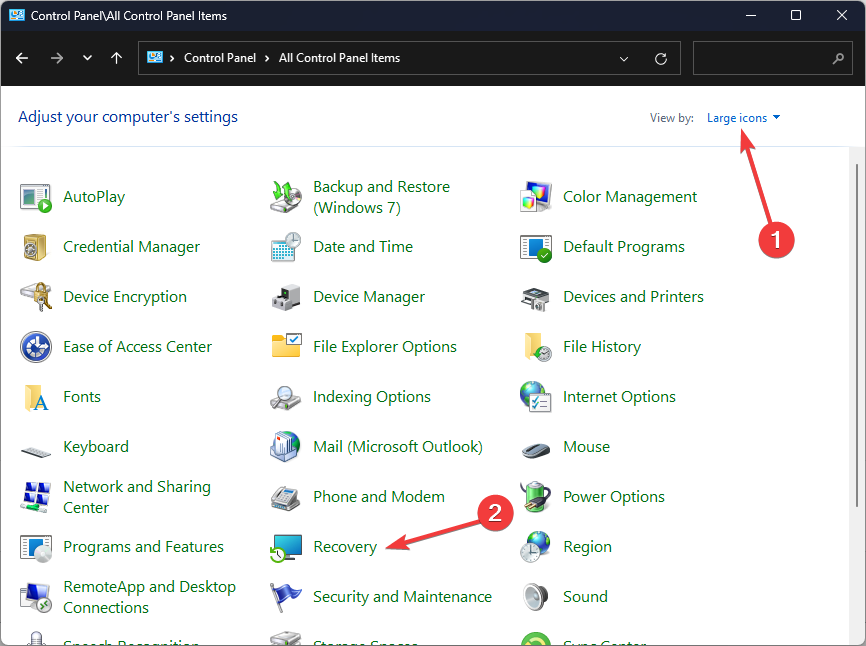
- Press the Windows key, type Control Panel, and click Open.

- Select Large icons as View by and click Recovery.
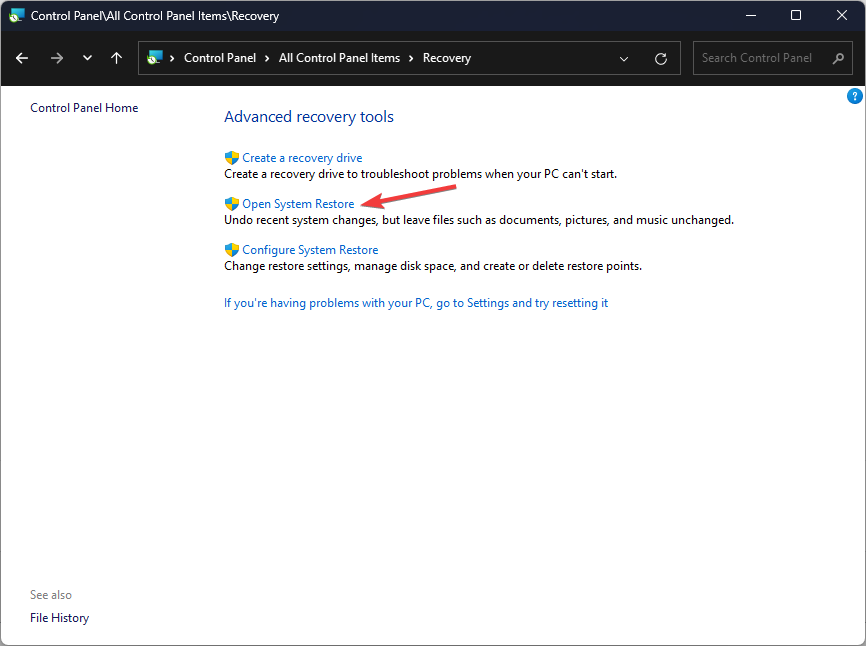
- Click Open System Restore.
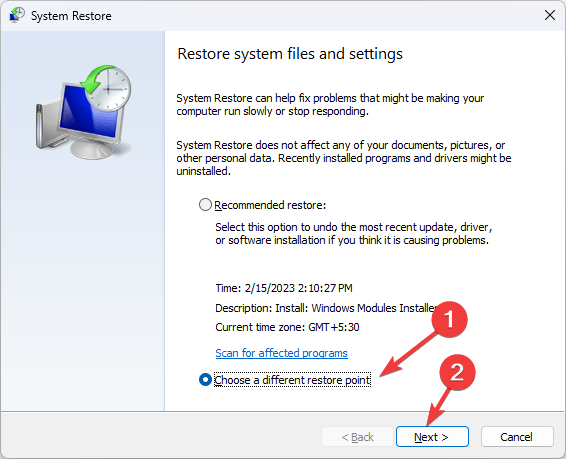
- Select Choose a different restore point and click Next.
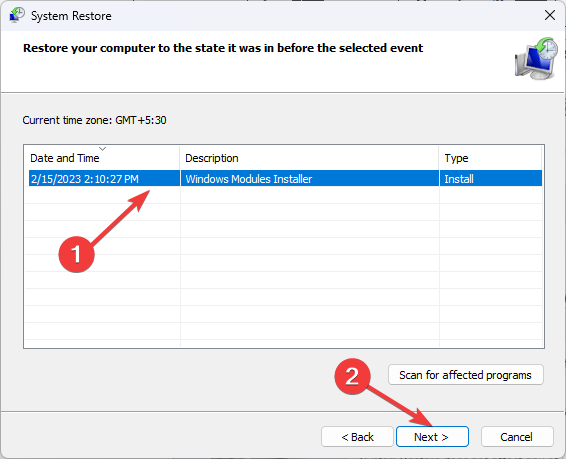
- Now select the restore point and click Next.
- Click Finish to restore the previous settings, and Windows will restart.
Unfortunately, these solutions are a trial and error and you might have to go through all of them to find a fix for the it looks like Windows didn’t load correctly error. Still, your issue may remain unresolved. For a more thorough and sure way of addressing this BSoD error, try a tailored BSOD fixer.
Though unorthodox, we also recommend triggering a BSoD once in a while to detect these issues in their early stages. As always, keep your PC in great shape to minimize the occurrence of such errors.
That’s a wrap from us but do let us know if you managed to address this issue. And if you have any other solution that is missing from our list, feel free to share it with us in the comment section..
Read our disclosure page to find out how can you help Windows Report sustain the editorial team. Read more


Improve this guide

User forum
0 messages