Easy Fix: Windows 10/11 cannot create the file error
5 min. read
Updated on
Read our disclosure page to find out how can you help Windows Report sustain the editorial team. Read more

Every day we access and create all sorts of different files, but sometimes certain issues with files can appear. Users reported that they are getting Cannot create the file error message on Windows 10, and today we’re going to show you how to fix it.
How to fix ‘Cannot create the file’ errors
Fix – “Cannot create the file” right-click the folder
Solution 1 – Change your registry
According to users, this error occurs when you don’t have the necessary permissions over the Temporary Internet Files folder stored on a server. Due to this problem, you won’t be able to open or save an email attachment, but you should be able to fix this problem by making certain changes to your registry.
Modifying the registry can be potentially dangerous if you don’t do it properly, therefore we recommend that you use extra caution and create a backup of your registry before making any changes. To edit your registry, do the following:
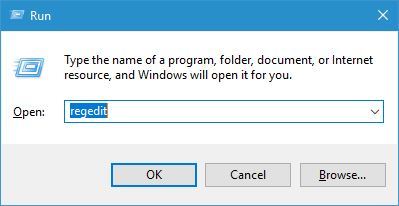
- Press Windows Key + R and enter regedit. Click OK or press Enter.
- When Registry Editor opens, in the left pane navigate to HKEY_CURRENT_USER\Software\Microsoft\Office\14.0OutlookSecurity.
- In the right pane double click OutlookSecureTempFolder.
- In the Value Data field enter C:\temp0 and then click OK.
- After making these changes, close Registry Editor and restart your PC.
After your PC restarts, check if the problem is resolved. This solution should work for all modern versions of Outlook, although the path in Step 2 might change a bit depending on the version that you’re using.
An alternative way to fix this problem is to create a new registry key for OutlookSecureTempFolder. You can do that by following these steps:
- Open Registry Editor and navigate to HKEY_CURRENT_USER\Software\Microsoft\Office\14.0\OutlookSecurity key in the left pane.
- Locate OutlookSecureTempFolder in the right pane and rename it to OutlookSecureTempFolder__Old.
- In the right pane, right click the empty space and choose New > String Value. Enter OutlookSecureTempFolder as the name of the new string.
- Double click OutlookSecureTempFolder and change the Value Data to %USERPROFILE%\Documents\Outlook\TempFiles. Click OK.
- Now go to %USERPROFILE%\Documents in and create the OutlookTempFiles folder there.
- Restart your PC, start Outlook again and check if the problem is resolved.
Solution 2 – Empty Outlook Secure Temp folder
This problem can affect almost any version of Outlook, and in order to fix this problem, you need to remove all files from Outlook Secure Temp folder. You can do that by following these steps:
- Open Registry Editor and navigate to HKEY_CURRENT_USER\Software\Microsoft\Office\15.0\OutlookSecurity key in the left pane. This path might be a bit different depending on the version of Outlook that you’re using.
- Open OutlookSecureTempFolder in the right pane to see its properties.
- Copy the file location from Value Data field and paste it into File Explorer’s address bar.
- After you open that folder, delete all files from it.
If checking the registry and removing these files is too complicated for you, you can also use tools such as OutlookTempCleaner and OutlookTools to quickly and easily empty Outlook Secure Temp folder.
Fix – “Cannot create the file” when that file already exists
Solution 1 – Check your syntax
Users reported this error while trying to create a link using the mklink command. This command can be quite useful, but in order to use it, you need to be sure that your syntax is correct. If your syntax is wrong, you’ll most likely get Cannot create the file error message. If you’re using mklink command, be sure to use the following syntax: mklink [options] [Link] [Target].
Solution 2 – Move the files from link to the target folder
As we already explained in our previous solution, mklink syntax should look like this: mklink [options] [Link] [Target]. To fix this problem you need to move the files from the Link directory to the Target directory manually.
After that, delete the Link folder and try to run the command again. Bear in mind that deleting certain directories can lead to problems, therefore it might be better that you just rename them.
Solution 3 – Delete Tvsuinstaller directory
Users reported this error while trying to install system updates, and apparently you can fix this problem on Lenovo laptops by removing one directory. Simply go to C:\ProgramData\Lenovo and delete the Tvsuinstaller folder. After deleting it, try to perform system update again.
Cannot create the file error usually occurs when you try to view Outlook attachments, or if you’re making links on your PC, but as you can see, this problem can be easily solved by using one of our solutions.
READ ALSO:
- Focused Inbox coming to Outlook, along with more features
- Fix: Message stuck in Outlook 2007 Outbox
- How to fix the Outlook data file cannot be accessed on Windows 10
- Fix: “Sorry, something went wrong” error in Outlook 2013
- Fix: change offline Outlook Data File (.ost) location in Microsoft Outlook on Windows 10


User forum
0 messages