Windows 10/11 Homegroup Encountered an Error [FULL FIX]

If you encounter a Windows HomeGroup error, it can prevent you from sharing files and printers on your home network. HomeGroups let you securely share content between computers, with permissions controlling who can modify files.
This feature works on Windows 7, 8.1, RT 8.1, and Windows 10, though some editions can only join a HomeGroup, not create one. Check your network, ensure unique PC names, sync the time and date, and confirm your router supports IPv6 to resolve common issues.
Let’s look at the solutions.
Steps to fix Windows 10 Homegroup errors
Table of contents
- 1. Run Homegroup troubleshooter
- 2. Make Internet Explorer your default browser
- 3. Delete and create a new homegroup
- 4. Enable Homegroup services
- 5. Check if the homegroup settings are appropriate
- 6. Run the Network Adapter troubleshooter
- 7. Change the name case
- 8. Check Use User Accounts and passwords
- 9. Rollback to the previous version
- 10. Turn on Windows services
- 11. Check Network Discovery
- 12. Unblock your computer’s visibility
- 13. Ensure NetBIOS over TCP/IP is enabled on both computers
- 14. Modify IPv6 registry key to enable IPv6
1. Run Homegroup troubleshooter
- Click Start and select Control Panel.

- Type troubleshooting in the search bar of the Control Panel.
- Click View All on the left panel.

- Click HomeGroup.

- Select Advanced on the Homegroup troubleshooter dialog box.
- Click Run as administrator (enter the password if needed).
- Click Next and follow onscreen prompts to complete the troubleshooter.
— RELATED: FIX: Can’t connect to Homegroup via WiFi on Windows 10, 8.1
2. Make Internet Explorer your default browser
- Click Start and select Control Panel.
- Select Programs.

- Click Default Programs.
- Click Set your default programs – the settings box will open up.

- Select Internet Explorer 11.
- Try and print the homegroup password.

3. Delete and create a new homegroup
If every user in the homegroup leaves, then the homegroup will no longer exist. To remove a computer from a homegroup, follow the steps below:
- Type Homegroup in the search bar and open it.
- Click Leave the homegroup then click.
- Repeat the steps with the other computers.
Once the Homegroup is deleted, start with a new Homegroup again using the steps below:
- Open HomeGroup by typing homegroup in the search box on the taskbar, and then selecting HomeGroup.
- Select Create a homegroup
- Click Next.
- Select the libraries and devices you want to share with the homegroup, and then select Next.
- A password will appear – print it or write it down. You’ll need this password to add other PCs to your homegroup.
- Select Finish
Note: If a homegroup already exists on your network, you’ll be asked to join it instead of creating a new one.
— RELATED: How to: Remove Homegroup on Windows 10
4. Enable Homegroup services
The Windows 10 homegroup error may occur if the homegroup services are not running, so ensure the services related to it are started and running by doing the following:
- Right-click Start and select Run.

- Type services.msc and press enter.
- Find these services: Peer Name Resolution Protocol, Peer Networking Grouping, and Peer Networking Identity Manager.

- Right-click on each of these three services, and select Properties.
- Ensure Startup type is set to Automatic.

- Ensure Service Status is started.
- Click Apply and OK
- Restart the computer and check if you can view the Homegroup Password

5. Check if the homegroup settings are appropriate
- Open Start and select Control Panel.
- Select Network and Internet.

- Click Homegroup.
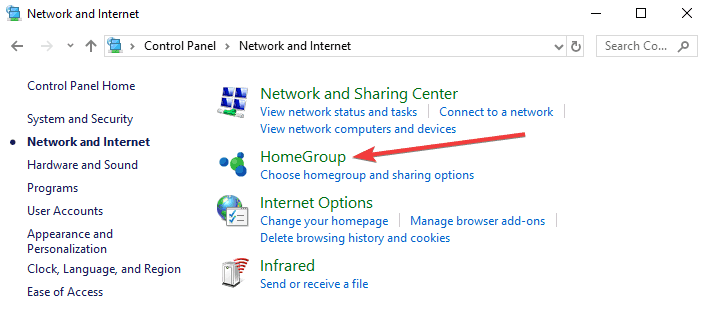
- Select Advanced Sharing settings and check if they’re correct.

In case the settings are correct, try your homegroup again. If not, set them to the appropriate ones and try again. If you still get the Windows 10 homegroup error, try the next solution.
— RELATED: FIX: Settings app won’t launch in Windows 10
6. Run the Network Adapter troubleshooter
- Type troubleshooting in the search bar.
- Select Troubleshooting.
- Select View all on the top left corner.

- Click on Network Adapter.
- Follow the on-screen instructions to run the troubleshooter.
- If the issue persists then update the Network Adapter driver manually from the Device Manager.
7. Change the name case
Sometimes the Windows 10 homegroup error may be caused simply because of the letter casing on the computer name – this can manifest as an error 1231 in the network view.
If it is in lower case, change to upper case or all caps, and see if it works. Some users have noted that Windows 10 is case sensitive to machine names, so if you have missing shares or completely disappeared machines on your LAN, ensure the machine names are not mixed case, in which case you should rename them to all caps and reboot your computer.
Here’s what to do:
- Click File Explorer.
- Right-click on This PC.

- Click Properties.
- In Computer Name, Domain and Workgroup area, click “Change Settings“.

- In “To rename this computer…or workgroup, click “Change“.

- Change Computer name on the next screen.
- Click OK.
- Reboot your computer.
8. Check Use User Accounts and passwords
On every computer in the workgroup, do the following:
- Click Start and select Settings.
- Select Network and Internet.

- Click Ethernet.

- Click Change advanced sharing options.
- Check the Use User accounts and passwords box to connect to other computers.

— RELATED: The user account is currently disabled and cannot be used [Fix]
9. Rollback to the previous version
If you still cannot fix Windows 10 homegroup error, you can either wait for the official Microsoft fix it, or perform a rollback to the previous Windows version, using the steps below:
- Click Start and select Settings.
- Select Updates & security.

- Choose Recovery.

- Go to Reset this PC and click Get started.

- Try and connect to your Homegroup again.
10. Turn on Windows services
For the homegroup networking feature to work, certain Windows services need to be active, enabled and running. If you used a program to disable services or you disabled them manually, it may be causing Windows 10 homegroup error. You need to turn on DNS Client, Function Discovery Provider Host, Function Discovery Resource Publication, Homegroup Provider, Homegroup Listener, SSDP Discovery, UPnP Device Host and Peer Networking Grouping.
You can turn on these services by doing the following:
- Right-click Start and select Run.
- Type services.msc and press enter.
- Click on Services to enable and turn on the ones listed here.
11. Check Network Discovery
- Click Start and select Control Panel.
- Select Network and Internet.
- Click Network and Sharing.

- Select Change advanced sharing settings.
- Choose turn on network discovery or turn off network discovery.
- Click Save changes.
12. Unblock your computer’s visibility
Sometimes, the firewall on your computer may block the access and visibility of your computer, leading to the Windows 10 homegroup error. Try using the command prompt to fix this by doing the following:
- Click Start and type CMD in the search bar.
- Right-click on Command Prompt and select Run as administrator.

- Type or copy-paste the below command into command prompt black screen and press enter: netsh advfirewall reset
- Exit the command prompt.
- Reboot your PC and see if the problem still appears.
13. Ensure NetBIOS over TCP/IP is enabled on both computers
- Choose Start and select Control Panel.
- Select Network and Internet.
- Click Network and Sharing.
- Click View Network Connections.
- Right-Click on the connection and click Properties.
- Find Internet Protocol (TCP/IP) Version 4 in the list.
- Click Properties, and then click Advanced.
- On the Advanced TCP/IP settings windows, go to “WINS” tab.
- Under NetBIOS setting, click Enable NetBIOS over TCP/IP, and then click OK.
14. Modify IPv6 registry key to enable IPv6
- Right-click Start and select Run.
- Type regedit and press enter or click OK.

- Locate and then click the following registry subkey:
HKEY_LOCAL_MACHINESYSTEM
CurrentControlSetServicesTcpip6Parameters.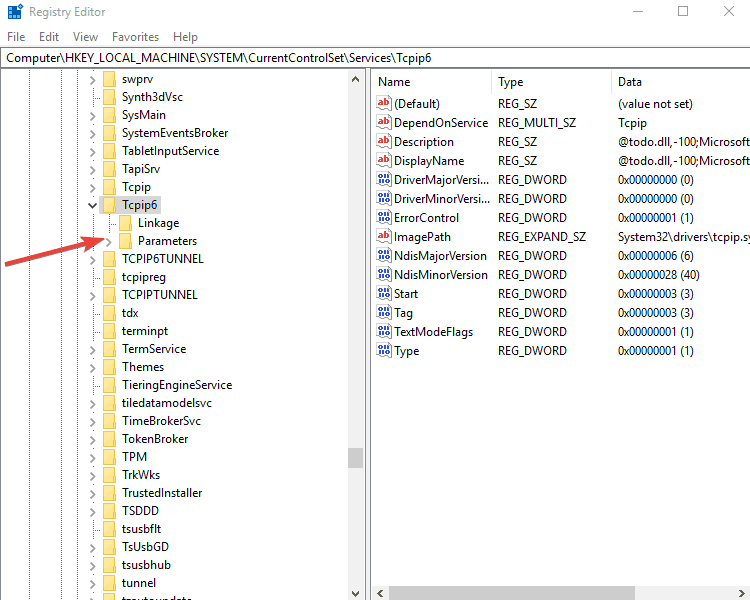
- Check whether the “DisabledComponents” registry key exists.
- Double click the “DisabledComponents” registry key and modify the value to 0. If the key doesn’t exist, please create the key above and assign the value 0, i.e. exit Registry Editor, and then restart the computer.
There you have an amazing list of 14 solutions that you can use to fix Homegroup errors on your Windows computers.
Let us know if any of the above solutions helped fix Windows 10 homegroup error by leaving a comment in the section below.
Read our disclosure page to find out how can you help Windows Report sustain the editorial team. Read more


Improve this guide


User forum
0 messages