How to Easily Change Default Download Location on Windows 10
Set a new download location if you don't have enough disk space
3 min. read
Updated on
Read our disclosure page to find out how can you help Windows Report sustain the editorial team. Read more
Key notes
- The default download location in Windows 10 is stored in the C drive.
- However, your system files and other programs are also installed in that drive, so you don't have a lot of space left for downloads.
- Changing the default location of the Windows 10 download folder is straightforward, and you have two different options for doing this.
You must have found this guide because you need to know how to change the download location on Windows 10.
In the tutorial below, you’ll learn how easy it is to change the default download location on your Windows 10 PC in only five minutes of your time.
How to change the default download location on Windows 10?
You may use a few methods to change the default download location on Windows 10. These two are the top recommendations, however:
- Using the Download settings of File Explorer
- Using the Windows Settings app
Also, note that individual browsers may have their default download location settings. And these will override the operating systems’ defaults.
However, regardless of what you opt for, you should get the same results.
What is the default download location for files on Windows?
The default download location for files on Windows is the Downloads folder, typically in the user’s profile folder.
The full path to the folder is usually the path mentioned below, where [username] is the user account’s name.
C:\Users[username]\Downloads
However, the user or software installations can change the location of the Downloads folder.
So, without wasting more time, let’s begin the tutorial and create a new directory for our downloaded items.
How can I change where downloads go on Windows 10?
1. Change the download location via Downloads Properties
- Press Windows + E to open File Explorer.
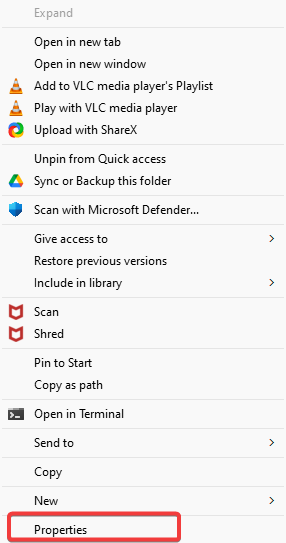
- Right-click on Downloads.
- Click on Properties.
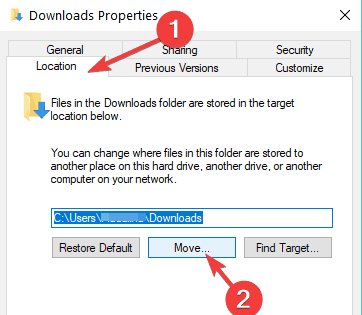
- Press on the Location tab presented on the upper side of that window. Now you should be able to edit the download path. So, click Move to select a new location.
- Write the drive where you want your items downloaded and in which folder. Note: If the folder doesn’t exist, after you click on Apply, you will be asked if you want to create that download folder and click OK.
- Another Move folder window will appear where you will have to click Yes.
- Now, you must click the OK button in the Download Properties window.
- Go to the location where you selected to download files and check if Windows has made a Downloads folder there.
Note: Restart your PC if it hasn’t created the Downloads folder, and check again after powering up.
2. Change the download location via Settings
1. Press the Windows key on your keyboard to open the Windows search box.
2. Type settings and click on the result.
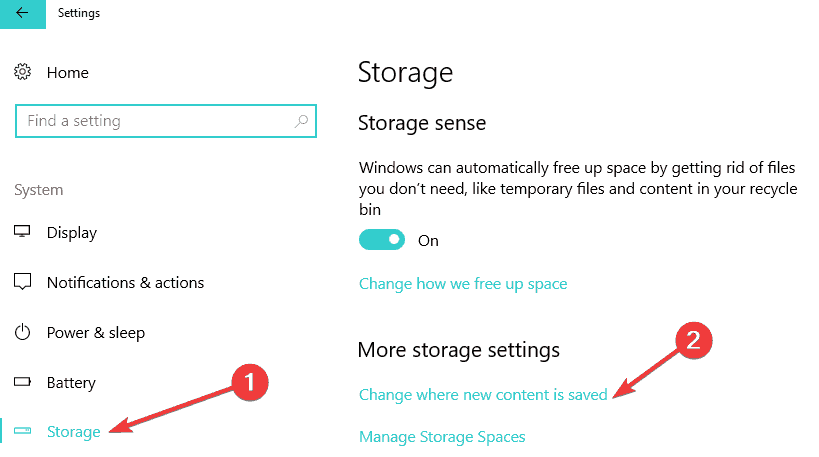
2. In the Settings app, click on System.
3. Select Storage.
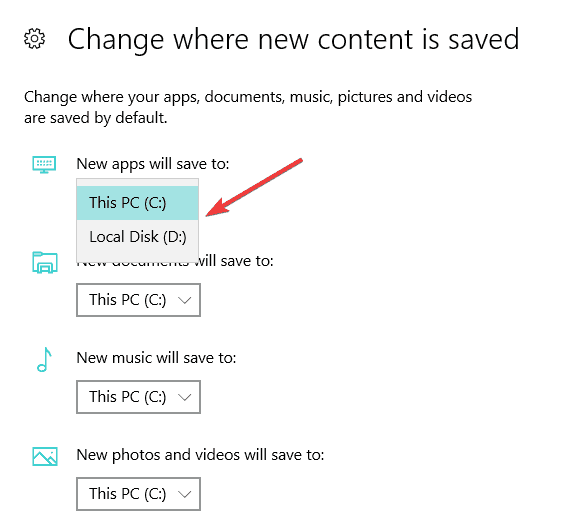
4. Now, click on the option Change where new content is saved.
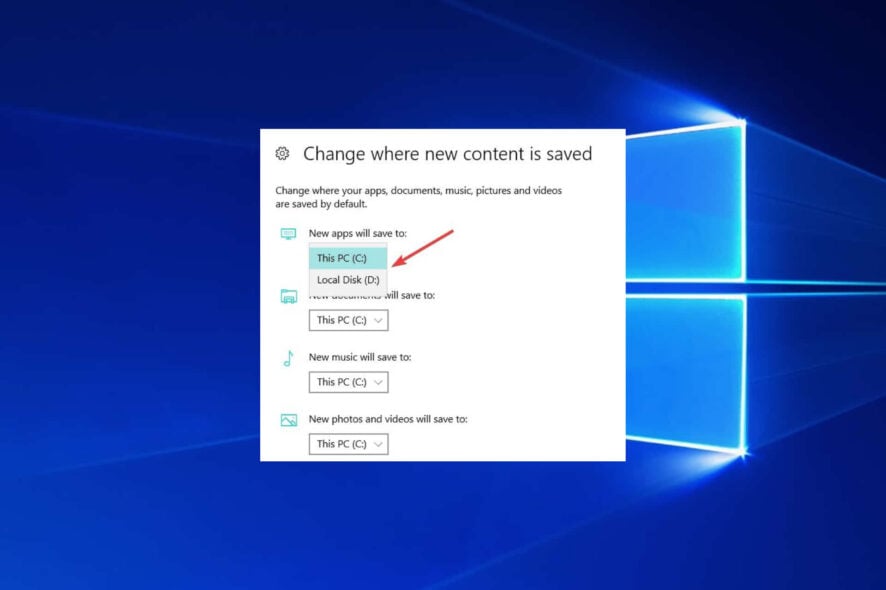
5. Set your preferred download location for each item category.
If Windows 10 is your OS of choice, you can also change the download folder save location from the Settings page, from the dedicated Storage section.
Also, you can change the default download location folder where downloads go when the message says you don’t have enough free disk space on the partition.
Now you can download your files or programs in Windows 10 without worrying about the download location. Share your thoughts on this article in the comments below.
Moreover, the location where a Windows 10 update is saved on your computer is tricky, but for that, you can check this guide on where’s the default download folder for the Windows 10 versions.
Finally, feel free to list your suggestions on what we can do to help you further with your Windows 7 or Windows 10 computer.



User forum
3 messages