Change the Power Button Action on Windows 11 [5 Tips]
Reconfigure for personalized behaviour and optimal performance
Key notes
- The power button action can be changed via different methods, including the Settings, Control Panel, and Windows PowerShell.
- With simpler methods, the changes apply to the current plan, while with Gpedit.msc or Registry, it’s across all power plans.
- Keep reading to find out the steps for each!

The power button can do a lot more than simply shutting down the PC, though that’s the default action for desktop users. And if you want to change the power button action in Windows 11, it’s easier than you thought!
Remember, the physical power button is different from the one in the Start menu, and the changes below won’t affect the actions of the latter. Besides, you will find slightly different power options depending on whether it’s a desktop or laptop.
Why change the power button action in Windows 11?
If you put the computer to sleep far too often than shut it down, changing how the hardware power button, i.e., the physical one on the PC, behaves will do. The same idea applies to Hibernate mode or simply turning off the display.
Changing the power button setting in Windows 11 will simplify things and make it easier to use your PC in a personalized way as well as prevent issues like a power button lockout.
How do I change what the power button does in Windows 11?
1. Using Control Panel
- Press Windows + S to open the Search menu, type Control Panel in the text field, and click the relevant search result.
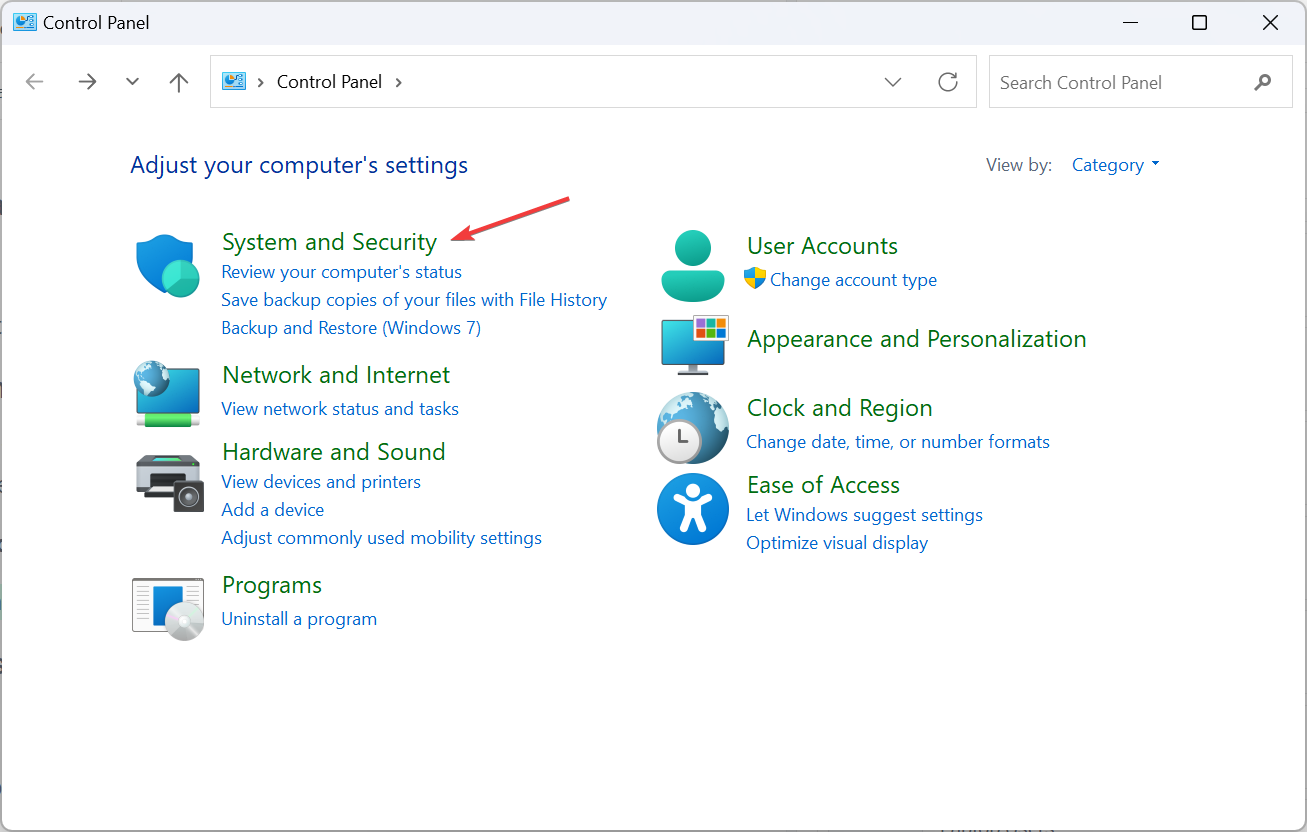
- Click on System and Security.
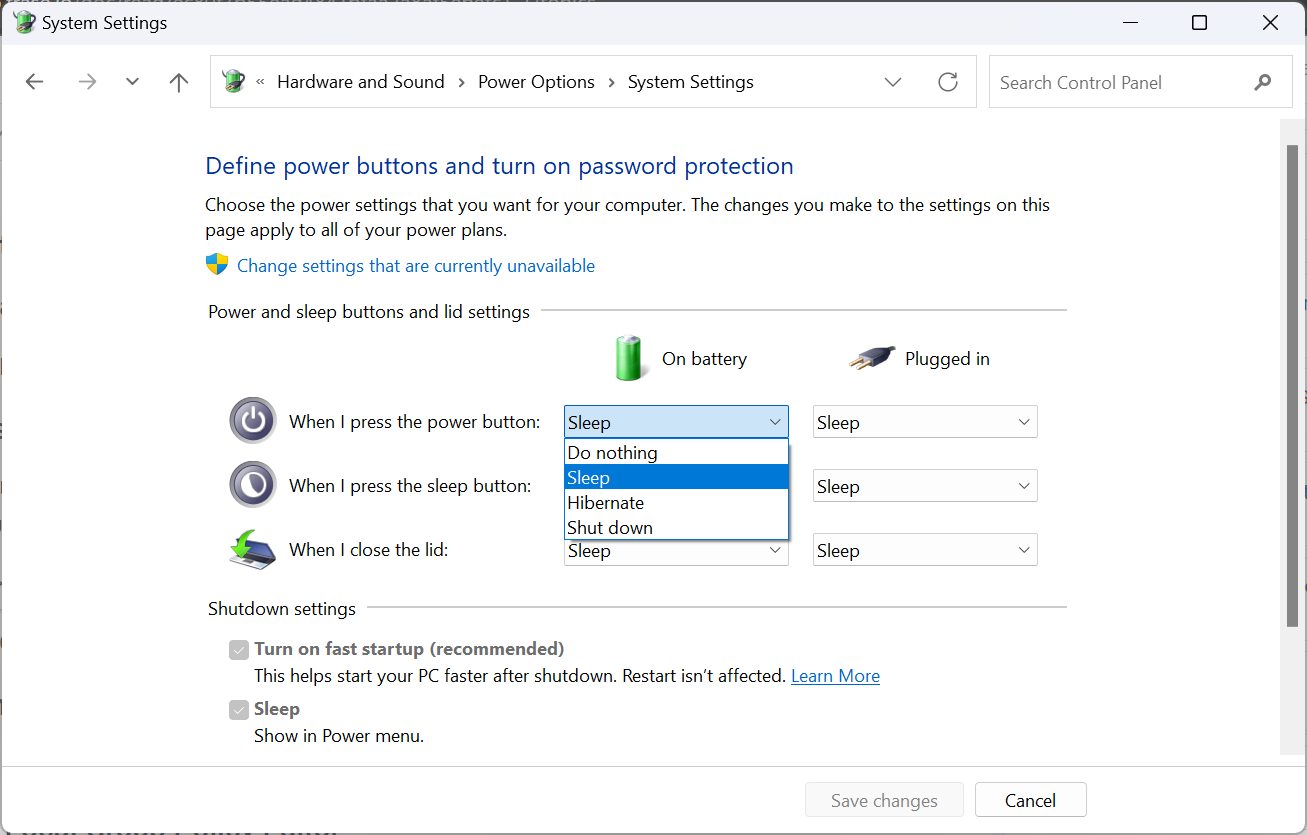
- Click on Change what the power buttons do under Power options in Windows 11.
- Now, select from the dropdown menu how you want the computer to behave when the power button is pressed for both On battery and Plugged in. The options usually available are:
- Do nothing: No action is performed
- Sleep: The PC is put into sleep mode (default settings on laptops)
- Hibernate: The PC is put into Hibernate mode
- Shut down: The PC is shutdown (default setting on desktops)
- Turn off the display: Powers off all connected displays
- Once done, click on Save changes at the bottom.
The settings here might be different for users. For instance, there will be an additional When I close the lid setting for laptop users. Similarly, some may find the Turn off the display option missing if their PC doesn’t support the S3 standard and has Modern Standby, the latter being the more recent of the two.
Also, the On battery setting will only be available for desktop users if they have a UPS connected. And remember, any changes you make through the Control Panel only apply to the current power plan.
2. Via Settings
 Tip
Tip
- Press Windows + I to open the Settings app, and click on Power & battery on the right in the System tab.
- Expand the Power button controls entry.
- Now, select the desired function from the dropdown menu next to Pressing the power button will make my PC under both Plugged in and On battery.
3. Through Windows PowerShell
- Press Windows + R to open Run, type powershell, and hit Ctrl + Shift + Enter.
- Click Yes in the UAC prompt.
- Now, paste one of the following commands and hit Enter, depending on the power button action you want to enforce in Windows 11:
- On battery:
Do nothing:powercfg -setdcvalueindex SCHEME_CURRENT 4f971e89-eebd-4455-a8de-9e59040e7347 7648efa3-dd9c-4e3e-b566-50f929386280 0Sleep:powercfg -setdcvalueindex SCHEME_CURRENT 4f971e89-eebd-4455-a8de-9e59040e7347 7648efa3-dd9c-4e3e-b566-50f929386280 1Hibernate:powercfg -setdcvalueindex SCHEME_CURRENT 4f971e89-eebd-4455-a8de-9e59040e7347 7648efa3-dd9c-4e3e-b566-50f929386280 2Shut down:powercfg -setdcvalueindex SCHEME_CURRENT 4f971e89-eebd-4455-a8de-9e59040e7347 7648efa3-dd9c-4e3e-b566-50f929386280 3 - Plugged in:
Do nothing:powercfg -setacvalueindex SCHEME_CURRENT 4f971e89-eebd-4455-a8de-9e59040e7347 7648efa3-dd9c-4e3e-b566-50f929386280 0Sleep:powercfg -setacvalueindex SCHEME_CURRENT 4f971e89-eebd-4455-a8de-9e59040e7347 7648efa3-dd9c-4e3e-b566-50f929386280 1Hibernate:powercfg -setacvalueindex SCHEME_CURRENT 4f971e89-eebd-4455-a8de-9e59040e7347 7648efa3-dd9c-4e3e-b566-50f929386280 2Shut down:powercfg -setacvalueindex SCHEME_CURRENT 4f971e89-eebd-4455-a8de-9e59040e7347 7648efa3-dd9c-4e3e-b566-50f929386280 3
- On battery:
The changes enforced via PowerShell will only apply to the current power plan. You can select another power plan and then execute the commands to modify it.
4. In Local Group Policy Editor
- Press Windows + S to open Search, type Local Group Policy Editor in the search bar, and click the relevant result.
- Expand Administrative Templates under Computer Configuration, and then select System.
- Now, choose Power Management from the left, then select Button Settings under it, and double-click on either Select the Power button action (plugged in) or Select the Power button action (on battery) from the right to configure the two settings.
- Choose Enabled from the top left, select the desired configuration from the Power button action dropdown menu, and click Apply and OK to save the changes.
You will also find policies for other settings here, including lid shutdown if it’s a laptop. In case Local Group Policy Editor is not available on your PC, check the OS edition, and if it’s Windows 11 Home, manually install gpedit.msc. Remember, these changes will reflect across all power plans.
5. With the Registry Editor
- Press Windows + R to open Run, type regedit in the text field, and click OK.
- Click Yes in the UAC prompt.
- Go to the following path from the navigation pane or paste it into the address bar and hit Enter:
HKEY_LOCAL_MACHINE\SOFTWARE\Policies\Microsoft\Power\PowerSettings\7648EFA3-DD9C-4E3E-B566-50F929386280 - If you can’t find the key or a DWORD below, right-click on the entry before it in the path, hover the cursor over New, and select DWORD (32-bit) Value or Key as the case may be.
- To change the power button function in Windows 11 for On battery, right-click on the DCSettingIndex DWORD, and select Modify.
- Replace the Value data with the value provided below for the desired setting:
- Sleep: 1
- Hibernate: 2
- Shut down: 3
- Do nothing: 0
- To change the power button behaviour in Windows 11 for Plugged in, right-click the ACSettingIndex DWORD, and select Modify.
- Paste the relevant value in the Value data text field to configure the power button action setting:
- Sleep: 1
- Hibernate: 2
- Shut down: 3
- Do nothing: 0
- Once done, click OK to save the changes, and then restart the computer for the new power button actions to apply.
What else can I do with the power button in Windows 11?
The scope of the power button is limited in Windows and is primarily related to shutting down the PC, putting it to sleep and hibernation mode.
You could also turn off the display, but the feature is present only in older systems that are compatible with the S3 power state. However, you can manually enable the S3 Sleep State in Windows.
In case you are wondering about the UI changes, removing the power button from the sign-in screen is easy!
Once you understand how to change the action of the soft power button in Windows 11, personalization abilities will go up a notch. For an even more seamless operation, you can create a shutdown shortcut key and quickly turn off the PC.
Lastly, users reported issues with the power modes, especially missing power plans in Windows 11. Running the built-in troubleshooter or updating the driver usually does the trick!
For any queries or to share your preferred power button action, drop a comment below.
Read our disclosure page to find out how can you help Windows Report sustain the editorial team. Read more


User forum
0 messages