Cloudflare 403 Forbidden: What Does It Mean & How to Fix It
Accessing websites with no SSL certificate may be the cause
4 min. read
Updated on
Read our disclosure page to find out how can you help Windows Report sustain the editorial team Read more
Key notes
- Cloudflare 403 Forbidden can appear when a client’s request can’t be processed or approved.
- It may be due to permission issues and corrupt browser caches and cookies.
- Managing Cloudflare firewall rules and clearing your browser data may be worthy alternatives to troubleshooting.

Error 403 Forbidden on Cloudflare is a critical error that indicates an HTTP status code showing denied permissions. It explains the impediments between internet communication and can be due to different reasons.
However, this guide will discuss ways to fix it. Also, our readers can check ways to fix Cloudflare checking your browser error in this guide.
What is Cloudflare 403 forbidden?
The main features of Cloudflare are to make everything you connect to the Internet secure, private, fast, and reliable. However, these features can be futile due to errors like 403 Forbidden that impede global network security.
Furthermore, Cloudflare 403 forbidden is an HTTP status code indicating that permissions aren’t established in the connection. It occurs when a client submits a request, and the origin cannot approve or process it.
What are the causes of the Cloudfare 403 forbidden error?
- Permission/Ownership issues – The error may occur due to permission settings, incorrect file or directory permissions, or an error in the .htaccess rules you have set. It can also be due to issues with the Cloudflare account membership.
- Cloudflare’s Web Application Firewall (WAF) rules – If the request you’re sending violates any of the Web Application Firewall (WAF) rules enabled for all Cloudflare domains, it will lead to the 403 Forbidden error.
- Subdomains with no correct SSL certificates – Building connection links via subdomains that don’t have valid SSL certificates can trigger the error because of Cyber attack threats.
- Browser issues – You can run into the error due to corrupt or old browser caches and cookies affecting the browser performance. Also, it can occur when the web hosting provider is not well configured or has been deleted or moved.
However, we’ll take you through how to bypass Cloudflare 403 Forbidden and resolve the error.
How can I fix Cloudflare 403 Forbidden error?
Before proceeding with any advanced troubleshooting steps, go through the following:
- Turn off background apps running on your computer.
- Fix network congestion.
- Temporarily disable Antivirus software.
- Restart Windows in Safe Mode and check if the error persists.
- Switch to a different browser – read our detailed guide about the best browsers to download on your PC.
- Contact the website owner – the last resort is to contact the website owner or administrator to access first-hand information about the access policies of the site.
If you can’t resolve the error, try the steps below:
1. Clear your browser’s cache and cookies
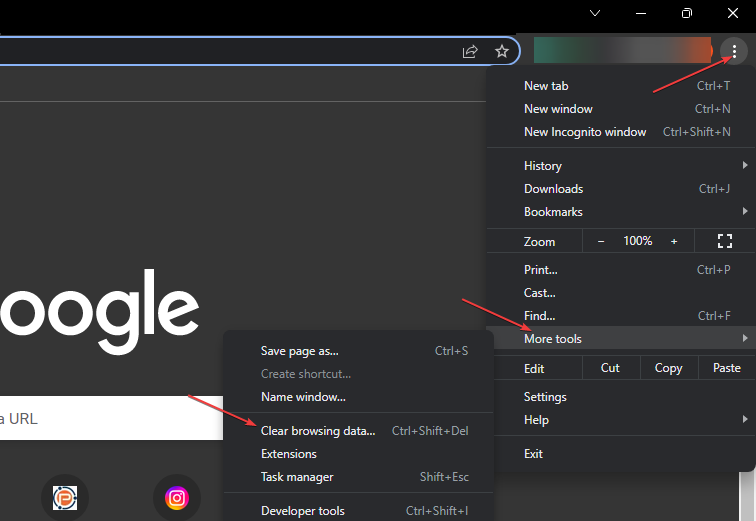
- Launch the Google Chrome browser on your PC, then click three dots to open the Menu. Go to More tools and click Clear browsing data.
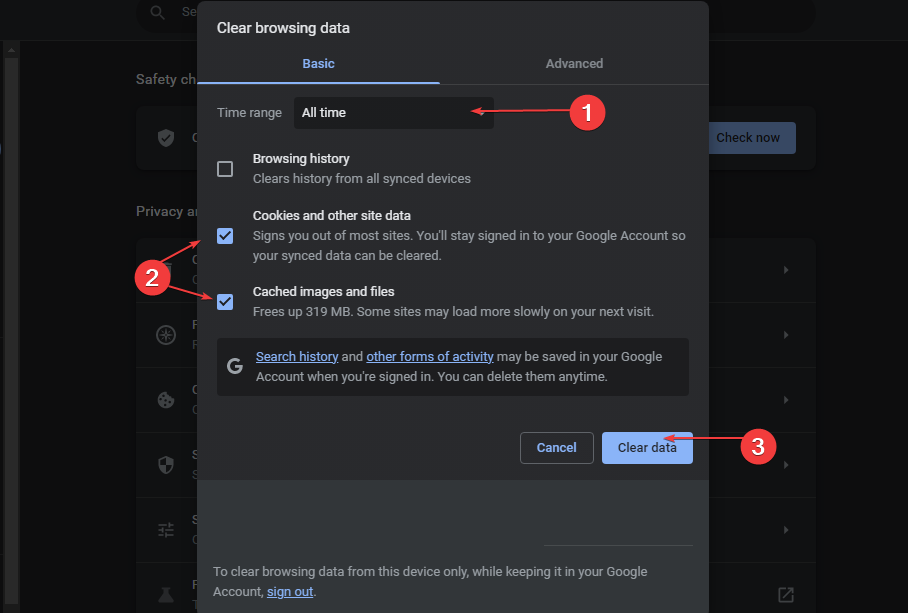
- Choose a time range for the data to be cleared, then select All time to delete everything.
- Check the boxes for Cookies, other site data, and Cached images and files, then click Clear data.
- Restart your browser and check if the Cloudflare error persists.
Clearing your browser caches and cookies will delete the corrupt files impeding the Cloudflare connection.
2. Manage Cloudflare Firewall Rules
- Log in to the Cloudflare dashboard, and select your account and website.
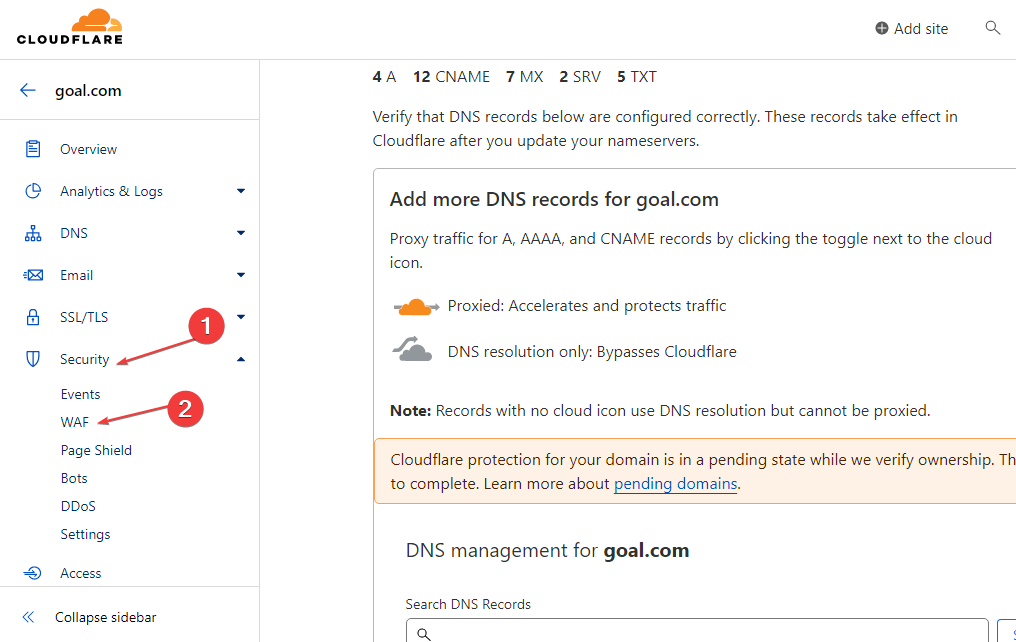
- Go to Security and click on Web Application Firewall (WAF).
- Click on Firewall rules to show the list of all rules available, then Use the toggle switch associated with a firewall rule to enable or disable it.
- Restart your browser and check if the 403 forbidden error appears.
You can toggle the firewall rule based on your preferences and knowledge of the error. So, managing it allows you to disable the rules that impede your request approval.
3. Upgrade your Cloudflare account to a Pro subscription
- Launch your browser and log in to the Cloudflare dashboard.
- Open the external link and click on your account and domain.
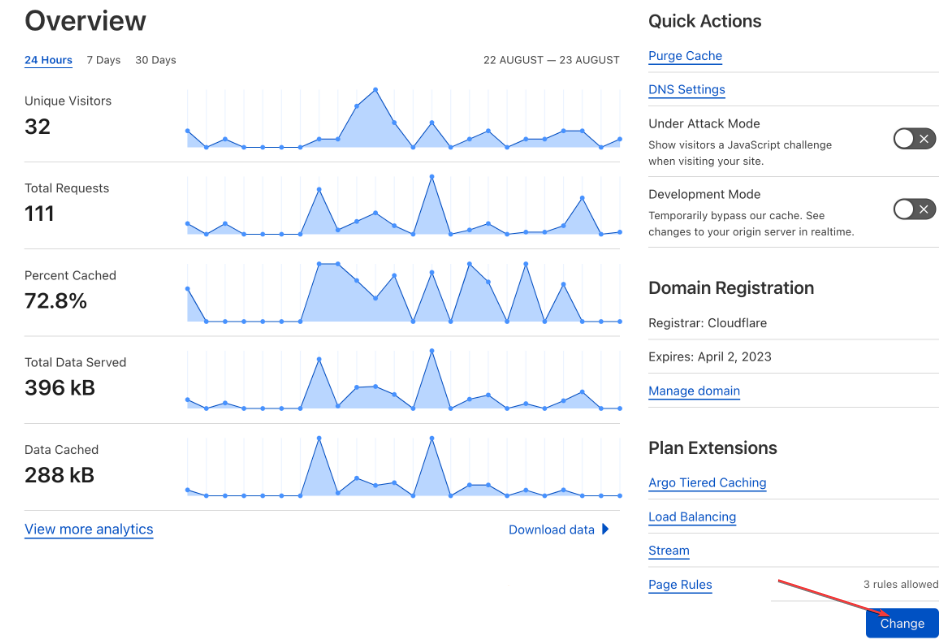
- Go to Overview.
- Click on the Change option to access Plan Extensions.
- Choose the appropriate plan type, then click on Continue.
- Click the Confirm button to verify that you want to make the upgrade.
- The upgrade should be effective immediately, and you should be able to access the website again.
Upgrading to a Pro subscription allows you to access more features and help safeguard your website against threats liable to cause a 403 Forbidden error.
Alternatively, check our articles about the best browsers with the highest support for HTML for your computer. Also, our readers can go through ways to bypass Error 1005 Access Denied in a few steps.
Another common issue is Cloudflare error 1001, which we tackled in a separate guide.
If you have further questions or suggestions, kindly drop them in the comments section.

