DCOM Server Process Launcher High CPU Usage [Fix]
Explore the expert-recommended methods to resolve the issue
Key notes
- The DCOM Server Process Launcher is responsible for starting COM and DCOM servers and starting remote COM objects.
- You may experience high CPU usage if there is third-party interference or a problem with the service.
- In this guide, we will discuss how to reduce CPU usage caused by this launcher with different methods.

If you notice high CPU usage triggered by the DCOM server process, your computer might run slow. The issue is more common than you think and can be fixed easily.
Here, we will discuss the DCOM server process launcher, the reasons for high CPU usage due to the service, and the solutions to fix the issue.
What is the service host DCOM server process launcher?
DCOM server process launcher is a Win32 service that starts COM (Component Object Model) and DCOM (Distributed Component Object Model) servers along with activating remote COM objects. It is installed with Windows and launches as soon as your OS starts.
The DCOM Server Process Launcher service is essential for proper functioning COM and DCOM servers and applications that depend on them.
What causes DOCM server process launcher high CPU usage?
There can be several reasons for high CPU usage by the DCOM server process launcher. Some of the popular ones are mentioned here:
- COM/DCOM server using high CPU resources – If COM and DCOM servers use many system resources, then the DCOM server process launcher can use a high CPU. To fix it, end the process for COM or DCOM server,
- Problem with DCOM server process launcher – If the DCOM server process launcher service has a problem, it could cause an issue. Try restarting the service.
- System files are corrupt – If your Windows is missing some files or has damaged files, then you might have to face the issue. Try running your computer in a clean boot environment or resetting your Windows to solve it.
How can I fix the DOCM server process launcher’s high CPU usage?
Before engaging in advanced troubleshooting steps, you should consider performing the following checks:
- First, make sure you have a stable internet connection.
- Restart your PC and check your Windows for updates. Here’s what to do if your computer is stuck on restarting.
- Remove all unnecessary external devices.
- Ensure your hard drive is not complete.
- Remove temporary files.
- Update BIOS.
- Disable third-party security apps and background apps.
If you are still facing the issue, move on to the below-mentioned troubleshooting methods.
1. Make a new user account with admin rights
- Press Windows + I to open Settings.
- Click Accounts, then click Other users.

- Next to Add other user, click Add account button.

- On the next page, click I don’t have this person’s sign-in information.

- Click Add a user without a Microsoft account.

- Next, on Create a user for this PC page, fill in the User name and other details, then click Next.

- The account will be created. Click on the drop-down menu for the newly created account and select Change account type.

- Change it to Administrator and click OK.
- Sign out from the current account and sign in using the new one to check if the problem persists.
2. Run the Process Explorer
 Tip
Tip
- Download Process Explorer.
- Open the zip file and extract it. Double-click the .exe file to run.
- Go to File, then click Show Details for All Processes.

- Right-click svchost.exe and select Properties.

- Go to the Image tab and check which service is using it.

- Now press Windows + R to open the Run window.
- Type services.msc and press Enter.
- Locate, and double-click the service. Now under Service status, click the Stop button. Click Apply and OK.

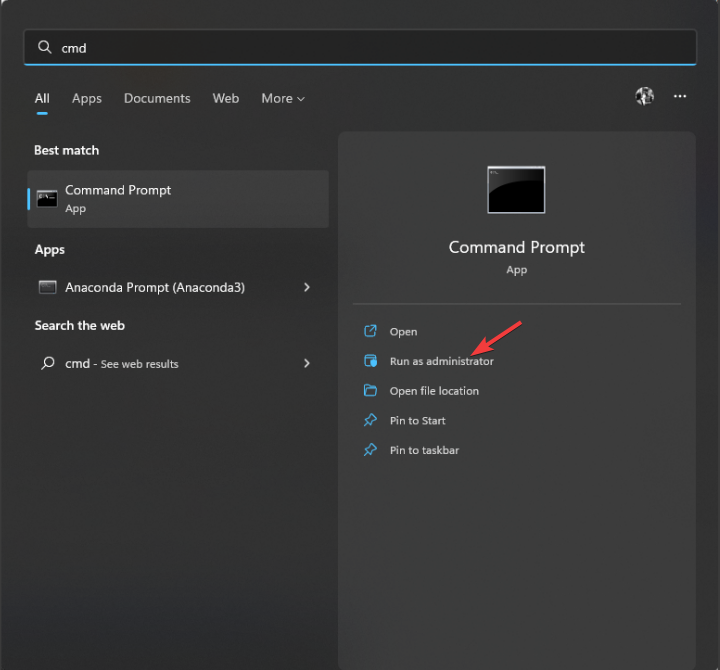
3. Run the DISM command
- Press the Windows key, type CMD and click Run as administrator.
- Type the following command and press Enter:
sfc/scannow - Once the scan is complete and if it comes up with an error. Copy and paste the following commands and press Enter after every command:
DISM /Online /Cleanup-Image /CheckHealthDISM /Online /Cleanup-Image /ScanHealthDISM /Online /Cleanup-Image /RestoreHealth - Restart your PC.
4. Adjust your PC to best performance
- Press Windows + I to open the Settings window.
- Go to System, then About.

- Click Advanced system settings.

- On the next window, on the Advanced tab, under Performance, select Settings.

- Now click on the radio button next to Adjust for best performance.

- Click Apply and OK.
5. Clean boot your PC
- Press Windows + R to open the Run window.
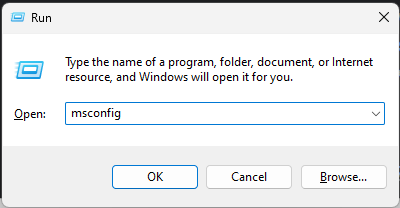
- Type msconfig and press Enter to open System Configuration.
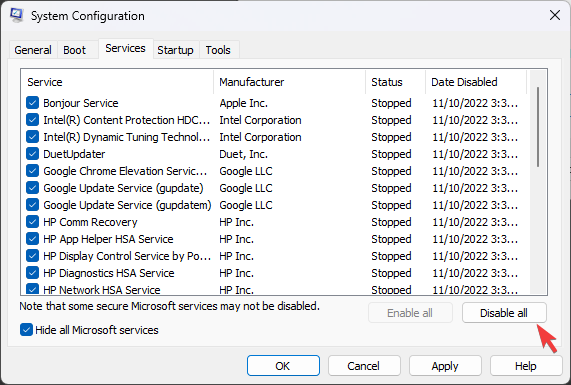
- Go to the Services tab, and click on Hide all Microsoft Services. Click Disable All.
- Next, switch to the Startup tab, and click Open Task Manager.

- Now go to all the enabled items, right-click them, and select Disable.

- Click Apply and OK to close the System configuration window.

- Now, click Restart. Upon restart, check all the recently installed apps to know which is causing the issue.
6. Disable Live Tiles
Tip
- Go to the Start menu to get all apps.
- Right-click on Tiles and select Unpin from Start.

- Do this for every tile.
So, these are methods that you need to follow to reduce CPU usage due to the DCOM server process launcher. If nothing has worked for you, try resetting your PC settings to resolve the problem.
If you think we have missed any solutions that worked for you, feel free to let, us know in the comments section below.
Read our disclosure page to find out how can you help Windows Report sustain the editorial team. Read more


Improve this guide


User forum
1 messages