Dell Data Manager High CPU: 6 Ways to Fix It
Enable a non-power saving mode or reset your PC
Key notes
- Dell Data Manager that is meant to protect your applications and other services in-house or in the cloud.
- However, you will find plethora of user reports complaining about the Dell Data Manager high CPU usage issue.
- You can fix it by scanning your PC for virus or malware, or check in with the Dell support.

Multiple user reports regarding the Dell Data Manager high CPU usage issue exist. High CPU usage issue affects the overall smooth functioning of the PC. In this guide, we will give you a bunch of solutions that will help you resolve the Dell Data Manager high CPU usage issue.
What is triggering Dell Data Manager high CPU usage?
After going through multiple forum reports, we have deduced a list of the most common reasons why Dell Data Manager is eating up the CPU on your PC:
- Presence of malware or virus: Chances are that the Dell Data Manager high CPU usage issue is triggered because of malware or virus. It could only be detected using a good antivirus.
- Too many programs running in the background: There might be multiple applications running in the background along with the Dell Data Manager, which are collectively causing the issue.
- Dell Data Manager is added to the system’s startup items: If you have added Dell Data Manager to the system startup, then it would load automatically every time you boot your PC, hence causing high CPU usage issues.
- It could be because of the Dell Support Assist app: Some users have reported that the Dell Data Manager’s high CPU usage was triggered because of some issues in the Support Assist app.
What can I do to fix Dell Data Manage high CPU usage issue?
Before any advanced solutions, note that:
- Dell has resolved the issue by disabling the System Repair option in the Dell Support Assist app.
- This, in turn, resulted in the Dell Data Manager usage to less than 5%, and the CPU usage went back to normal. So, you can try updating the Dell Support Assist app.
- Uninstalling it from your PC might also do the trick.
1. Scan your PC for virus
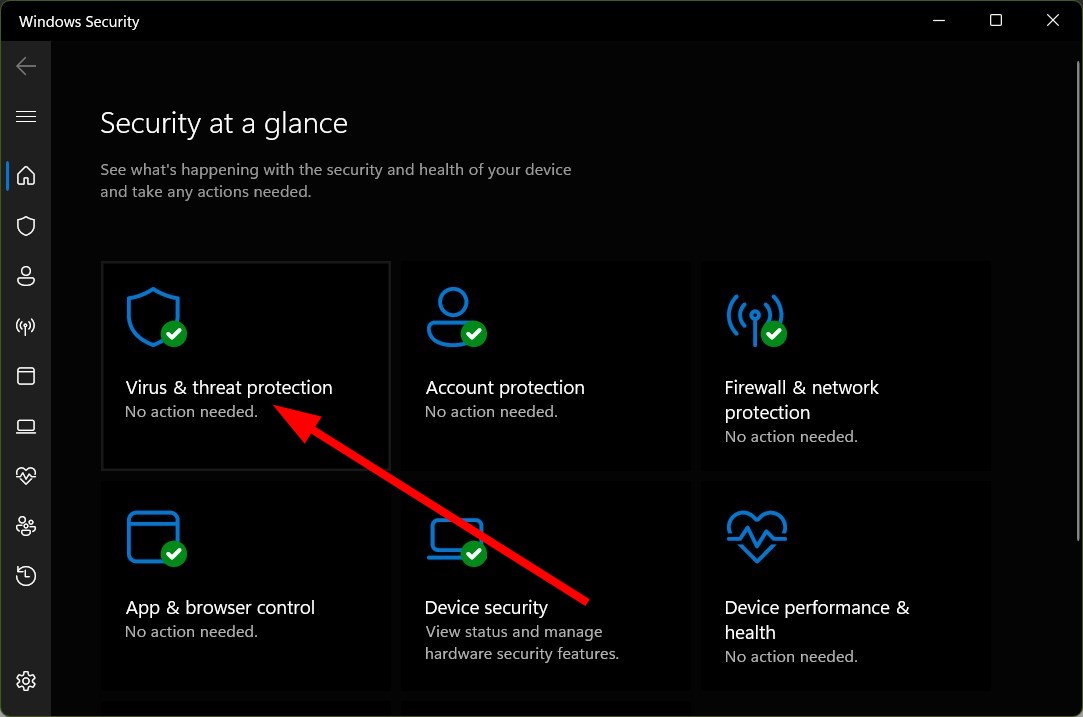
1.1 Using Windows Defender Firewall
- Press the Win key to open the Start menu.
- Type Windows Security and open it.

- Select Virus & threat protection.
- Hit the Quick Scan button.
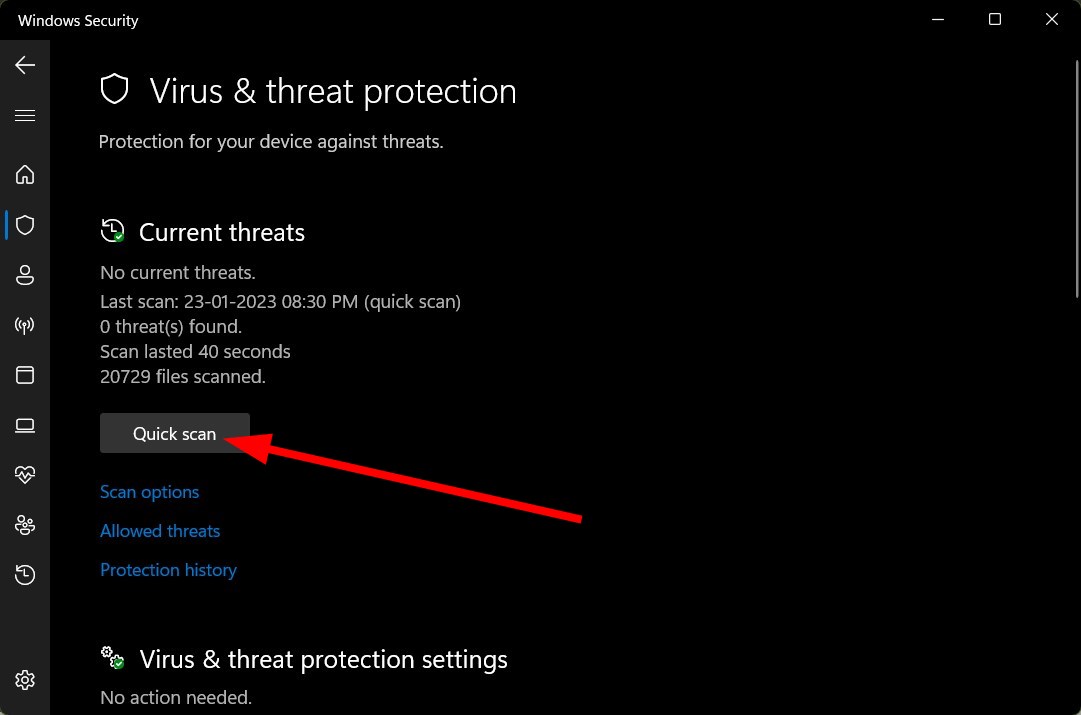
- You can tap on the Scan options and select Full Scan for a deep scan of your PC.

Here, we have used the Windows Security in-built tool to scan for viruses or malware, but it isn’t as effective as any third-party antivirus software.
1.2 Use a third-party antivirus software
If there is no trace of high CPU usage in Task Manager, is it a virus infection or malicious software that runs in the background, then there could be a hidden program or a virus that might be causing the problem.
To keep yourself safe from any malware or virus that could potentially be the reason why you are getting the Dell Data Manager high CPU usage issues, we would recommend using ESET HOME Security Essential.
ESET HOME Security Essential is easy to use and install. The program is lightweight and will not interfere with your system or cause interruptions. Using ESET, you will stay secure from such viruses.

ESET HOME Security Essential
Lightweight antivirus solution that will unquestionably eliminate any digital threat from your device.2. Upgrade your PC
Several user reports confirm that they were able to fix the Dell Data Manage high CPU usage issue by simply upgrading their PCs.
If you are using Windows 10, then you should upgrade to Windows 11. Our simple and easy guide on how to upgrade to Windows 11 will help you with that.
3. Clean boot your system
- Press the Win key to open the Start menu.
- Type the system configuration and open it.

- Click on the Services tab.

- Check the box for Hide all Microsoft Services.
- Select Disable all.

- Click Apply and OK.
- Switch to the Startup tab.
- Click on Open Task Manager.

- Locate any Dell related services and disable them.
- Close Task Manager.
- Restart your PC.
4. Update all drivers
- Press the Win key to open the Start menu.
- Type Device Manager and open it.

- Expand the Display adapters section.

- Right-click on your GPU and select Update driver.
- Select Search automatically for drivers option.

- Follow the same steps for each driver on your PC.
You can update all drivers on your PC by following the above-mentioned steps. However, these are time-consuming as you have to repeat the same steps for each driver.
To fix this, we would suggest you make use of a dedicated tool called Outbyte Driver Updater. It will not only help you update all drivers in just a few clicks, but it also acts as a download manager, creates driver backups, help you schedule scans to keep your PC up to date, and much more.

Outbyte Driver Updater
You need to keep your drivers updated at all times and Outbyte Driver Updater will make your PC faster as well!5. Enable a non-power saver plan
- Press the Win key to open the Start menu.
- Open Control Panel.
- Select Power options.

- Choose a different power plan other than battery saver.

If you have a battery saver power plan enabled, then your PC will have to do a lot more to run all the processes in a smooth way.
In this case, we would suggest you select a different power plan that will take off the pressure from your CPU and would result in less CPU usage by programs.
6. Reset your PC
- Open the Start menu by pressing the Win key.
- Type recovery options and open it.

- Select the Reset this PC option.

- Choose the Keep my files option.

- Follow the on-screen prompts to reset your PC without losing your files.
As a last resort, we would suggest you reset your PC. Resetting will help you fix all the problems associated with any programs.
That is it from us in this guide. For users facing the Dell laptop plugged in but not charging issue, we would suggest you check out our guide that lists 6 effective solutions to resolve the problem.
We also have a guide that will help you fix the Dell XPS 13 fingerprint reader not working problem in three simple steps.
Also, if you have trouble with brightness not working with Dell XPS 17 in just 4 quick ways. There is a neat device that will help you to charge your laptop without a charger.
Let us know in the comments below, which one of the above solutions helped resolve the Dell Data Manager high CPU usage issue.
Read our disclosure page to find out how can you help Windows Report sustain the editorial team. Read more


Improve this guide


User forum
0 messages