The driver disconnected while associating [WiFi Connection]
4 min. read
Updated on
Read our disclosure page to find out how can you help Windows Report sustain the editorial team. Read more
Key notes
- The driver disconnected while associating WiFi connection error can occur after a Windows upgrade.
- Among the frequent reasons why the network is disconnected by the driver are outdated components.
- Windows has a network troubleshooter that is useful to start troubleshooting the driver disconnected while associating error.
- Fixing the network is disconnected by the driver issue in Windows 10 might require you to work in Safe Mode.

If your laptop is not connecting to your WiFi router and if you tried to get a status report using the netsh wlan show wlanreport command, you might encounter the drive disconnected while associating error.
The error above can occur due to several reasons. For some users, the error was triggered after updating their Windows 10 laptop to a newer version.
Fortunately, the error can be resolve by performing a few troubleshooting tips listed in the article below.
How can I fix the driver disconnected while associating error?
1. Run Network Troubleshooter
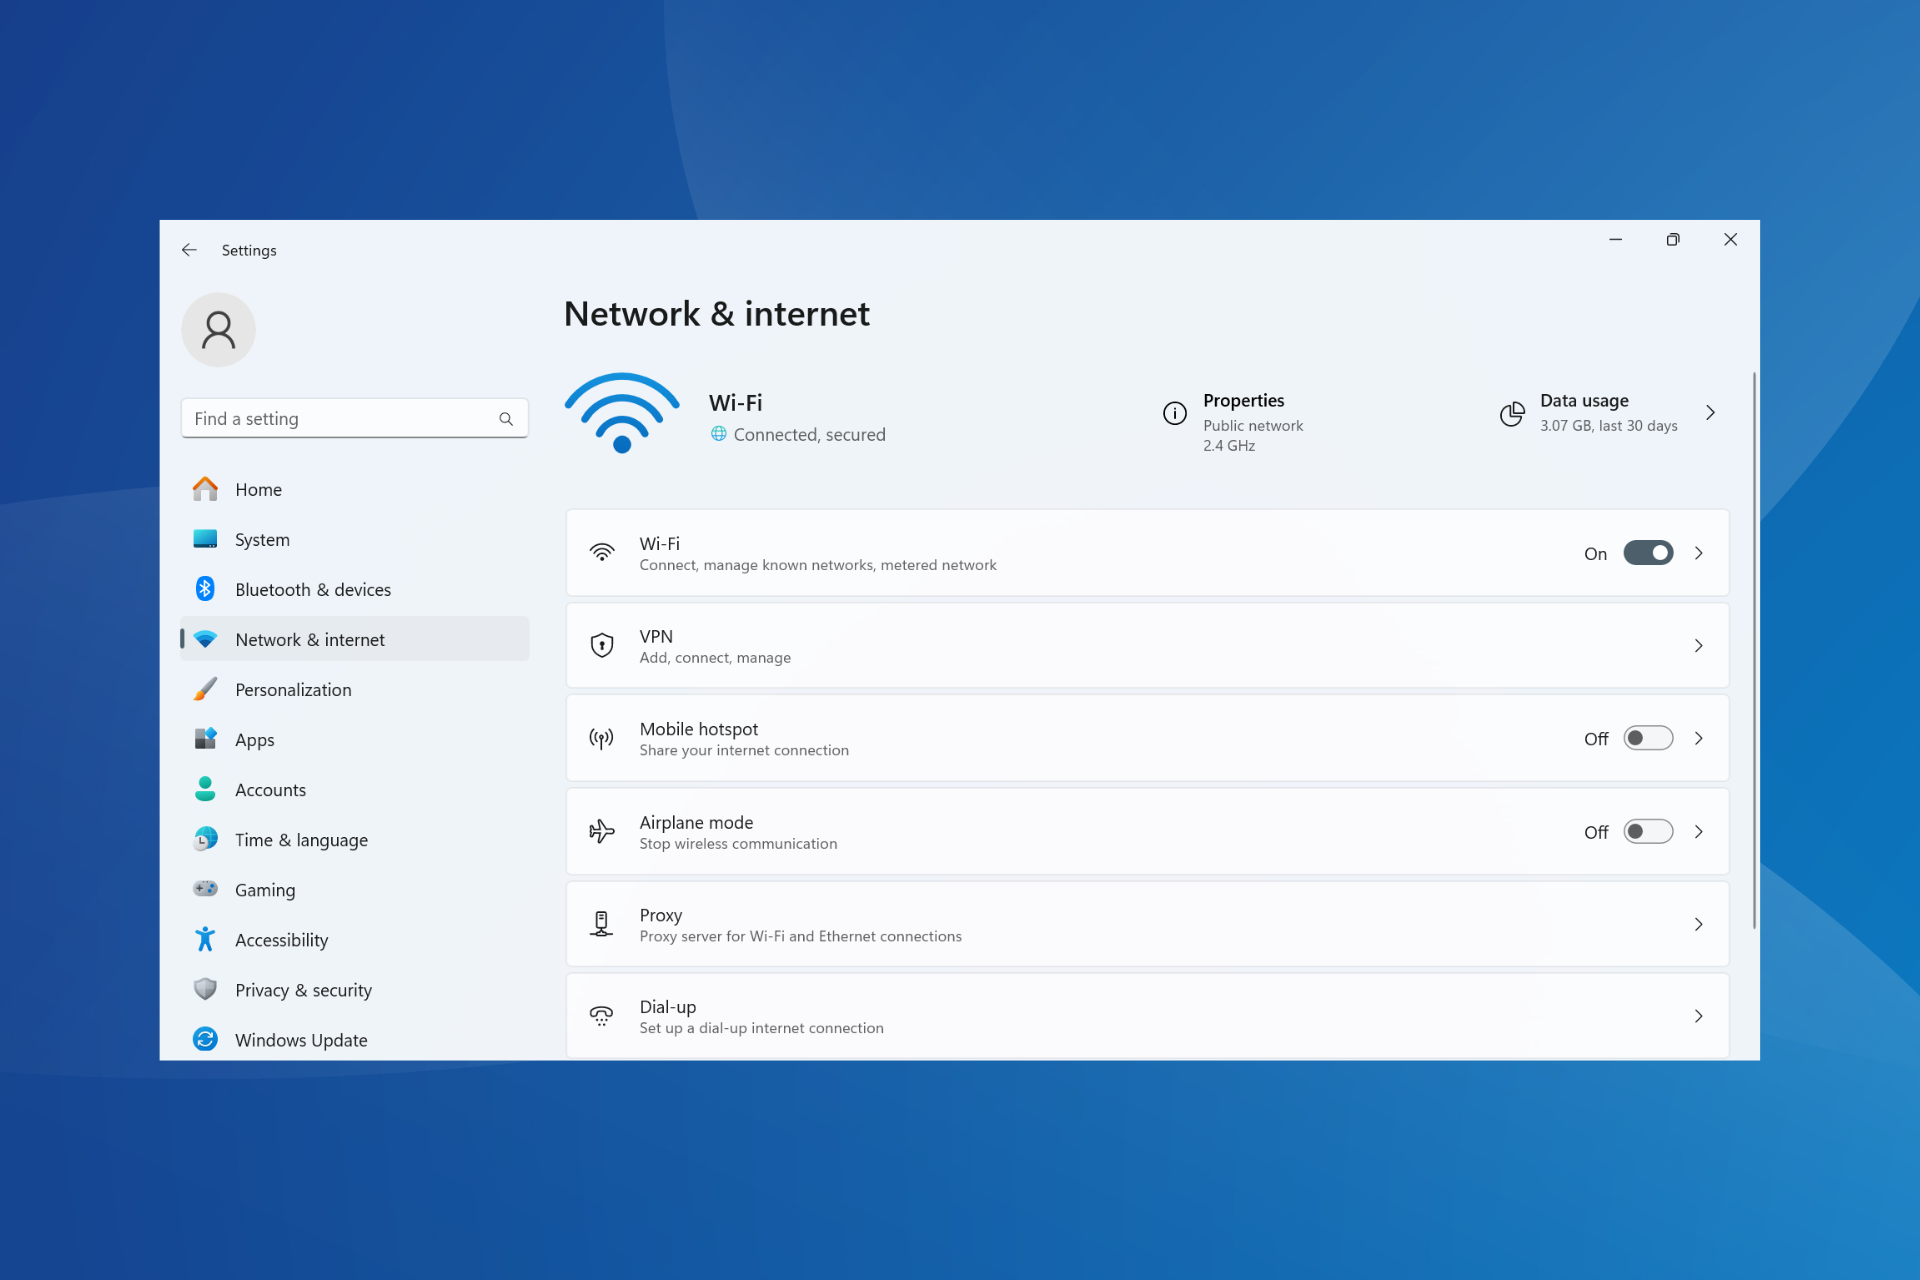
- Click on Start and select Settings.
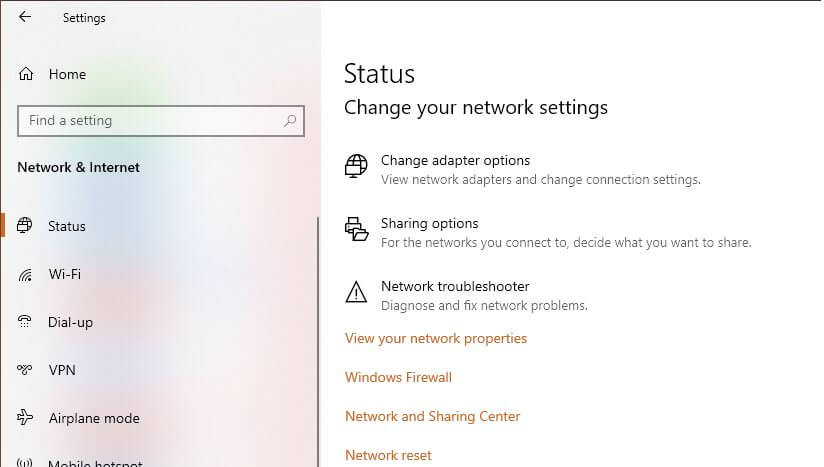
- Go to Network and Internet.
- Click on Status.
- Scroll down to Change your network settings.
- Click on Network Troubleshooter.
- The Windows network troubleshooter will initiate the scan.
- Follow on-screen instructions, and apply any recommended fixes.
The Windows network troubleshooter will fix minor issues with the WiFi adapter. If the issue persists, follow the next set of steps below.
2. Update network drivers
Update drivers manually
- Press Windows Key + R.
- Type dvmgmt.msc and click OK.
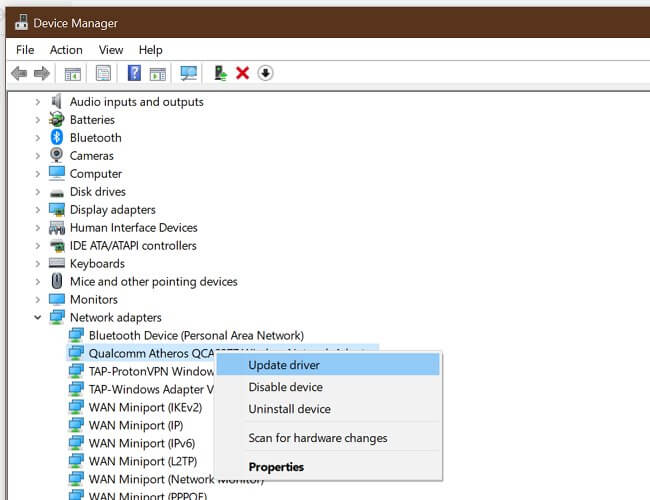
- In Device Manager, expand the Network Adapters category.
- Right-click on the wireless network adapter.
- Select Update Driver.
- Select Search automatically for updated driver software.
- Wait for Windows to download and install a newer version of network drivers.
Once installed, reboot the computer. If the issue persists, try resetting the network adapter.
Alternatively, in the 4th step above you can choose to uninstall the network driver and reboot your PC. Windows will automatically install the network adapter driver upon restart. Check to see if the error is resolved afterward.
Update drivers automatically
Another viable and time-saving solution would be to use third-party software that searches for the most suitable drivers for your PC and installs them with a few clicks.
Such driver manager tool like PC HelpSoft Driver Updater keeps your Windows OS in optimal condition and aims to help your device function at peak performance.
It is useful software for updating your computer’s drivers. You simply need to scan your system after installing the program. It detects out-of-date drivers and then asks for your permission to update them, ensuring that only the necessary drivers are installed.
After installation, the program will run automatically, so you won’t have to look for its shortcut or the source folder. Outbyte Driver Updater will scan your system for faults or missing drivers and generate a report in a matter of seconds.
3. Disable your antivirus
- Expand the system tray.
- Right-click on your antivirus icon and select Disable/Turn off temporarily.
- Once disabled, try connecting to the network again.
Your antivirus software may cause issues with the network adapter resulting in connectivity issues. Also, check your startup apps tab and disable any unwanted app from the process.
Disable startup apps
- Right-click on the Taskbar.
- Select Task Manager.
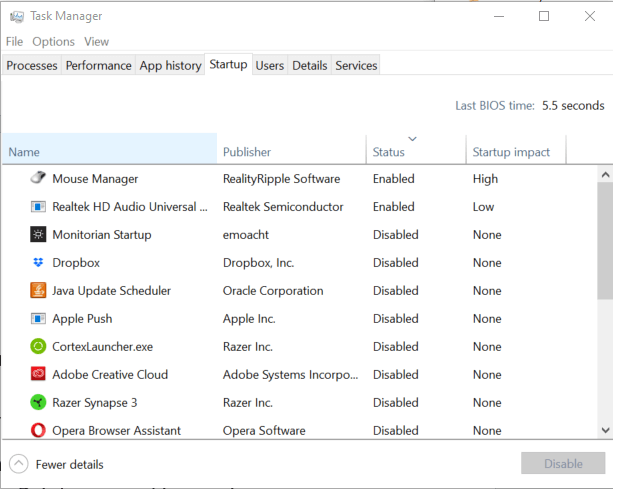
- Open the Startup tab.
- Select all the startup apps that are enabled.
- Click on Disable.
- Do this for all the apps in the startup tab.
Reboot the computer and check if the connectivity issue is resolved. If not, restart the system in Safe Mode to fix the issue.
4. Start in Safe Mode with Networking
- Click on Start and select Settings.
- Open the Recovery tab.
- Scroll down to the Advanced Startup section.
- Click on Restart Now.
- Select Troubleshoot.
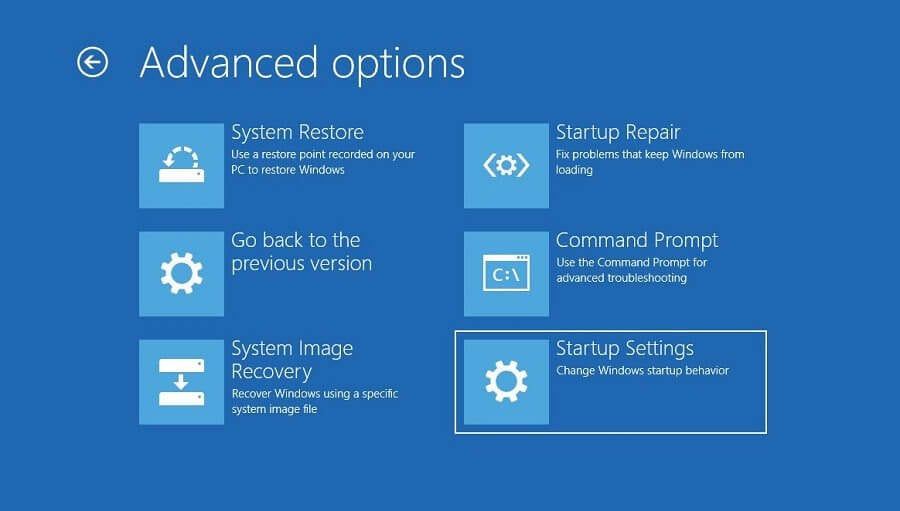
- Click on Advanced Options.
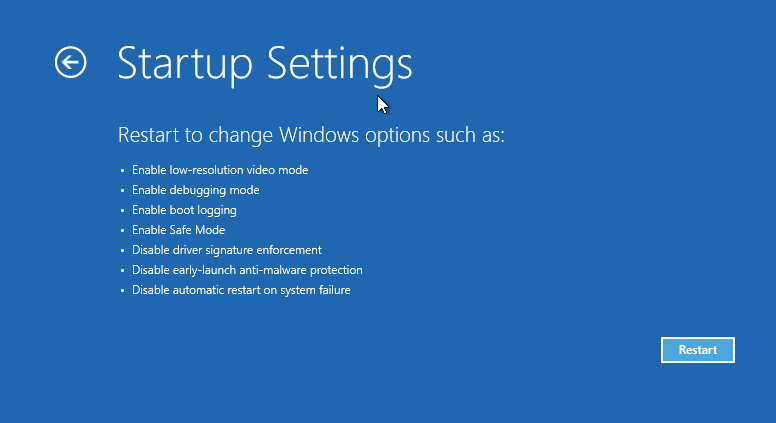
- Click on Startup Settings.
- Select Restart.
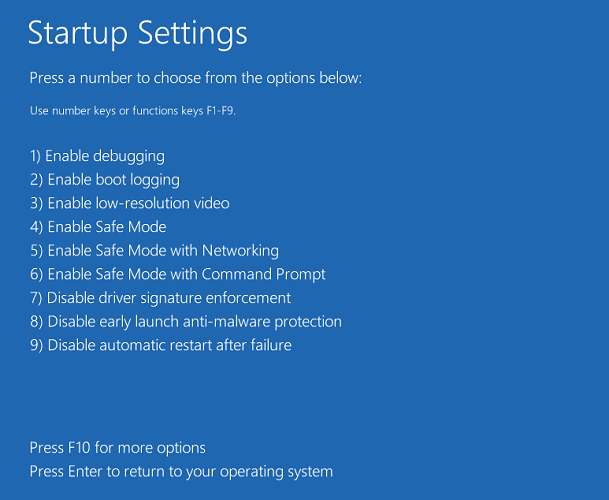
- Next, press 7 or the appropriate number to select Enable Safe Mode with Networking.
- The system will restart in Safe Mode with networking enabled.
- Try connecting to your WiFi network to see if the issue is resolved.
If you are able to connect to the network in Safe Mode, the error is most likely triggered by third-party software installed on your system.
- Press Windows Key + R.
- Type appwiz.cpl and click OK to open Control Panel.
- Select the most recently installed app, and click on Uninstall.
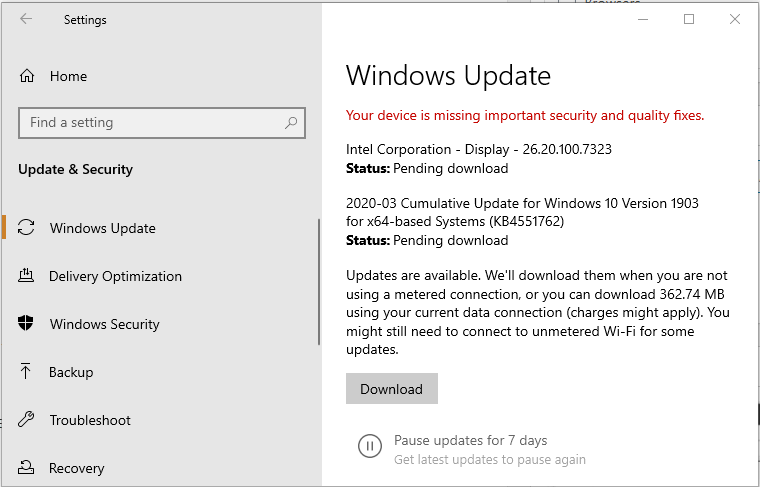
5. Check for Windows updates
- Press Windows key + I to open Settings.
- Go to Update & Security.
- Check for pending Windows 10 updates.
- Download and install the pending updates.
6. Reset Winsock

- Press the Windows key.
- Type cmd, right-click on Command Prompt, and select Run as Administrator.
- In the command prompt window, type the following command one by one and press Enter after each of them:
netsh winsock resetnetsh int ip resetipconfig /releaseipconfig /renewipconfig /flushdns - Close the command prompt and check for any improvements.
Windows 10 comes bundled with essential driver updates from the manufacture. Keeping your Windows 10 PC up to date can fix many compatibility issues.
The driver disconnected while associating WiFi error usually occurs due to your antivirus or third-party software installed on your system. Follow the steps in the article to diagnose and fix the error for good.





User forum
0 messages