Beginner’s Guide to Using IrfanView for Photo Editing

IrfanView is a lightweight, free image editor for Windows that makes basic photo editing simple and fast. It’s perfect for tasks like cropping, resizing, adding text, or applying filters without needing heavy tools like Photoshop. Follow these steps to start editing images with IrfanView today.
Table of contents
How Can I Use IrfanView For Editing?
1. Install IrfanView
First, download and install IrfanView on your Windows PC.
- Go to the official IrfanView website.
- Click Download and choose the version for your operating system.

- Run the installer and follow the on-screen setup.
- Download the IrfanView Plugins pack for more features and format support.
For details on making it your default image viewer, check this guide on how to set IrfanView as default in Windows 11.
2. Open an Image
Once installed, open your first image in IrfanView.
- Launch IrfanView from the Start menu.
- Click File > Open.
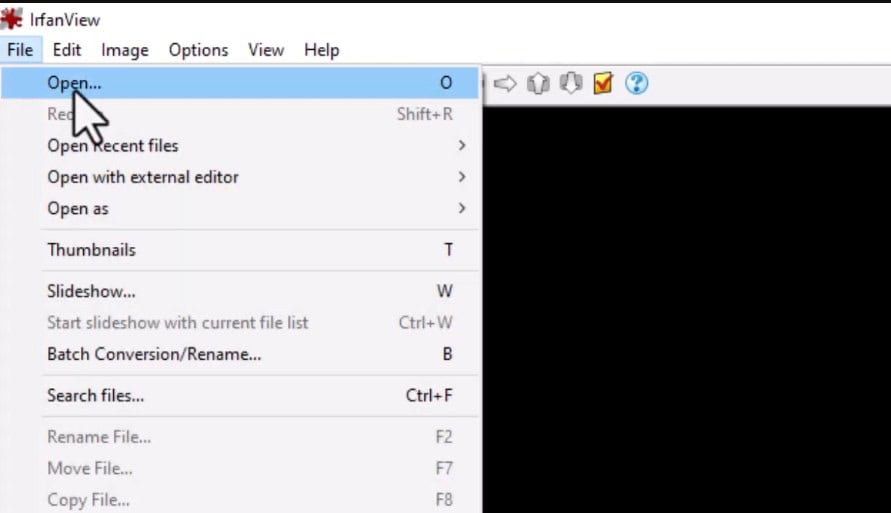
- Browse to your image and click Open.
- You can also drag and drop the file directly into the IrfanView window.
3. Crop an Image
Cropping helps you remove unwanted parts and focus on key details.
- Click and drag your mouse to select the area you want to keep.
- Go to Edit > Crop Selection (Cut Out) or press Ctrl + Y.
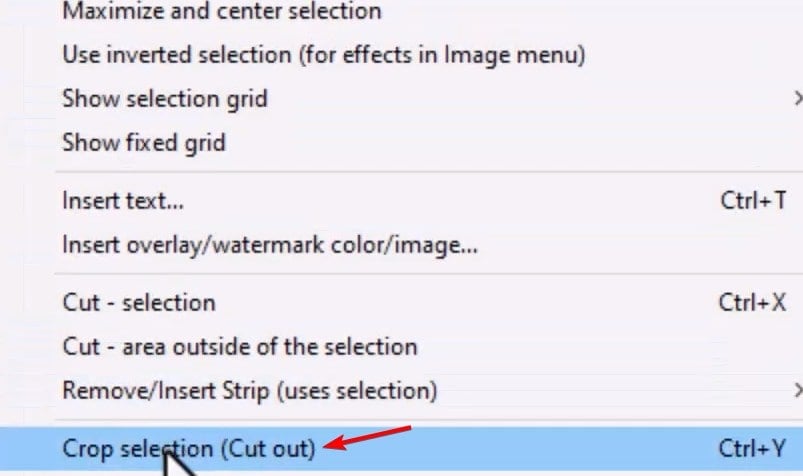
- The image will instantly crop to your selected area.
If you want alternative methods, here’s a detailed tutorial on how to crop an image in Windows 11.
4. Resize or Rotate a Picture
Use resizing to fit specific dimensions or rotate to correct orientation.
- Go to Image > Resize/Resample.
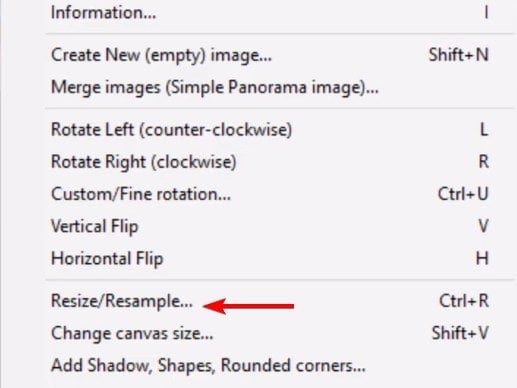
- Enter new width and height or select a percentage option.
- Click OK to confirm.
- To rotate, select Image > Rotate Left/Right or press L/R.
5. Apply Filters and Effects
You can enhance your photos by adding creative filters.
- Open the Image menu and click Effects.
- Choose options like Sharpen, Blur, or Sepia.
- Adjust settings as needed and click OK to apply.
6. Add Text to an Image
Adding text is useful for watermarks or captions.
- Go to Edit > Insert Text or press F12.
- Enter your message in the text box.
- Adjust font, color, and position as desired.
- Click OK to add it to your image.
7. Save or Convert Files
When finished editing, save your work or convert images in bulk.
- Click File > Save As.
- Choose your preferred file format such as JPG or PNG.
- Adjust compression settings if necessary.
- Click Save to finalize.
- For batch tasks, go to File > Batch Conversion/Rename.
If you ever lose your saved screenshots or edited files, see how to restore the screenshots folder in Windows 11.
FAQs
No. It’s free for personal and educational purposes, but commercial users need a license.
Yes, once you install the optional plugin pack.
Open Options > Set file associations, select your preferred formats, and click OK.
No, it focuses on fast, single-layer image editing.
By default, it saves them in the same folder as the source image unless you choose a different path when saving.
Conclusion
IrfanView remains one of the best lightweight editors for Windows users. It’s simple enough for beginners yet powerful enough to handle everyday editing tasks quickly and efficiently. If you want more Windows editing options, explore other related tutorials at WindowsReport.
Read our disclosure page to find out how can you help Windows Report sustain the editorial team. Read more


Improve this guide


User forum
0 messages