Kernel Data Inpage Error on Windows 11: How to Fix it
The Startup Repair tool is often effective in fixing the error
7 min. read
Updated on
Read our disclosure page to find out how can you help Windows Report sustain the editorial team. Read more
Key notes
- The KERNEL DATA INPAGE ERROR in Windows 11 is a very serious BSoD because it can affect your stored data.
- This usually signals problems with your drive so you should perform a backup of your files as soon as possible.
- Check the cables before starting to tweak the software because this can be caused by a connection issue.
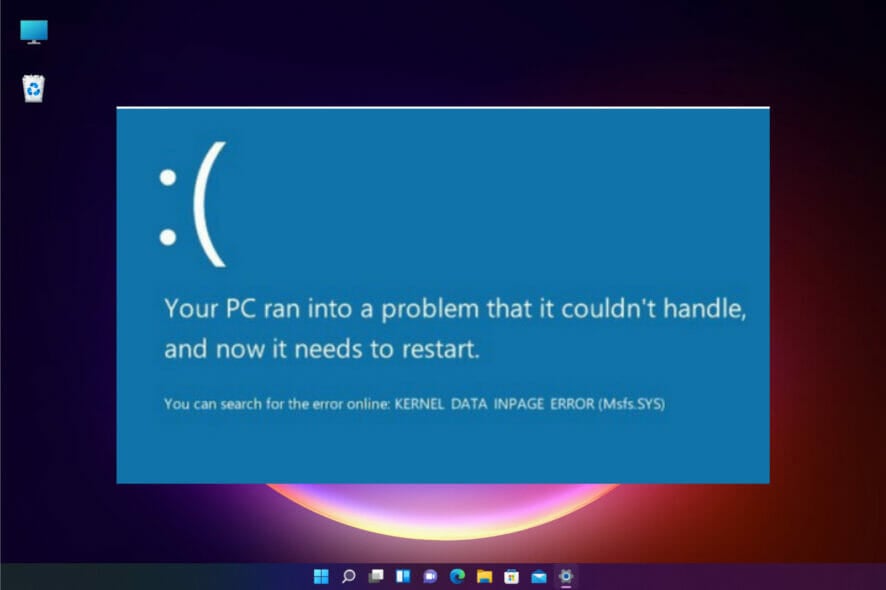
Let us discuss the Windows 11 kernel data inpage error. The OS has many new features and a great design, but it also inherited some bugs from Windows 10.
For instance, the KERNEL DATA INPAGE ERROR known by Windows 10 users is pretty severe because it can lead to corrupted files and even data loss.
The kernel data inpage error BSoD is directly related to storage drive issues, which you need to address as soon as possible.
What does Kernel_data_inpage_error mean?
The kernel is often characterized as a computer’s central processing unit (CPU) because it is at the core of all your computer operations and is responsible for managing the whole operating system.
This inpage error can signal problems with your storage drive. It is often associated with the BSOD and may represent bad drive sectors, bad connections, and disk failure. It is usually caused by one of the following:
- Hardware components – For many users, it is triggered by failing RAM or disk controller errors.
- Driver errors – If you have damaged, unsupported or outdated drivers, it may trigger this error.
- Bad system files – In some cases, it is triggered because some essential system files have become corrupted.
This error has different variations and may come with error codes that can help you quickly identify the cause. Here are some of the possible error codes:
- 0x0000007A – File access errors can cause this error.
- 0xC000009C – Bad hard drive sectors may be the reason for this code.
- 0xC000009D – The code signals possible imperfect connections or hard disk failure.
- 0xC000016A – Bad sectors on your hard drive trigger it.
- 0xC0000185 – Check the cables for any damage or improper connections.
How can I fix the KERNEL DATA INPAGE error in Windows 11?
Before you try any of these solutions, do the following checks:
- Back up your data – Back up your data as soon as possible. If your drive has any malfunctioning problems, this can get even worse, and you might lose your data. So, you can manually copy and paste your sensitive data on an external drive or another drive installed on your PC.
- Check the cables and connections – Check all the cable connections to and from your hard drive. One of them might be loose or have an improper connection, which might cause the KERNEL DATA INPAGE ERROR.
1. Use the Startup Repair
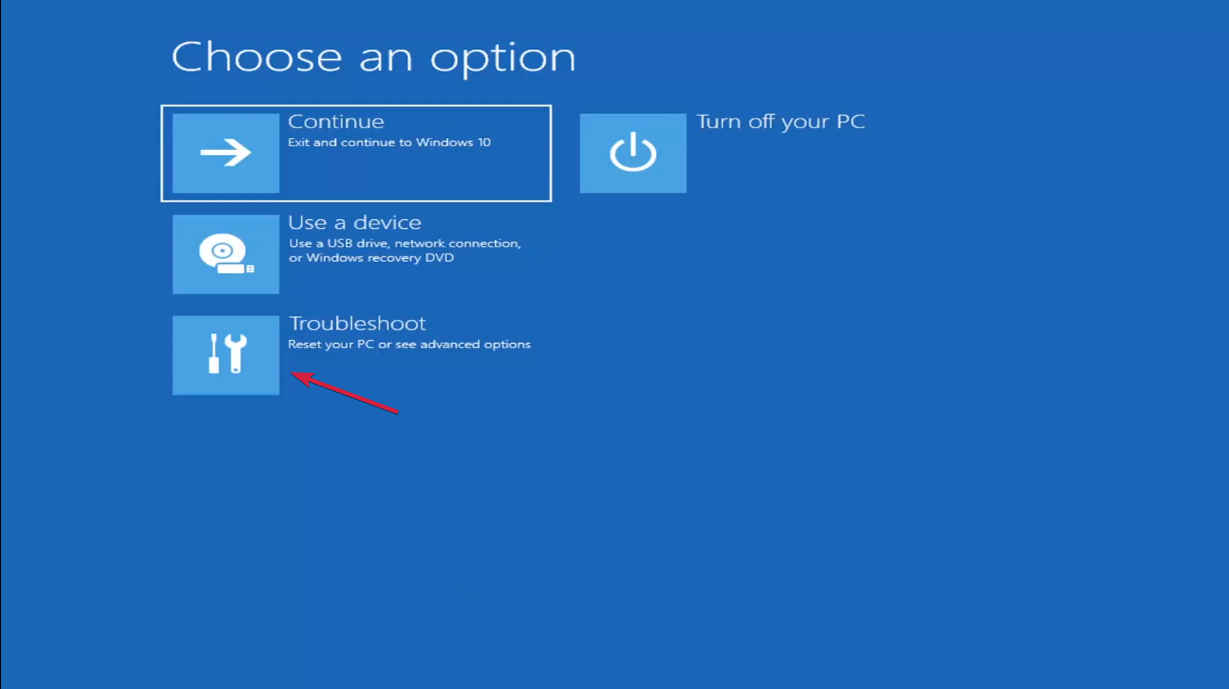
- Start Windows 11 with a bootable media or use a hard power off three times in a row to boot the OS into Recovery Mode.
- Select Troubleshoot.
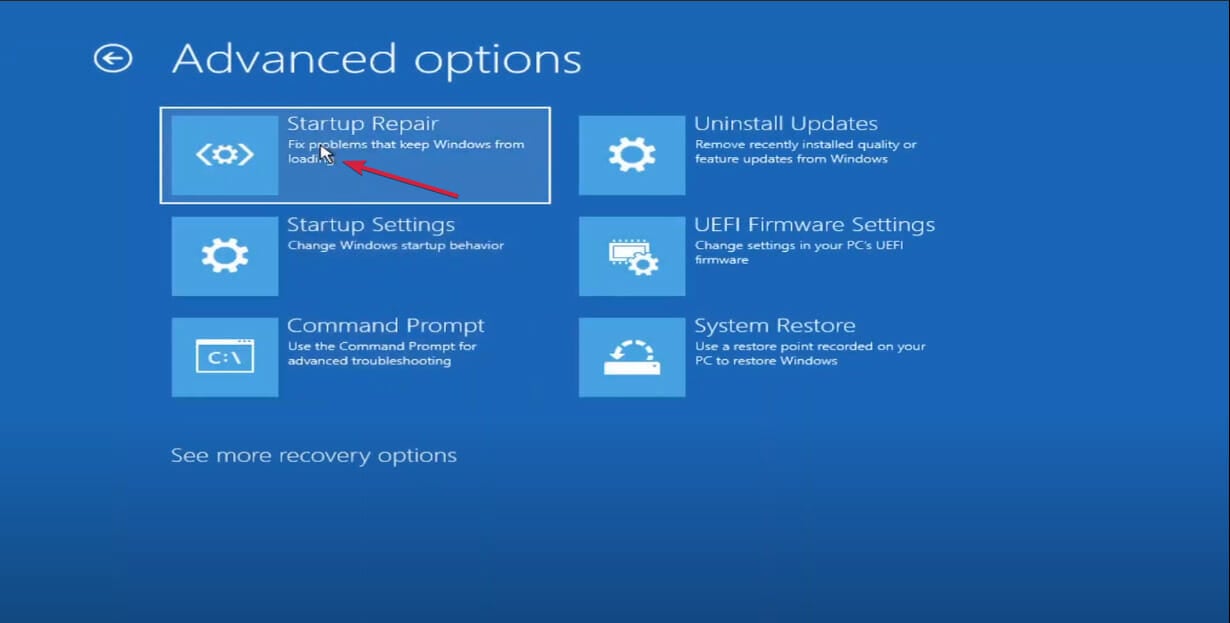
- Click on Advanced options.
- Next, choose Startup Repair.
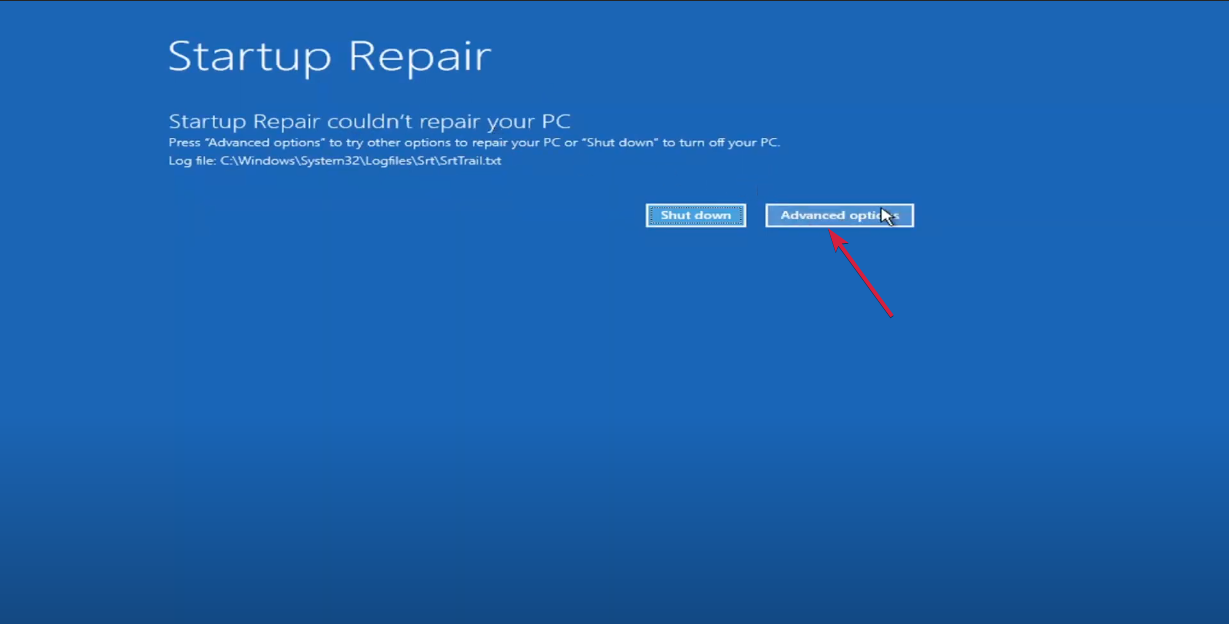
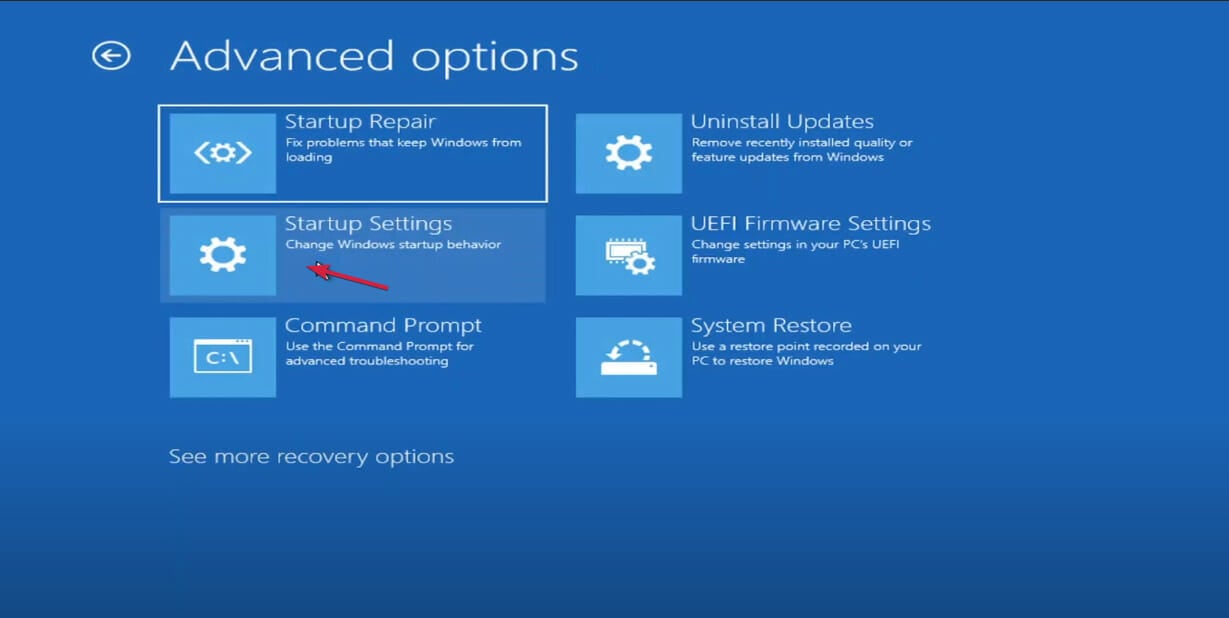
- If the system detects any issues, it will start fixing them. If you get the message that Startup Repair couldn’t repair your PC, click on the Advanced options button.
- You will get back to the main screen. Select again Troubleshoot, then Advanced options, and in the new window, click on Startup Settings.
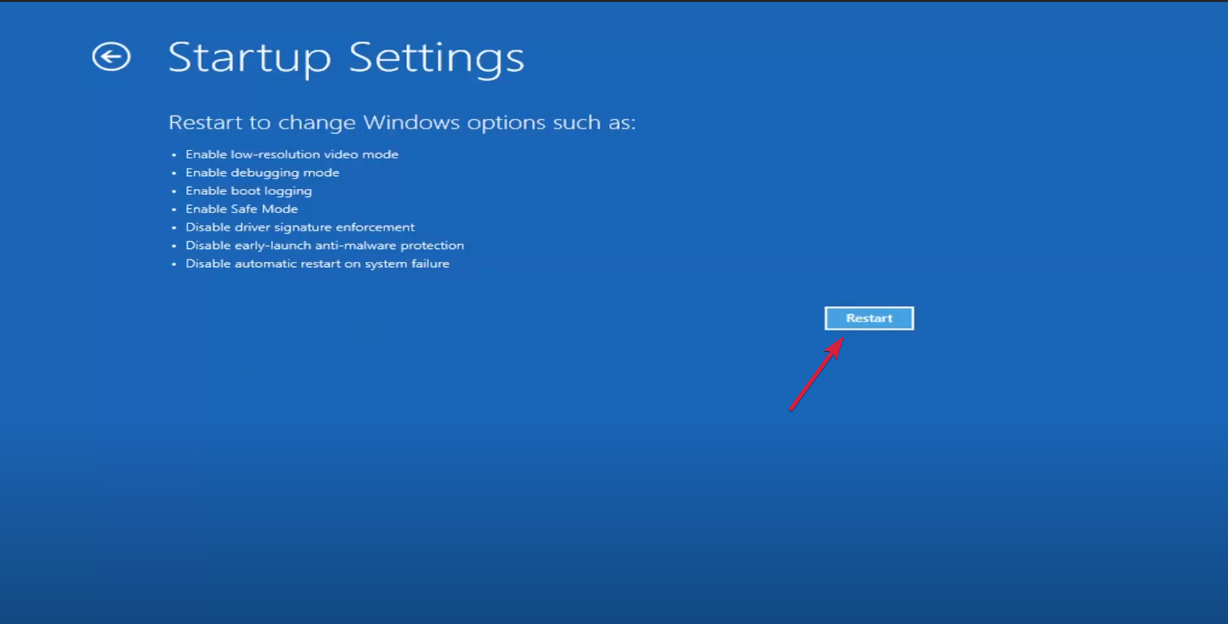
- Next, click on Restart to boot the PC in Safe Mode.
- After the PC restarts in Safe Mode, check if the problem occurs again. If it doesn’t, third-party software is causing this issue, and you need to uninstall it. If the issue persists, start the PC again in Recovery Mode.
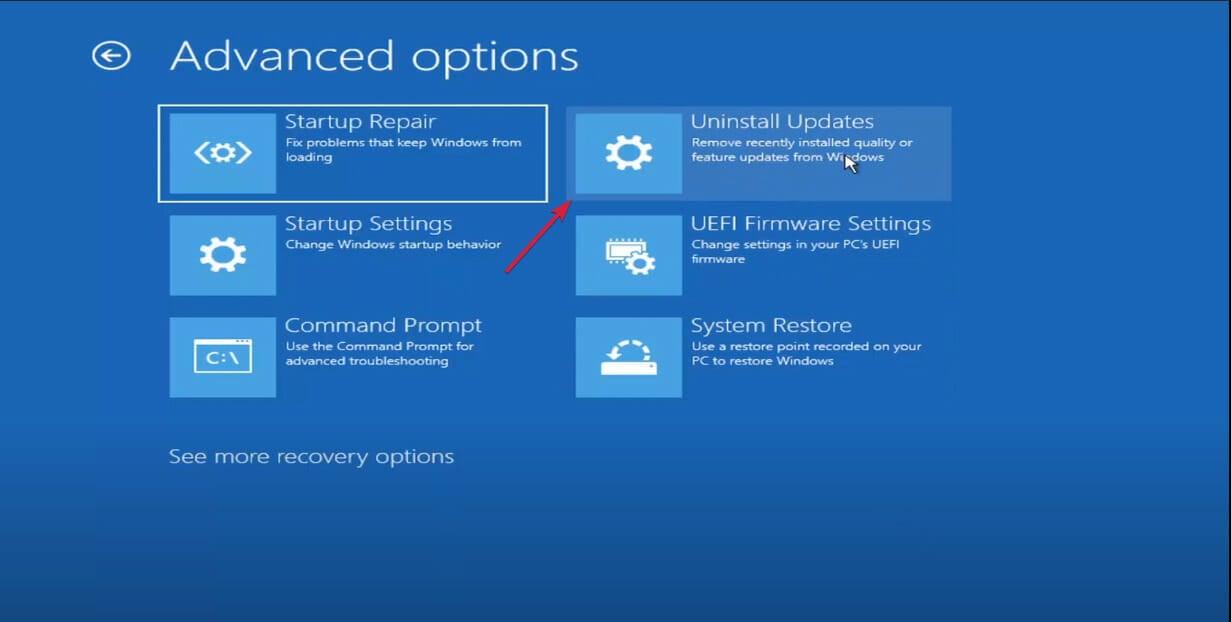
- Select Advanced options again from the main window.
- Now select Uninstall Updates and roll back any recent updates if you suspect they caused this issue.
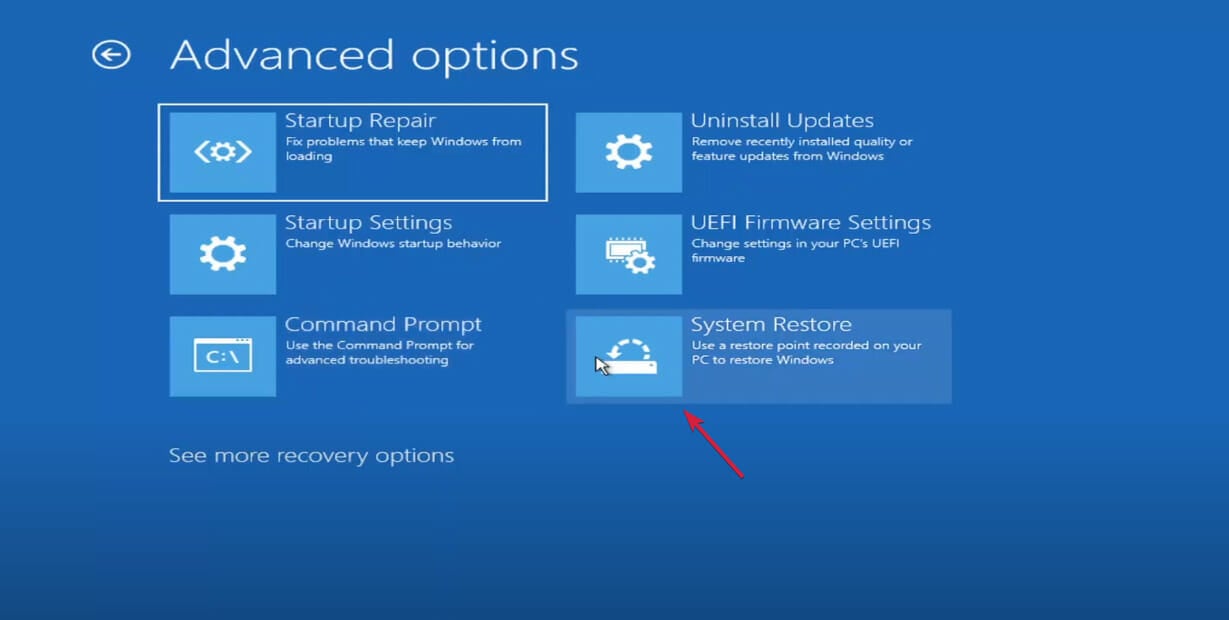
- If the previous step doesn’t solve the problem, you can choose System Restore from the same menu and roll back your system to an earlier restore point.
If you don’t have a bootable media yet, learn how to create a Windows 11 bootable USB drive and keep it safe for other occasions when you want to restore your system.
2. Run a CHKDSK scan
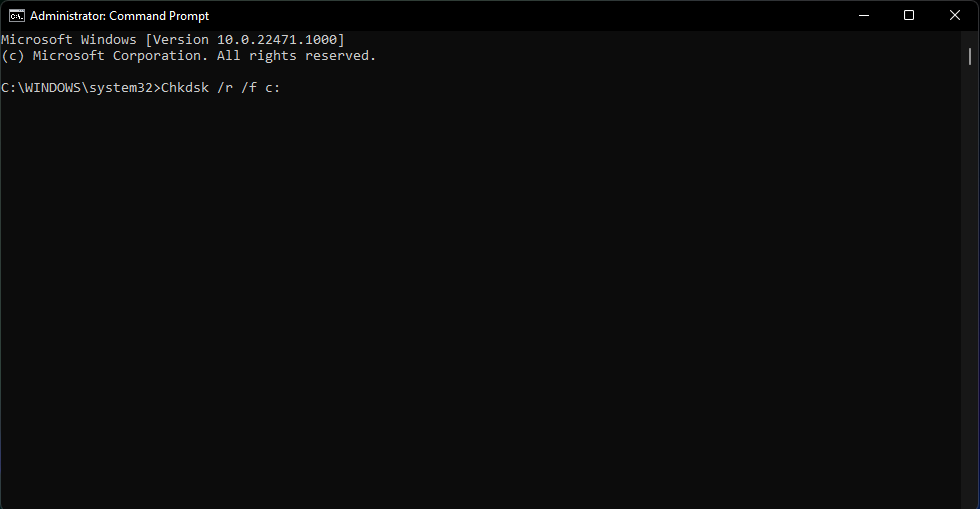
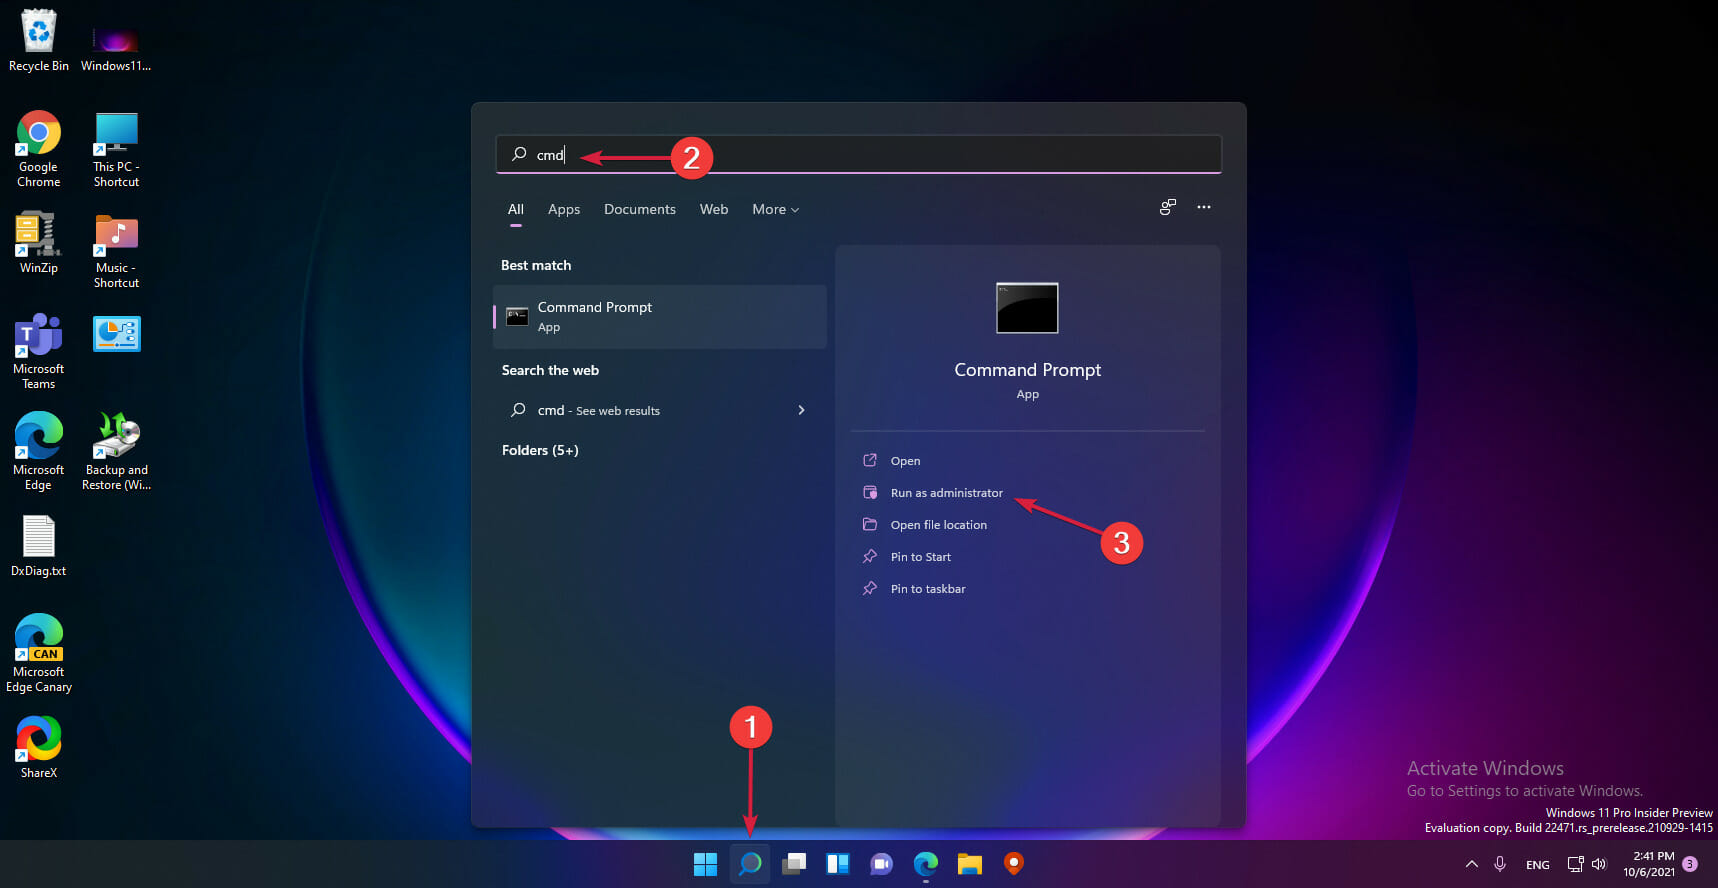
- Press the Search icon from the Taskbar, type cmd, and click on Run as administrator to start Command Prompt with full privileges.
- Type or paste the following command and press Enter to run it (C: is the default drive for the system, but you can replace it with the drive letter of your corresponding system partition):
chkdsk /r /f C: - CHKDSK will attempt to fix any problems found on your drive so wait patiently for the process to finish and then restart your PC.
3. Run a full antivirus scan
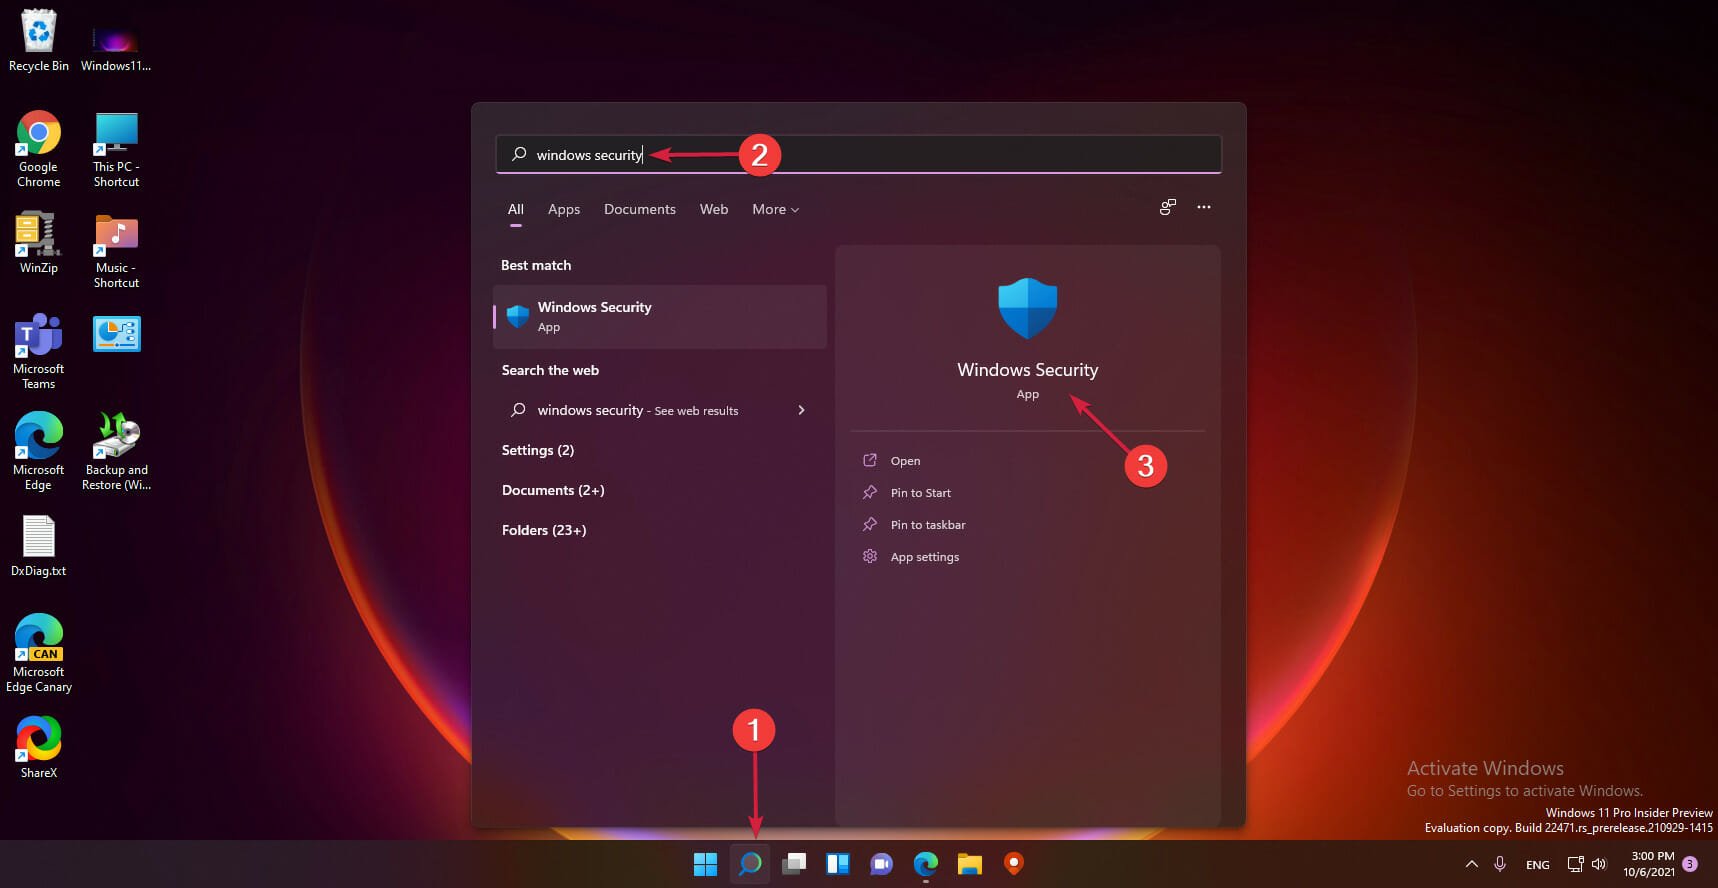
- Click the Search icon on the Taskbar, type windows security, and click on the app from the results.
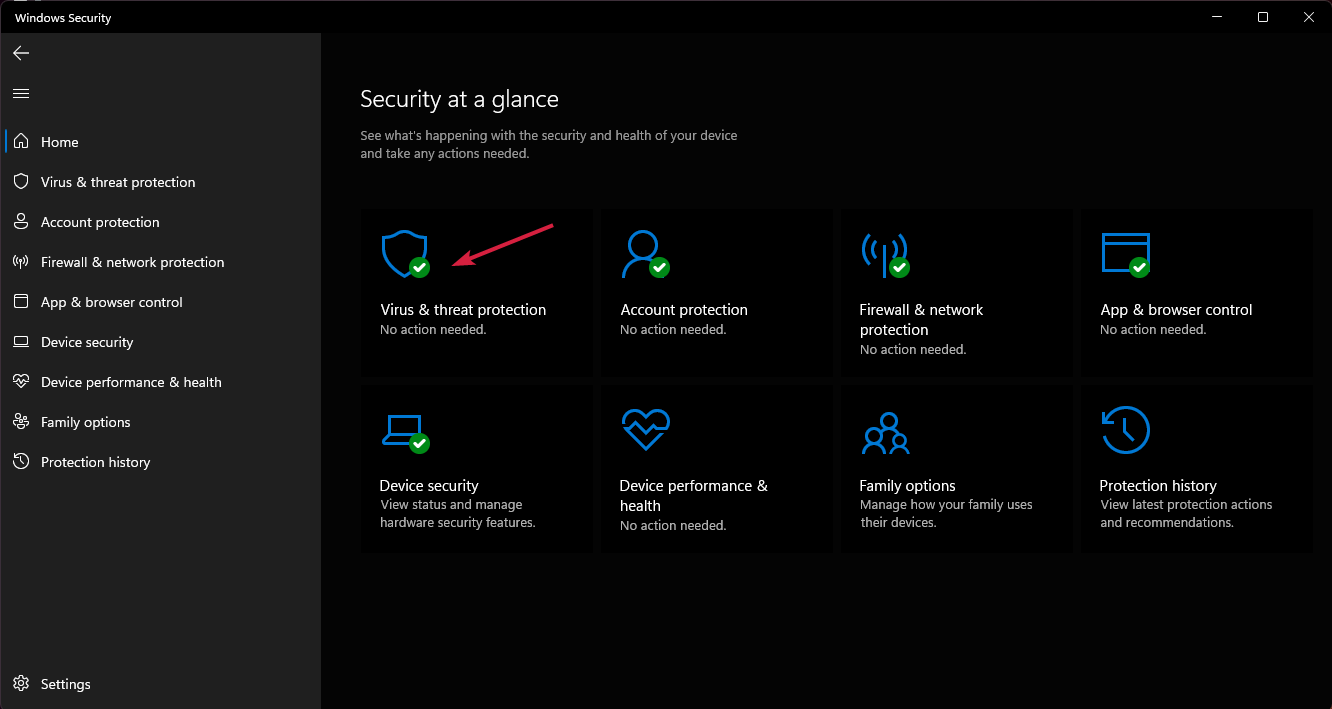
- Now click on Virus & threat protection.
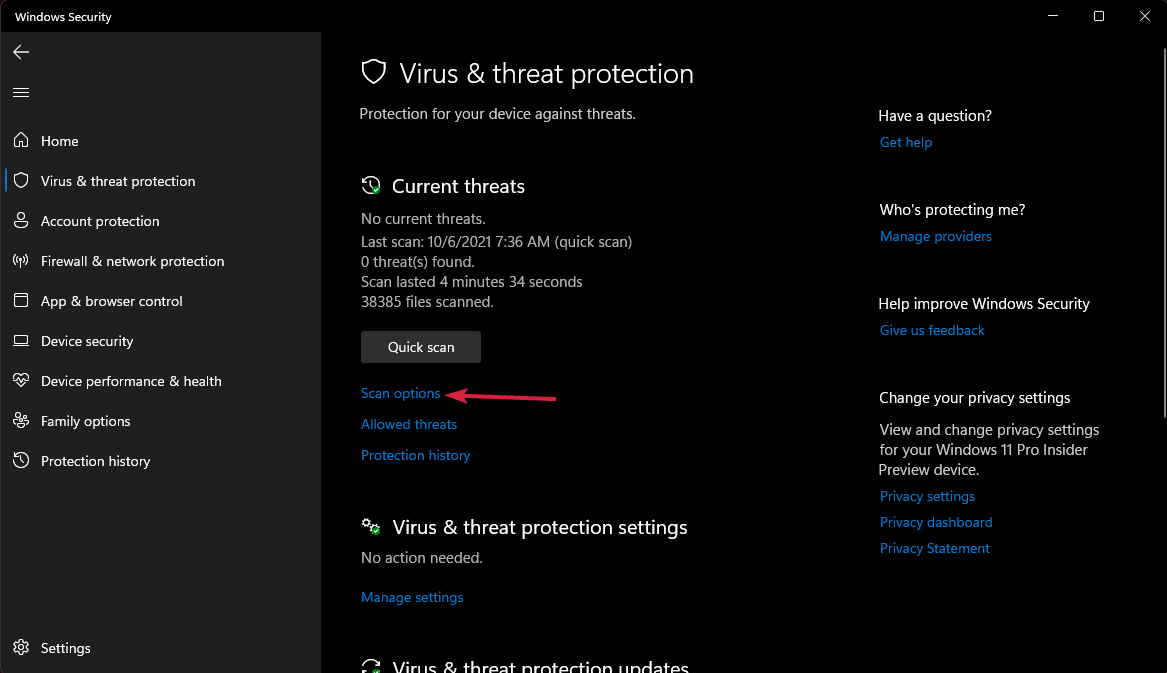
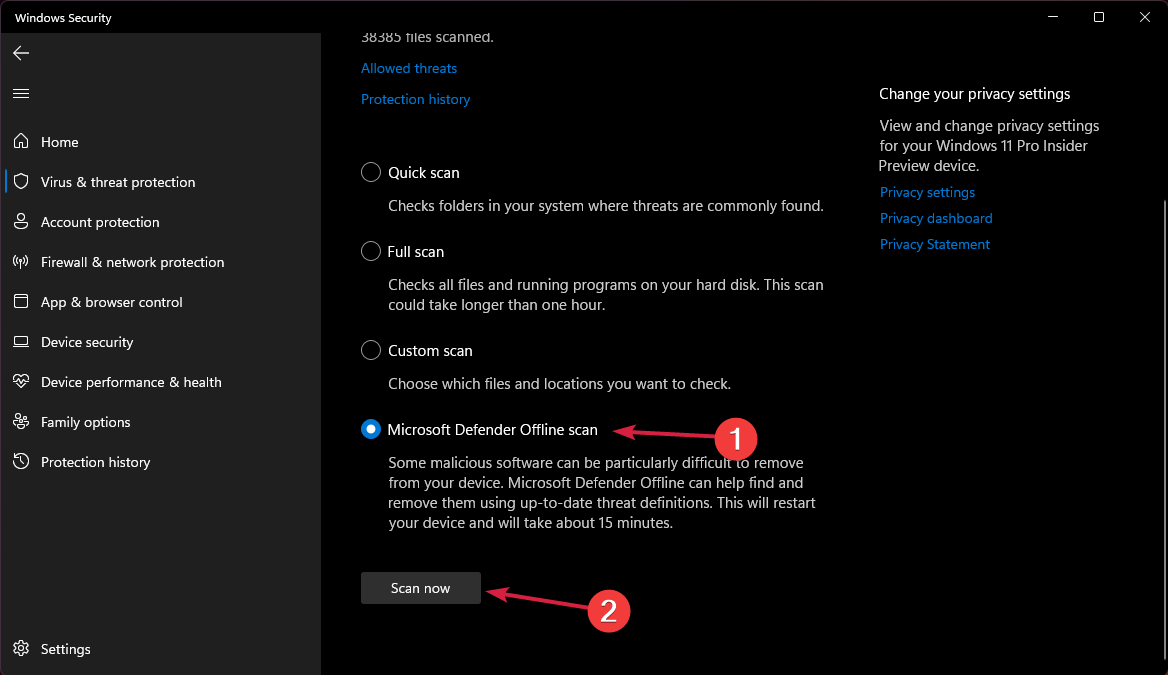
- Select Scan options right under the Quick scan button.
- Check the Microsoft Defender Offline scan and hit the Scan now button.
- It would be best if you restarted your PC for the scan procedure to start.
Now check if the kernel data inpage error is resolved.
4. Update or reinstall the disk driver
4.1 Update the driver
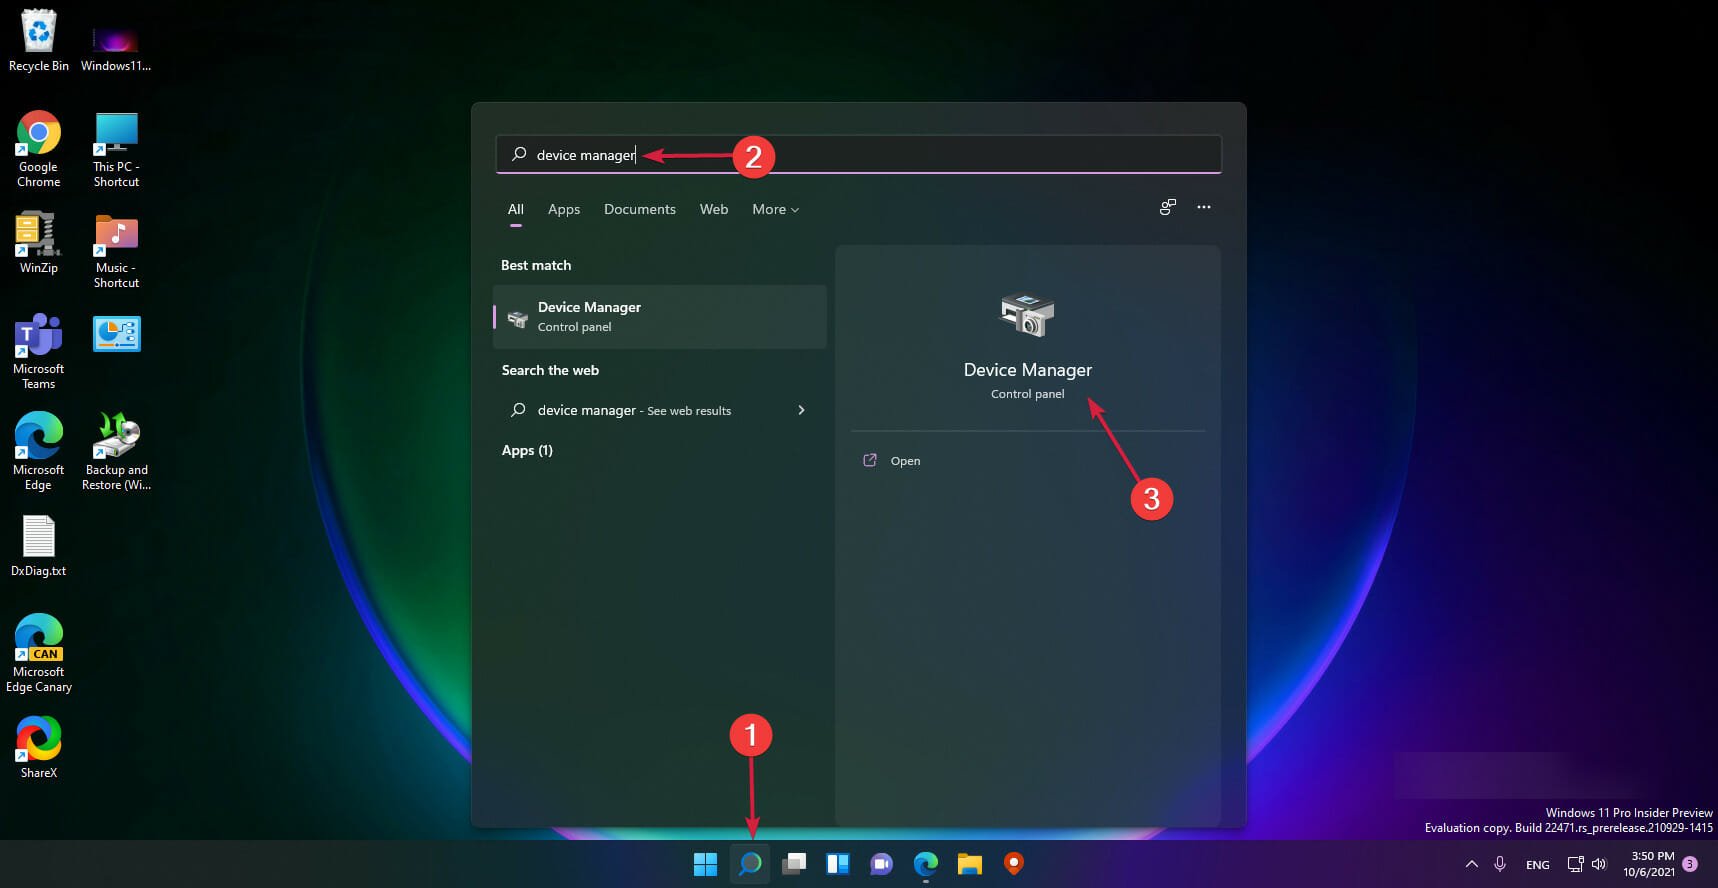
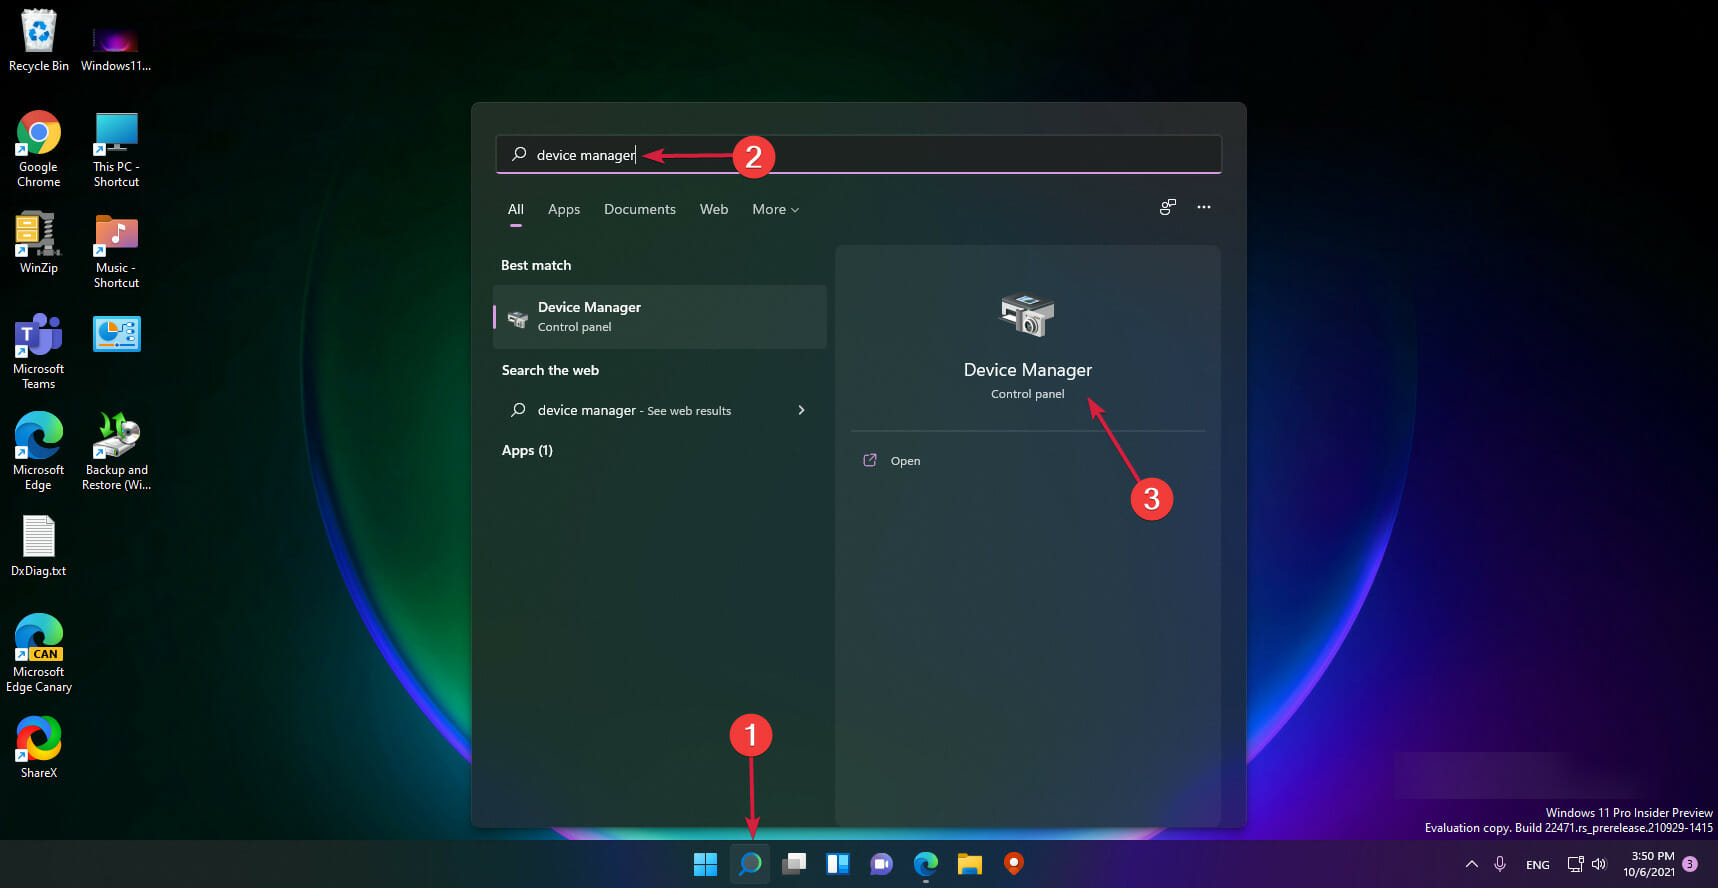
- Click the Search icon, type device manager, and select the app from the results.
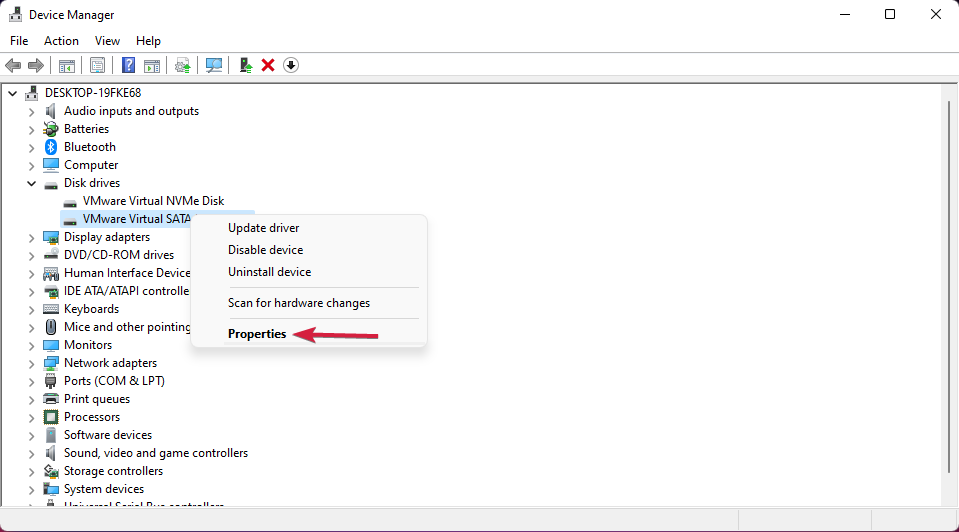
- Right-click, the driver from the Disk drives section and select Properties.
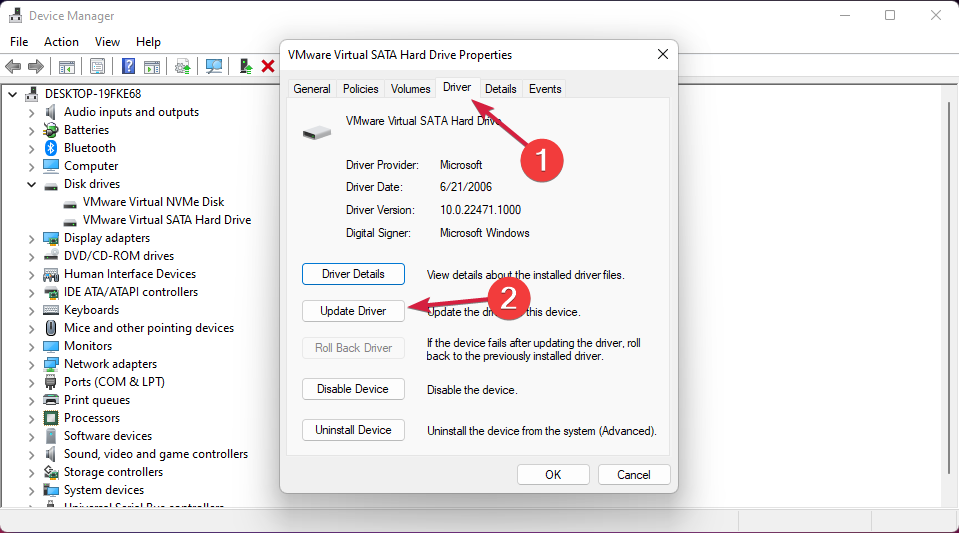
- Select the Driver tab, then click on the Update driver button.
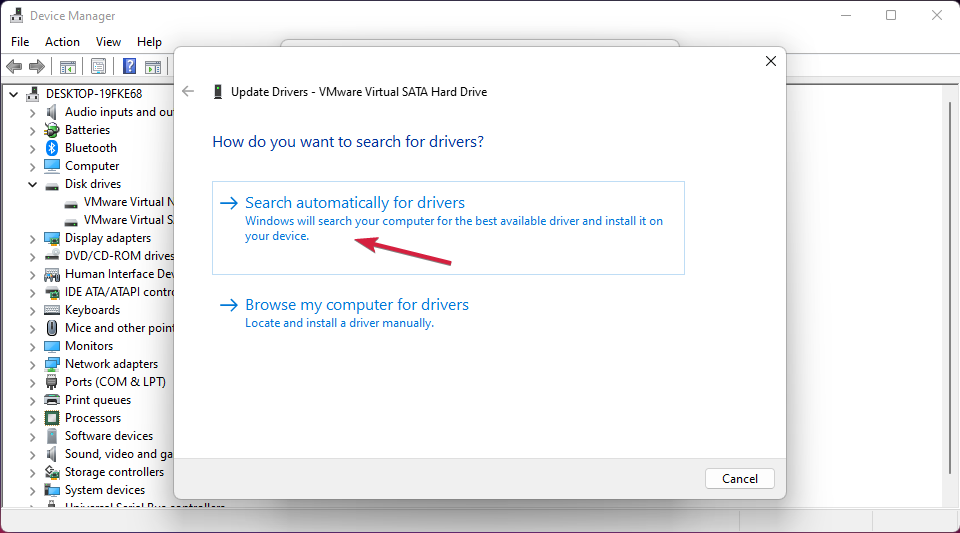
- Choose the first option, and Search automatically for drivers.
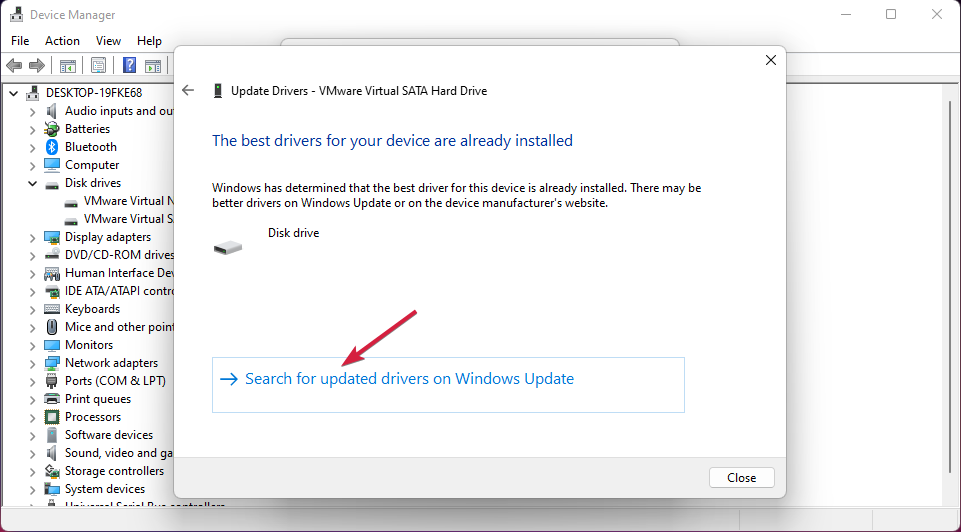
- If the system finds any new drivers, it will install them. If not, you can also click on Search for updated drivers on Windows Update.
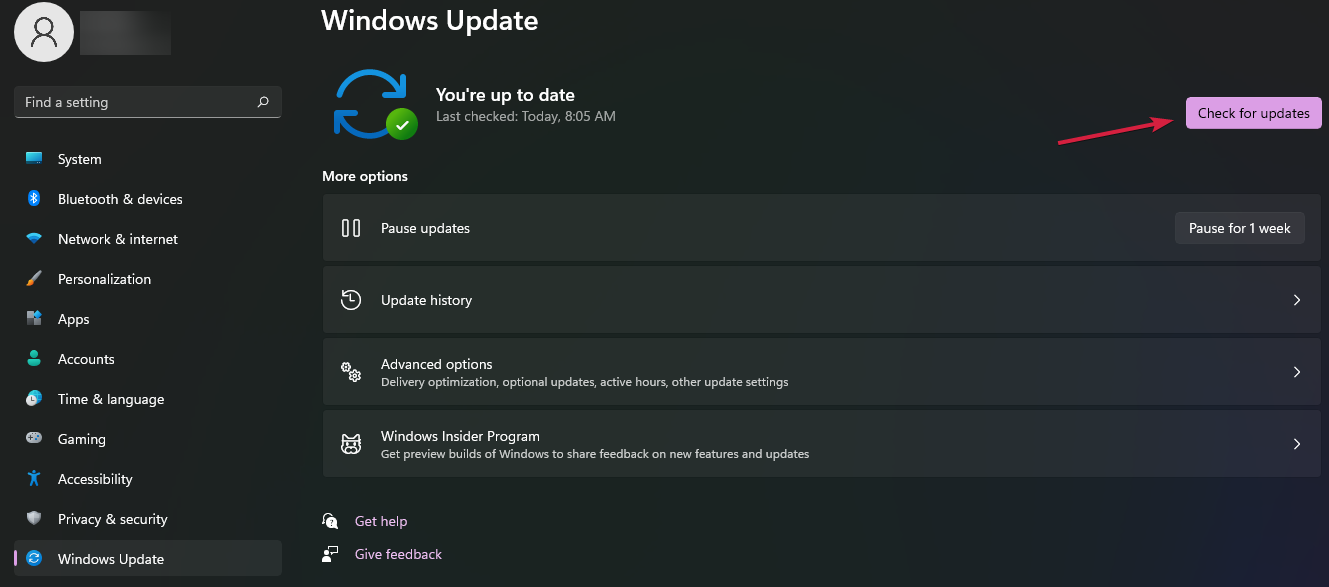
- You will be redirected to the Windows Update menu, so hit the Check for updates button.
- If there are any system updates, they will be downloaded and installed, and some updates may also contain new disk drive drivers.
For automatic driver updates, we recommend Outbyte Driver Updater, which will scan your entire PC and prompt you to choose which outdated or missing drivers to update.
4.2 Reinstall the disk driver
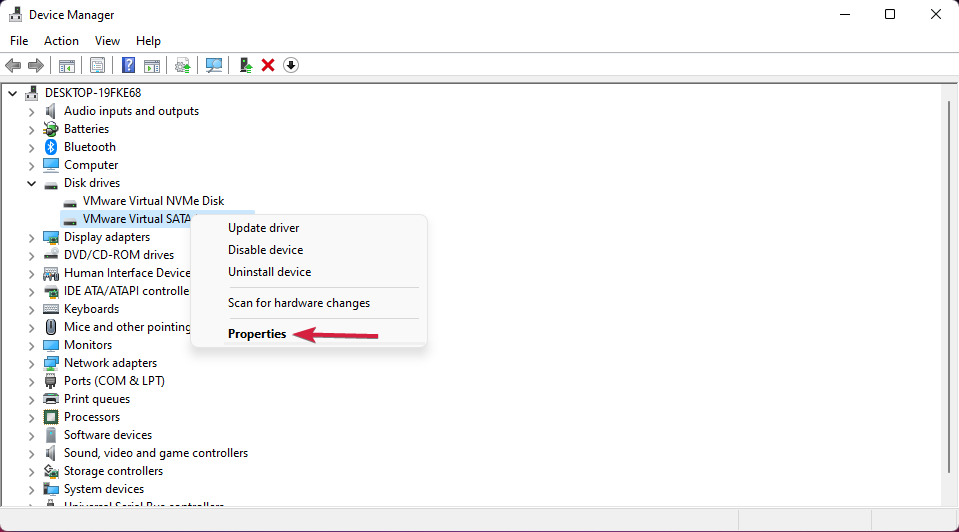
- Select the Search icon from the Taskbar, type device manager, and select the app from the results.
- Expand the Disk drives section, right-click the driver, and select Properties.
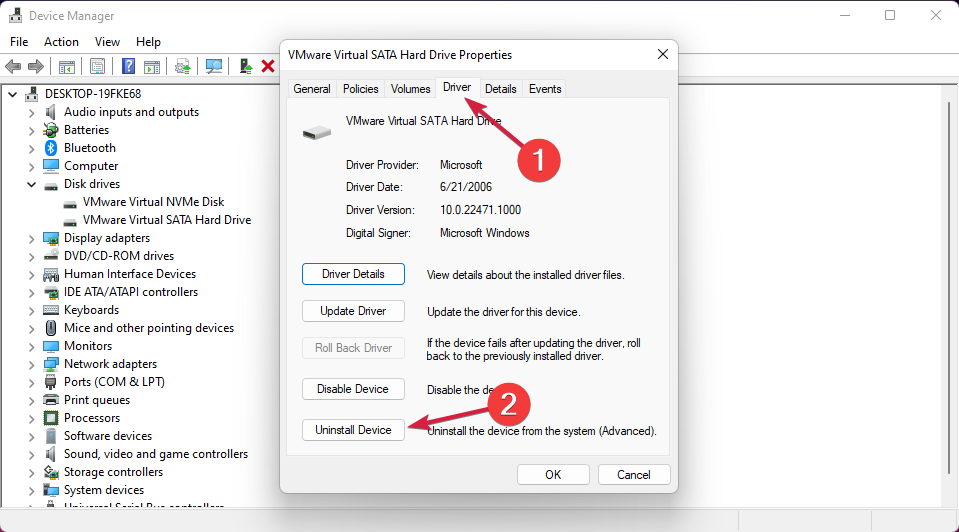
- Select the Driver tab and then select Uninstall device.
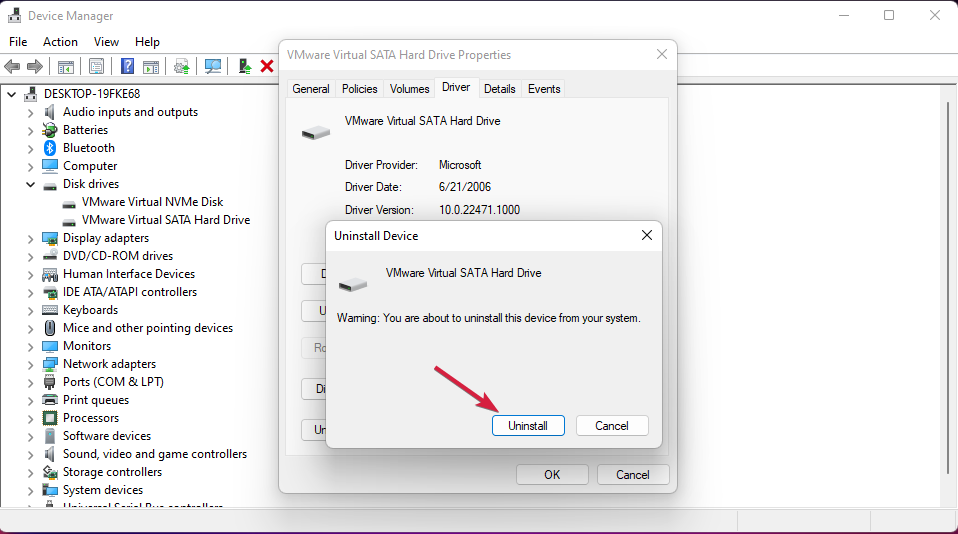
- Click on Uninstall to confirm your choice.
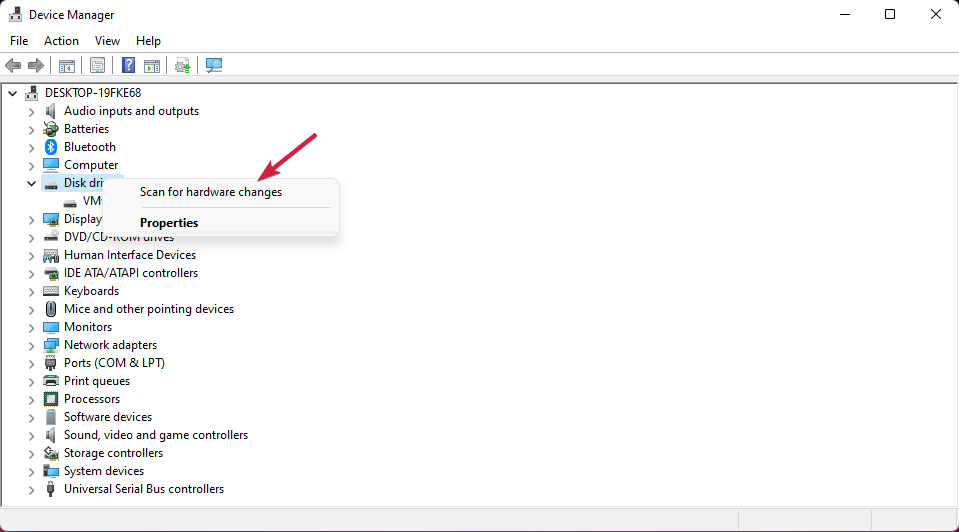
- Right-click on the Disk drives section and select Scan for hardware changes.
- The system will reinstall the latest driver for the drive.
5. Perform an SFC scan
- Click the Search button from the Taskbar, type cmd, and select Run as administrator to start Command Prompt with admin privileges.
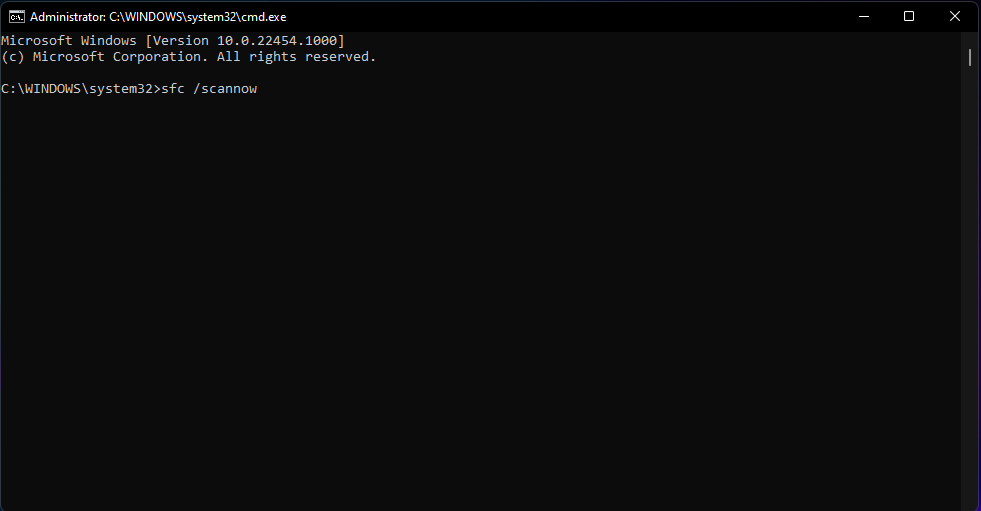
- Type or paste the following command and press Enter to run it:
sfc /scannow - Wait for the scan to complete the scanning process. If there are any corrupted system files, the tool will detect and repair them. First, check if the Windows 11 kernel data inpage error is fixed.
6. Set the Paging system to Automatic
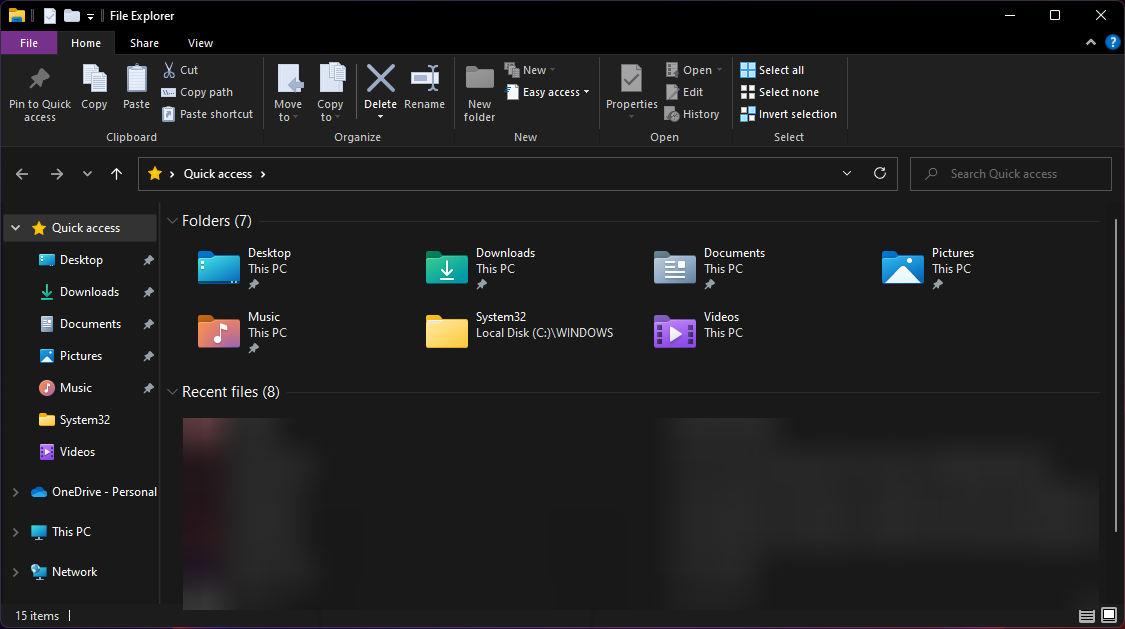
- Press the Windows key + E to start File Explorer.
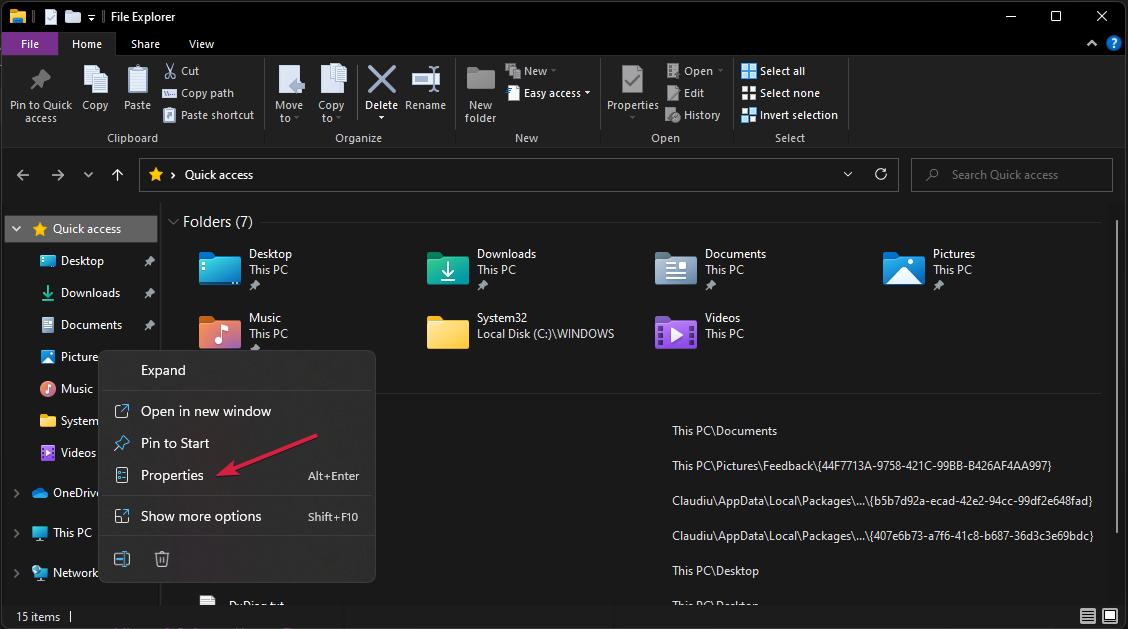
- Right-click on This PC and select Properties.
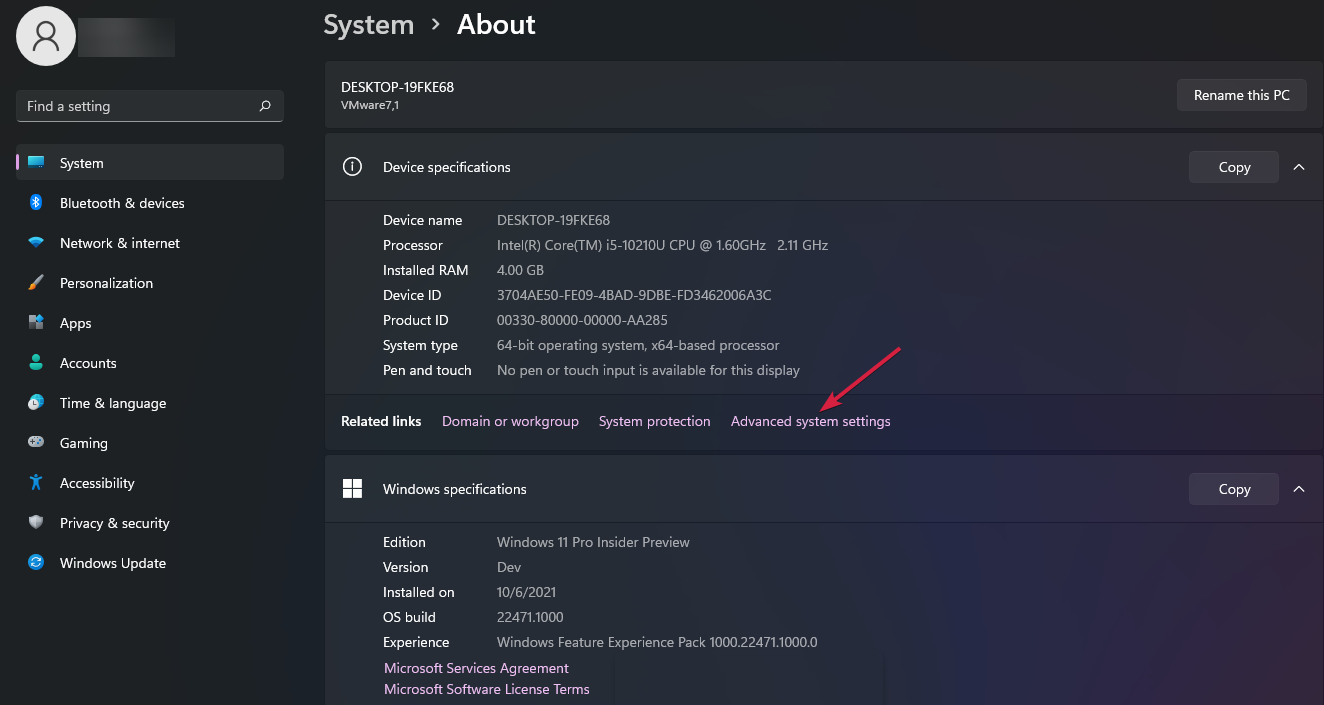
- Select Advanced system settings from the right pane.
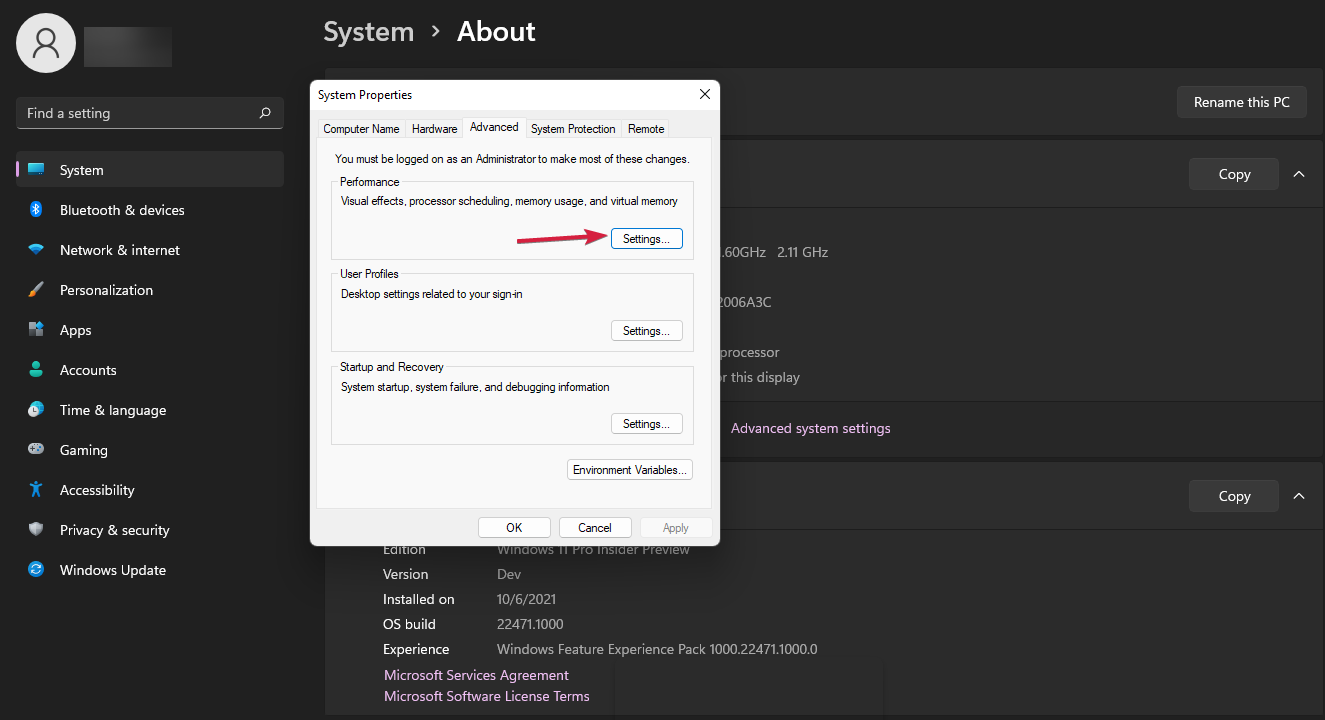
- Hit the Settings button under the Performance section.
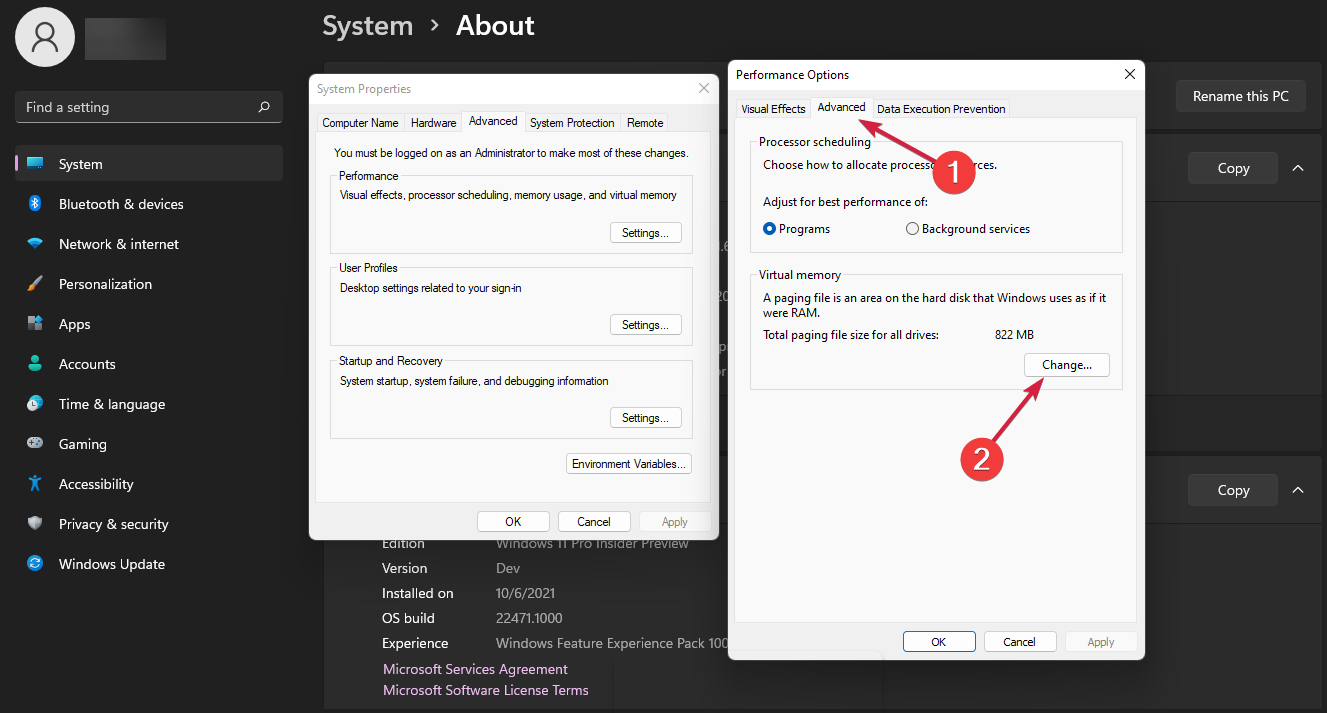
- Click on the Advanced tab, then click the Change button.
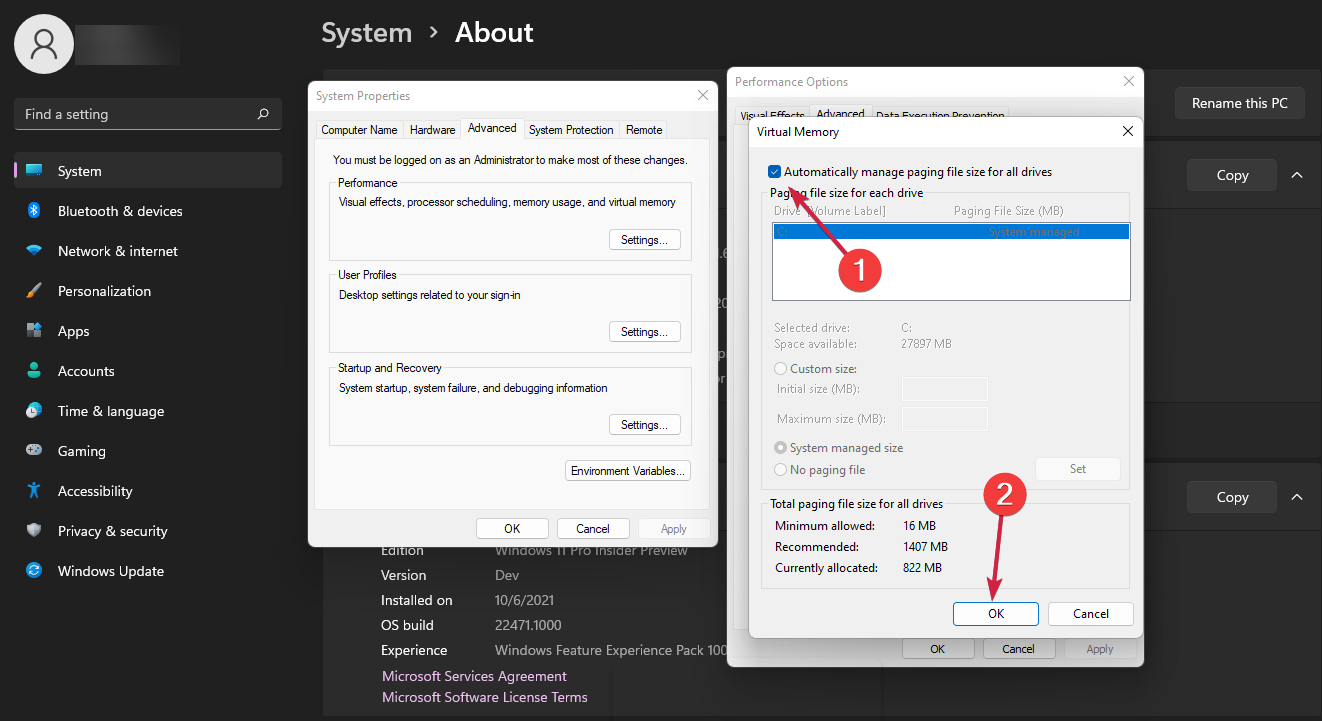
- Check the Automatically manage paging file size for all drives box and click OK.
- Restart the PC for the changes to take effect.
We hope our solutions helped you fix the Windows 11 kernel data inpage error, and now your computer works perfectly again.
When the drive shows signs of fatigue or malfunctioning, it’s much wiser to use the best backup software and look for a new component.
Tell us in the comments section below if you have any other suggestions or have experienced this problem firsthand.







User forum
0 messages