Night Light Not Turning Off in Windows 11? Apply These Fixes
7 min. read
Updated on
Read our disclosure page to find out how can you help Windows Report sustain the editorial team. Read more
Key notes
- The night light feature is critical since it helps reduce the strain on your eyes, but if the night light is not turning off in Windows 11, it could affect your experience.
- To fix the problem, check the system settings, reinstall or update the graphics driver, modify the registry, amongst other methods listed below.
- Also, find out all the other critical display issues you may encounter in Windows 11.

The night light is a feature in Windows that is meant to reduce the strain on your eyes when viewing the screen for extended periods. However, several users have reported that the night light is not turning off in Windows 11.
The feature is undoubtedly beneficial, but it affects the display, and several users disable it. Also, many with the night light enabled generally use the built-in option to activate it from sunset to sunrise.
But viewing the screen with the feature enabled the whole day can affect your experience. If you face this problem, read the following sections to determine what to do when the night light is not turning off in Windows 11.
How does the night light feature work in Windows 11?
Your computer screen emits blue light, similar to light from the Sun. During the day, it’s perfectly alright since the light emitted from the screen resembles the light around you.
But, when the environment gets dark at night, your eyes find it difficult to focus on bright colors. This is where night light comes into the picture. With the feature enabled, your screen emits warmer colors that gel with the surroundings.
Now, you must be wondering if the night light feature is beneficial. There are various research studies conducted on the subject that suggest so. The warmer color reduces the strain caused to your eyes and induces sleep, though the latter doesn’t work for all.
This night light feature is also available on iPhone, MacBook, and Android devices.
Now that you have a basic understanding of the feature, let’s walk you through the most effective fixes in case the night light is not turning off in Windows 11, and don’t hesitate to also take a closer look at the best night light settings for Windows.
What do I do if the night light is not turning off in Windows 11?
1. Disable the Schedule night light option
2. Update Windows 11
- Press Windows + I to launch the Settings app, and select Windows Update from the tabs listed in the navigation pane on the left.
- Next, click on Check for updates to scan for newer versions of the OS.
- If any are listed after the scan, click on the Download & install button.
Often, it’s a bug in the current OS version to be blamed for the night light not turning off in Windows 11 problem. In this case, it’s best that you update to the latest version.
If it’s an issue with the OS itself, Microsoft will likely release a patch for the subsequent updates. After updating Windows 11, check if the error is fixed. In case it does, head to the next method.
3. Reinstall the graphics driver
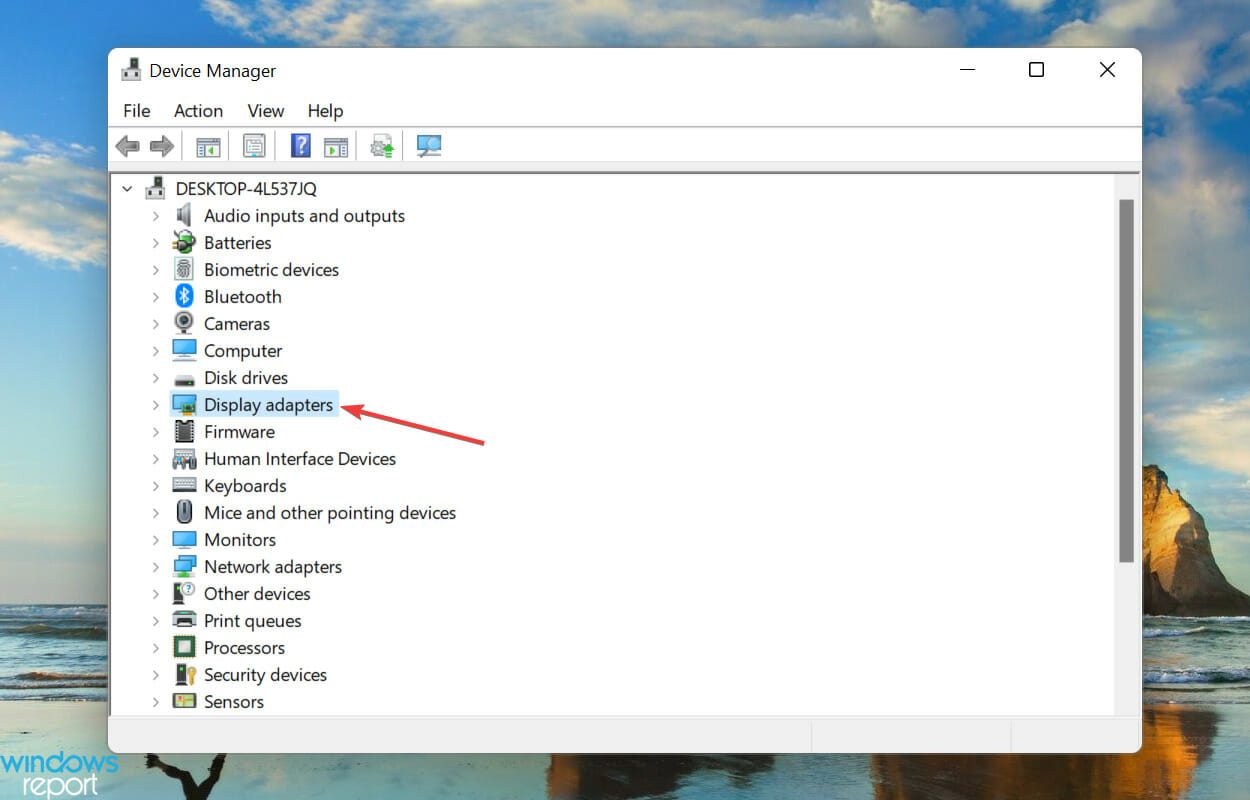
- Right-click on the Start icon or press Windows + X to launch the Quick Access menu, and select Device Manager from the list of options.
- Double-click on the Display adapters entry to view the graphics card.
- Now, right-click on the graphics adapter, and select Uninstall device from the context menu.
- Finally, tick the checkbox for Attempt to remove the driver for this device and click on Uninstall at the bottom.
- After the driver is uninstalled, restart the computer, and the OS will automatically install a fresh driver for the graphics adapter.
If the installed graphics driver is corrupt, it’s likely to lead to many display-related issues, including the night light not turning off problem in Windows 11. In this case, you should reinstall the driver.
Though the process may sound intricate to first-timers, it’s actually simple and wouldn’t take more than a few minutes.
4. Update the graphics driver
- Press Windows + S to launch the Search menu, enter Device Manager in the text field at the top, and click on the relevant search result.
- Next, double-click on the Display adapters entry or click on the carat icon before it.
- Right-click on the graphics adapter and select Update driver from the context menu.
- Now, select Search automatically for drivers from the two options listed in the Update Drivers window.
Drivers are critical for the effective functioning of every piece of hardware. And with each update, you will find several new features, performance enhancements, and patches for known problems. Therefore, it’s recommended that you keep the drivers updated.
The Device Manager method listed here will only scan for the best available driver on the system and not the web. So, if you haven’t downloaded a newer version previously, it won’t be able to update the driver.
In this case, you can always check for the latest driver version in Windows Update or manually download the setup from the manufacturer’s official website and install it.
The process of updating drivers seems tricky and time-consuming to most users, and they often give it a miss. This is where third-party apps come to your rescue.
5. Modify the registry
- Press Windows + R to launch the Run command, type regedit in the text field, and either click on OK or hit Enter to launch the Registry Editor.
- Click Yes on the UAC (User Account Control) prompt that pops up.
- Now, paste the following path in the address bar at the top, and hit Enter. Alternatively, you can use the navigation pane on the left to go to it:
HKEY_CURRENT_USER\Software\Microsoft\Windows\CurrentVersion\CloudStore\Store\DefaultAccount\Cloud - Next, right-click on the following key and select Delete from the context menu:
$$windows.data.bluelightreduction.bluelightreductionstate - Click Yes in the confirmation prompt that appears.
- Similarly, delete the following key as well:
$$windows.data.bluelightreduction.settings - Once done, restart the computer for the changes to come into effect, and check if the error is fixed.
6. Create a new user account
If none of the fixes listed above have worked, it could be a problem with the user account as well. And, after going through several forums, we believe it’s most likely that the user profile has gone corrupt.
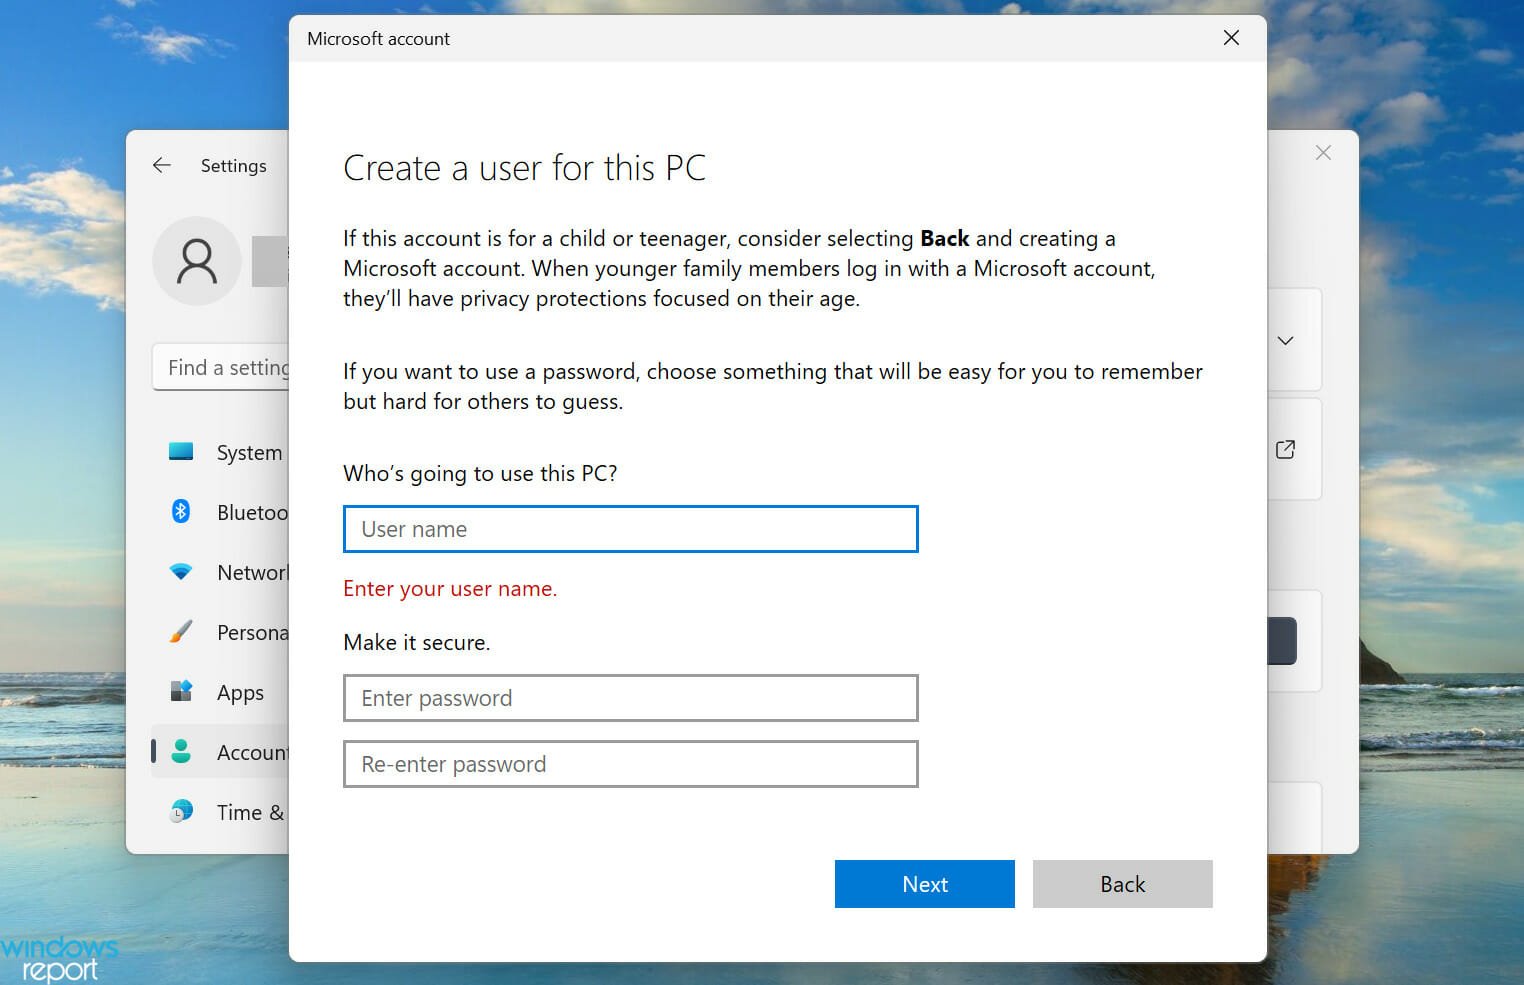
In this case, it’s best to create a new local account in Windows 11 and verify the same. If it works and you don’t encounter the error anymore, you can continue using the same local account or create another one linked to Microsoft.
The decision of whether to continue with the local account or create a Microsoft one depends solely on the user, since it has got to do with personal requirements and the way the device is to be used.
What are the display issues users generally face in Windows 11?
Windows 11 is still relatively new and you are bound to encounter a few issues, until a couple of updates with patches for previously known bugs are released. Also, some issues could arise due to misconfigured settings or conflicting applications.
Several users have reported screen dimming automatically in Windows 11, so learn how to fix it. Also, there is the screen flickering problem, and the methods to eliminate it are listed in the linked guide.
But one of the scariest display problems remains the black screen issue in Windows 11, check out the solutions for it. In this case, you are unable to use the system, which makes troubleshooting all the more difficult.
In the above sections, we have comprehensively discussed the problem of the night light not turning off in Windows 11 and other display-related issues. If none worked, you can always reset Windows 11 to its factory settings and eliminate the error.
Also, check the detailed guide on the best Night light settings for Windows 10/11; read this guide to learn more.
Also, find out how to go full screen in Windows 11 or mirror your computer’s screen to a TV.
Tell us which fix worked and what your experience of Windows 11 has been thus far in the comments section below.








User forum
1 messages