Fix Sound not Coming Through Headphones with 9 Expert Tips
For wireless headphones, make sure they are set as the main output
8 min. read
Updated on
Read our disclosure page to find out how can you help Windows Report sustain the editorial team Read more
Key notes
- If the sound is not coming through the headphones on your PC, use the audio troubleshooter and update the audio drivers.
- Read below to find the detailed step-by-step instructions teste by our WR software specialists.
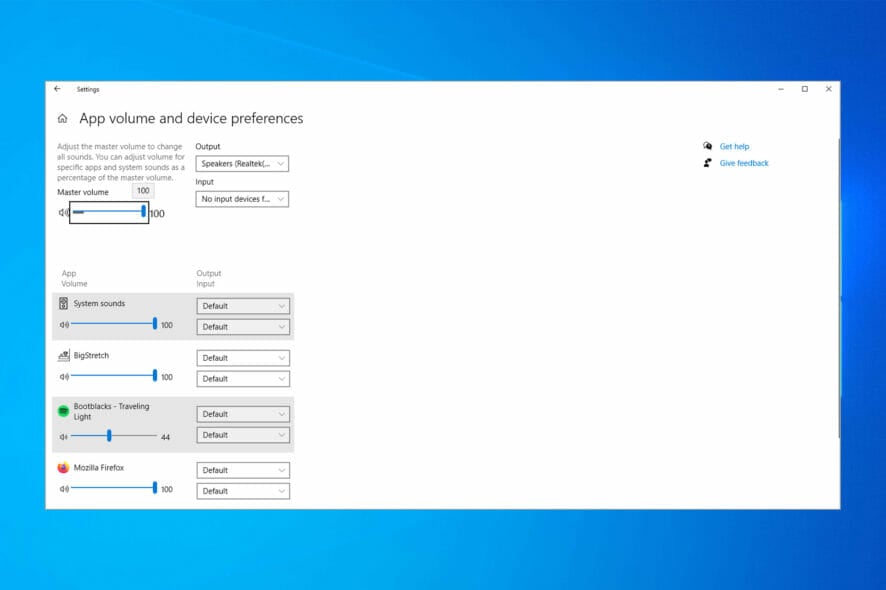
If the computer is not playing sound through headphones, our WR labs specialists have found ways to fix the problem.
Why is the sound not coming through my headphones? Various factors could cause this problem, including outdated or malfunctioning drivers, incorrect settings, or the headphones are not detected. But we will show you how to fix the issue quickly, as we did with the Windows 11 no sound issue.
What do I do if the sound is not coming through headphones?
1. Use the Troubleshooting tool
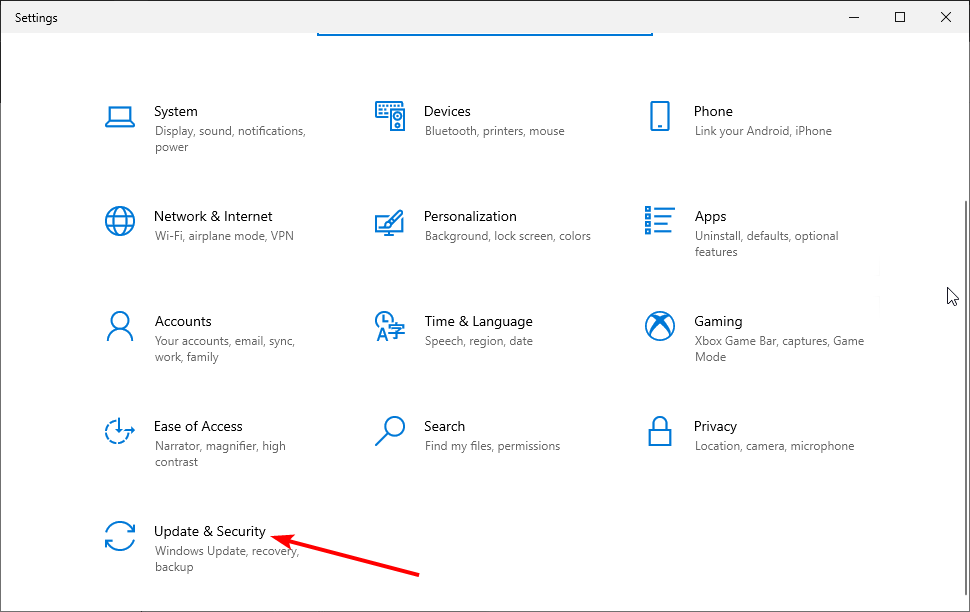
- Press the Windows key + I to open the Settings app.
- Choose Update & Security.
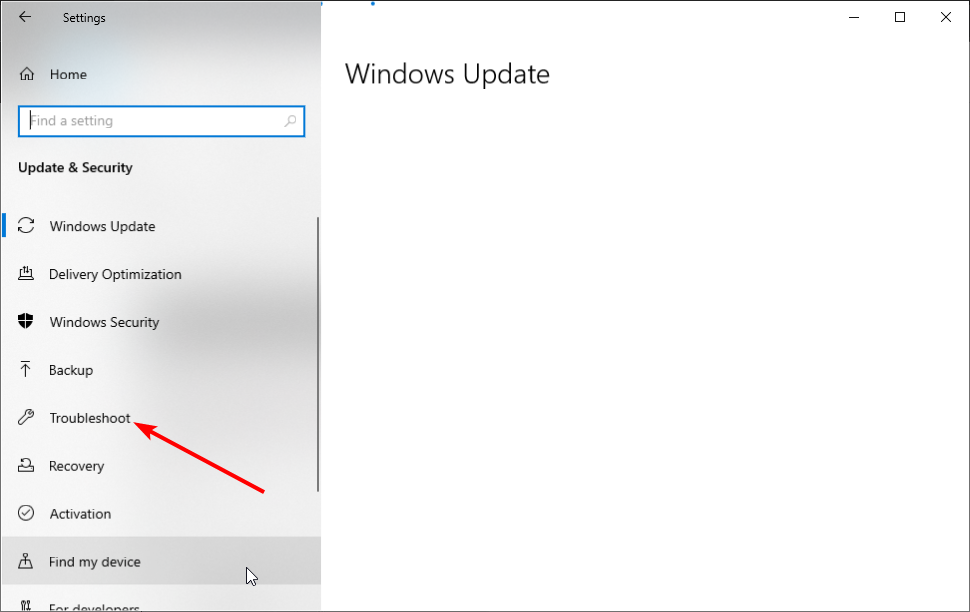
- Select Troubleshoot in the left pane.
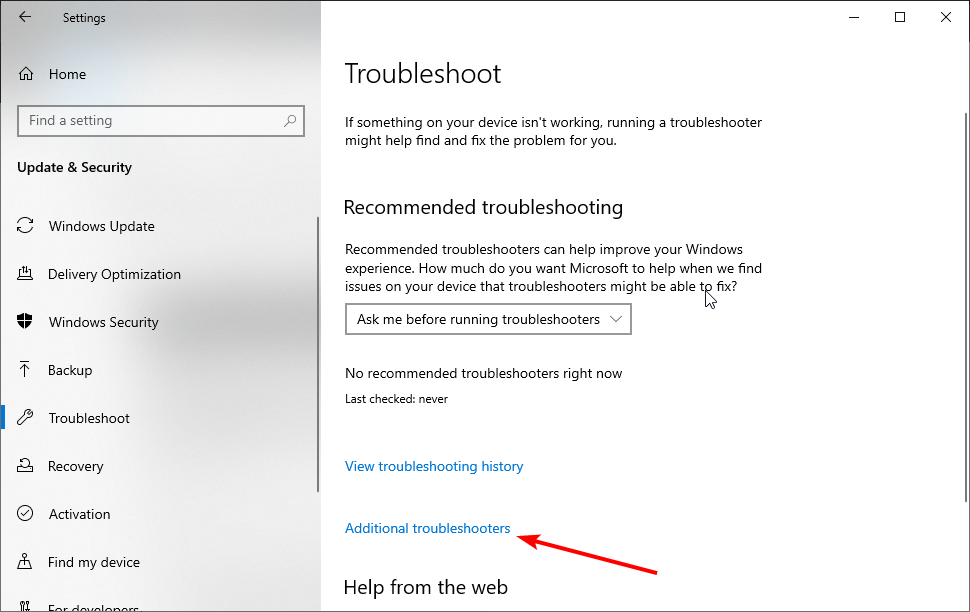
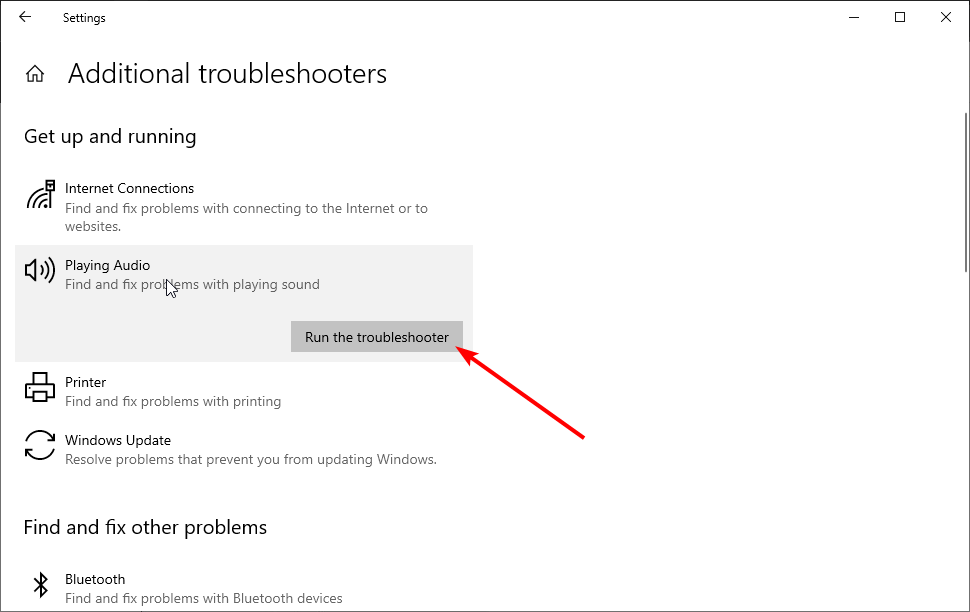
- Choose the Additional troubleshooters option.
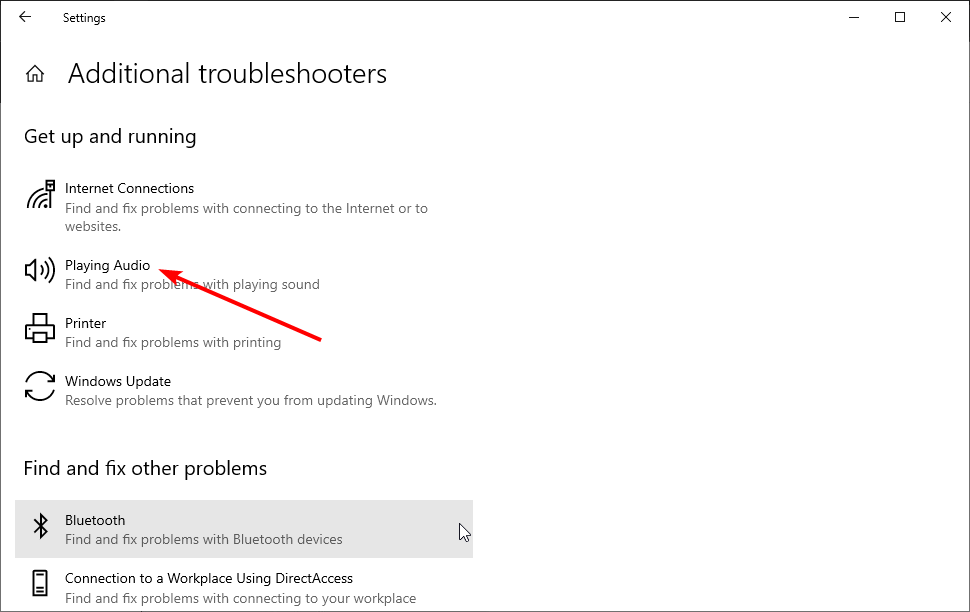
- Now, click on the Playing Audio option.
- Finally, click the Run the troubleshooter button and follow the onscreen instructions to complete the process.
The Troubleshooting feature is a tool that can automatically fix common problems in your system, such as wired headphones connected but no sound.
Although it can’t fix every problem, it can still fix minor issues like headphones recognized or detected but no sound.
2. Update the audio driver
2.1. Update driver manually
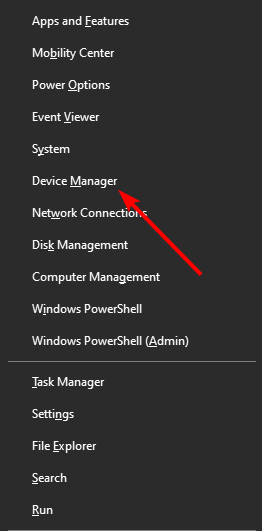
- Press the Windows key + X and select Device Manager.
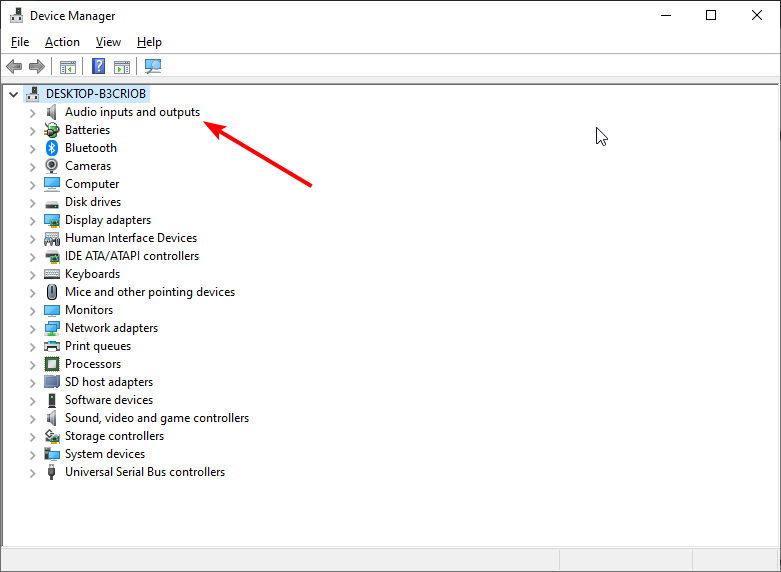
- Double-click on the Audio inputs and outputs option to expand it.
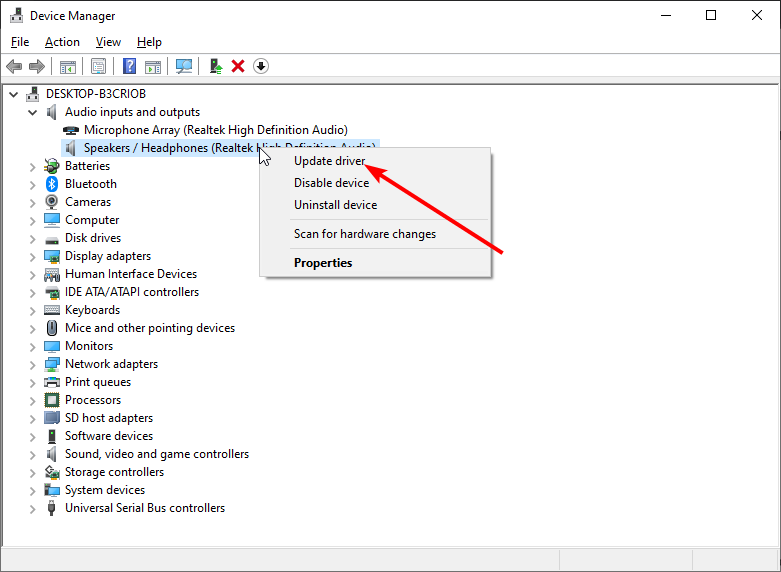
- Right-click on the speaker driver there and select Update driver.
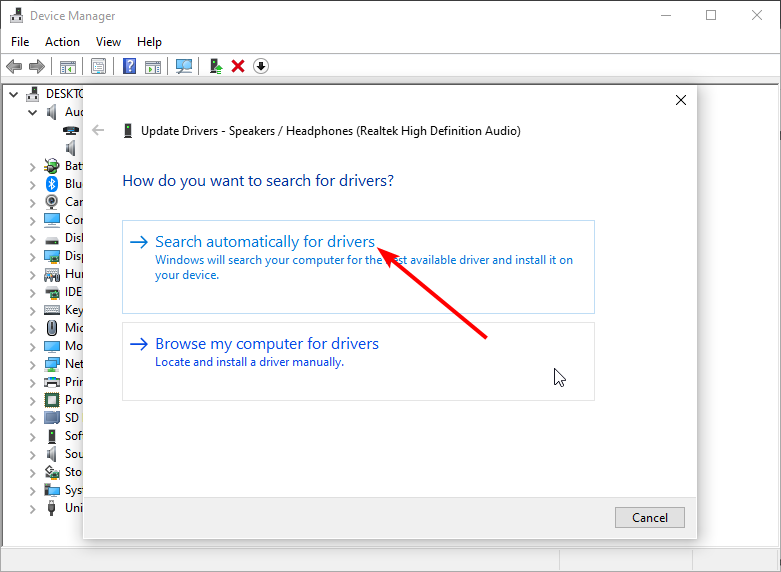
- Choose Search automatically for drivers.
- Wait for the scan to finish and install any available updates.
An updated audio driver might resolve the problem if headphones are detected but no sound in Windows 10 Realtek after upgrading the operating system to Windows 10.
One of the first things everyone will tell you to do is check if your audio drivers are up to date. Outdated drivers often cause various problems, which is the same with speakers.
So use the method above to update your Realtek audio driver and the headphone driver to fix the headphones detect but no sound issue.
Your drivers can be the problem, especially if you’re having USB headset issues, so updating the drivers as instructed above will do the trick.
2.2. Update drivers automatically
Updating drivers manually is very annoying, so we recommend you download a third-party driver updater to do it automatically.
Thus, you will prevent file loss and even permanent damage to your computer by constantly having the latest available drivers installed.
3. Set default speakers and test the sound
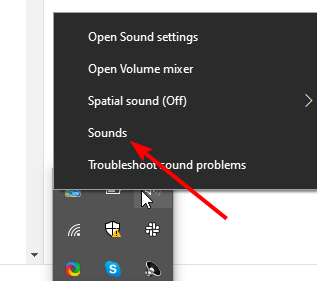
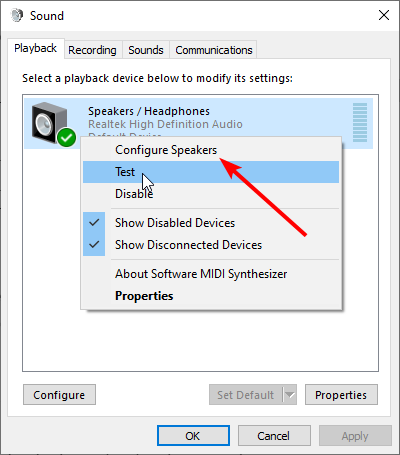
- Right-click the sound icon in the Taskbar and select the Sounds option.
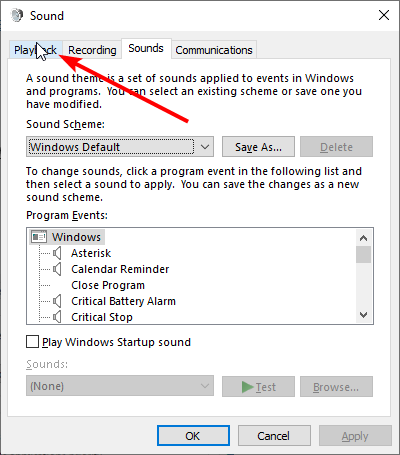
- Click on the Playback tab and right-click your headphones.
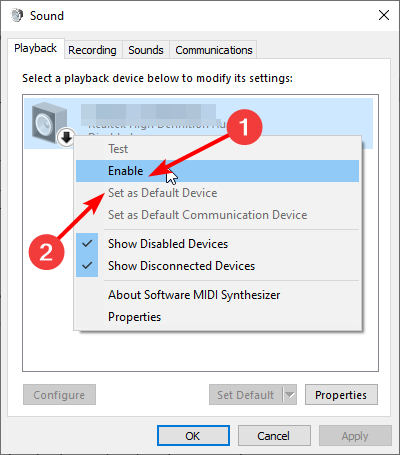
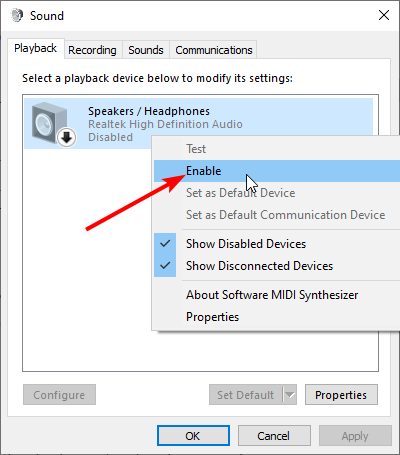
- Select the Enable option followed by Set as Default Device. For example, if you have only your speakers connected to your computer and no other playback device, they will be set to default automatically.
- Now, right-click on your headphone again and select the Configure Speakers option.
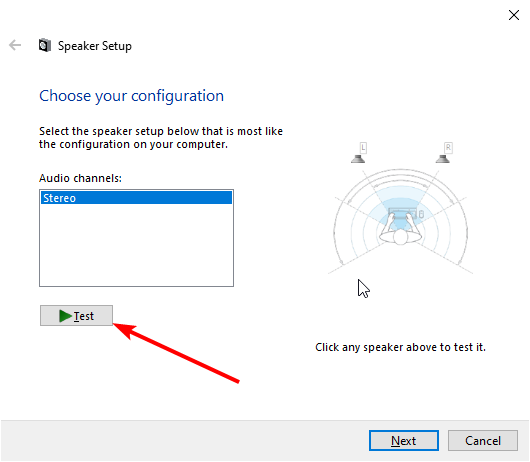
- Select your speaker setup and click the Test button to play sound with your device.
After using the Troubleshooting tool, get the system speakers back to default.
You’re all done if you correctly hear the sound in your headphones. If the sound is still missing, try to finish your configuration setup. Click Next and follow further on-screen instructions.
If you still didn’t solve your problem with sound, don’t get mad; there’s still something you can do.
4. Change the default sound format
- Right-click on the speaker icon in the taskbar and select Sounds.
- Click the Playback tab at the top.
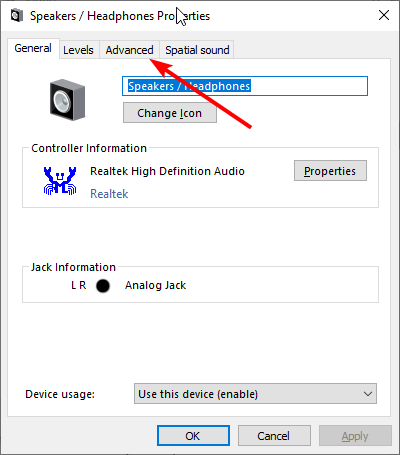
- Double-click your default playback device.
- Click the Advanced tab at the top.
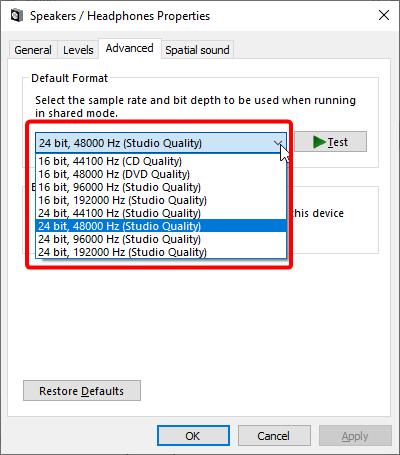
- Now, click the Default Format dropdown and choose a suitable sound format.
This is the most common issue which causes the disappearance of sound from your speakers or headphones. If your default sound format is wrong, you won’t be able to play any sound on your computer.
So, all you need to do is change the sound format. The wired headphones will be connected, but there will be no sound issue on your PC.
5. Roll back your headphones driver
- Repeat the Steps 1 and 2 in the previous solution.
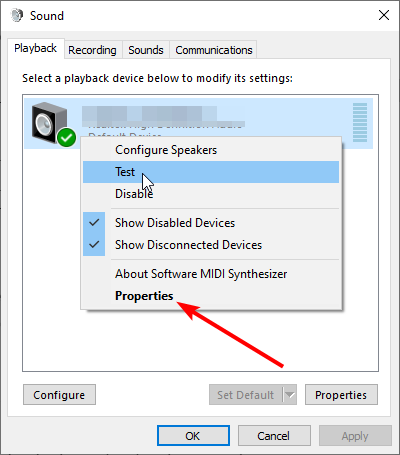
- Right-click your default playback device and select Properties.
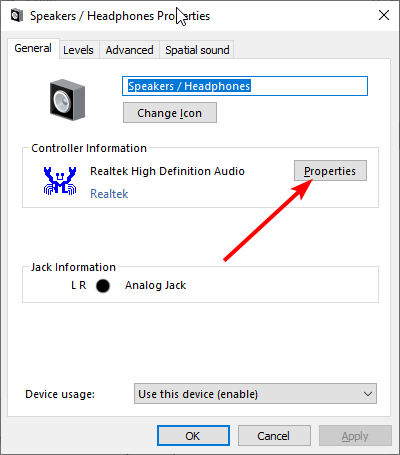
- Click the Properties button in the General tab.
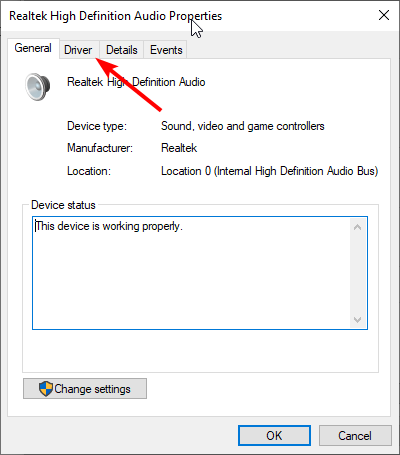
- Now, click the Driver tab at the top.
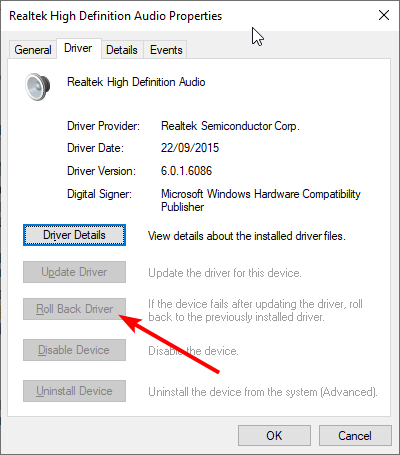
- Finally, the Roll Back Driver button.
We told you at the beginning of the article to update your sound driver, but maybe the solution is the opposite.
If you’re using an older sound card version, its latest driver may not be compatible with Windows 10, so you can try rolling back to the previous version, which worked.
Many users had no sound after updating the Realtek driver. Check this quick article out for some quick tips to solve the problem!
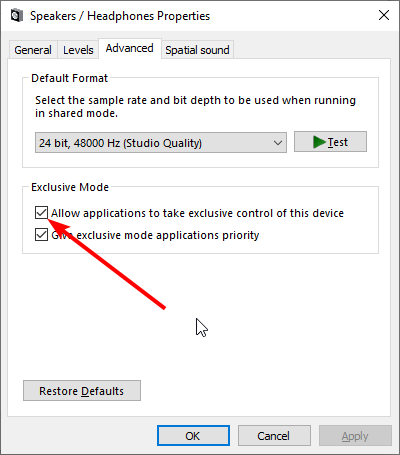
6. Disable Exclusive mode
- Right-click the sound icon in the taskbar and Sounds.
- Click the Playback tab at the top and double-click your headphone.
- Click the Advanced tab at the top.
- Now, uncheck the box for Allow applications to take exclusive control of this device.
- Lastly, click Apply and OK to save changes.
7. Restart the Windows Audio service
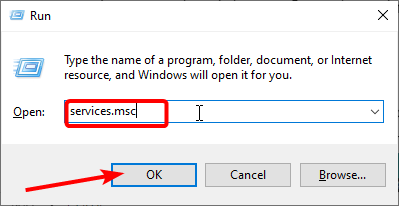
- Press the Windows key + R, type services.msc, and click OK.
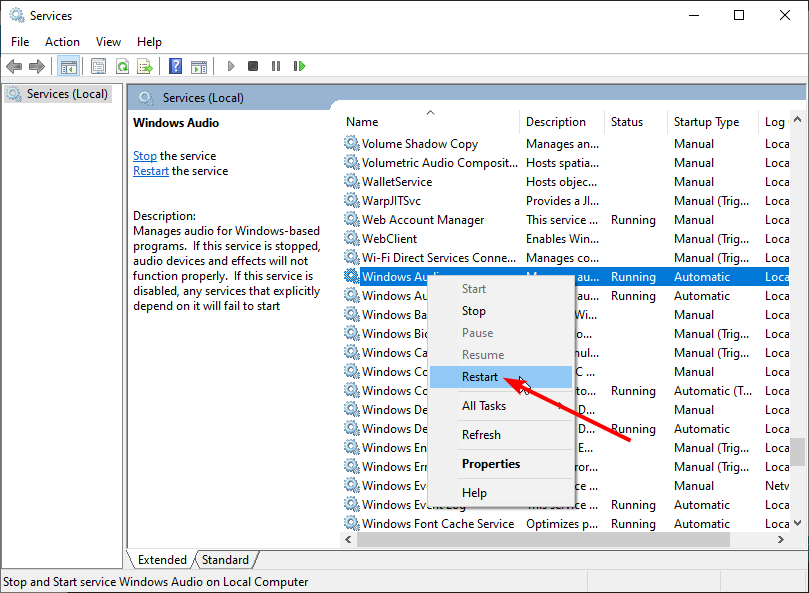
- Locate the Windows Audio service and right-click it.
- Select the Restart option.
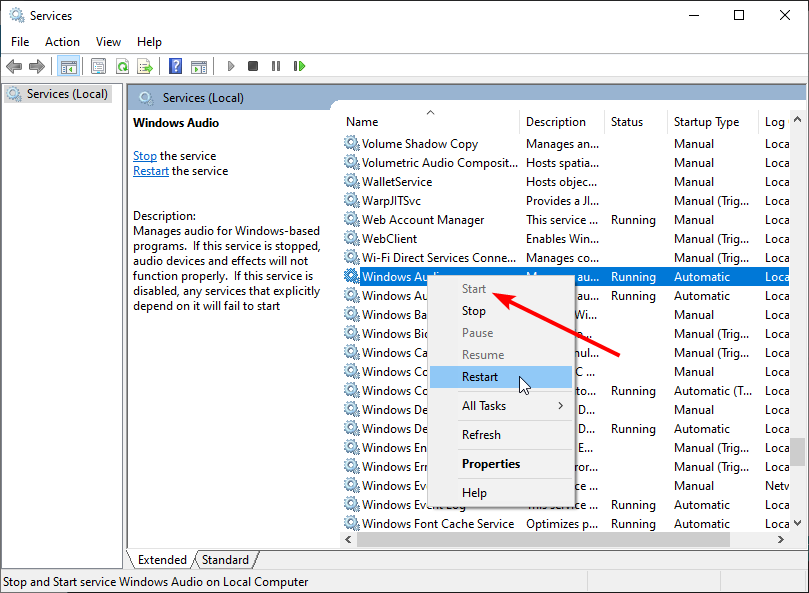
- If the service is disabled, select the Start option instead.
- Wait for the process to finish and restart your computer.
There’s a chance Windows’ default audio service got disrupted, which is precisely what blocks the sound from your headphones. So, we will restart this service and see if it has any positive effects.
8. Perform an SFC scan
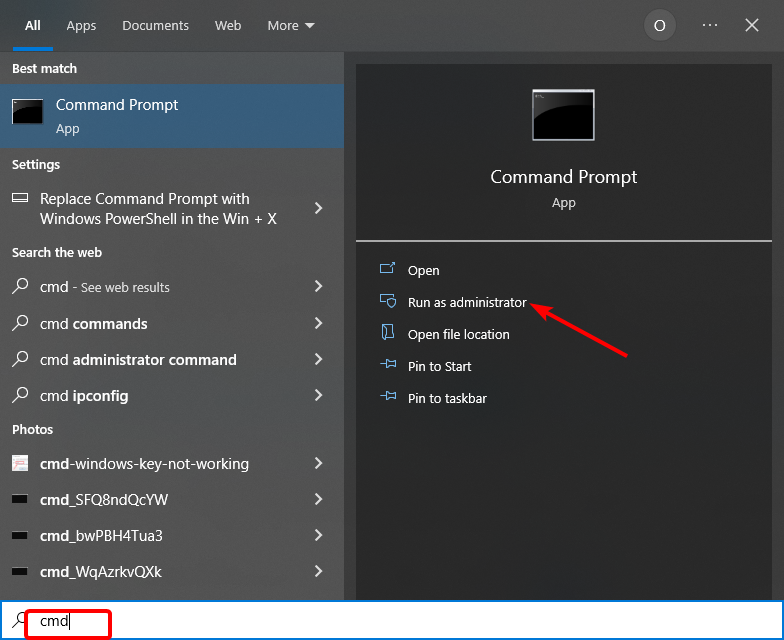
- Press the Windows key + S and type cmd.
- Click the Run as administrator option under Command Prompt.
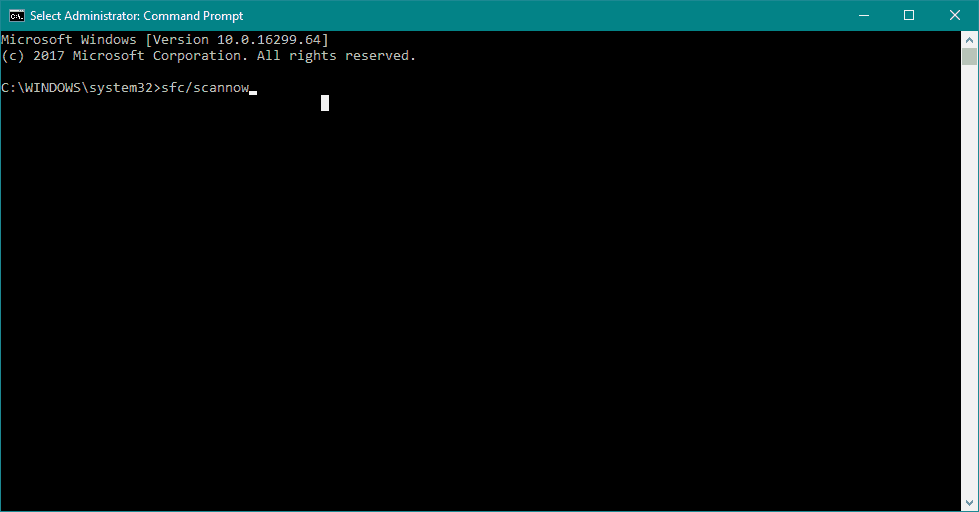
- Enter the following command, and press Enter:
sfc/scannow - Wait for the process to finish and restart your computer.
The SFC scan is another built-in troubleshooter in Windows. It helps with various problems, including our sound issue.
9. Restore your computer
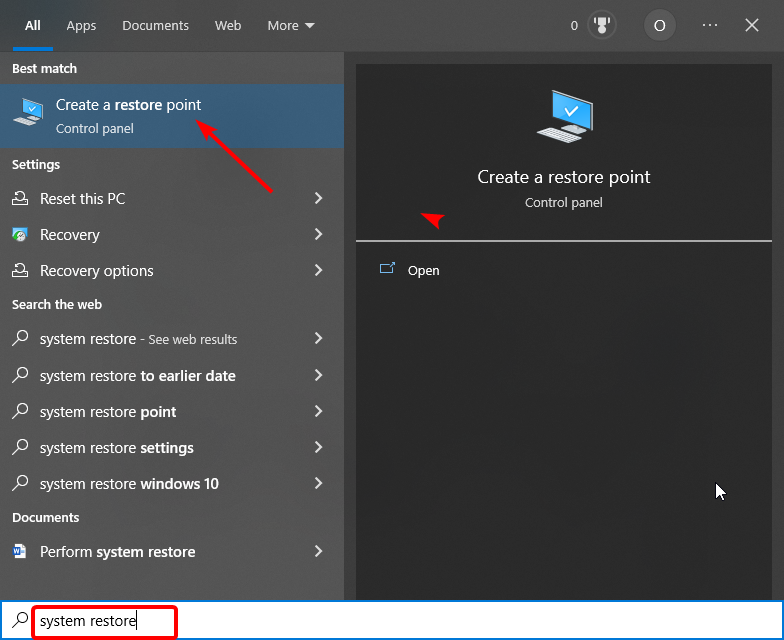
- Click the Start button, and search System Restore.
- Select the Create a restore point option.
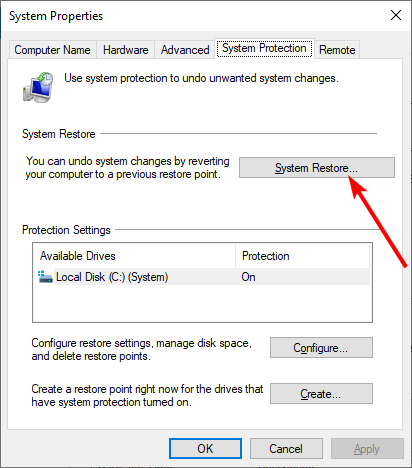
- Click the System Restore… button.
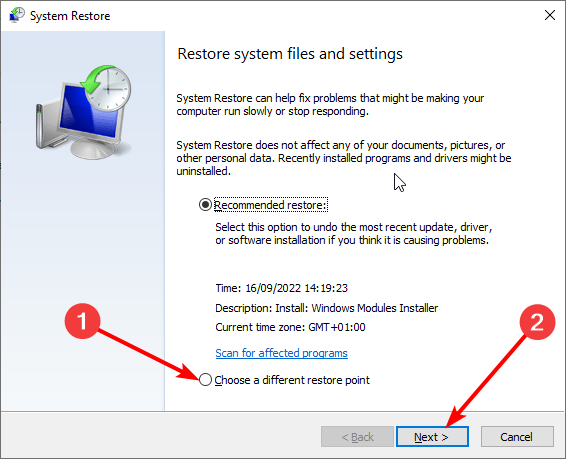
- Now, tick the radio for Choose a different restore point and click Next.
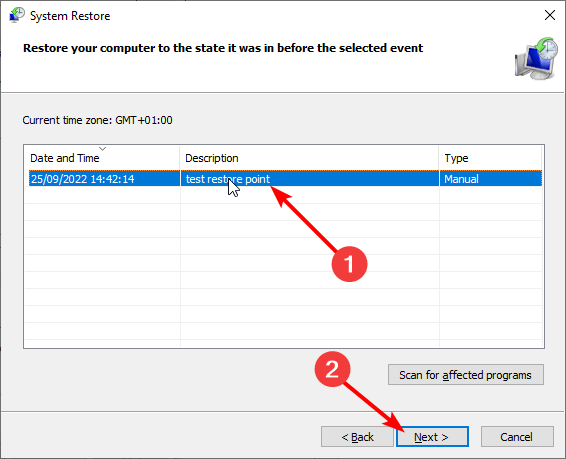
- Select your desired restore point and click the Next button.
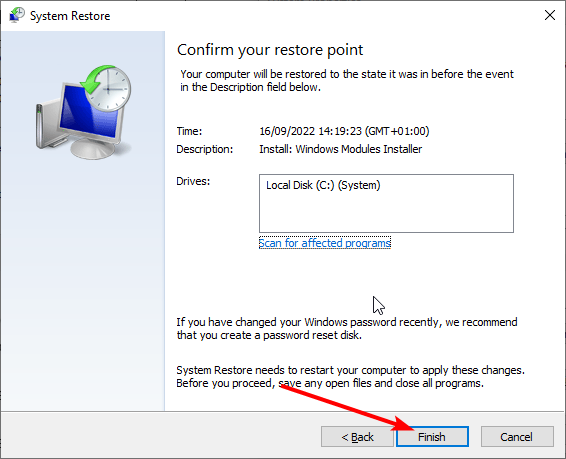
- Finally, click the Finish button and follow the instructions to complete the process.
If you tried all of these troubleshooting steps, and the sound on your headphones still doesn’t work, try restoring your computer.
 NOTE
NOTE
What do I do if headphones are detected, but no sound is coming on Windows 11?
If you are facing the headphones detected but no sound issue on Windows 11, you are lucky because the solutions are virtually the same as with Windows 10.
Since the latest operating system is built on the solid foundations of its predecessor, there is not much difference in the steps to follow to fix this issue. So, be free to try the solutions above.
How do I get Realtek to recognize my headphones?
- Right-click the sound on the Taskbar and select the Sounds option.
- Click the Playback tab at the top.
- Right-click on your headphone and select the Enable option.
With this, your PC should start recognizing your headphone. If you are facing the Realtek not detecting headphones issue on ASUS, check our detailed guide on how to fix it.
As you probably noticed, all these solutions are system-related, so if you’re able to play sound on other devices, like speakers or headphones, the problem lies in the hardware.
If that’s the case, you should consider getting new headphones because your current headphones may be broken.
Also, remember that the solutions here would fix things if the headphones are detected but no sound in Windows 7.
Other sound issues you might encounter
- Headphones detected but no sound
- Headphones plugged in but no sound
- Game sound not coming through headphones PC or Xbox One (Steam game, Minecraft)
- Headphones connected but no sound
- Sound not coming through headphones on Zoom, Teams
- Can’t hear audio through headphones PC
- Sound not coming through headphones Windows 10, Windows 11
- Sound not coming through headphones on laptop
- Sound not coming through headphones Bluetooth
These issues occur if no speaker or headphones are connected, but the problem is most likely software-related if everything is in order.
Looking for the best headphone? Look no further! Here is a detailed list of the best USB-C headphones for a top-notch audio experience!
If you’re using VIA HD Audio driver and have some problems with playing sound, you can check out our article about solving problems with VIA HD Audio.
This marks the end of our article. We hope that one of these solutions helped you solve the sound problem. Make sure you give us any feedback regarding the subject in the comment section below.

