This is The Outlook PST File Location in Windows 11
You can find PST file manually or using Outlook settings
Key notes
- PST file is a crucial component of Outlook since it stores important data related to your user profile.
- You can easily locate this file using the Run dialog or by opening email account settings page.

Microsoft Outlook uses PST files for storing user information, and sometimes, you need to access the file location of Outlook PST file on Windows 11 to fix specific issues.
File corruption can affect the PST file and cause the loss of information, so today we’re going to show you how to properly access this file so you can easily back it up or repair it.
How do I locate the Outlook PST file in Windows 11?
1. Use the Run dialog
- Press Windows key + R.
- Now enter %localappdata% and press Enter.

- Navigate to the following directory:
Microsoft\Outlook
In addition, you should also do the following:
- Open the Run dialog using the Windows key + R shortcut.
- Enter %appdata% and press Enter.
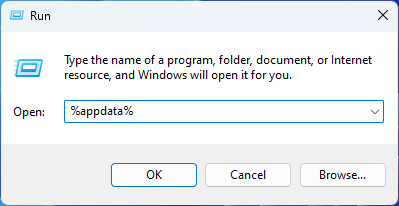
- Lastly, navigate to the following directory:
Microsoft\Outlook
This is the default location for the PST file, so be sure to check it out. Keep in mind that your file can be located on either of those paths. Many reported that PST cannot be found, but we covered this issue in a separate guide.
2. Use Outlook account settings
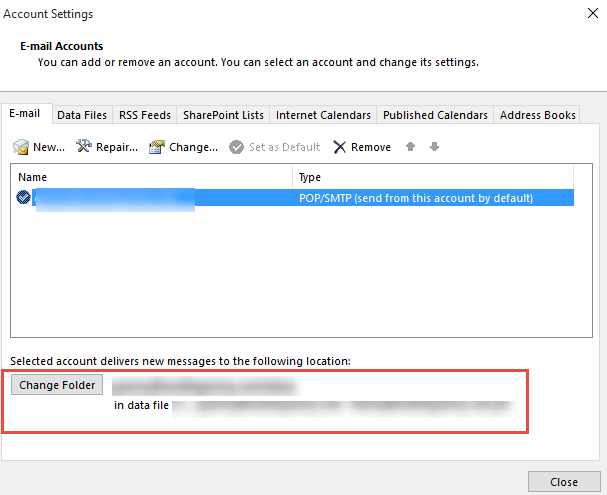
- In Outlook, go to File and select Info.
- Next, expand Account Settings and select Account Settings.

- Navigate to the Data Files tab.

- Select your email account.
- Lastly, click on Open File Location.
How do I change the location of my PST file in Outlook?
1. Change Outlook settings
- In Outlook, go to File and select Info.
- Next, click on Account Settings and choose Account Settings from the menu.

- Click on Change Folder and then select the desired email account. After that, click on Inbox.
- Now click on New Folder and set the desired name.
- Lastly, click on the New folder again. After that, select the Inbox folder and click on OK.
- Restart Outlook and check if changes have been applied.
2. Use Registry Editor
- Press Windows key + R and enter regedit.

- Navigate to the following path:
HKEY_CURRENT_USER\Software\Microsoft\Office\16.0\Outlook - Right-click the right pane, and choose New and then Expandable String Value.

- Name the new string ForcePSTPath and double-click it.

- Now set the value data to the desired location and click OK.

This is an advanced method to change PST file location, so be sure to try it. Make sure to use it only if you’re an experienced user.
3. Use symbolic links
- Press Windows key + S and enter the command prompt. Choose Run as administrator from the list of results.

- Now run the following command:
mklink "C:\Users\%username%\AppData\Local\Microsoft\Outlook\outlook.pst" "C:\Users\WindowsReport\Outlook\outlook.pst"
- After doing that, the symbolic link will be created.
Keep in mind that this method won’t change the file’s location, but it will point to the file at a new location. This method also works as a backup for Outlook PST file, so be sure to try it.
Finding the PST file location in Windows 11 is important since it allows you to recreate or back up your data and fix issues such as the PST file is not valid or the Outlook data file cannot be accessed.
While Outlook uses PST files, many are wondering how to import mbox file to Outlook, and we have a special guide that can help you with that.
Did we miss your preferred method of finding the Outlook PST file? If so, let us know in the comments section below.
Read our disclosure page to find out how can you help Windows Report sustain the editorial team. Read more


Improve this guide


User forum
0 messages