Realtek Audio Driver Keeps Crashing: 5 Quick Ways to Fix It
Outdated drivers will cause Realtek driver to keep crashing
Key notes
- Realtek audio driver crashing on your PC can make the audio device inaccessible.
- Reinstalling the Realtek audio driver often fixes the issues affecting it.
- Running the Audio troubleshooter will identify the problem and recommend a likely solution.
Windows users complain that the Realtek audio driver keeps crashing on their PCs. It impedes the functionality of the audio features dependent on it. The audio driver’s frequent crashes can cause the Realtek HD Audio Manager not to work on Windows 11.
Why does Realtek audio keep crashing my PC?
Realtek High Definition Audio driver crashes on your PC can occur for a few reasons, which can vary in different instances.:
- Outdated Realtek audio driver: The most common cause of the problem is your computer’s outdated or broken Realtek audio drivers. This will likely cause an incompatibility issue and crash your PC.
- Outdated Windows operating system: Windows updates are available to help you fix bugs affecting your PC. So, not keeping your Windows PC up-to-date can make it incompatible with the driver version, causing it to crash.
However, the Realtek audio driver crashing or slowing down the computer can occur for reasons that may differ in different computers.
What can I do if Realtek audio driver keeps crashing?
Fixing the Realtek audio driver that keeps crashing on your PC can be tricky. Hence, we recommend you go through these preliminary checks before troubleshooting your PC:
- Disconnect external audio devices connected to your PC, and peripherals plugged into the USB ports.
- Restart your PC to fix startup problems that may interfere with the Realtek audio driver crash.
If you’re unable to fix the issue with the preliminary checks above, then proceed with the solutions below:
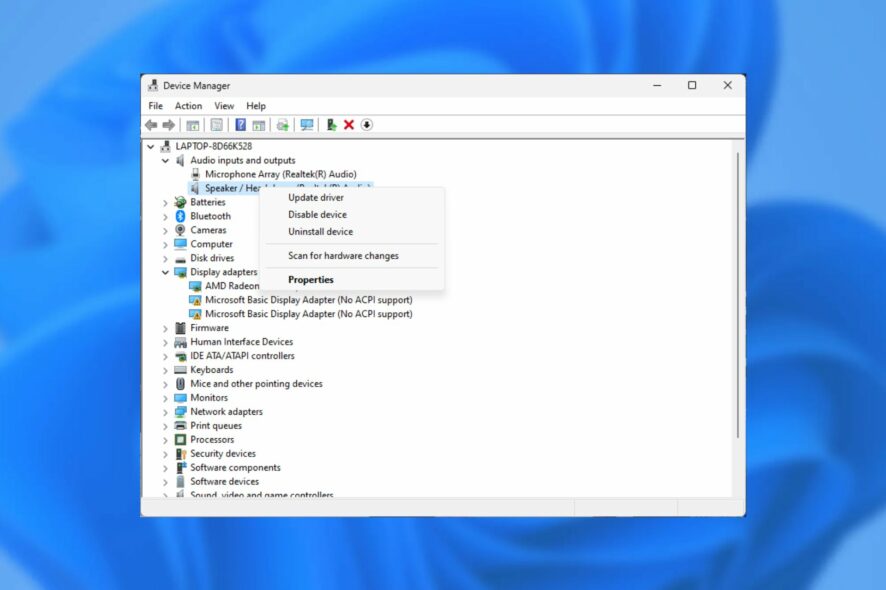
1. Uninstall and reinstall the Realtek audio device
- Right-click the Start button in the bottom-left corner of the taskbar, then select the Device Manager from the drop-down.
- Expand the Sound, video, and game controllers, right-click on Realtek Audio, and select the Uninstall device option from the drop-down.

- Check the box for the Attempt to remove the driver for this device option, then click Uninstall.
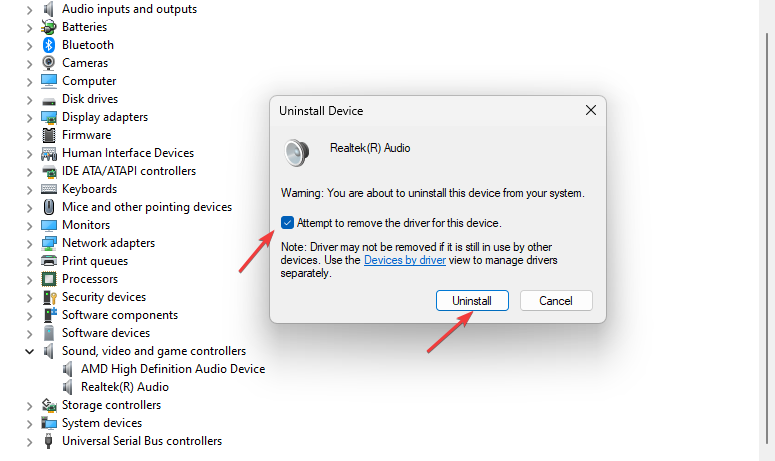
- Restart your computer after the installation is complete, and your PC will automatically install the driver.
Alternatively, you can check how to download the Realtek audio driver for Windows 11 if your device doesn’t install it automatically.
2. Update Windows
- Click on Start in the bottom-left corner of the taskbar and select Settings from the Start menu.
- Click on Windows Update, then select Check for updates (Windows will automatically search for updates and download them if any are available for your PC).

Updating Windows will help fix bugs affecting the Realtek audio driver. Also, we recommend you read about what to do if the Windows Update breaks Realtek soundcard drivers on your PC.
3. Update your audio drivers
- Right-click the Start button in the bottom-left corner of the taskbar, then select the Device Manager from the drop-down.
- Expand the Sound, video, and game controllers, then right-click the Audio driver and select Update driver.

- Then, select Search for the driver automatically from the options.

Restart your computer after the installation process is complete and see if you can fix the problem.
Updating your audio drivers can fix it if it’s corrupted or broken. You can read how to enable and disable automatic driver updates on Windows 11.
4. Restart Windows Audio Service
- Press Windows + R key to open the Run window, type services.msc in the search box, and press OK.

- Also navigate to Windows Audio service and right-click on it.
- Select the Restart option from the drop-down.

The steps above will restart the Windows Audio service and fix any Realtek audio driver issues on your PC.
5. Run the Audio Troubleshooter
- Press Windows + I to prompt the Windows Settings app.
- Click System from the left pane and select Troubleshoot from the options.

- Choose Other troubleshooters in the window’s right pane.

- Then select the Playing Audio tab and click on the Run button beside it.
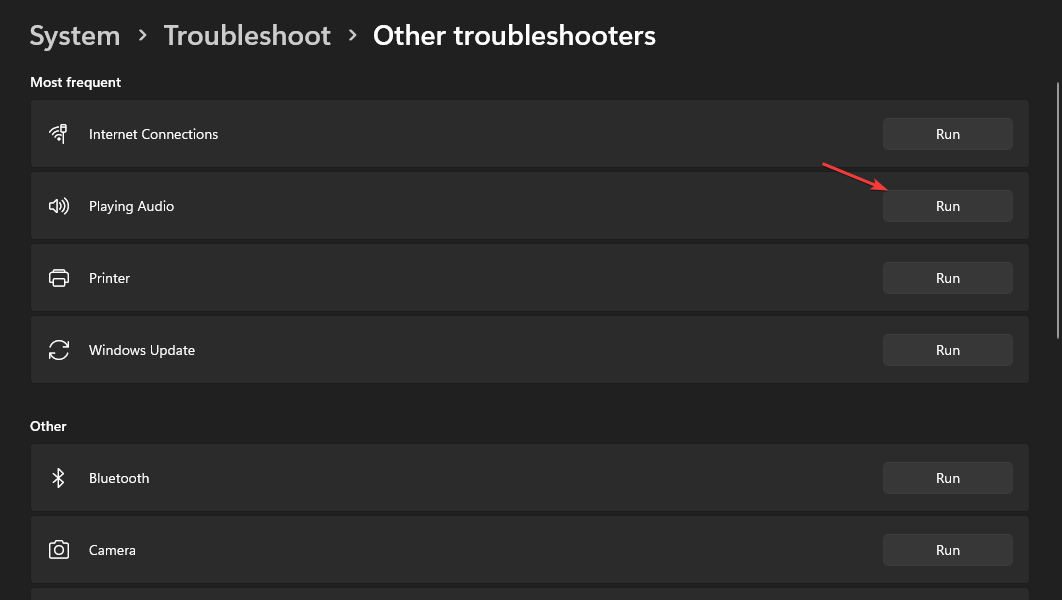
- Select Realtek Audio and click Next (running the Audio troubleshooter will detect issues affecting the PC and recommend solutions).

- Press the Apply this fix option if it is displayed.
Check and see if the Realtek audio driver keeps crashing.
Conclusively, we recommend you read how to fix Realtek High Definition Audio Driver problems on your PC and what to do when the RAC is greyed out.
Likewise, knowing what to do will be beneficial if the Realtek High Definition Audio Manager won’t open on your computer.
If you have any questions or suggestions, kindly leave them in the comments section. We’d like to hear from you.
Read our disclosure page to find out how can you help Windows Report sustain the editorial team. Read more


Improve this guide


User forum
0 messages