Fix: Set Time Zone Automatically Defaults to Wrong Time Zone
Make sure Windows has access to your location
Key notes
- When Windows shows an incorrect time zone even while it's set to automatic, it could be the related settings or misconfigurations to blame.
- The Windows Time service and its properties remain critical to the functionaility.
- Keep reading this guide to find out what worked for others!
According to reports in forums, the set time zone automatically defaults to the wrong time zone in Windows 11. It’s not a recent problem, but affects all iterations of the OS.
The issue often arises after a Windows update or when users make changes to the PC. Remember, for problems like this, there’s no universal fix! You have to identify the underlying cause and execute the relevant solution.
Why is automatic time zone wrong on Windows 11?
- The system files are corrupt
- A bug in the installed version of Windows
- The related services are not running
- Issues with the user profile
- Missing location access
How do I fix automatic time zone if it’s wrong in Windows 11?
Before we head to the slightly complex solutions, try these quick ones first:
- Check for any pending Windows updates and install them.
- Re-enable the toggle for Set time zone automatically in Settings.
- Force sync Windows time and check for improvements.
- Scan the PC for malware using the built-in Windows Security or an effective third-party antivirus.
If none work, move to the fixes listed next.
1. Enable the Windows Time service and change its properties
- Press Windows + R to open Run, type services.msc in the text field, and hit Enter.

- Locate the Windows Time service, right-click on it, and select Properties.
- Select Automatic from the Startup type dropdown menu, click the Start button under Service status, and then on Apply to save the changes.

- Now, go to the Log On tab, select This Account, then enter NT AUTHORITY\LocalService in the text field while leaving the password fields blank, and click OK to save the changes.

If the time zone or Windows time keeps changing, you just need to enable the Windows Time service and configure it to load automatically at startup.
2. Turn on location access
- Press Windows + I to open Settings, navigate to Privacy & security from the left pane, and click on Location under App permissions.

- Now, enable the toggle for Location services.

- Finally, restart the computer and check for improvements.
2. Set the default location using Maps
- Press Windows + S to open Search, type Maps in the text field, and click the relevant search result.
- Click the ellipsis near the top right, and select Settings.

- Scroll down and click the Change default location button.

- Click on Set default location.
- Enter your precise location in the text field, and select the relevant entry from the dropdown menu.

- Once done, restart the computer and check Windows now picks the correct time zone.
When Windows can’t access your location or time zone, it relies on the default location set in the built-in Maps app.
4. Enable daylight savings
- Press Windows + I to open the Settings app, go to Time & language from the navigation pane, and then click Date & time on the right.

- Now, enable the toggle for Adjust for daylight saving time automatically.

5. Repair the corrupt system files
- Press Windows + S to open Search, type Command Prompt in the search bar, and click on Run as administrator.

- Click Yes in the UAC prompt.
- Now, paste the following DISM commands individually and hit Enter after each:
DISM /Online /Cleanup-Image /CheckHealthDISM /Online /Cleanup-Image /ScanHealthDISM /Online /Cleanup-Image /RestoreHealth - Similarly, execute this command to run the SFC scan:
sfc /scannow
If the set time zone automatically changes to the wrong one or you can’t change the time zone, it could be corrupt system files to blame. And an effective fix against it is to run DISM commands and the SFC scan!
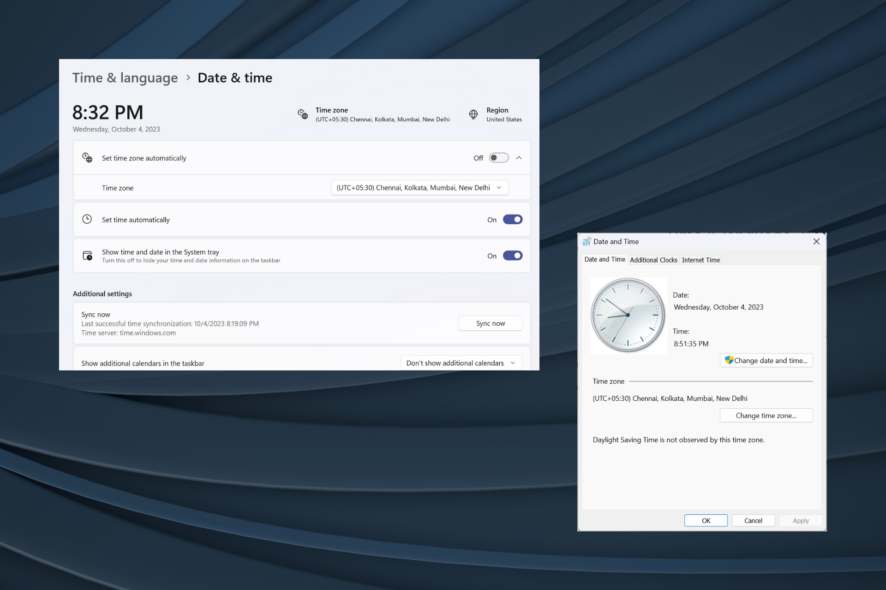
6. Manually change the time zone
- Press Windows + R to open Run, type control panel in the text field, and click OK.

- Click on Clock and Region.
- Now, click on Date and Time.

- Click the Change time zone button.

- In the Time Zone Settings window, select your zone from the dropdown menu, and click OK to save the changes.

- Now, go to the Internet Time tab, and then click on Change settings.
- Select time.windows.com from the Internet time server dropdown menu, click on the Update now button, and then OK.

- Restart the computer and check if the correct time zone is showing.
7. Uninstall conflicting apps
Third-party apps can also automatically change the time zone in Windows. To identify one, check the error logs. Filter them for Event ID = 1 or Source = Kernel-General. A user reported that MaxproVideoGuardAgent.exe changed the time zone on their PC.
Once you have found it, uninstall the app. If things still don’t work out, download a reliable software uninstaller tool, and use to delete all leftover files and Registry entries created by the program.
8. Perform an in-place upgrade
- Go to Microsoft’s official website, select the edition and product language, then download the Windows 11 ISO.

- Double-click the ISO file once downloaded, and choose Open in the confirmation prompt.
- Run the setup.exe file.

- Click Yes in the UAC prompt.
- Click on Next to proceed.
- Review Microsoft’s license and terms, and then click Accept.

- Finally, verify that the setup reads, Keep personal files and apps, and click Install.

- Wait for a few hours for the process to complete, and the set time zone shouldn’t change to a wrong one automatically.
9. Create a new user account
If nothing else works and Windows still shows an inaccurate time zone or the time zone option is greyed out, maybe it’s the user profile corruption to blame. In this case, simply create a new local account.
To make sure you don’t run into issues with permissions, switch to an administrator account for maximum privileges.
Why does my time zone keep changing by itself?
When the time zone keeps changing or never picks the current location, it’s the permissions, corrupt system files, or misconfigured settings to blame. Besides, if you are a frequent traveller and Windows is set to automatically detect the time zone, a few issues may arise.
The best option here is to enable Location services, repair the corrupt files, or manually set the correct system time zone, and it won’t change automatically.
You now know why the automatic time zone is set wrong in Windows 11 and the fixes that work in every case. A few users also found that the PC stops updating time and shows an incorrect time, but that’s easy to fix!
Remember, it’s best to let Windows handle all time and time zone-related tasks. Just make sure the OS is up-to-date, and you shouldn’t face problems!
For any queries or to share which fix worked for you, drop a comment below.
Read our disclosure page to find out how can you help Windows Report sustain the editorial team. Read more


Improve this guide


User forum
0 messages