Starcraft 2 Won't Launch: Quickest Ways to Fix It
Key notes
- When Starcraft 2 won't launch or crashes on the loading screen after starting, there might be a compatibility issue.
- If Starcraft 2 is lagging on Windows 10, make sure that your drivers and the game are up to date.
- Moreover, when you experience a Starcraft 2 black screen, check the antivirus or third-party apps.
- All in all, there are a lot of common bugs with Starcraft 2 which are nevertheless easy to fix.

Starcraft 2 is one of the most popular RTS games for PC, but it’s not free of bugs. The gaming experience on Windows 10 is sometimes spoiled by game crashes, black screens, slow menus, screen tearing, and low frame rate.
All these issues can make Starcraft 2 almost unplayable for players, but there are few things that you can do to fix these issues on Windows 10.
How do I fix Starcraft 2 launch crash/lag on Windows 10?
- Run Starcraft 2 in compatibility mode
- Turn off EVGA Precision X
- Update your graphic card drivers
- Run Starcraft 2 as administrator
- Set Affinity for Starcraft 2
- Disable Windows DVR
- Check your firewall
- Start the game in windowed mode
- Disable Vsync and reinstall Battle.net desktop app
- Check your ports
- Delete the Battle.net and Blizzard Entertainment folders
- Disable SLI or Crossfire
- Use 32-bit client instead of 64-bit client
- Update your OS/ game
- Renew your IP and flush DNS
- Disable background apps
1. Run Starcraft 2 in compatibility mode

- Go to Starcraft 2 installation directory and locate Starcraft 2 exe file. It should be called SC2.exe.
- Right-click it, choose Properties and go to the Compatibility tab.
- Choose Run this program in compatibility mode for and choose Windows 7 or Windows 8 from the dropdown menu.
- Click Apply and OK to save changes.
- Try running the game again.
Although this is a simple solution, it has been confirmed by users that it fixes the crashes for some of them.
2. Turn off EVGA Precision X

EVGA Precision X is a popular overclocking tool for Nvidia graphic cards. Although this tool can unlock the full power of your graphic card, it has been reported that EVGA Precision X can cause crashes with Starcraft 2.
In order to avoid Starcraft 2 crashes on Windows 10, make sure that you turn off EVGA Precision X before starting the game.
3. Update your graphic card drivers
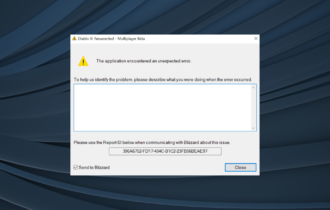
It has been reported that some users are getting a fatal error that crashes Starcraft 2 every time they start a game. The game runs great for 30 seconds and then crashes to the desktop.
This issue has been caused by Nvidia drivers, and in order to fix it, you need to update your Nvidia drivers to the latest version.
Hence, if you need to update your graphic drivers fast and without affecting your PC functionality, it’s advised to use dedicated driver update software as Outbyte Driver Updater.
4. Run Starcraft 2 as administrator

- Go to Starcraft 2 installation directory, find Starcraft 2 .exe file and right-click it.
- Go to the Compatibility tab.
- Check Run this program as administrator.
- Click Apply and OK to save changes and try to run the game again.
5. Set Affinity for Starcraft 2

- Start Starcraft 2.
- When the game starts press Alt + Tab to switch back to Windows 10.
- Press Ctrl + Shift + Esc to start Task Manager.
- When Task Manager opens, go to the Details tab.
- Now find the Starcraft 2 process in the list, right-click it and choose Set Affinity.
- When the new window opens make sure that you disable one CPU by unchecking it.
- Click OK to save the changes and go back to the game.
Users have reported that setting Affinity for Starcraft 2 fixes menu lag, but unfortunately, you’ll have to repeat this solution every time you start the game.
If you don’t want to repeat this step every time you start Starcraft 2, there’s a way to do that, but it’s a bit advanced, so if you can’t understand it maybe it’s better to skip it.
- Find out how many cores do you have. The easiest way to do that is to go to the Details tab, right-click any application and choose Set Affinity. Now simply count the number of CPUs on the list. Remember to count CPU 0 as well.
- In our example, we’ll assume that you have 4 cores. Each running core is represented by number 1, so if you have 4 cores, all four running cores would be represented by number 1111. If you have 8 cores, that number would be 11111111, or if you have 2 cores that number would be 11.
- Now, if you want to deactivate one core, you just have to replace one number with zero, so if you have 4 cores and you want to disable one of them the number would change from 1111 to 0111 for example. In our example, we’ll use 0111.
- Now you need to convert the binary number from the previous step, in our case 0111, to a decimal number. There are many free online converters online that can do this for you. In our example, binary number 0111 is decimal number 7. Remember this number, you’ll need it for later.
- Open Battle.net Launcher and click Starcraft 2 > Options > Game Settings.
- Find Starcraft 2 on the list and check Additional command-line arguments.
- Add -affinity 7. Remember to use the number that you got at the end of Step 3. In our case, it was 7.
- Save the changes and now Starcraft 2 will run always with one core disabled.
Once again, if this seems too complicated for you, keep to the first part of our solution and manually set the affinity every time you start Starcraft 2.
6. Disable Windows DVR

- Open the Xbox app.
- Open Settings.
- Go to Game DVR tab and turn off Record game clips and screenshots using Game DVR.
7. Check your firewall

Users have reported that the game is unable to start and that it freezes during the authentication process. Due to this issue, users can’t even access the main menu.
To fix this issue you need to start the game and wait for the game to load properly, press Alt + Tab to switch back to Windows. In the firewall popup message allow Starcraft 2 to bypass your firewall.
In addition, you might want to check your firewall settings and to make sure that Starcraft 2 isn’t blocked.
If this doesn’t help, you might want to temporarily disable your antivirus and your firewall.
Looking for the best firewall for Windows 10? This guide will help you decide which one to get.
8. Start the game in windowed mode

- Start Battle.net desktop application, go to Starcraft 2 tab, and choose Options > Game Settings.
- Check Additional command-line argument and add -Displaymode 0 as an argument for every Starcraft game you wish to run in windowed mode.
- Save the changes and try running the game again.
- When the game starts, switch back to fullscreen mode and check if the issue persists.
9. Disable Vsync and reinstall Battle.net desktop app

If you’re having black screen crashes while playing Starcraft 2, try disabling Vsync from Nvidia Control Panel or Catalyst Control Center for Starcraft 2.
If that doesn’t help, try reinstalling Battle.net desktop app.
10. Check your ports

If you’re getting BLZBNTAGT00000BB8 error as soon as you launch the game, you need to make sure that ports TCP: 6112 and UDP:6112 are open.
To do so, you can use many of the free services available online. If these ports are blocked, you should check your firewall settings in order to open them.
11. Delete the Battle.net and Blizzard Entertainment folders

Users have reported BLZBNTAGT0000096A error, and in order to fix it you need to go to C:ProgramData folder and delete Battle.net and Blizzard Entertainment folders from it.
Before deleting these folders you can try disabling the all non-Microsoft services from the Startup.
12. Disable SLI or Crossfire
Owning two graphic cards and using them in SLI or Crossfire mode can give you better performance sometimes, but SLI or Crossfire mode can cause some graphical issues in Starcraft 2 such as flickering textures.
If you want to fix these visual glitches in Starcraft 2, it’s advised that you disable SLI or Crossfire and try running the game again.
13. Use the 32-bit client instead of the 64-bit client

- Open Battle.net launcher.
- Click Starcraft 2 tab.
- In Starcraft 2 tab, click Options.
- In Options, click on Game settings.
- When Game settings open, click the checkbox next to the 32-bit client for Starcraft 2 games.
- Click Done, and try starting your game again.
After doing that you’ll start Starcraft 2 in 32-bit mode, and according to users, get better performance.
Besides improved performance, using 32-bit client also fixes error 0xc0000142 for some players. This error occurs every time user tries to launch the game, and switching to 32-bit client fixes it.
Although 32-bit client has its advantages, some users report that 32-bit client is causing fatal errors for them.
So if you’re using a 32-bit client and getting fatal errors, maybe you should switch to the 64-bit client instead.
We need to mention that you can’t switch to 64-bit version of Starcraft 2 if you are using 32-bit version of Windows 10.
14. Update your OS/ game
Installing the latest Windows 10 and Starcraft 2 updates may fix many issues affecting the game.
Updating your machine is essential for enjoying a smooth gaming experience as all the games that you run depend on the OS to run properly.
To download and install the latest Windows 10 patches on your computer, go to Start > type ‘settings’ and open the Settings page. Navigate to Update & Security > Windows Update and check for updates.

Install the available updates, restart your computer and launch the game again to check if the problem persists.
What to do if Windows 10 won’t update? Check out this guide to solve the problem!
15. Renew your IP and flush DNS

- Go to Start and type CMD, then right-click on Command Prompt and launch it as administrator.
- Enter the ipconfig /release command
- Wait a few seconds until you get the confirmation that the IP address has been released
- Enter the ipconfig /renew command
- Wait until your computer has e-established the IP address
- Now, enter ipconfig /flushdns to flush DNS
- Exit Command prompt and launch the game again
16. Disable background apps
- Go to Start > type msconfig then hit Enter to launch System Configuration
- Go to the General tab > select Selective startup > uncheck Load startup items

- Go to the Services tab > check Hide all Microsoft services > click Disable all.
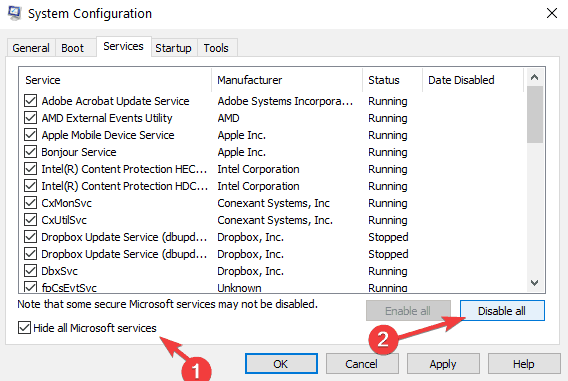
- Click Apply > click OK > Restart.
We hope that the solutions listed in this article helped you fix the Starcraft 2 bugs that you experienced.
If you have tried other possible solutions to the same problems, hare them with us in the comments.
Read our disclosure page to find out how can you help Windows Report sustain the editorial team. Read more


Improve this guide


User forum
0 messages