FIX: Microsoft Teams Microphone not Working on Remote Desktop
Solve this kind of minor issue in no time using our guide
Key notes
- Many users claimed that Microsoft Teams fails to detect their microphone in the desktop client.
- In order to quickly fix this issue, you should first check if your microphone is in use.
- To get rid of errors, make sure you run the latest app update and the latest OS version.
- You can also reinstall Microsoft Teams by following our step-by-step guide below.

Microsoft Teams is a versatile collaboration tool that seamlessly integrates a plethora of business tools that most users need when it comes to their business.
A high-quality microphone allows you to engage in video and audio calls without fearing you’ll encounter any technical issues.
Thus, some users have reported that Microsoft Teams does not recognize the microphone in the desktop client.
Why doesn’t the microphone work?
This issue can occur due to several reasons, one of them being software glitches. It can also occur if there are permission issues that prevent access to your microphone.
Another possible cause is that the Windows operating system or the application itself is not updated to the latest version on the market.
It is also highly advisable before you start looking for the cause of this unpleasant situation to check if your microphone is in use.
To do this, just close all other apps that might be using your microphone and restart your PC. This way you make sure that you can use your microphone in Teams.
In this article, we walk through the steps required to fix the Microsoft Teams microphone issues, so be sure to discover all of them.
How can I fix the Microsoft Teams microphone issues?
1. Make sure your app is updated
First, to make sure you don’t make yourself directly responsible for any bugs or glitches in the app, install the latest Windows update and the latest version of the Teams app.
All you need to do is open Microsoft Teams, log into it, and on the top right, click on your profile picture and select Check for updates.
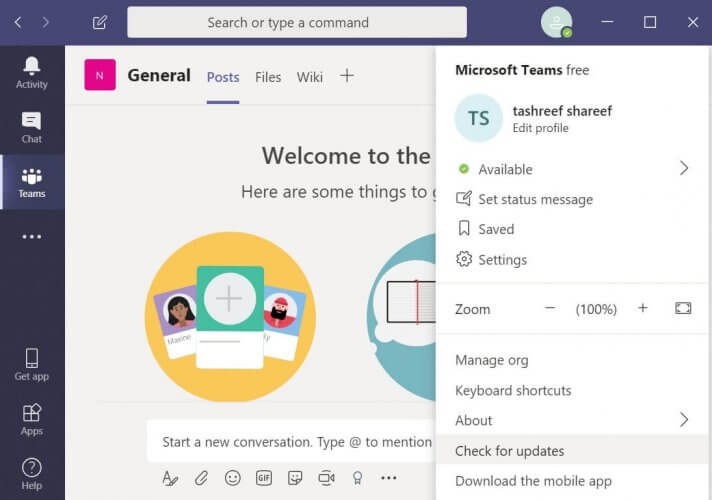
The app will accordingly install updates in the background if necessary, and then you can check that the microphone is working properly by making a test call.
2. Check microphone privacy settings
- Click on Start, and select the Settings app.
- Select the Privacy option.
- From the left pane, scroll down to App Permission, and click on Microphone.

- Scroll down to the Allow desktop apps to access your microphone section.
- From the list, enable microphone access for Microsoft Teams.
- Launch Microsoft Teams, and check if the client recognizes the microphone.
In case the microphone is already enabled for Microsoft Teams, revoke the access. Reboot the computer and enable microphone for Microsoft Teams again.
Access to the microphone can get disabled when new updates are installed or Microsoft Teams. Make sure the required permission is given to resolve the issue.
If you’re having trouble opening the Settings app, take a closer look at our comprehensive guide, and fix it for good.
3. Troubleshoot the sound problem
- Right-click on the speaker icon in the Taskbar.
- Select the Troubleshoot sound problem option.
- The troubleshooter will perform an initial scan.
- When prompted, select your microphone, and click Next.

- Follow the on-screen instructions to troubleshoot the microphone.
- Apply any recommended fixes and check for any improvements.
Also, if the troubleshooter fails to load with an error, be sure to follow our useful guide and fix it in just a couple of simple steps.
4. Reinstall Microsoft Teams
- Type control in the search bar, and open Control Panel.
- In the Control Panel, go to Program, and select Programs and Features.
- Select Microsoft Teams from the list, and click Uninstall.

- Once uninstalled, reboot the computer.
- Download and install the latest version of Microsoft Teams.
Reinstalling Microsoft Team can resolve many issues that can occur due to corrupted files and bugs. Install the new version of Microsoft Teams and check for any improvements.
Also, if you can’t open Control Panel, you should take a closer look at our step-by-step guide to find the best solution.
Conclusion
The Microsoft Teams not recognizing the microphone issue can occur due to several reasons. By following the steps in this article, you can fix the problem with your desktop client in no time.
The most important thing, however, is to make sure you are running the latest version of Windows and the latest Teams app update to get rid of various bugs.
Another point worth mentioning is that before you start troubleshooting the problem, you should check if your microphone is in use, and if it is somehow used by other apps in the meantime.
Don’t forget also that you can always use the speaker troubleshooter provided by Windows, which you can rely on without any problems, without having to perform several actions.
And if absolutely necessary, you can always uninstall and reinstall the Microsoft Teams app to make sure everything will work smoothly, and you’ll be able to call without any problems.
Let us know which step helped you fix the issue in the comments. Also, leave there any other questions or suggestions that you may have, and we’ll surely check them out.
Read our disclosure page to find out how can you help Windows Report sustain the editorial team. Read more


Improve this guide


User forum
4 messages