Fix Laptop Camera Black Screen Issues with 9 Easy Tips
Updating your Windows and drivers will quickly solve the laptop camera showing a black screen
9 min. read
Updated on
Read our disclosure page to find out how can you help Windows Report sustain the editorial team. Read more
Key notes
- An outdated or corrupted software driver will cause a webcam black screen on Windows 10.
- Some users suggested making sure your recording software is also working properly.
- You should also check if your USB port is working and plug your webcam into another one.
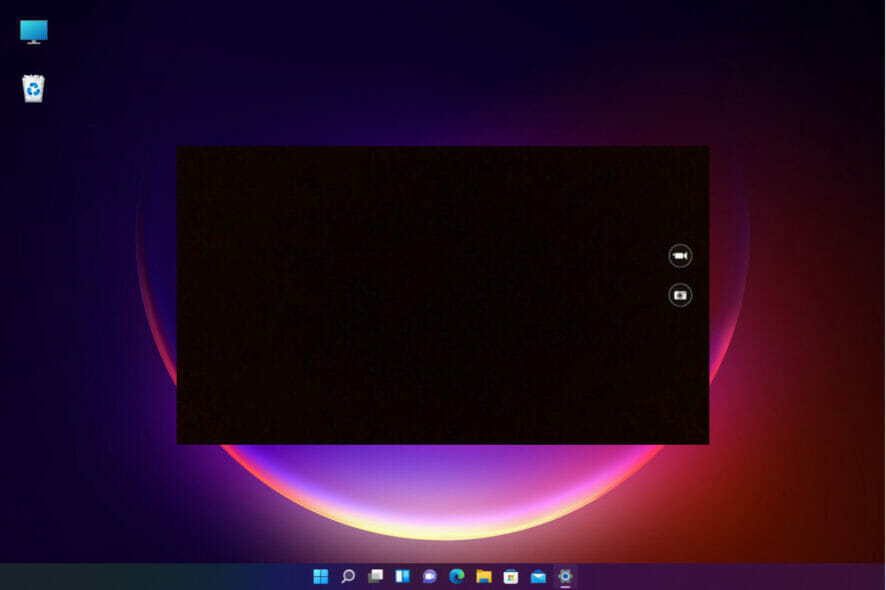
Windows 10 and 11 work with some of the best high-quality webcams to devastating effect. However, some users are starting to complain that their webcam is showing a black screen when using it.
This issue mostly occurs after an operating system upgrade. Thankfully, you can fix the issue quickly by following the steps in this guide carefully.
However, it must be noted that if you have any hardware malfunctions to the webcam this will not be an appropriate approach to the issue. If you are sure it is not a hardware issue, you can confidently use our solutions to solve the webcam black screen issue on Windows 10 and 11.
Why is my laptop camera black?
There are many things that can cause the black screen issues with your webcam on Windows 10. Below are some of the variations of this issue and the causes:
- A4Tech, Logitech webcam shows black screen – Camera showing a black screen on Zoom: Almost every webcam can have this problem, and many users reported this issue with A4Tech and Logitech webcams.
- Webcam shows a black screen no audio: This is usually caused by a bad driver, and it can be easily fixed.
- Webcam shows a white screen, green screen, gray screen: This is a variation of this problem, but you should be able to fix it by using solutions from this article.
- HP, Dell, Lenovo, Asus, Acer, Toshiba laptop camera showing black screen on Windows: This can be a driver or a hardware-related issue.
- Webcam shows mirror image, inverted image, picture upside down: This is usually caused by a bad driver or your webcam settings.
- Webcam not working, not detected: If your webcam isn’t detected, be sure to connect it to a different port and update your drivers.
- Laptop camera showing black screen Windows 10, Windows 11, Windows 7: The solutions below are applicable to all Windows iterations, so make sure to check them out.
- Camera black screen Android: Try to restart your phone or apply any software updates available.
Without further ado, let’s just jump right in!
How do I fix my camera black screen?
1. Download the latest webcam driver
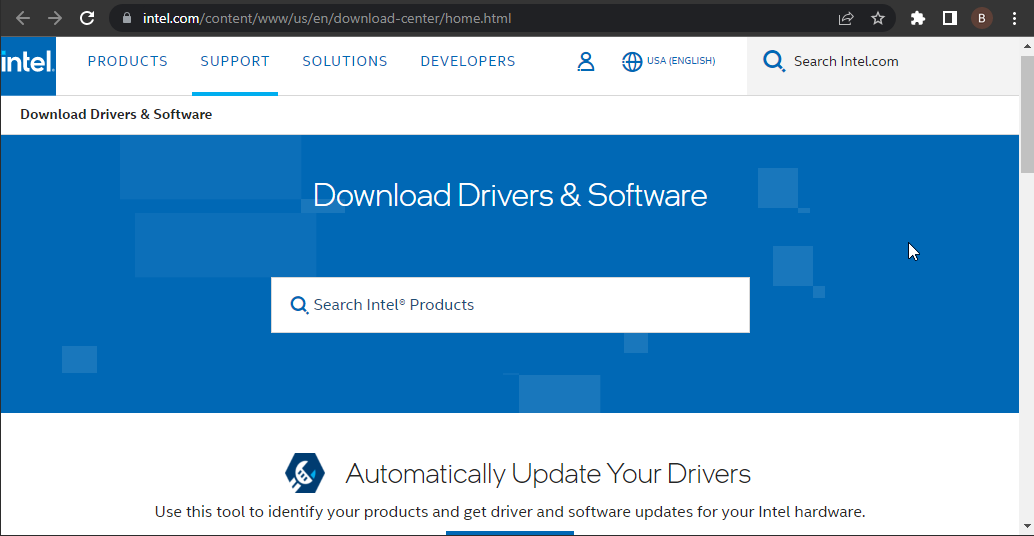
- Go to your manufacturer’s website to download the latest of your webcam driver.
- If a new version of drivers for Windows 10 is available you will need to uninstall the current drivers you use and install the new drivers from the website
If the webcam camera of a laptop like HP, Dell, or Lenovo is showing a black screen, you can proceed to your webcam manufacturer’s website to download the latest driver. This should help fix the driver issue. try it.
Use a third-party driver downloader
We also strongly recommend using dedicated software, in order to make sure that your PC won’t have any problems caused by installing the wrong drivers.
Rid yourself of manually searching for the correct drivers with specialized driver updating software. Any driver that is found broken will be compared to its built-in database and updated accordingly.
2. Update your webcam driver
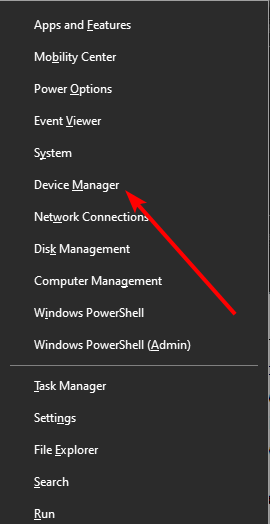
- Press the Windows key + X and select Device Manager.
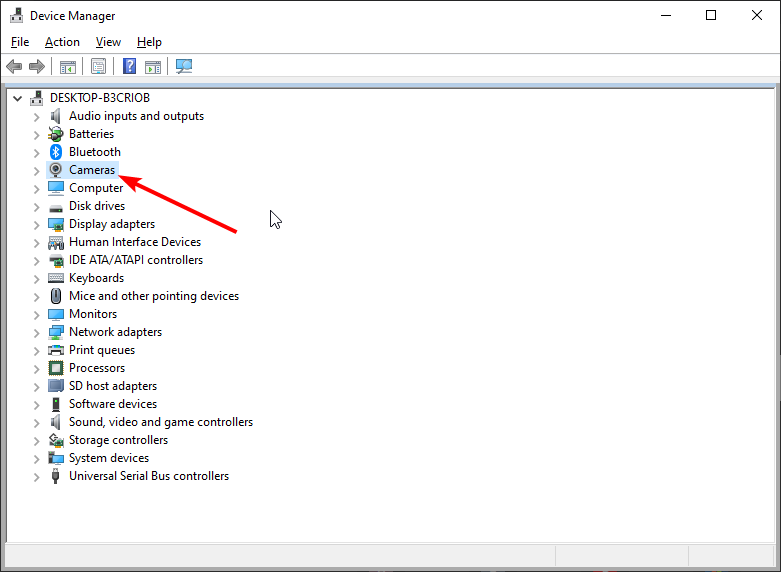
- Double-click on the Cameras option to expand it.
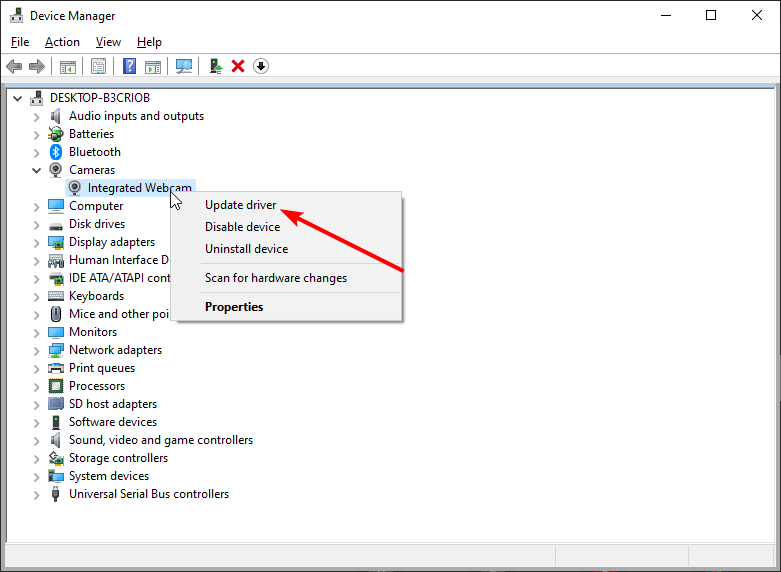
- Right-click on the drivers there and select Update driver.
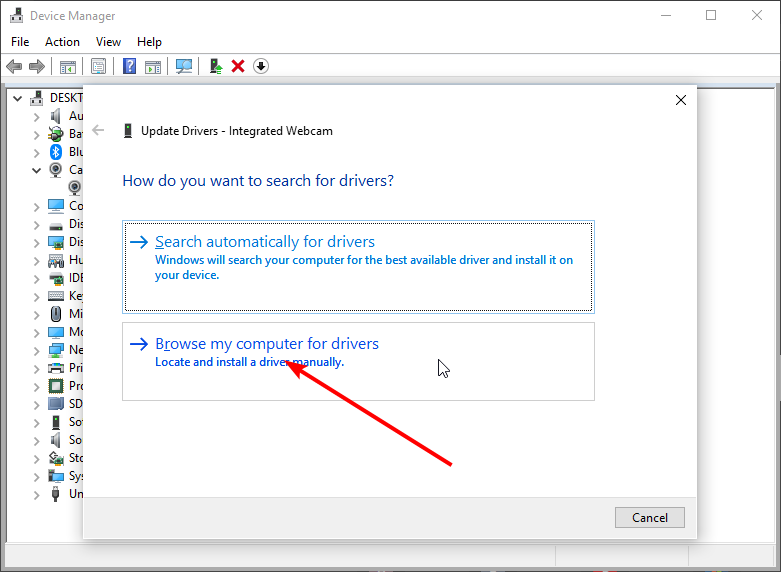
- Select the Browse my computer for drivers.
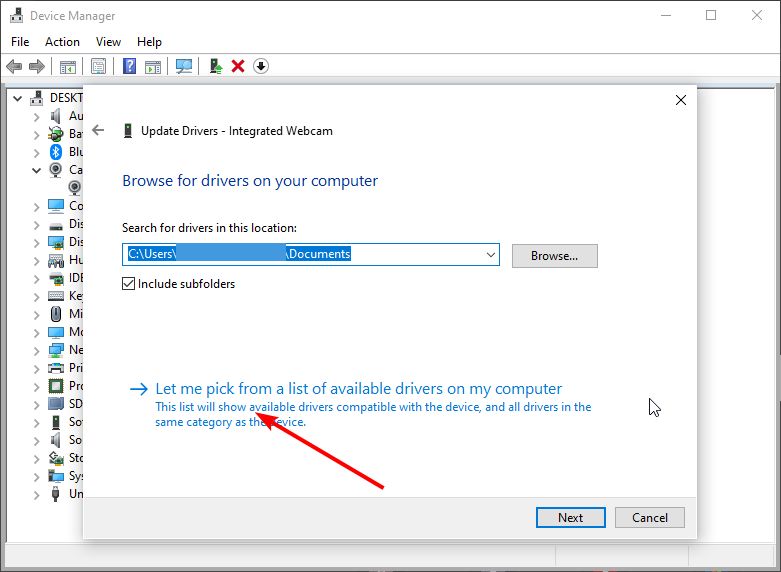
- Select the Let me pick from a list of available drivers on my computer option.
- Now, choose the USB Video device option.
- Finally, click the Next button and wait for the process to finish.
The webcam black screen issue on Windows 10 is usually down to driver issues. Updating your drivers should help fix the issue in this case. Remember to restart your PC after the update.
3. Update your recording application
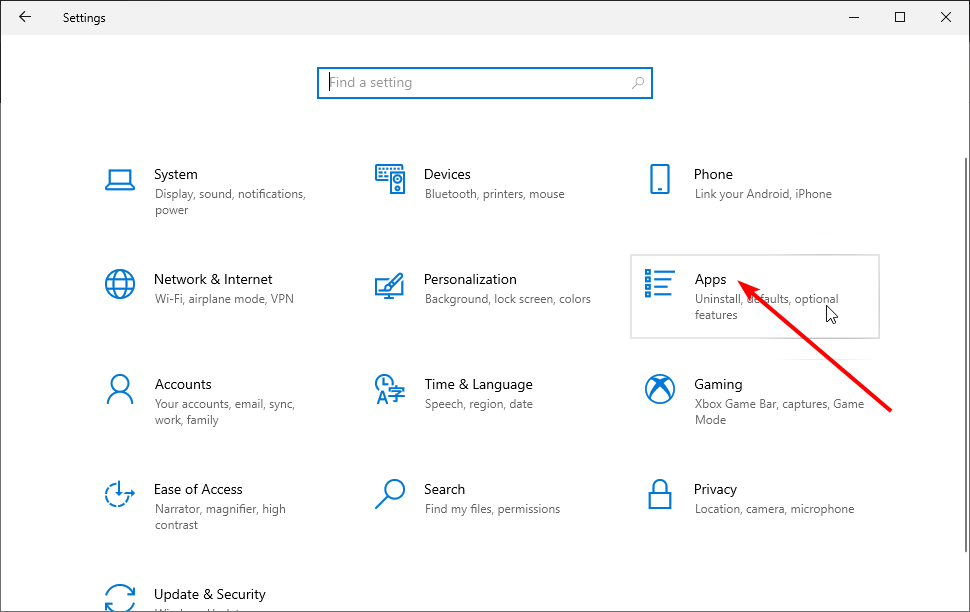
- Press the Windows key + I to open the Settings app.
- Select the Apps option.
- Look for the app that is experiencing the issue and click on it.
- Click the Uninstall button.
- Now, go to the Microsoft Store to download the latest version of the app.
If you are facing the camera black screen issue on apps like Zoom or Skype on Windows 10, you can uninstall and reinstall the app. This is because the issue might be with the version of the app you are using.
So, reinstalling the latest version should solve the problem.
4. Uninstall your webcam driver
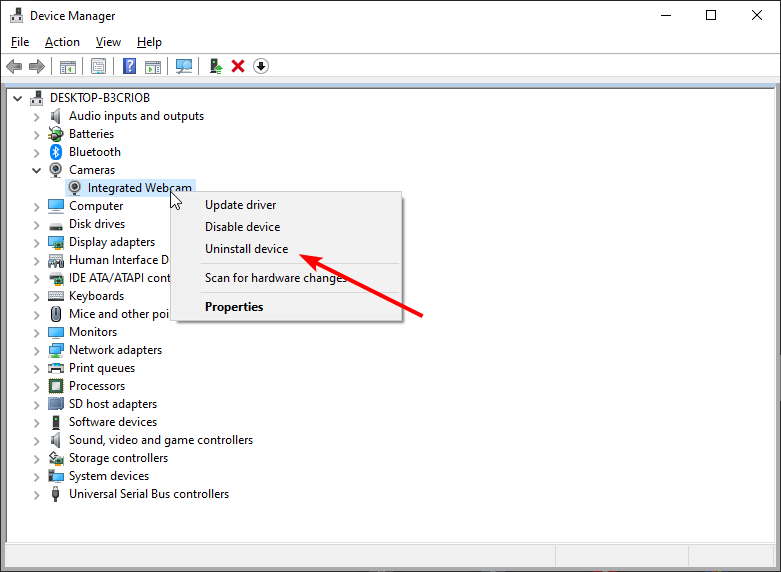
- Open Device Manager.
- Expand the Cameras option by clicking the arrow next to it.
- Right-click your webcam driver and choose Uninstall device.
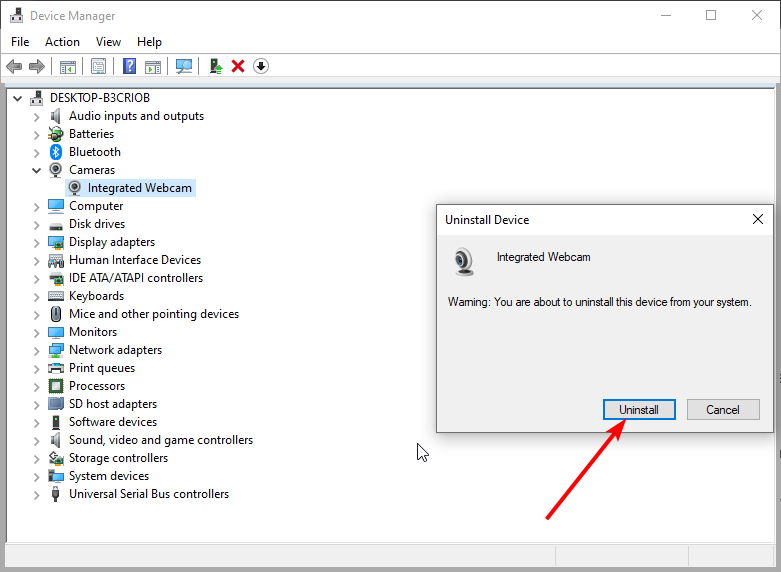
- Click the Uninstall button to proceed.
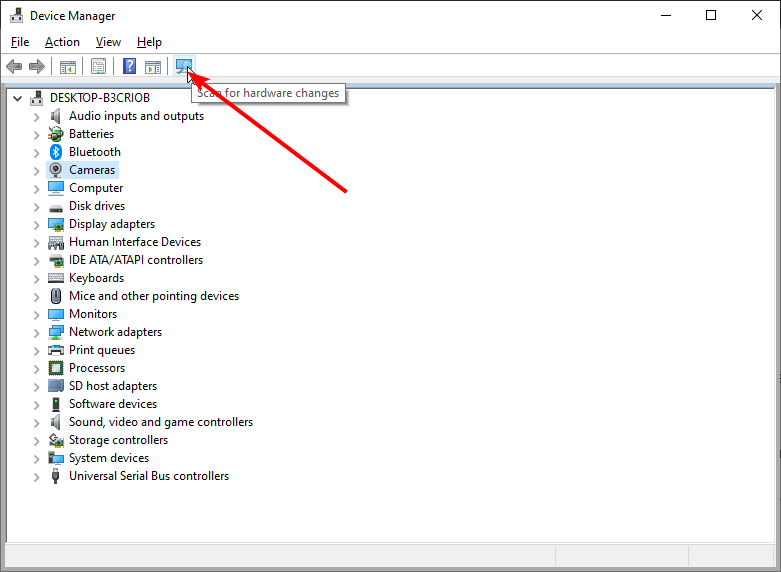
- Finally, click on Scan for hardware changes icon and wait while Windows installs the necessary drivers.
After reinstalling your drivers, check if the laptop camera is still showing a black screen on Windows 10.
Keep in mind that Windows 10 can sometimes update your drivers automatically in the background causing this issue to reappear.
If this happens, you’ll have to repeat this process and uninstall your driver once again.
To prevent your webcam driver from automatically updating be sure to check our guide on how to prevent certain drivers from updating.
5. Add an additional light source
According to users, sometimes you might fix this problem simply by adding an additional light source.
If your webcam shows a black screen, simply use a flashlight or any other light source, and point it at your camera. After doing that your webcam should start working again.
Keep in mind that this is a crude workaround, but if this solution works for you, you need to repeat it whenever you want to use your webcam.
6. Remove your laptop battery
Sometimes, the camera black screen issue on Windows 10 might be down to some glitches with your laptop.
To fix this, some users suggest that you disconnect your laptop from the power outlet and remove its battery.
Now, press and hold the power button for 30 seconds or more. You might have to repeat this process a couple of times in order for this solution to work.
After doing that, the laptop battery back into your laptop and start it normally. Now your webcam should start working again.
If the issue still persists, you might have to remove your battery and repeat the entire process again.
7. Change your Exposure settings
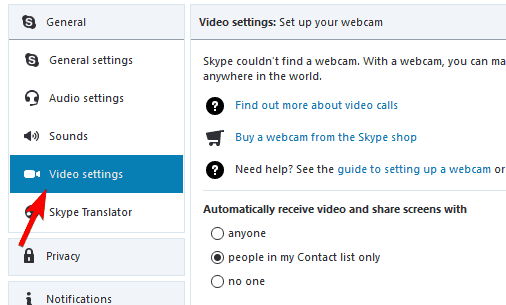
- Open Skype and go to Tools and select Options.
- Now navigate to Video settings and click on Webcam settings.
- Go to the Camera Control tab and check the Auto checkbox next to Exposure.
Keep in mind that every recording application is different, so you might not have the Exposure option available.
This isn’t a universal solution, and you’ll have to repeat it for every video recording app that you want to use.
8. Make sure that your camera is compatible with your PC
If your camera shows black screen on Windows 10 or 11, the problem might be a compatibility issue. Some older webcams might not be fully compatible with your PC, and that can cause this issue to appear.
To check if the compatibility is the issue, we advise you to try your webcam on a different device and see if the issue reappears.
If the issue manifests on another PC, the camera might not be fully compatible with Windows 10, and your only solution is to replace it.
9. Disconnect other USB devices and connect the camera to a different port
If you’re using a USB camera, you should know that sometimes other USB devices can cause interference. This can occur if you’re using a USB hub.
You can check out our useful article about the best USB hubs if you are thinking about changing your current one.
To fix the issue, it’s advised to disconnect unnecessary USB devices and check if your webcam works.
If the issue still persists and your webcam shows a black screen, you might want to try connecting it to a different port. Try connecting your camera to every available port and check if that solves the issue.
The solutions above are all you need to find and fix your webcam if it only shows a black screen since the update to Windows 10.
How can I fix camera showing black screen on Windows 11?
- Press the Windows key + X and select Windows Terminal (Admin).
- Type the command below and hit Enter:
get-appxpackage *Microsoft.WindowsCamera* | remove-appxpackage - Finally, go to the Microsoft Store to download the camera app again.
After reinstalling the app, you camera should start working normally again on Windows 11.
Like Windows 10, the camera black screen issue on Windows 11 can also be due to outdated or faulty drivers.
The driver update process is pretty much the same in the new OS so you will find it very easy to perform by following the steps on our Windows 10 guide.
Also, other solutions in this guide should work seamlessly on Windows 11. So you can try them if updating your drivers does not work.
How do I restart my laptop camera?
The easiest way to restart your built-in webcam on a Windows 10 or 11 laptop is to restart your PC. Also, you might need to uninstall and reinstall the camera drivers as shown in this guide.
However, if you want to restart the camera for a particular app or program, you can turn off the access from settings and turn it on again.
The camera black screen issue on Windows 10 and 11 can be exasperating, as it restricts some apps like Zoom and Skype. But with the fixes in this guide, you should be able to restore normalcy easily.
While still on camera issues, you might be interested in our guide on what to do if the webcam is not working in Windows 11.
Please post below in the comments section of the page if you encountered any other issues to your webcam and the fixes posted above don’t work for you.




User forum
15 messages