Windows 11 Not Showing WiFi Option (Quick Fix Guide)
Our 15 fixes will solve the Windows 11 no WIFI option only Ethernet issue

If Windows 11 is not showing the WiFi option, you’re likely missing key drivers or dealing with disabled services. This guide walks you through step-by-step solutions to restore wireless connectivity and access the WiFi toggle from the settings menu.
Table of contents
- How do I get my Wi-Fi back on Windows 11?
- 1. Check for a physical switch to turn on Wi-Fi
- 2. Update the Wi-Fi driver
- 3. Verify that Airplane mode is disabled
- 4. Turn on the Airplane mode and then disable it
- 5. Restart the PC
- 6. Check if Wi-Fi adapter is enabled
- 7. Use the Roll Back Driver option
- 8. Reinstall the Wi-Fi driver
- 9. Update Windows 11
- 10. Uninstall Windows 11 updates
- 11. Run the Network Adapter troubleshooter
- 12. Run File Explorer
- 13. Modify the Group Policy
- 14. Perform a clean boot
- 15. Perform a system restore
- FAQs
Why Is There No WiFi Available on Windows 11?
When the WiFi toggle is missing in Windows 11, it often points to:
- A disabled WiFi adapter in Device Manager
- Missing or outdated network drivers
- Airplane Mode being active
- Corrupt system or network configurations
You might also encounter this if you’re setting up a new device with no WiFi available during Windows 11 setup.
How do I get my Wi-Fi back on Windows 11?
Before trying complex fixes, start with these: boot Windows 11 in Safe Mode if Wi-Fi is missing, switch to Ethernet for a stable connection, and enable auto-login to skip entering your password.
1. Check for a physical switch to turn on Wi-Fi
Many new computers, and laptops, in particular, have a built-in switch to enable/disable the Wi-Fi. You will find it either on the side or around the keyboard.
After locating the switch, make sure it’s turned on and check if the Wi-Fi icon and settings reappear.
 NOTE
NOTE
2. Update the Wi-Fi driver
2.1 Via Device Manager
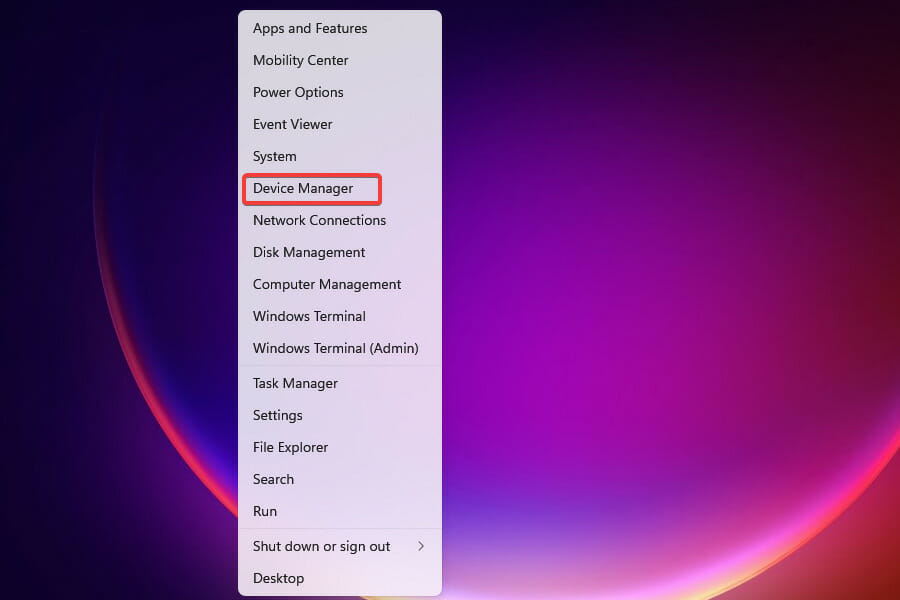
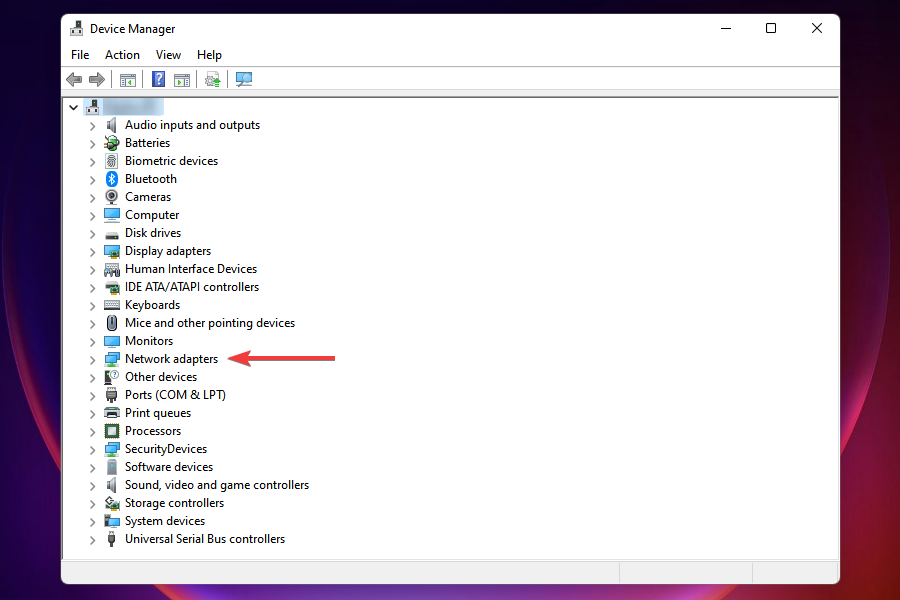
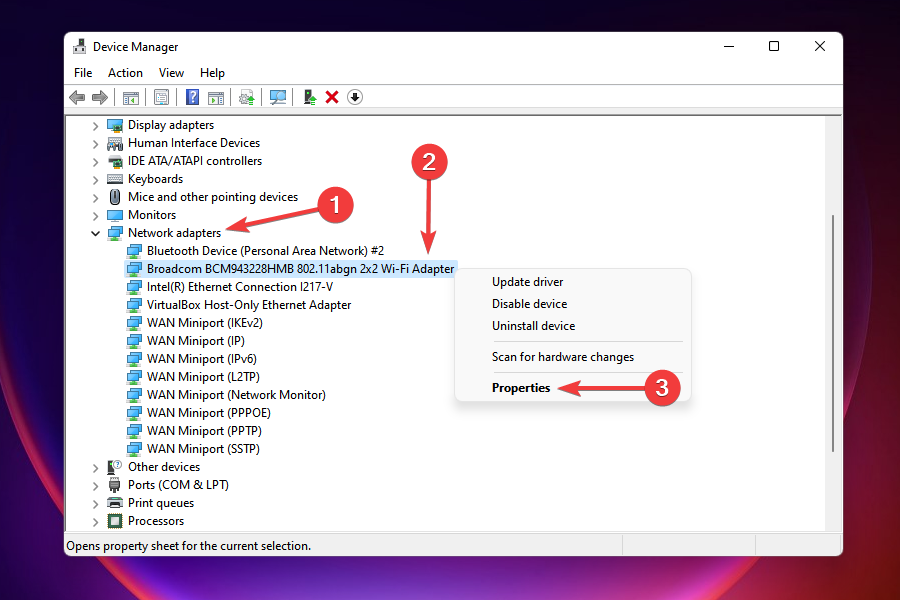
- Press Windows + X to launch the Power User/Quick Access menu.
- Select Device Manager from the list of options that appear.
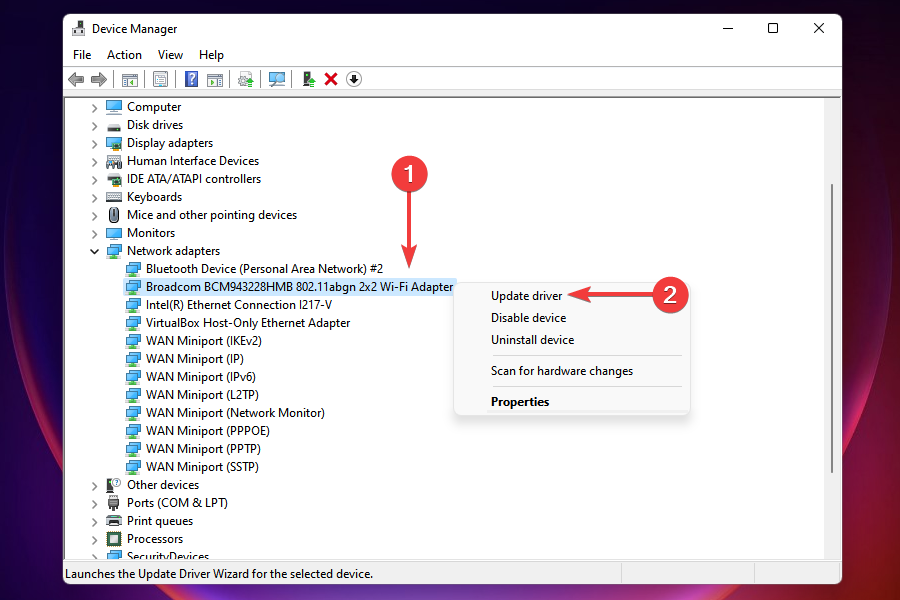
- Locate and double-click on the Network adapters entry to expand and view the devices under it.

- Right-click on the Wi-Fi adapter and select Update driver from the context menu.
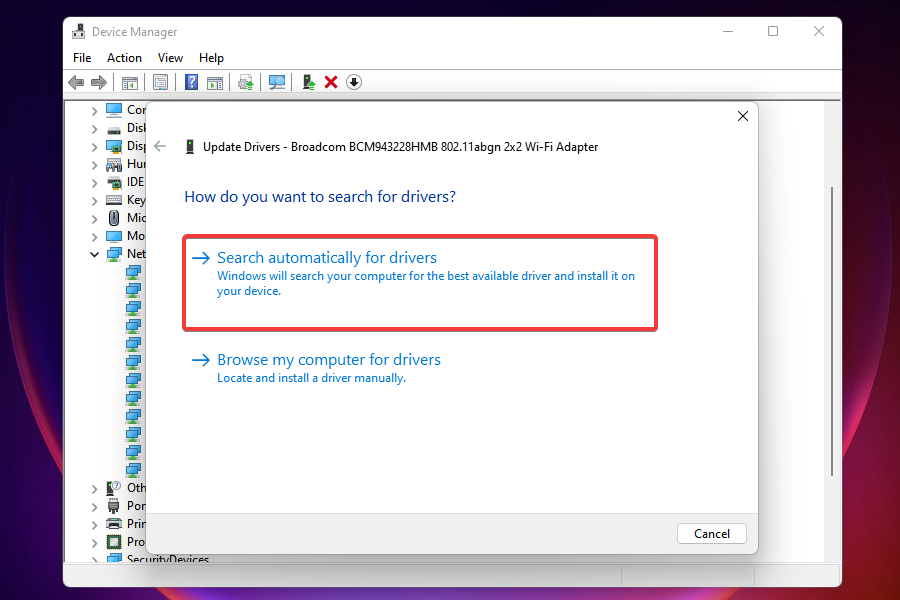
- Select Search automatically for driver to let Windows scan for the best available driver on the system and install it. Check if the Windows 11 no WiFi option issue is solved.

 NOTE
NOTE
2.2 Via Windows Update
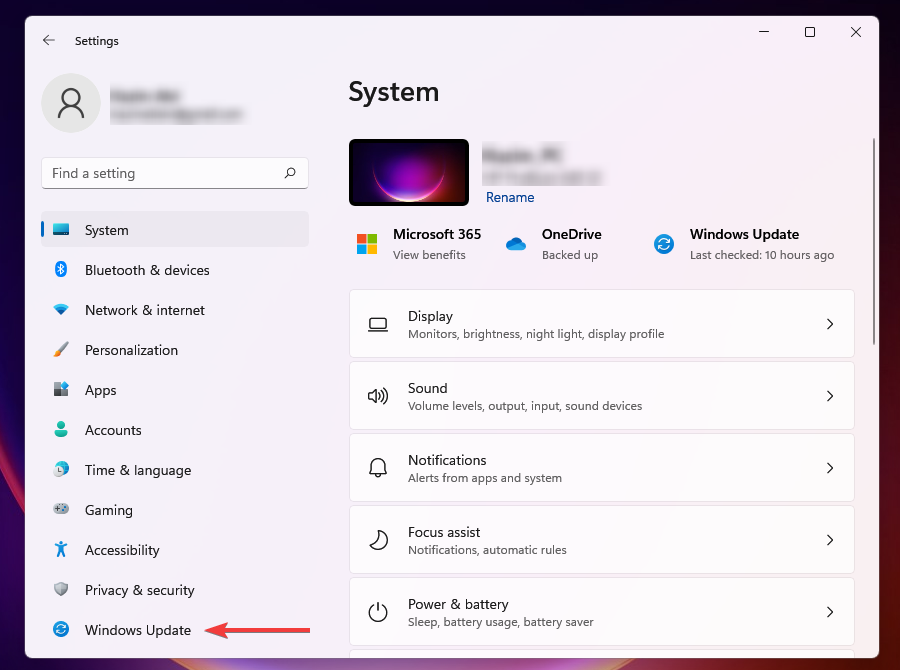
- Press Windows + I to launch the Settings.
- Select Windows Update from the navigation pane on the left.

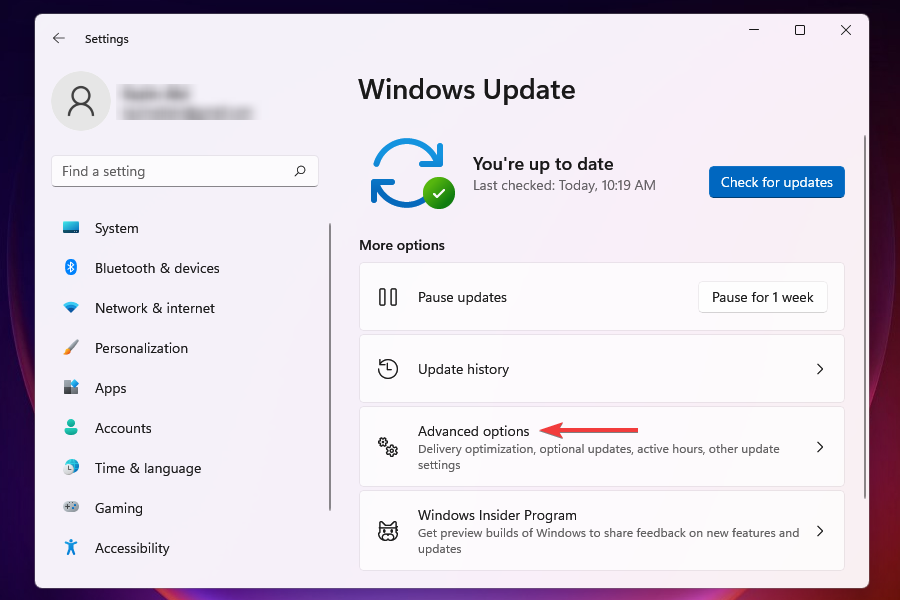
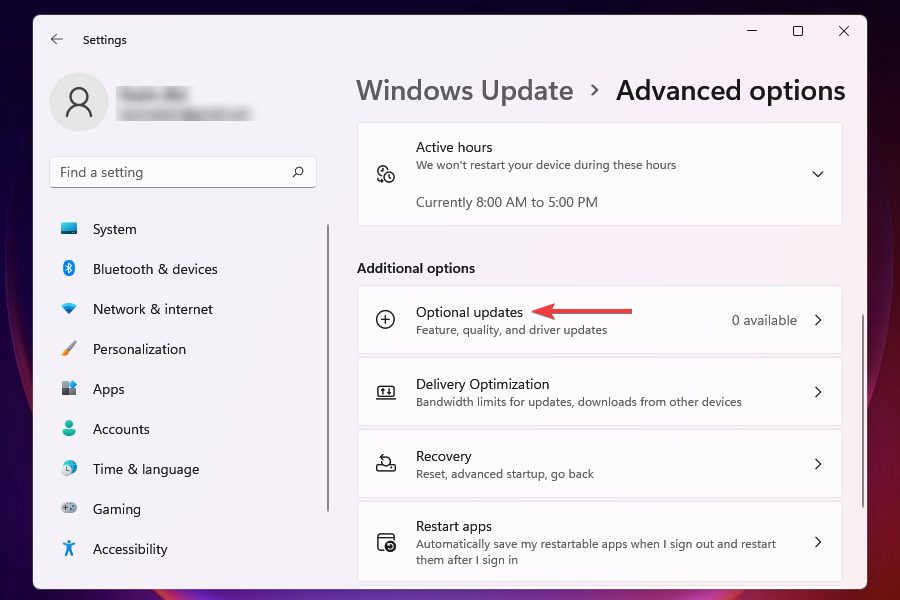
- Click on Advanced options.

- Select Optional updates under Additional options.

- Check if there is an update available for the Wi-Fi driver. In case there’s one present, tick the checkbox for it and click on the Download & install button.
2.3 Via manufacturer’s website
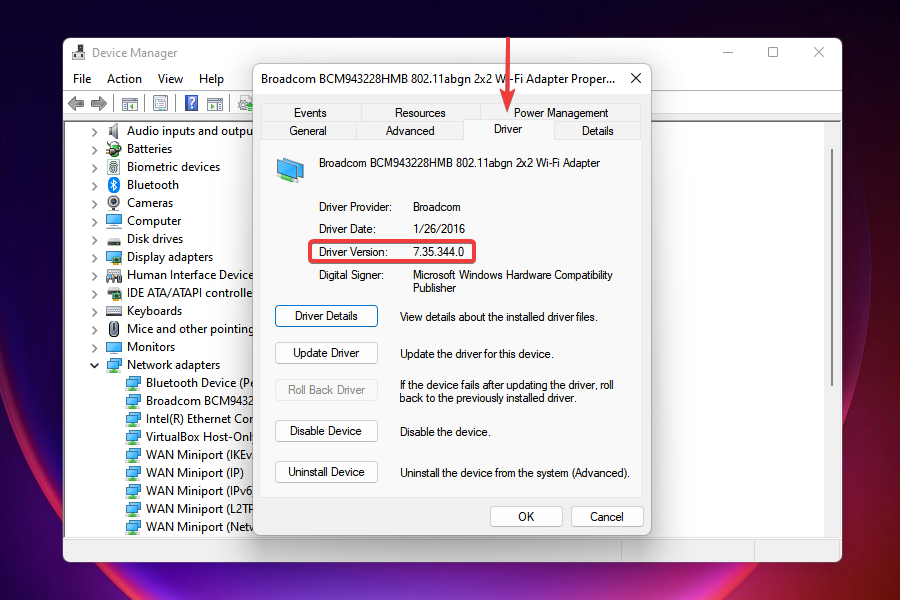
- Launch the Device Manager.
- Double-click on Network adapters, locate and right-click on the Wi-Fi adapter, and select Properties from the context menu.

- Navigate to the Driver tab and jot down the driver version.

- Once you have the current driver version, go to Google or any other search engine of your preference, and search for the update using the Driver Name and Operating System (Windows 11) as the keywords followed by Update driver.
- Locate and open the manufacturer’s website from the search results.
- On the OEM’s website, identify if there is an update available based on the current driver version you noted earlier.
- In case a newer version is available, download it.
- Navigate to the folder the driver update is downloaded to, double-click on it to launch the installer, and follow the on-screen instructions to complete the installation process.
- After updating the driver, restart the computer for the changes to come into effect and check if the Wi-Fi icon can be accessed now.
In case you are looking for simpler ways to keep your drivers up-to-date, we recommend using a dedicated third-party tool. It automatically scans for driver updates and installs them to your PC, thus making the whole process simpler and more convenient.
3. Verify that Airplane mode is disabled
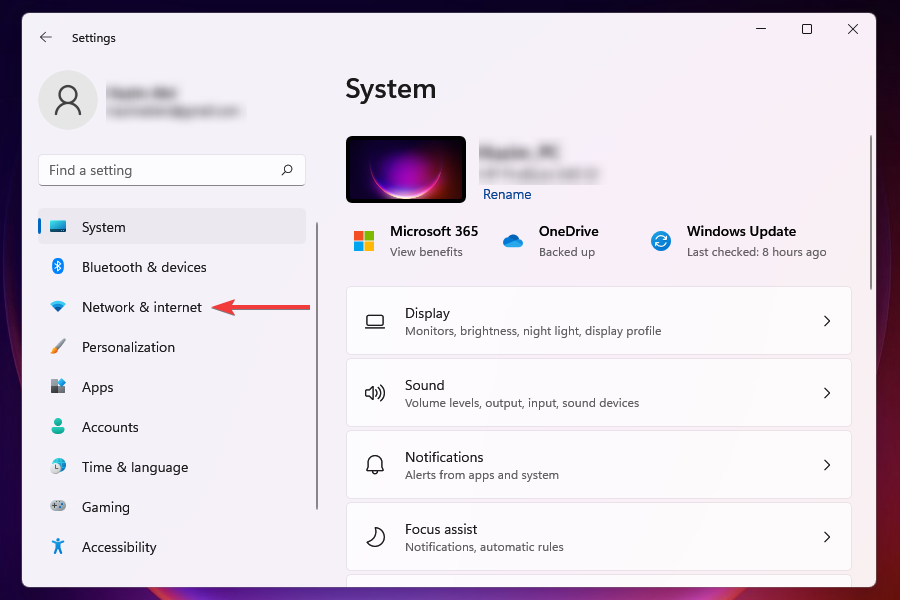
- Press Windows + I to launch the Settings app.
- Select Network & Internet from the tabs listed to the left.
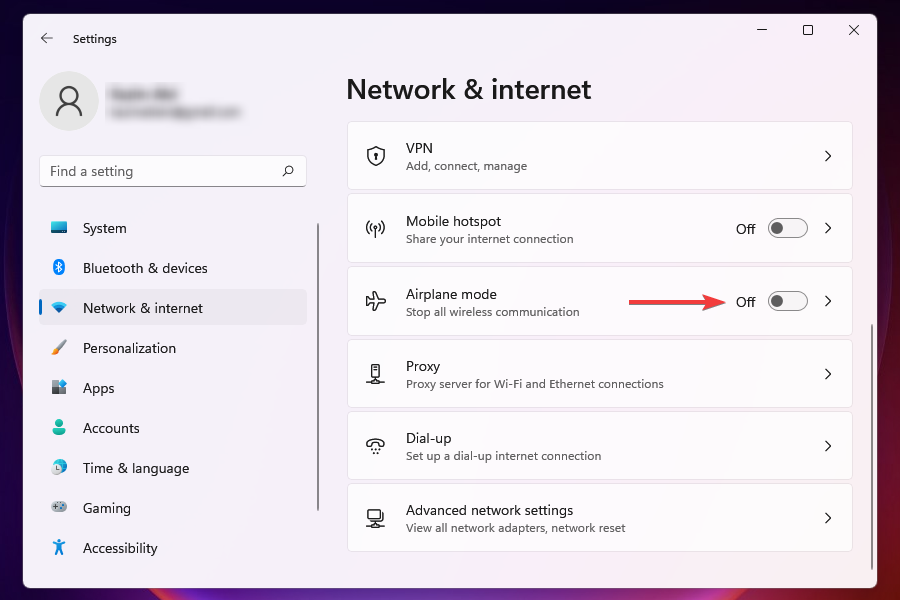
- Locate the Airplane mode toggle and ensure that it’s disabled. The Windows 11 no WiFi option issue, will be solved.


4. Turn on the Airplane mode and then disable it
- Click on the Action Center icon at the right of the Taskbar or press Windows + A, to view the Quick Settings.

- Click on the Airplane mode tile to enable it. Once enabled, the tile color will change to blue.
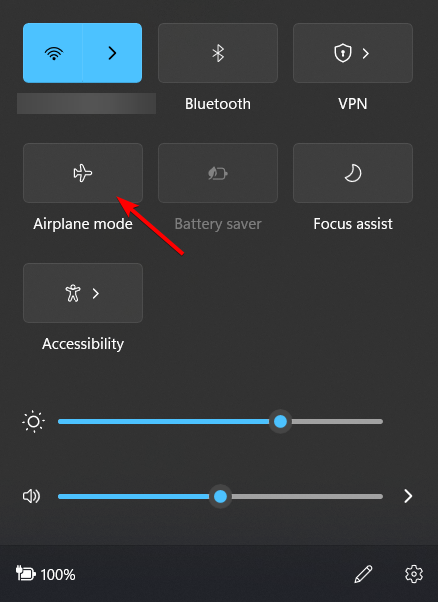
- Wait for a couple of minutes, and then again click on the Airplane mode tile to disable the setting. Check it the Windows 11 no WiFi option problem is gone.

Quick Settings allow you to make modifications to the system and enable or disable features without having to navigate to their actual location. You can also customize the Action Center and only keep the tiles you often use, for a finer experience.
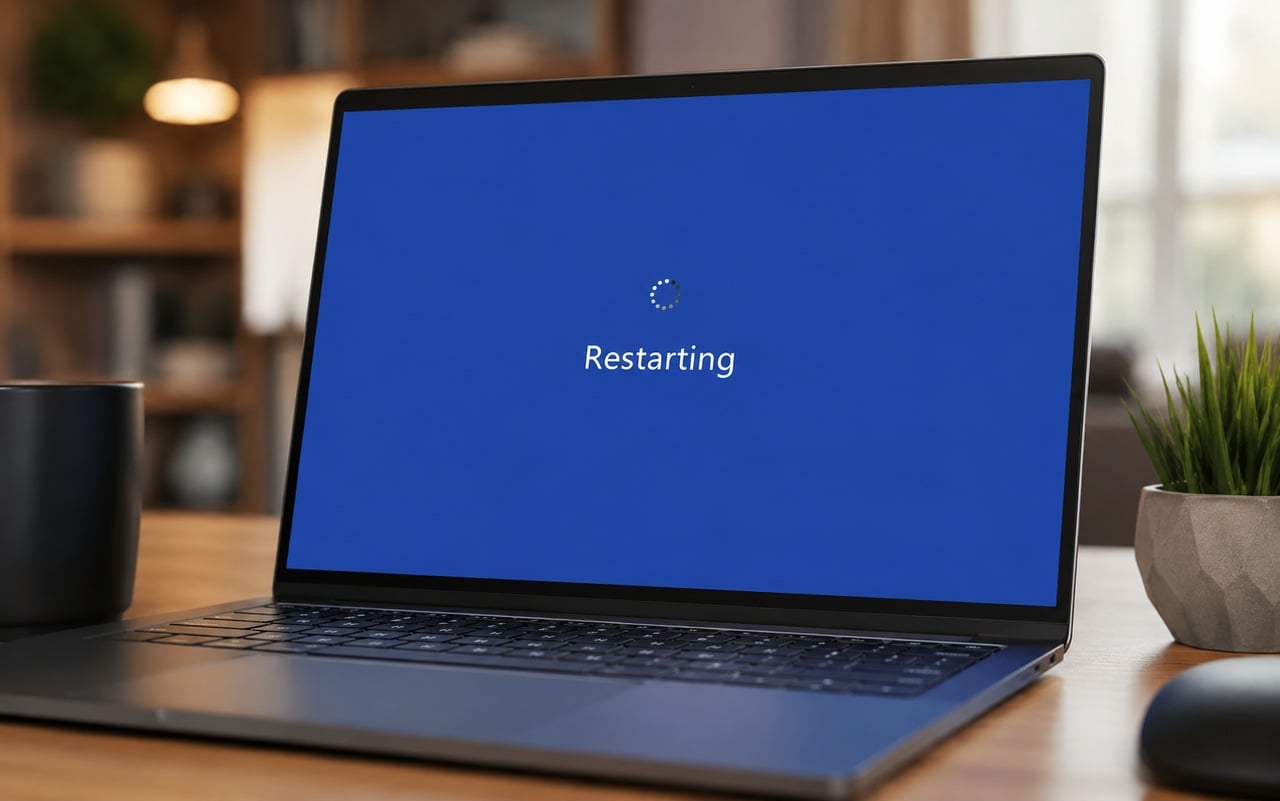
5. Restart the PC
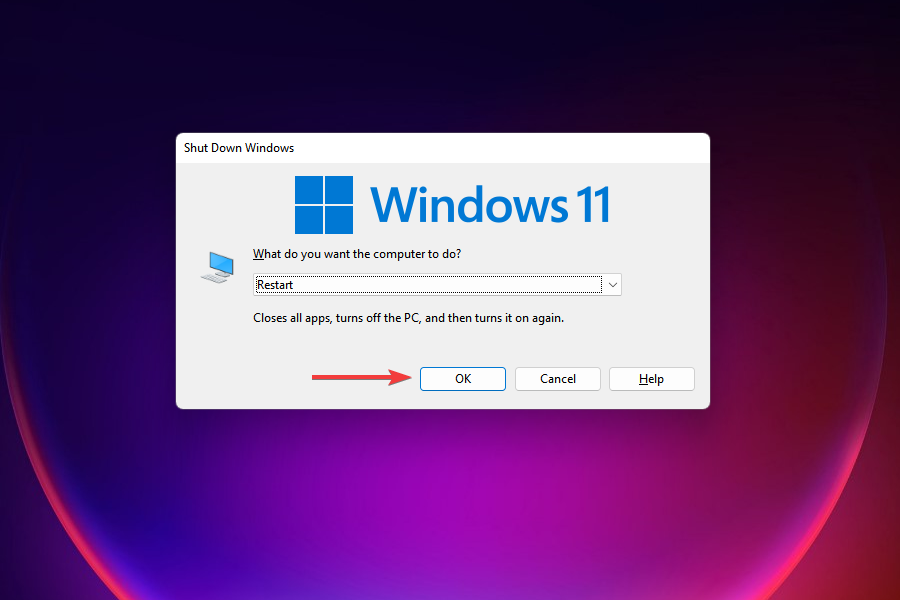
- Go to your Desktop and press Alt + F4 to launch the Shut Down Windows box.
- Click on the dropdown menu and select Restart from the list of options.
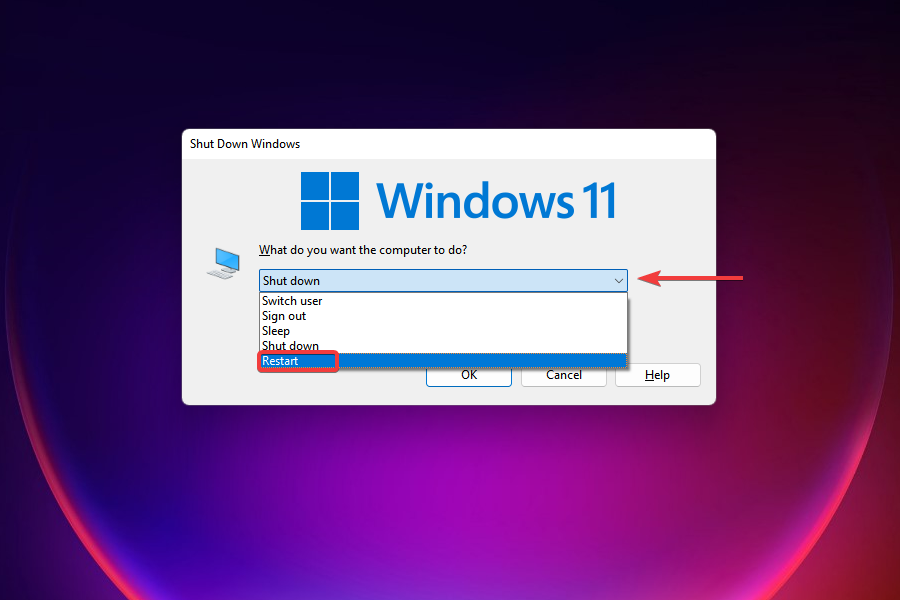
- Click OK at the bottom.


We hope this helped you solve the Windows 11 no WiFi option situation. If you have trouble with the account after the restart, learn how to change your password and username in Windows 11.
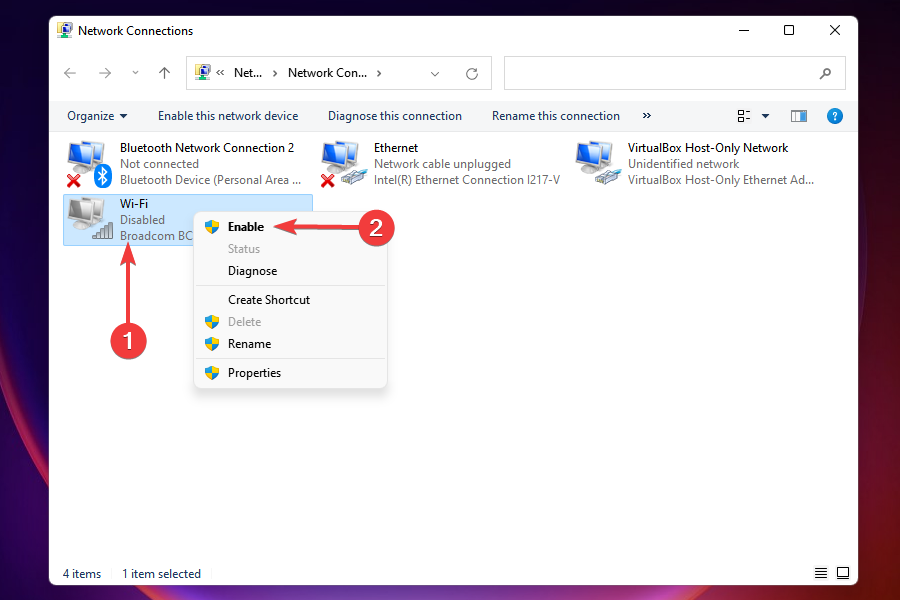
6. Check if Wi-Fi adapter is enabled
- Press Windows + R to launch the Run command and enter ncpa.cpl in the text field, then either click on OK or press Enter, to launch Network Connections.
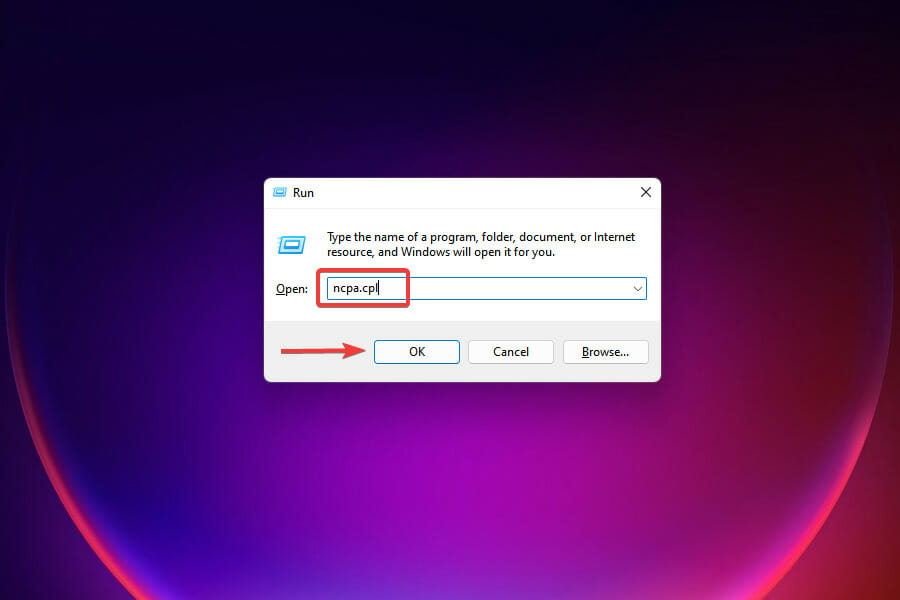
- Locate and check if the Wi-Fi entry is greyed out. In case it is, you have to enable it.
- Right-click on the Wi-Fi adapter, and select Enable from the context menu.


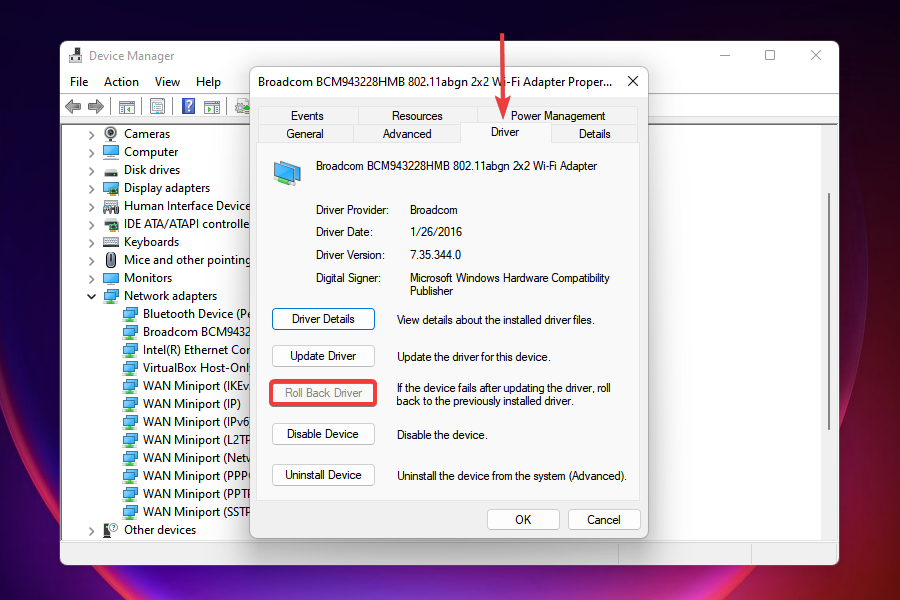
7. Use the Roll Back Driver option
- Launch Device Manager.
- Locate and double-click on Network adapters, right-click on the Wi-Fi adapter, and select Properties from the context menu.

- Go to the Driver tab and select Roll Back Driver.

- You will now be asked to select a reason for rolling back the update. Choose the necessary response and click Yes.

 NOTE
NOTE
In case the Wi-Fi disappeared after you updated the Wi-Fi driver, rolling back the update could work. Windows keeps the files for the previous version if you want to revert to it.
8. Reinstall the Wi-Fi driver
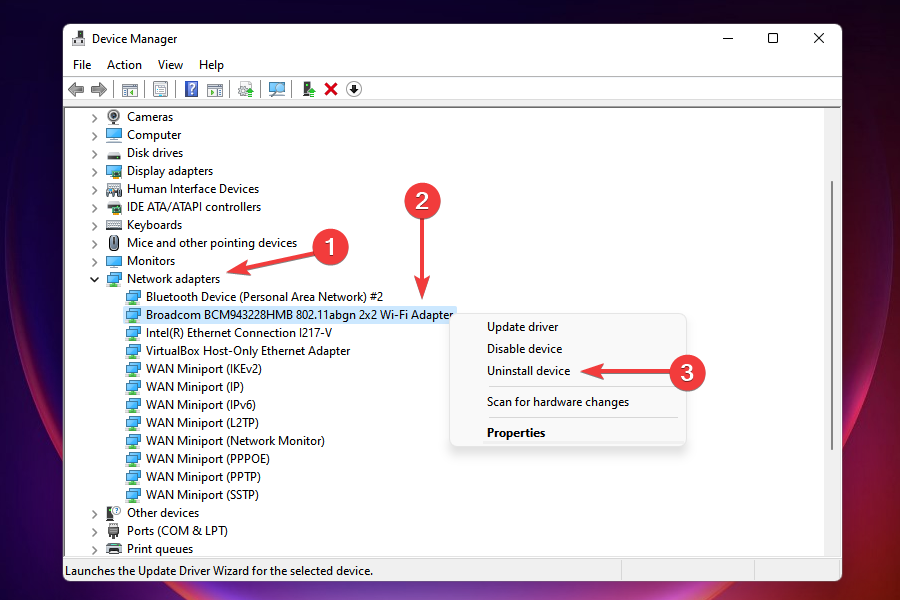
- Launch Device Manager.
- Double-click on the Network adapters to expand and view the devices under it, right-click on Wi-Fi adapter, and select Uninstall device from the context menu.

- Tick the checkbox for Attempt to remove the driver for this device and click on Uninstall at the bottom.
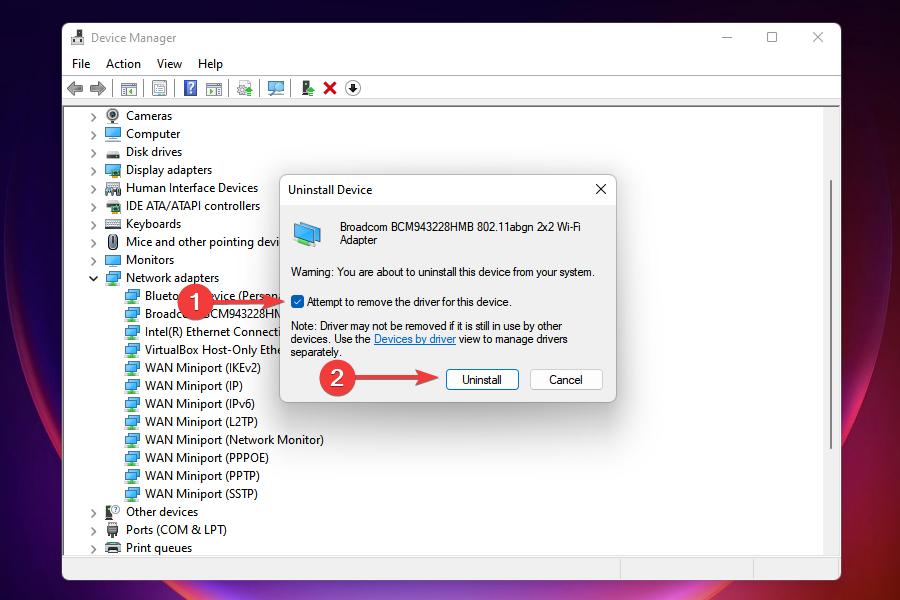
- After the driver is uninstalled, restart the computer.
- When the computer turns on, Windows will automatically look for the best available driver and install it. Check if you are now able to connect to the Wi-Fi.

9. Update Windows 11
- Press Windows + I to launch the Settings app.
- Select Windows Update from the tabs listed on the left.

- Click on Check for updates and let Windows scan for any pending updates. If there are any available, they will be downloaded and installed on the computer.


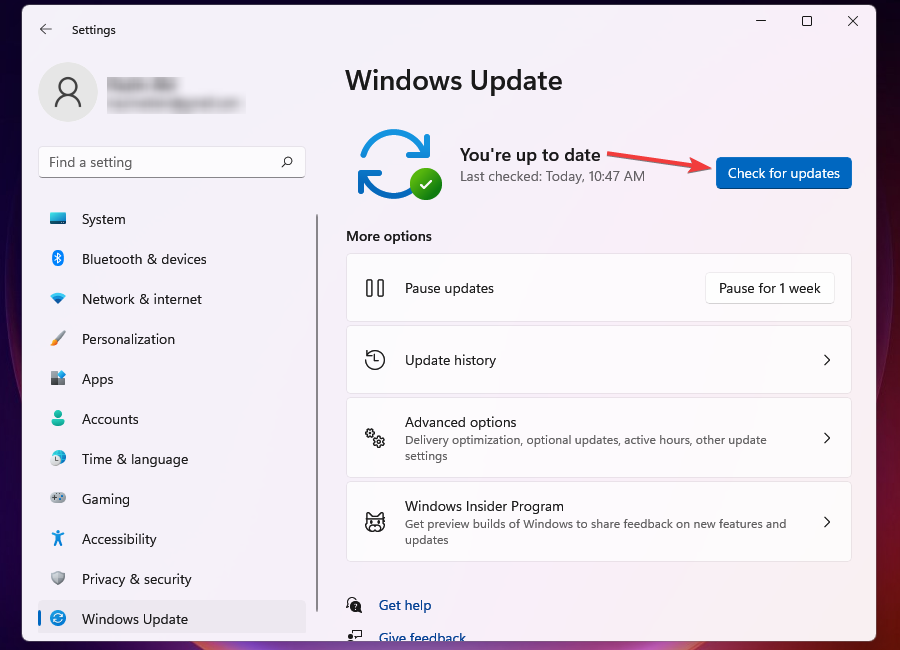
Sometimes, running an older version of Windows is also likely to cause a bunch of issues. In the updates released by Microsoft, there are patches for various problems along with other new features for your computer. It’s the former part that you should be concerned with here.
After installing the latest updates, the problem with no WiFi option in Settings on Windows 11 should be resolved.
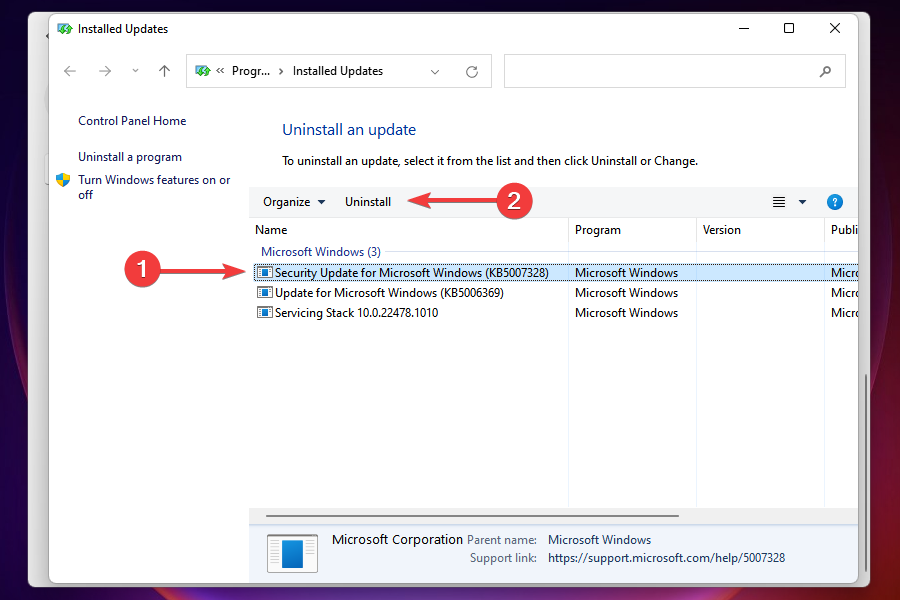
10. Uninstall Windows 11 updates
- Press Windows + I to launch the Settings.
- Select Windows Update from the tabs listed on the left.
- Click on Update history on the right.
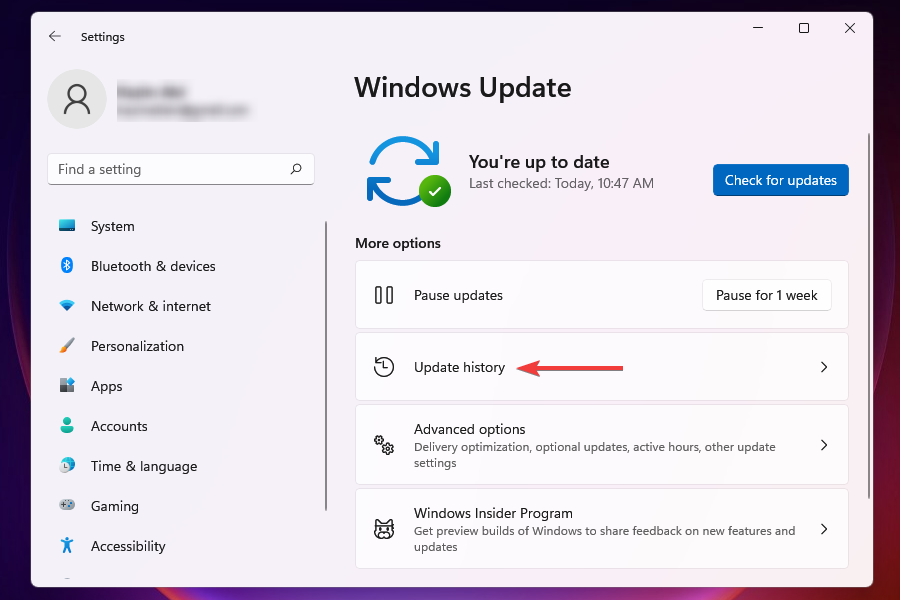
- Click Uninstall updates under Related settings.
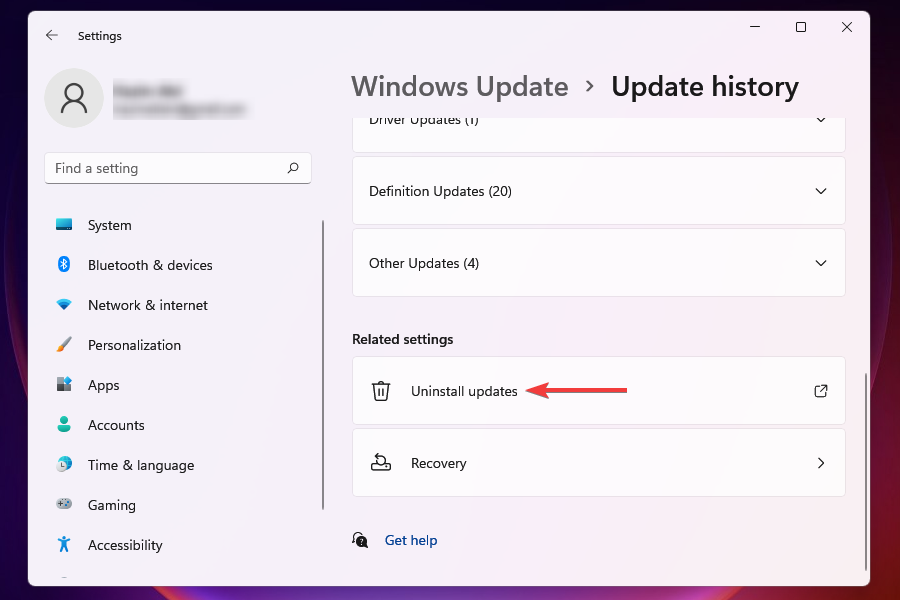
- Select the update you want to remove and click on Uninstall.


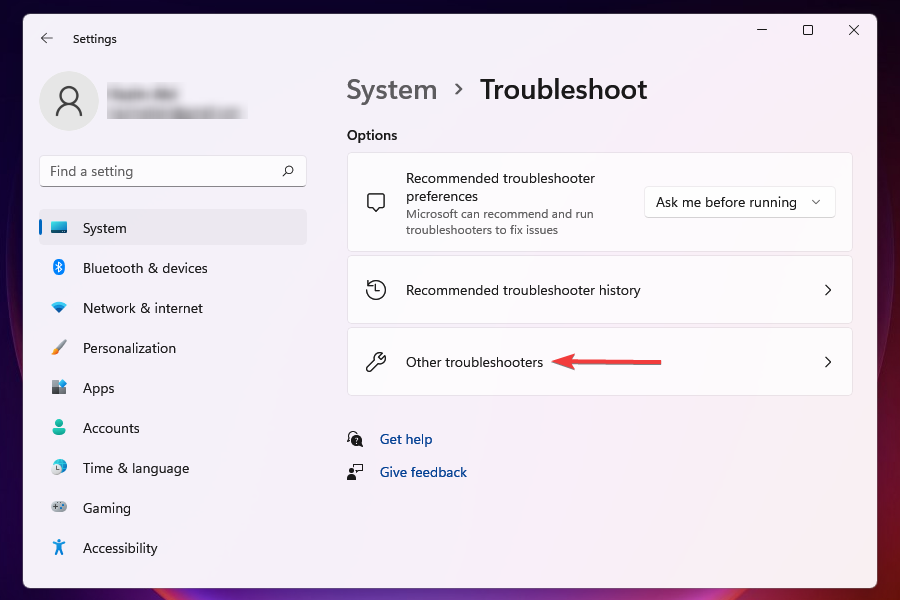
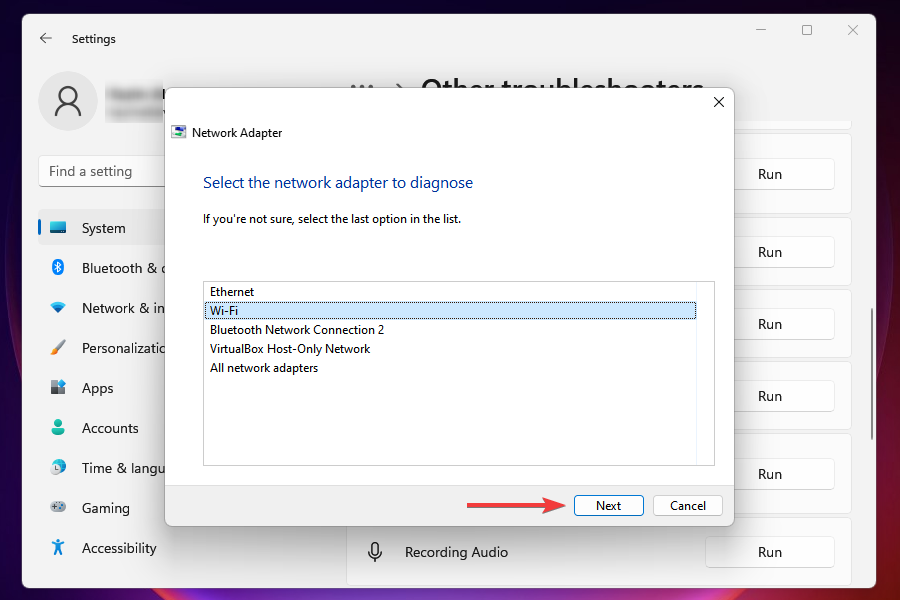
11. Run the Network Adapter troubleshooter
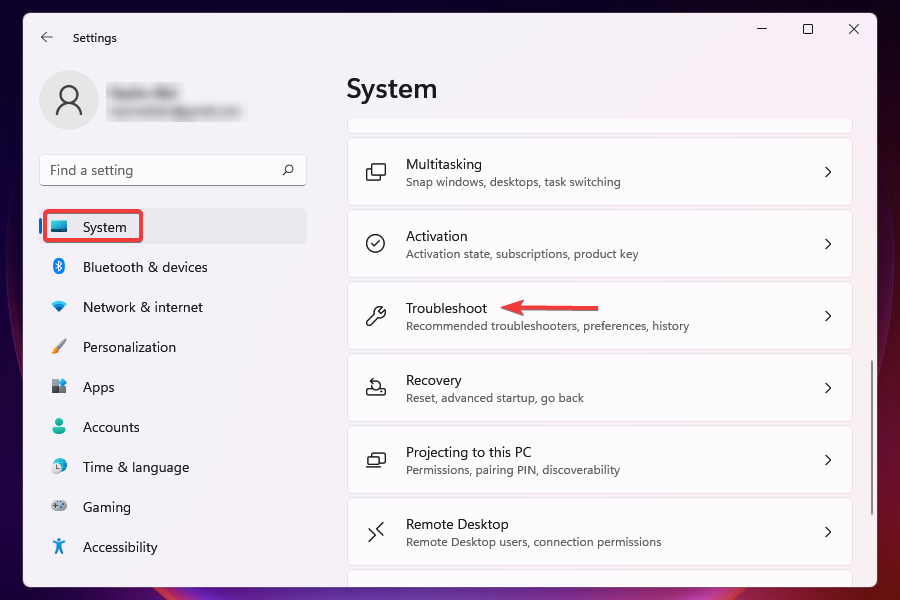
- Press Windows + I to launch the Settings.
- Scroll down and select Troubleshoot in the System tab.

- Click on Other troubleshooters.
- Click on the Run button next to Network Adapter troubleshooter.
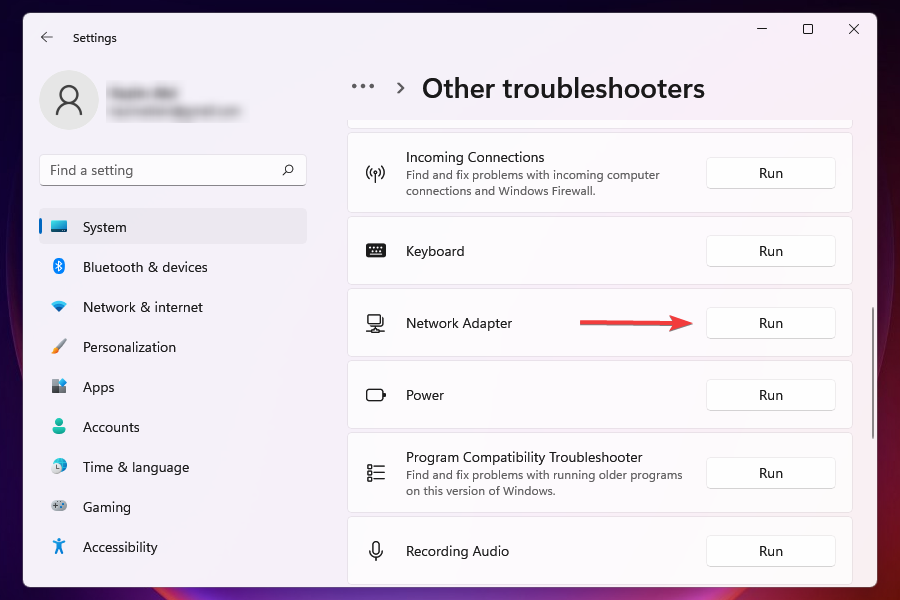
- Wait for the troubleshooter to run a scan and then select Wi-Fi from the list of network adapters.

- Wait for the troubleshooter to identify and fix the issues.


12. Run File Explorer
- Press Ctrl + Shift + Esc to launch the Task Manager.
- Click on the File menu at the top-right corner and select Run new task.
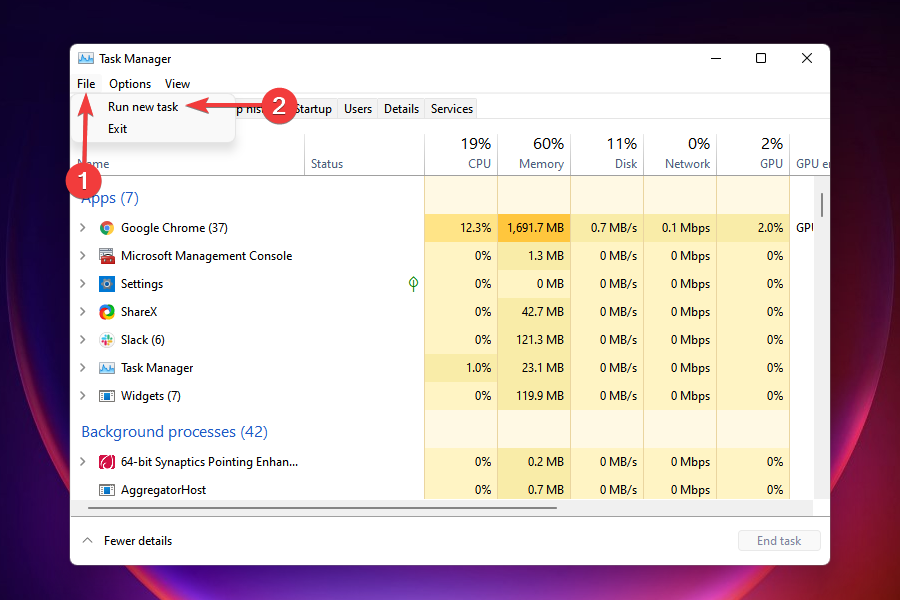
- Type explorer.exe in the text field, and either click on OK or hit Enter to launch File Explorer.
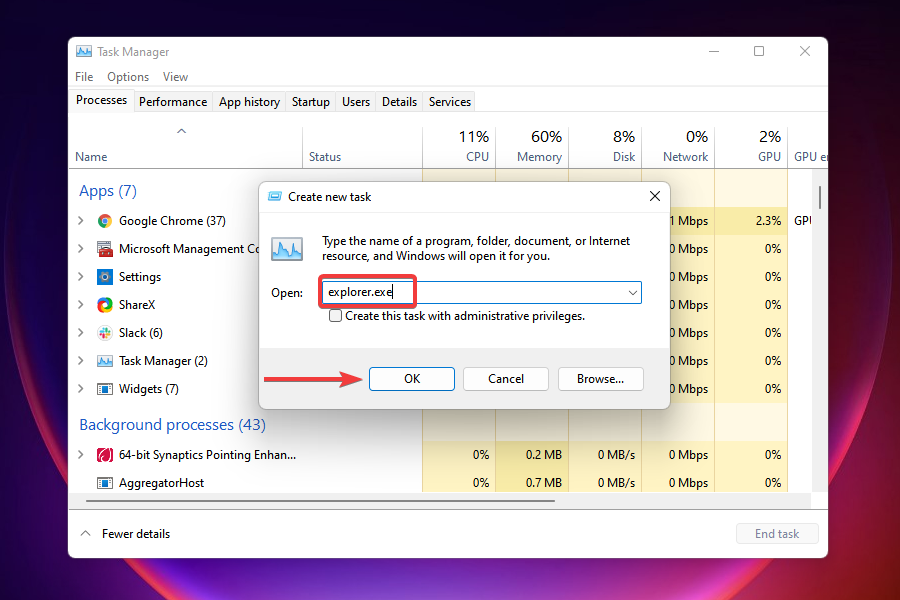
- After the File Explorer process starts, check if the Wi-Fi icon reappears.


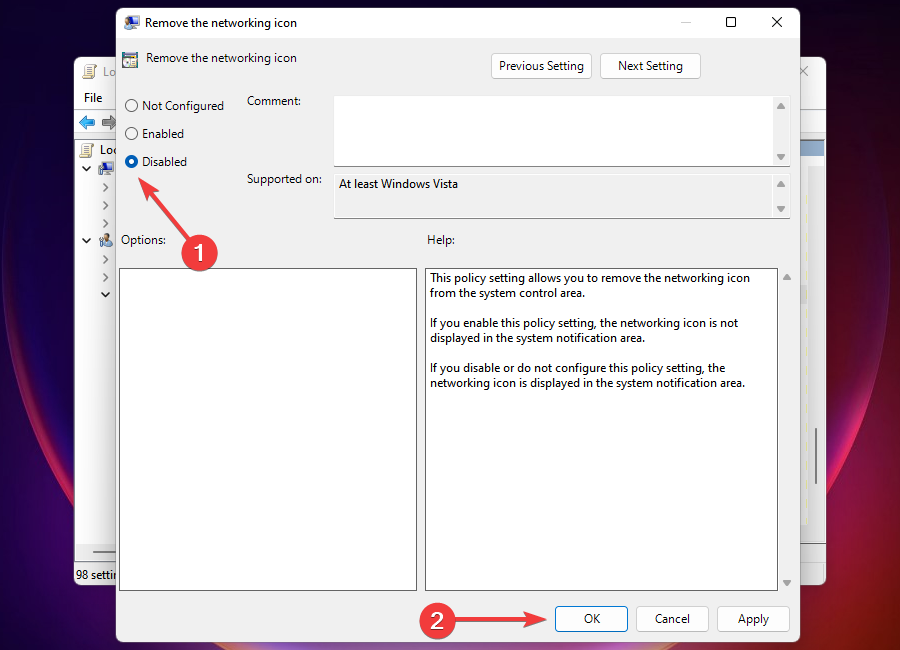
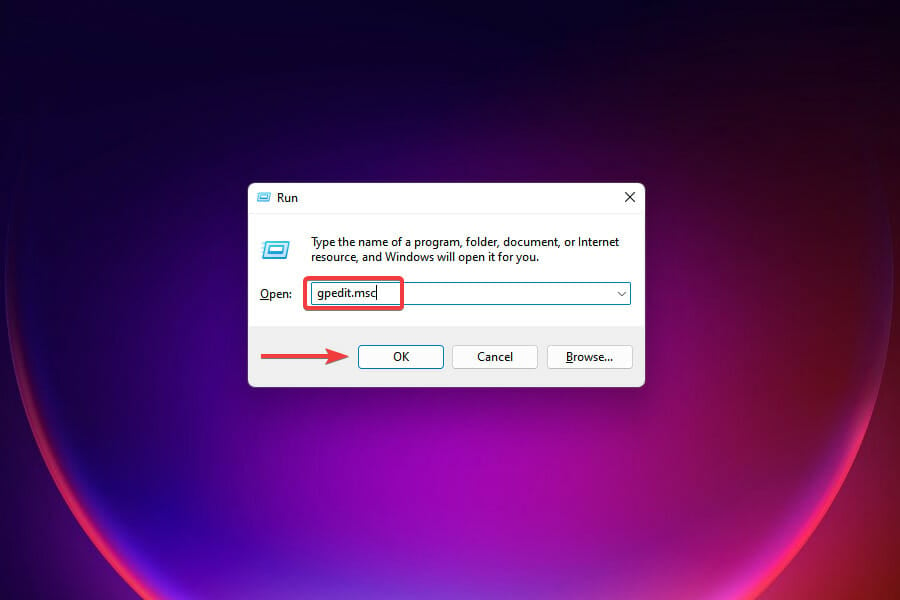
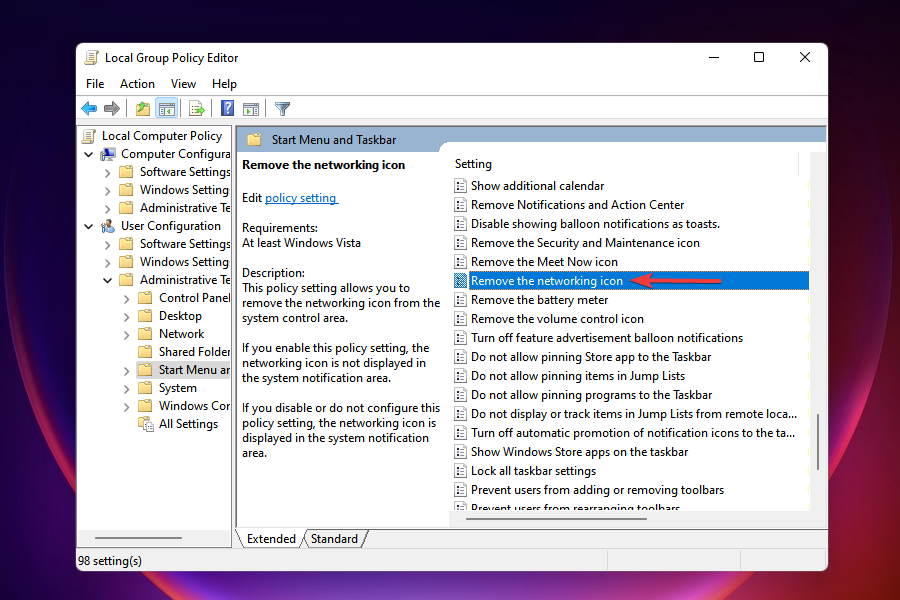
13. Modify the Group Policy
- Press Windows + R to launch the Run command.
- Enter gpedit.msc in the text field, and either click on OK or hit Enter to launch the Group Policy Editor.

- Navigate to User Configuration, then to Administrative Templates and Start Menu and Taskbar from the navigation pane on the left.
- Locate and double-click on Remove the networking icon.

- Select the checkbox for Disabled and click on OK to save the changes.

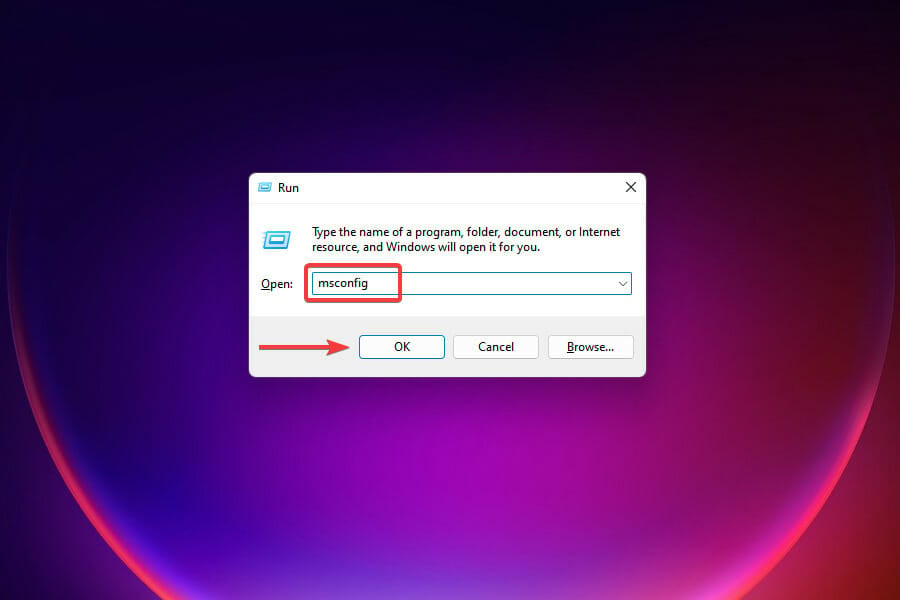
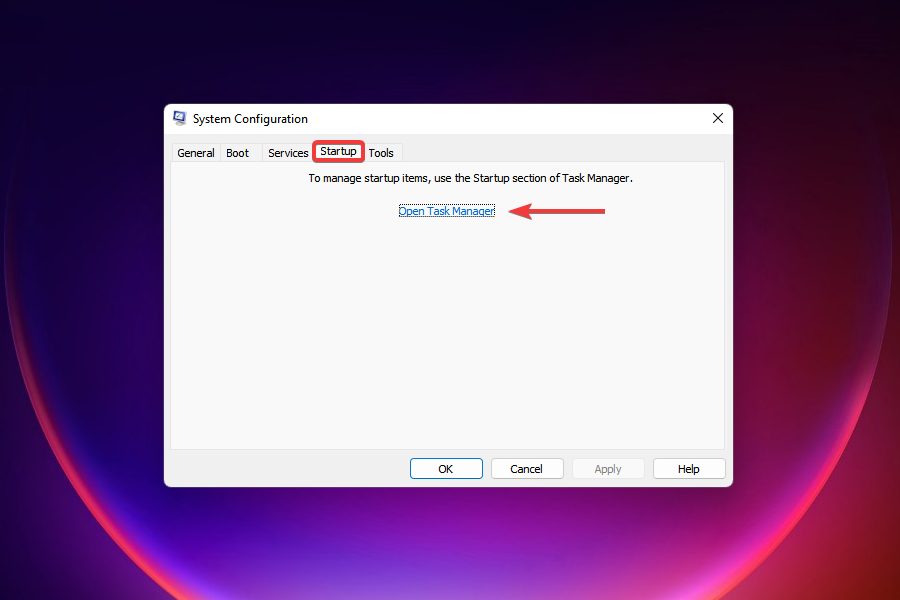
14. Perform a clean boot
- Press Windows + R to launch the Run command.
- Type msconfig in the text field, and either click on OK or hit Enter to launch the System Configuration window.

- Go to the Services tab.
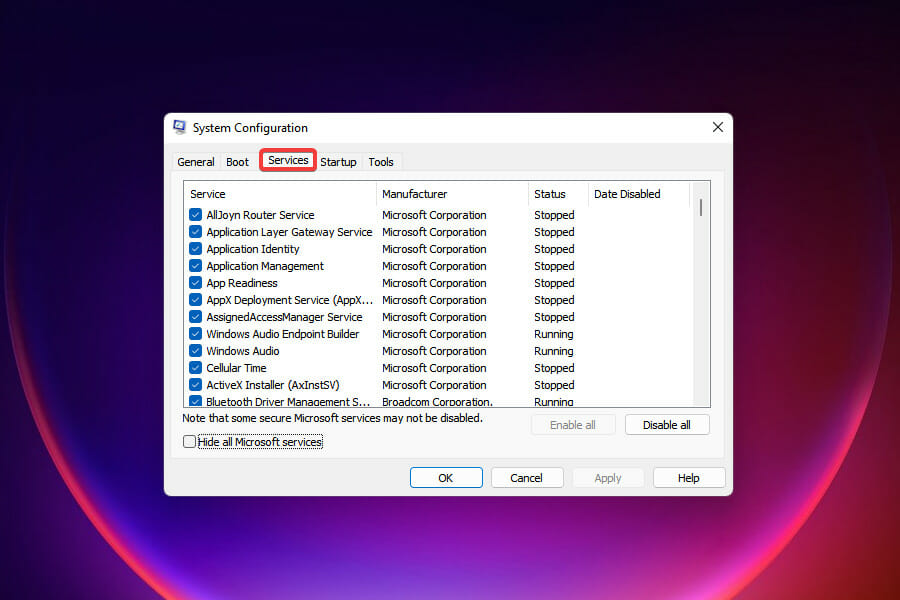
- Tick the checkbox for Hide all Microsoft services and click Disable all.

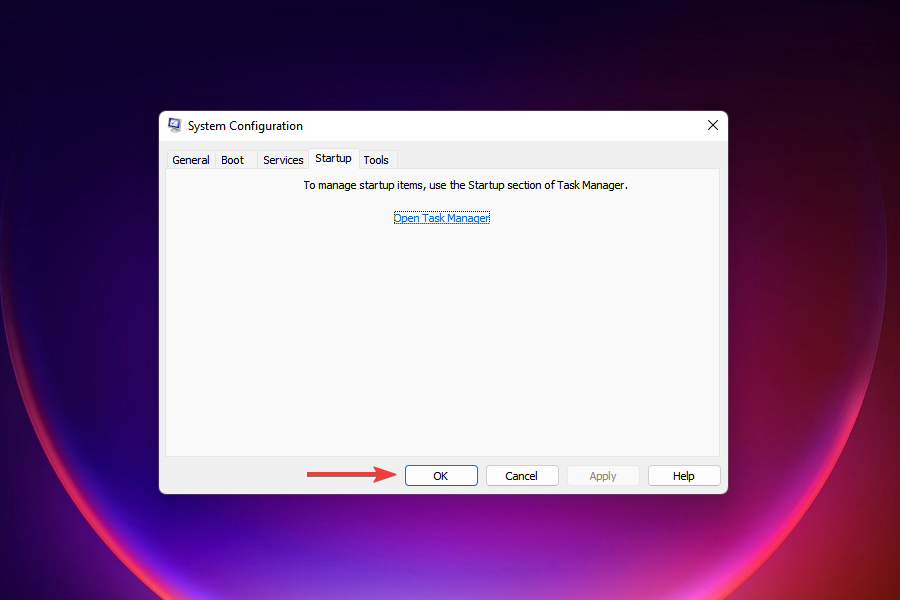
- Navigate to the Startup tab and select Open Task Manager.

- Select all the startup items listed here one at a time and click on Disable each time.

- Close the Task Manager once you are done disabling the startup programs
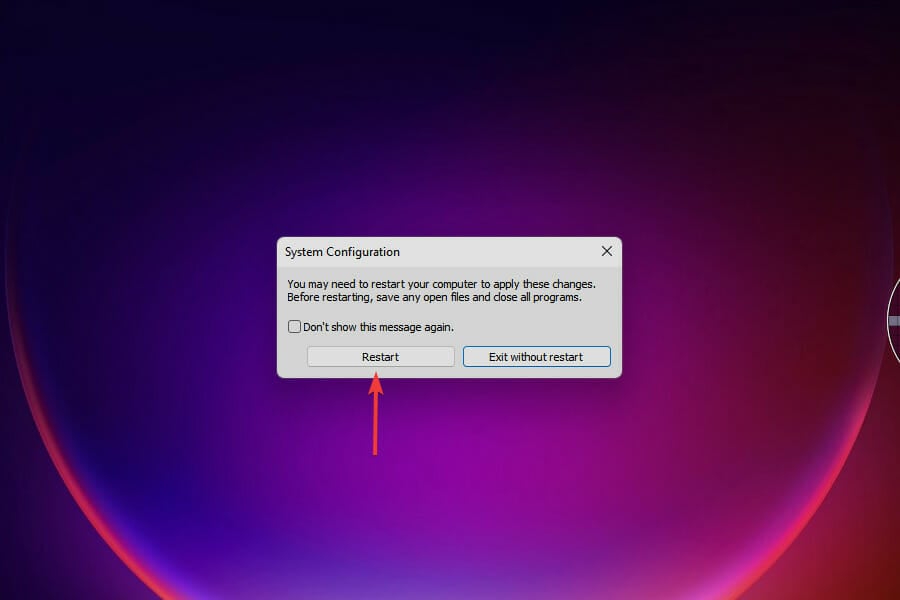
- Click on OK in the System Configuration window.

- Click Restart to launch Windows with just the critical services and startup programs.


For any problems logging in after the clean boot, learn how to remove your login password in Windows 11.
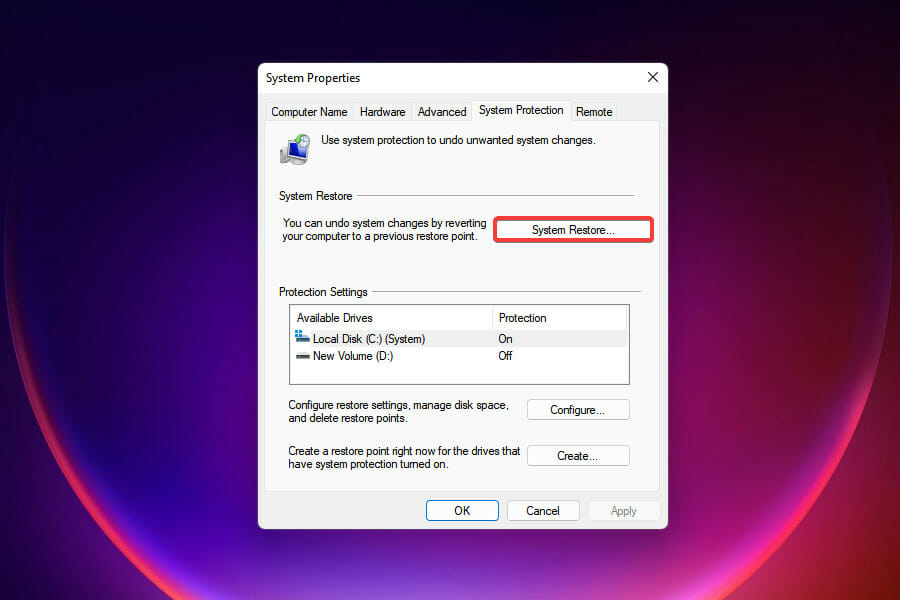
15. Perform a system restore
- Press Windows + S to launch the Search menu.
- Type create a restore point in the text field at the top and click on the relevant search result.
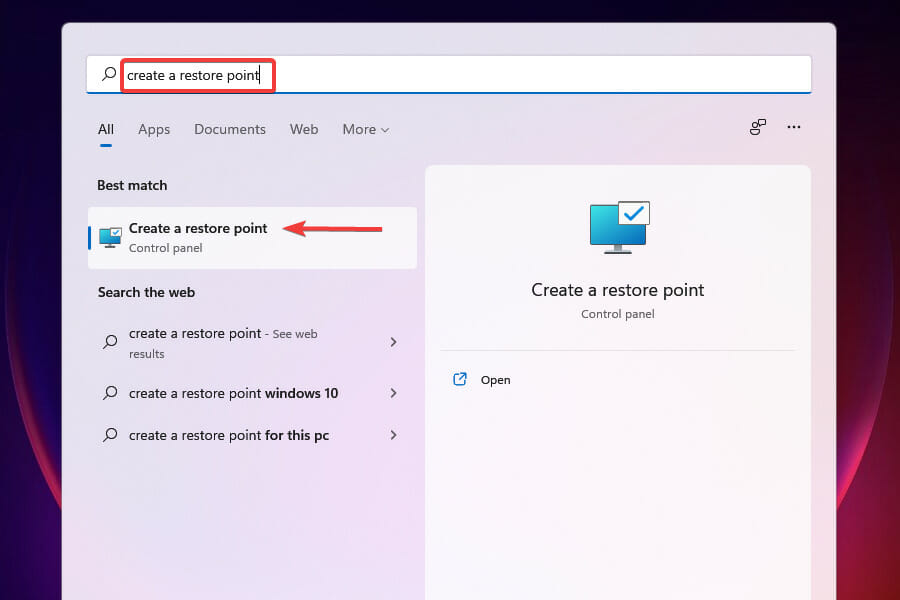
- Click on System Restore.
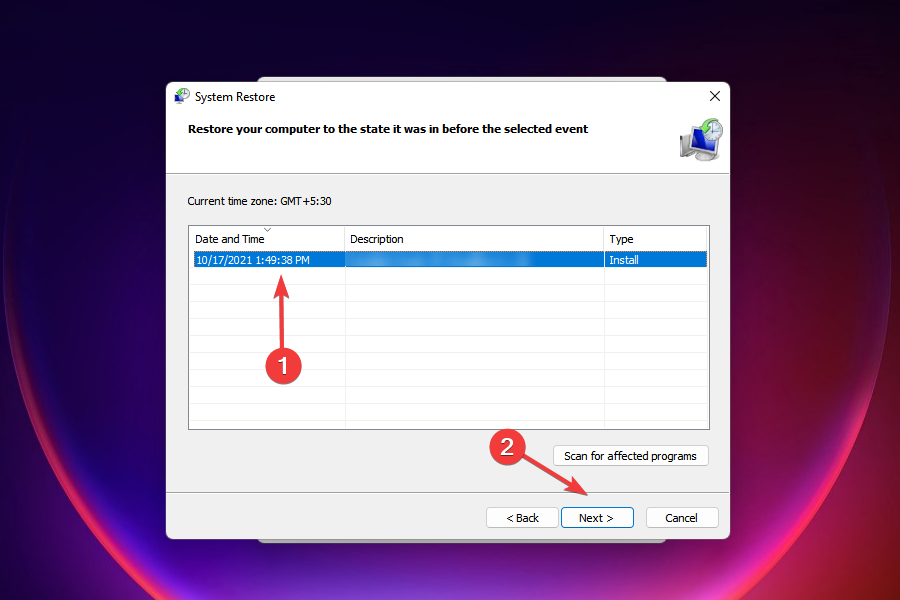
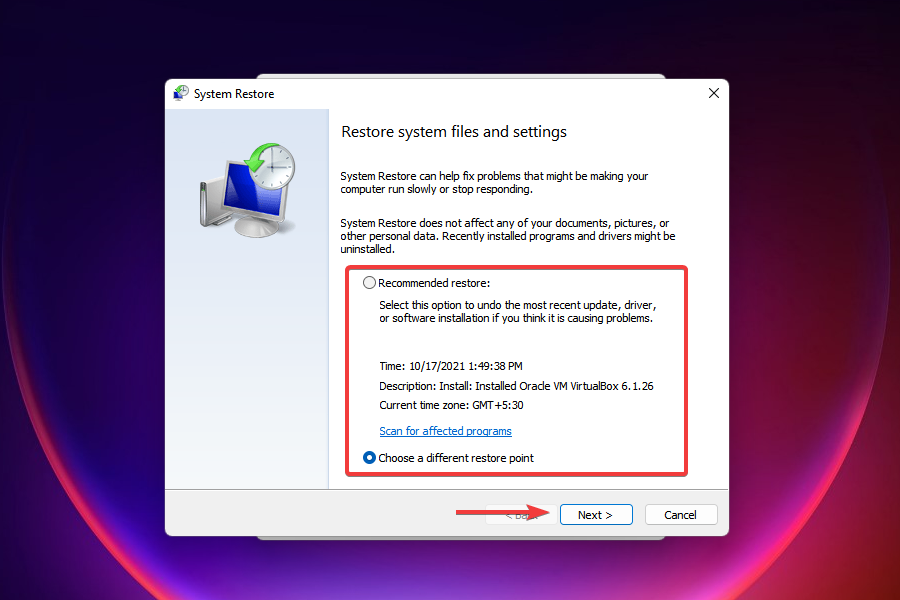
- Select the preferred setting and click on Next. The first option here is the recommended restore point by Windows while with the other setting, you can select one manually. We will choose the second option.

- Choose a restore point and click on Next.
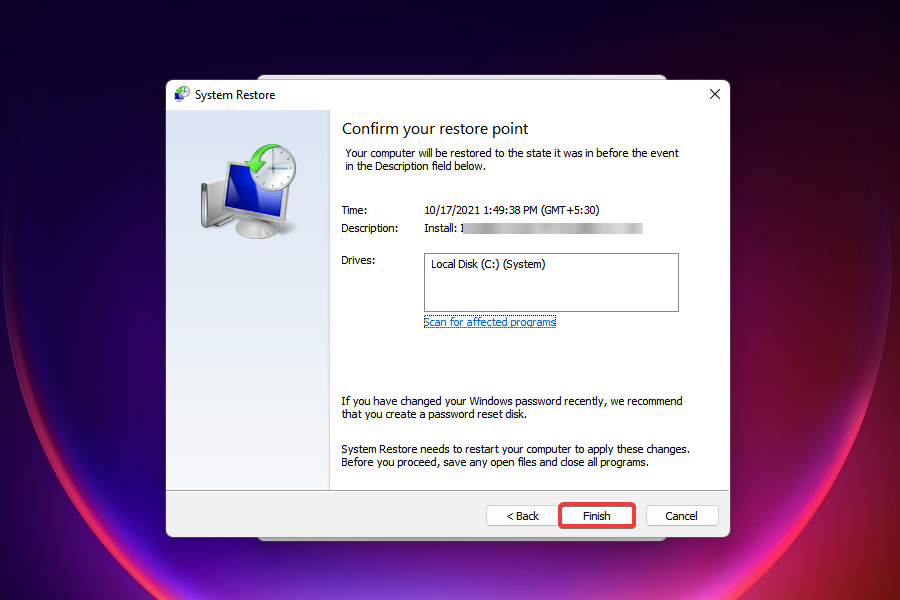
- Review the details and click on Finish to start the restore process.

- The computer will restart during the restore process, hence, we recommended that you save any open files to avoid loss of data.

System restore has been present on the previous versions of Windows as well and is an effective troubleshooting method.
It takes the computer back in time to a point where the error did not exist by modifying the settings and uninstalling apps. The restore process, however, does not affect the files stored on the system.
However, if you noticed a gradual reduction in the Wi-Fi strength over time or have run into trivial issues, it could be the failure of the hardware as well.
If you are facing trouble with the connection, check our guide on how to increase the Internet speed on Wi-Fi. Also, find out the best browsers for Windows 11 to seamlessly surf the web while ensuring privacy and security.
Lastly, if your WiFi symbol is not showing on laptop, check out our dedicated guide for help.
If you want to learn more about other issues like no Wi-Fi networks found, a “Wi-Fi action needed” message, or a Wi-Fi adapter not working, check out these helpful guides.
Let us know which fix worked for you in the comments section below.
FAQs
If you don’t see WiFi during initial setup, you’re likely missing wireless drivers. Use an Ethernet connection temporarily or create a USB with drivers.
Yes. Download the drivers from another PC and transfer them via USB.
Ensure the WiFi adapter is enabled, the drivers are installed, and Airplane Mode is off.
Read our disclosure page to find out how can you help Windows Report sustain the editorial team. Read more


Improve this guide


User forum
0 messages