Fix: Password Protected Sharing not Turning Off on Windows
Everything you need to turn off password protected sharing
4 min. read
Updated on
Read our disclosure page to find out how can you help Windows Report sustain the editorial team. Read more
Key notes
- If the turn off password protected sharing is not working on your PC, it might be because of the wrong settings.
- You can fix this issue quickly by making some changes to your registry.
- Another effective solution is to remove the guest account password.

After installing the latest Windows 10 updates, many users reported being unable to turn off the password for protected sharing.
Password-protected sharing is a Windows 10 feature that stops other users from accessing shared files, printers, or public folders. Some users reported that the Off button wouldn’t stick when using this feature.
Other users were able to move the button to the Off position but reported that the settings didn’t change after restarting the computer. Here’s a series of solutions that should help you to fix this problem once and for all.
Why can’t I turn off password protected sharing?
Below are some of the reasons the turn off password protected sharing is not working on your PC:
- Wrong settings: If the password protected sharing is off but still asking for a password, it might be because the registry value is still active. You can fix this quickly by modifying your registry.
- Issues with the guest account: In some cases, this problem might be caused by the password in your guest account. The solution to this is to remove the password.
How do I turn off password protected sharing?
1. Turn off Password Protected Sharing from the Control Panel
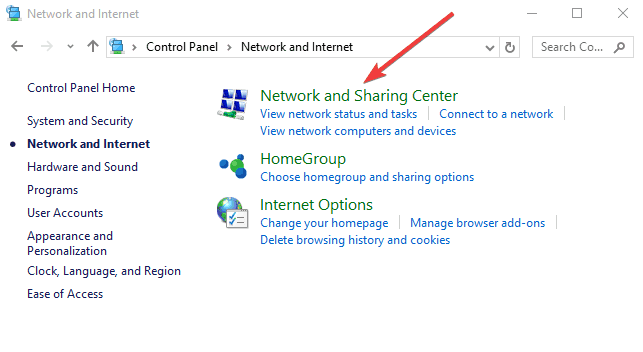
- Click on the Start button and open the Control Panel
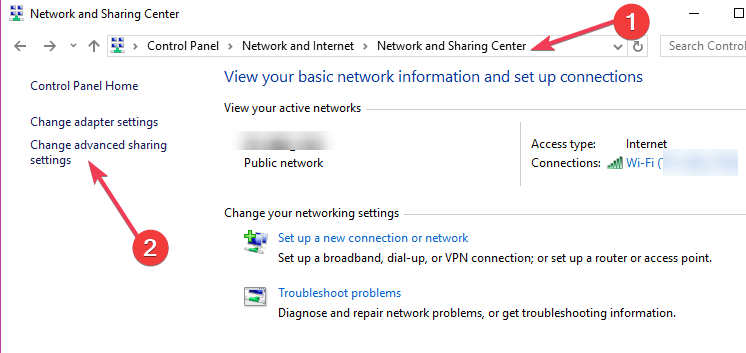
- Click on the Network and Sharing Center
- Click Change advanced sharing settings which you can find in the left side
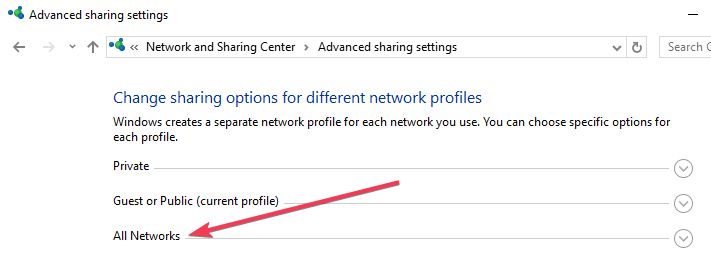
- Click the arrow next to All Networks to expand the section
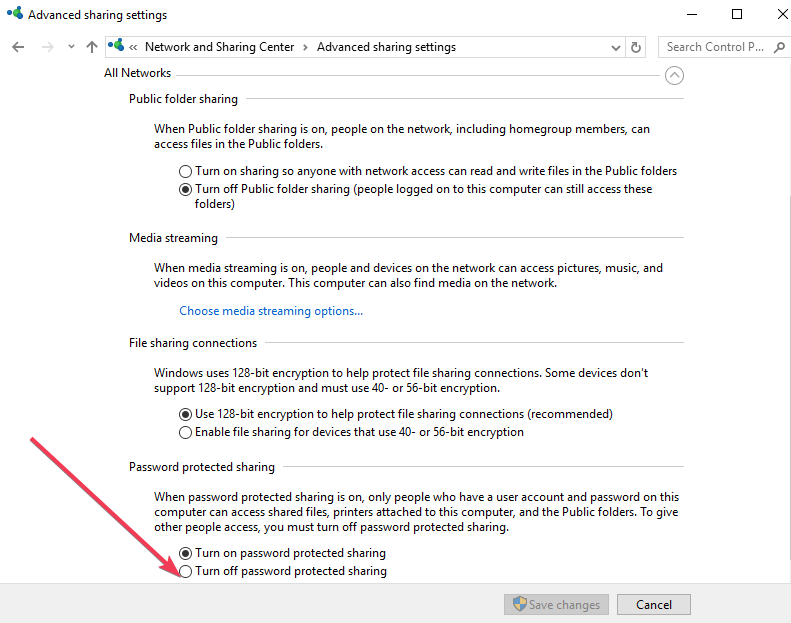
- Select Turn off password protected sharing option under Password protected sharing
- Click Save changes.
First, you can try to turn off the Password Protected Sharing from the Control Panel and see if it works properly.
2. Remove the Guest account password
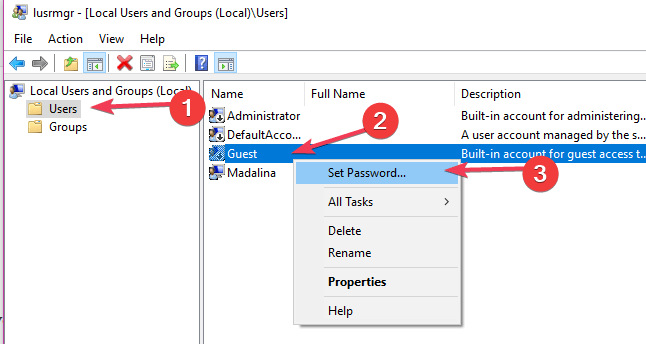
- Open the Run box by pressing the Windows key + R on your keyboard, and type lusrmgr.msc , and hit Enter.
- In the Local Users and Groups box, click Users in the left pane.
- Now, right-click Guest and press Set Password…
- In the Set Password for Guest box that pops up, you need to leave the New Password and Confirm Password fields empty.
- Finally, click OK.
If method 1 does not work, you could have to remove the Guest account password. To do so, follow the steps above.
3. Remove Password Protected Sharing from User Accounts
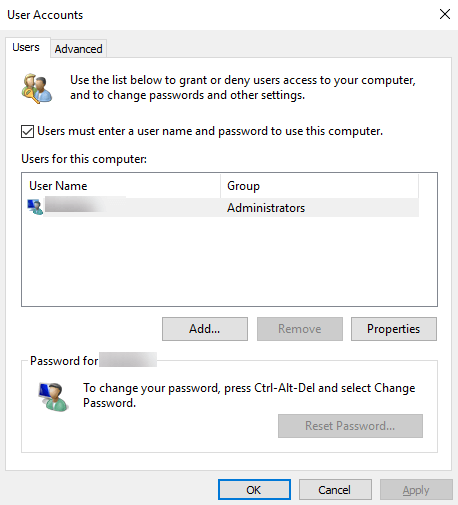
- Open the Run box by pressing the Windows key + R on your keyboard, type control userpasswords2 in the box, and hit Enter.
- The User Accounts window will open.
- Under the Users for this computer section, select Guest, and click Reset Password…
- Leave the New Password and Confirm Password fields empty.
- Finally, click OK.
Alternatively, you can try removing the password using the Registry Editor.
4. Modify registry entries using the Registry Editor
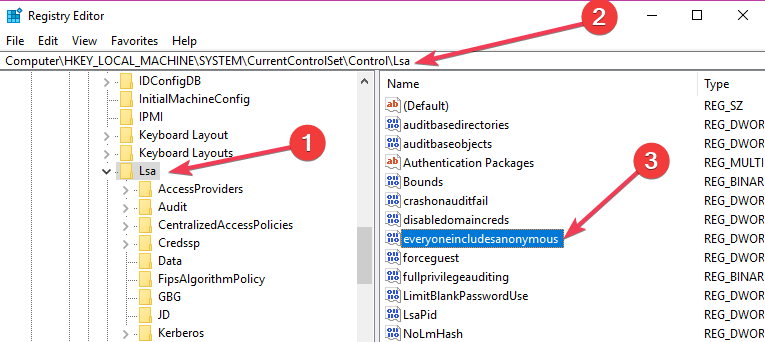
- Press the Windows key + R, type regedit in the box, and hit Enter.
- The Registry Editor window will pop up > find this location in the left pane:
HKEY_LOCAL_MACHINE\SYSTEM\CurrentControlSet\Control\Lsa - In the right pane, find the REG_DWORD type registry named everyoneincludeanonymous.
- Now, double-click on the registry and set the Value data to 1.
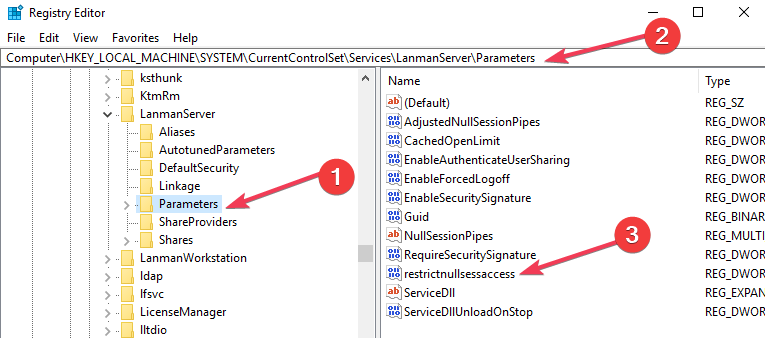
- Click OK and go to the next registry location:
HKEY_LOCAL_MACHINE\SYSTEM\CurrentControlSet\Services\LanmanServer\Parameters - Next, click on the parameters folder and find the REG_DWORD type registry named restrictnullsessaccess.
- Double-click on the registry and set the Value data box to 0.
- Close the window and restart the computer.
We recommend modifying the registry entries manually, and being very careful while making these changes. A simple mistake could have dramatic impacts on your system.
5. Check the Password never expires on property
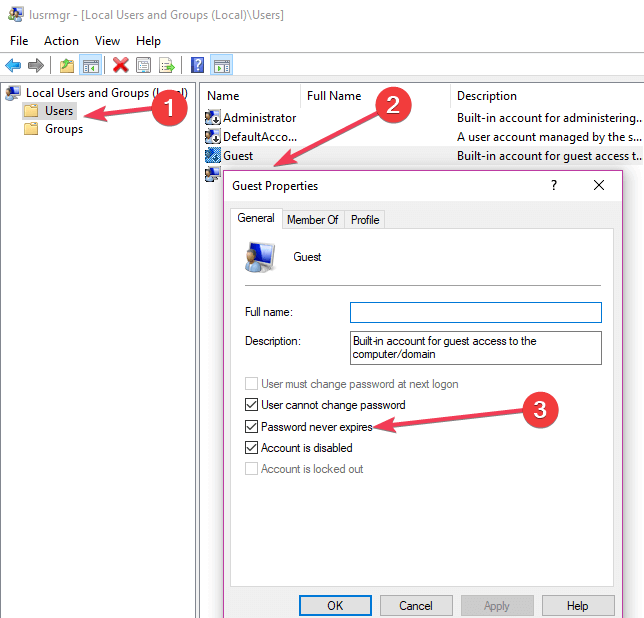
- Open the Run box by pressing the Windows key + R, type lusrmgr.msc in the box, and hit Enter.
- Select Users in the Local Users and Groups window, and right-click Guest > Properties.
- In the Guest Properties window that pops up, check the box next to Password never expires.
- Click Apply, followed by OK, and reboot your PC.
An alternative solution would be to change the password’s expiry status.
If you are able to remove the sharing security password, be aware that public folders and printers are now accessible to other devices.
If your folder can’t be shared on Windows 10, check our detailed guide to fix it for good.
Feel free to let us know the solution that helped you fix this issue in the comments below.




User forum
3 messages