FIX: Windows 10/11 VPN shows unidentified public network
![]() 8 min. read
8 min. read
![]() Updated on
Updated on
Share this article
Improve this guide
Read our disclosure page to find out how can you help Windows Report sustain the editorial team Read more
Key notes
- If your Windows 10 VPN connection shows an unidentified or unknown public network connection message, the network it’s trying to connect with can’t be identified due to a connectivity issue or lack of identifiable characteristics.
- Follow our complete step-by-step guide below to find out how to fix this issue and make the Windows 10 VPN connect to a private and identified network connection. Discover the best VPN that can help you.
- Visit our Windows 10 Troubleshooting area to fix more problems with Microsoft's operating system.
- Join our VPN Troubleshooting Hub for more how-to guides about virtual private network services.

If your Windows 10 VPN connection shows an unidentified or unknown public network connection message, this means that the network it’s trying to connect with can’t be identified due to a connectivity issue or lack of identifiable characteristics.
In the second case, you don’t have to worry that your VPN isn’t working properly. And it doesn’t mean it’s leaking your IP address or compromising your security either.
It’s a Windows 10 error that can’t identify the network due to specifications it can’t translate. For example, if you have IPv6 enabled but your ISP doesn’t support IPv6, you might receive this message.
It’s only problematic when it points out a network issue. If that’s the case, check out our 9 quick-fixes below.

How do I prevent Windows 10 VPN from showing the unidentified or unknown public network message?
Check if Internet connects to an unidentified network

- Disconnect from the VPN.
- Right-click the Start button and select Network Connections.
- Click Network and Sharing Center or View your network properties.
- Check if your Internet connection shows Unidentified network or Unknown network.
If the Unidentified network message on Windows 10 is caused by the Internet connection, you need to fix this. Afterward, check if the VPN connection is still displaying this error. If so, proceed to the following steps.
By the way, feel free to bookmark our Network Hub to troubleshoot any Internet connection issues.
Run the VPN client as admin
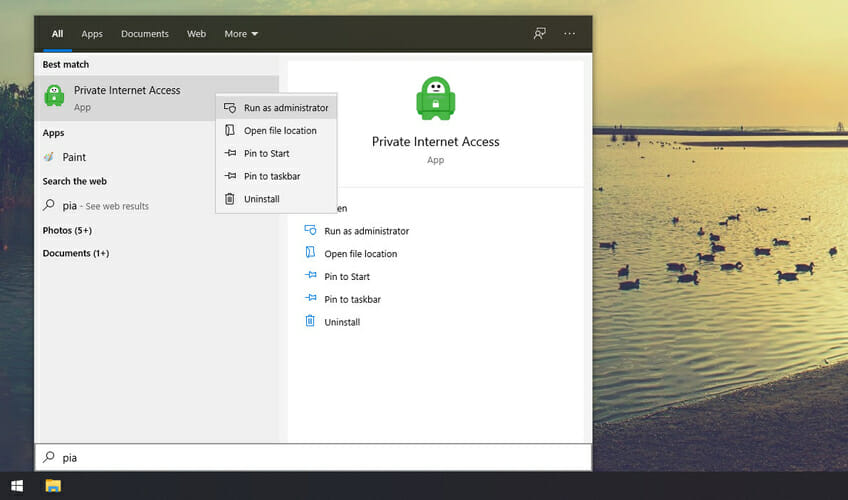
- Disconnect from the VPN.
- Click the Start button and search for the VPN client.
- Right-click its entry and select Run as administrator.
If you have a VPN desktop client installed on your PC, the error message could be caused due to lack of permissions. Make sure to run your VPN client as the administrator. Then you can check if it still shows the unidentified public network message on Windows 10.
A lot of Windows-related issues are caused by a lack of permissions. Visit our Admin Rights Hub to find out more.
Disable IPv6 connectivity
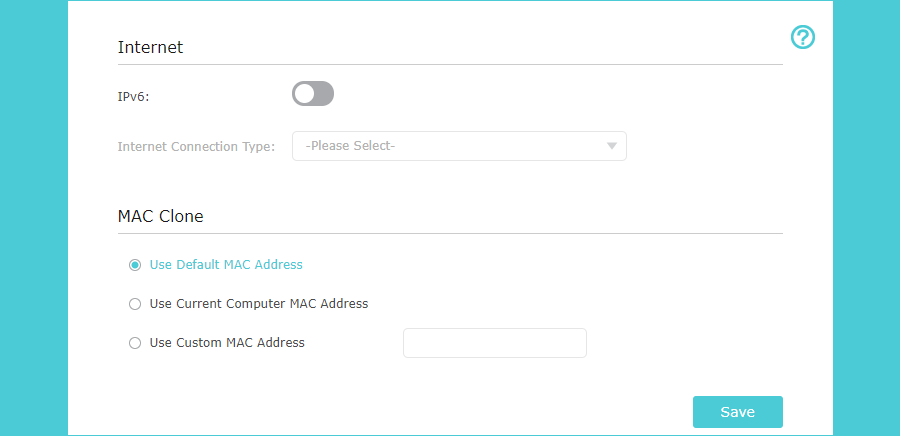
- Using a web browser, log in to your router admin page.
- Sign in with your credentials*.
- Locate the IPv6 section.
- Turn off IPv6.
- Save changes.
- Right-click the Start button and go to Network Connections.
- Click Change adapter options.
- Right-click your VPN connection** and select Properties.

- Locate and disable Internet Protocol Version 6 (TCP/IPv6).
- Click OK.
- Do the same for your Wi-Fi or Ethernet connection*** to disable IPv6.
- Restart your computer.

*The default settings should be written on the back of the router.
**If you have multiple connections and don’t know which one belongs to your VPN client, keep an eye on the Network Connections window while connecting to the VPN to spot the one that becomes active.
***If Windows gets stuck after trying to confirm settings on Wi-Fi or Ethernet, force close the connection window and restart Windows Explorer from Task Manager.
If Windows 10 VPN shows unidentified public network but it’s still connected to the Internet, this shouldn’t affect you. However, if you don’t use IPv6 connectivity, it’s a good idea to turn it off everywhere (router, Ethernet, Wi-Fi, VPN).
If the error message is still displayed after deactivating IPv6, it might be your ISP’s fault, not yours. If this still bugs you, contact your ISP and ask for assistance.
Reinstall the TAP drivers
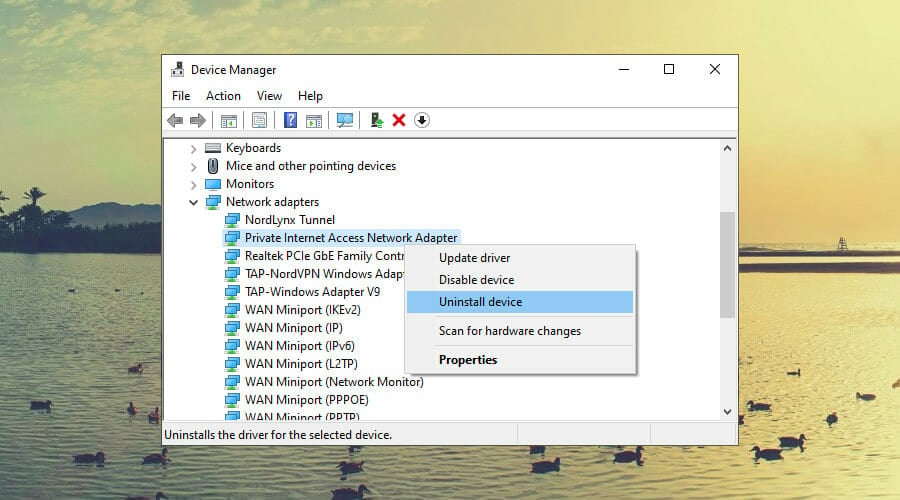
- Right-click the Start button and go to Device Manager.
- Expand Network adapters.
- Locate the TAP driver of your VPN client.
- Right-click the TAP driver and select Uninstall device.
- Leave Delete the driver software for this device unchecked.
- Click Uninstall.
- Launch your VPN client.
- When it asks you to reinstall the TAP driver, allow it.
- Or, if you have Private Internet Access
- Right-click the PIA icon in the systray and select Settings.
- Go to Help.
- Click Reinstall OpenVPN Network Adapter*.
- If prompted by UAC (User Account Control), click Yes.
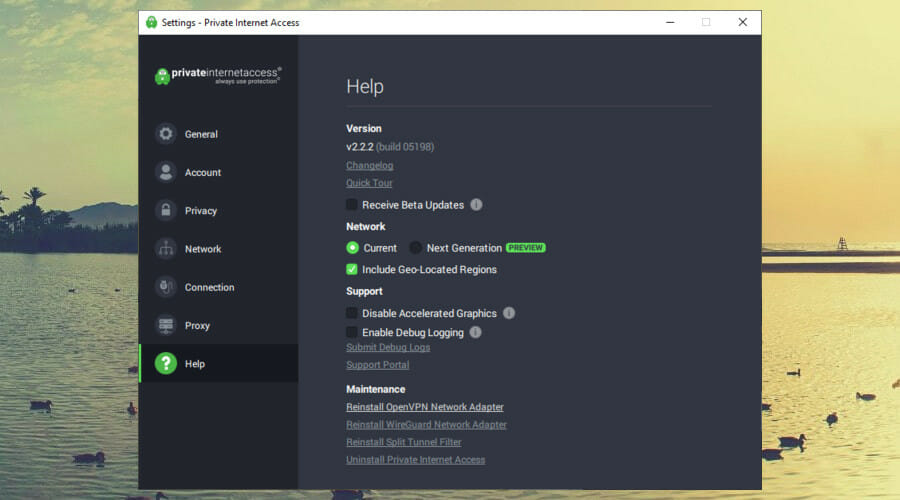
*If you use the WireGuard protocol instead of OpenVPN, then click Reinstall WireGuard Network Adapter.
You can also fix errors with the TAP-Windows Adapter V9 to resolve the problem with the unidentified public network over the virtual private network.
Uninstall extra VPNs and remove their TAP drivers
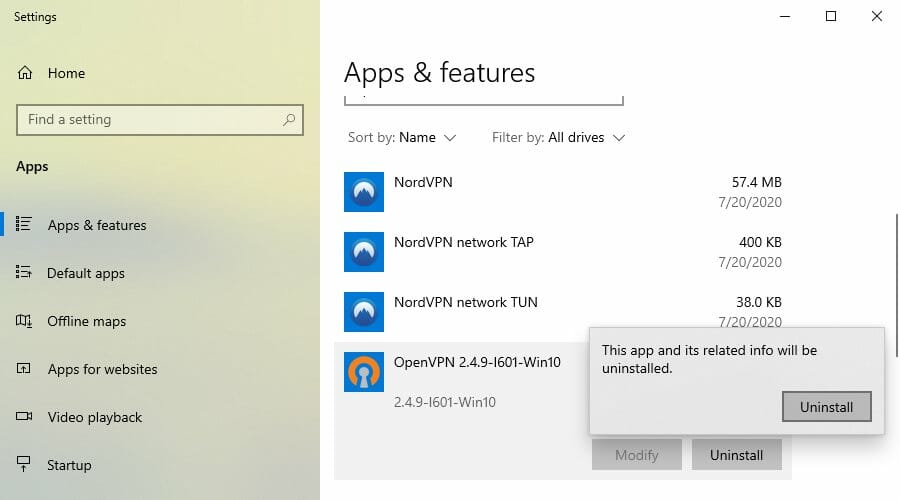
If you have more than one VPN client installed on your computer, this could result in conflicts because each VPN has its own TAP driver.
So, if two or more TAP drivers apply individual settings to Windows 10, it could be the reason why your VPN shows the unidentified public network message.
Make sure to uninstall all VPN apps except for the one you currently use. You can use the default Windows 10 uninstaller, but we recommend using third-party tools that also remove any software leftovers, including the associated TAP drivers.
Otherwise, you might have to visit Device Manager and manually remove any leftover TAP drivers.
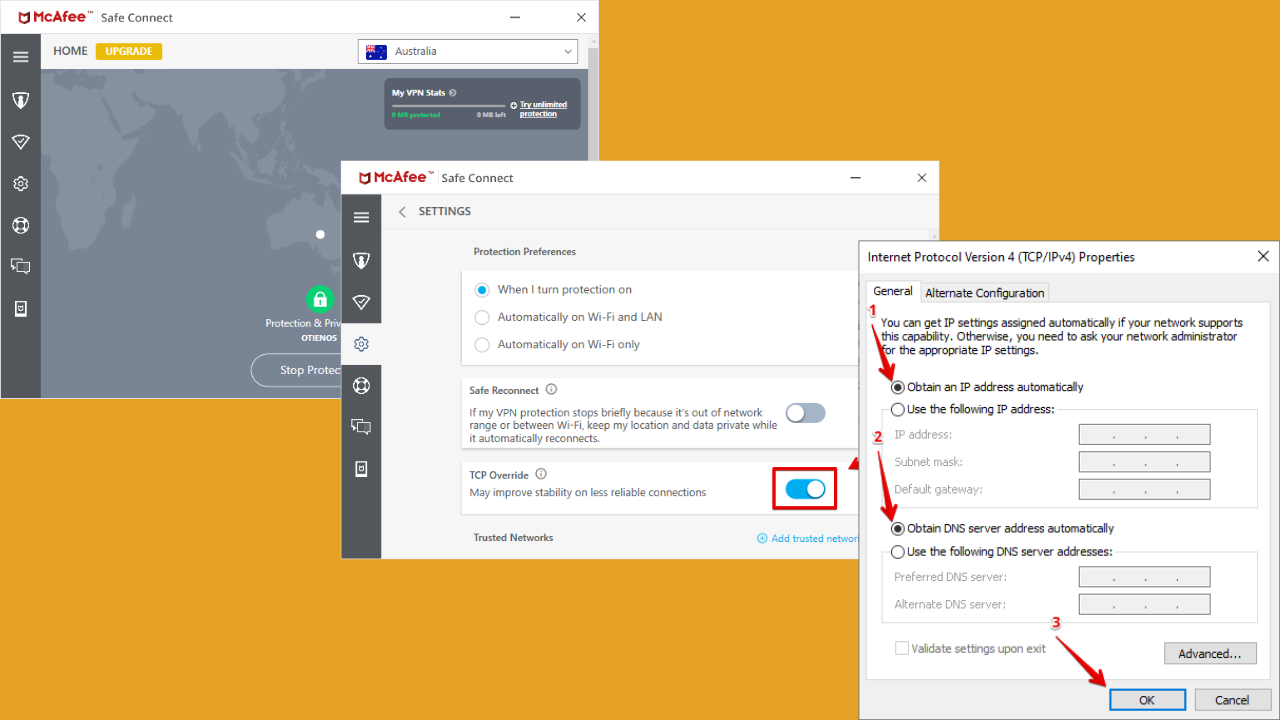
Check for faulty IP addresses
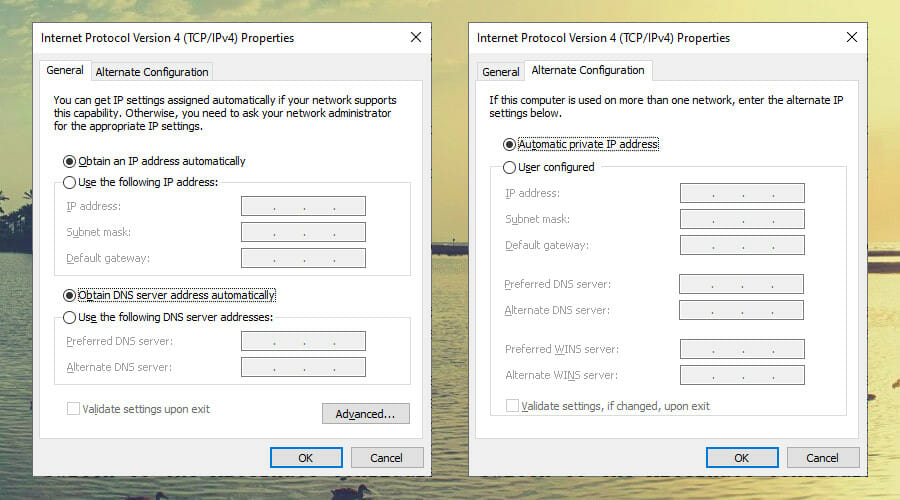
- Disconnect from the VPN.
- Click the network icon in the systray.
- Go to Network & Internet settings.
- Click Change adapter options.
- Right-click your VPN connection and go to Properties.
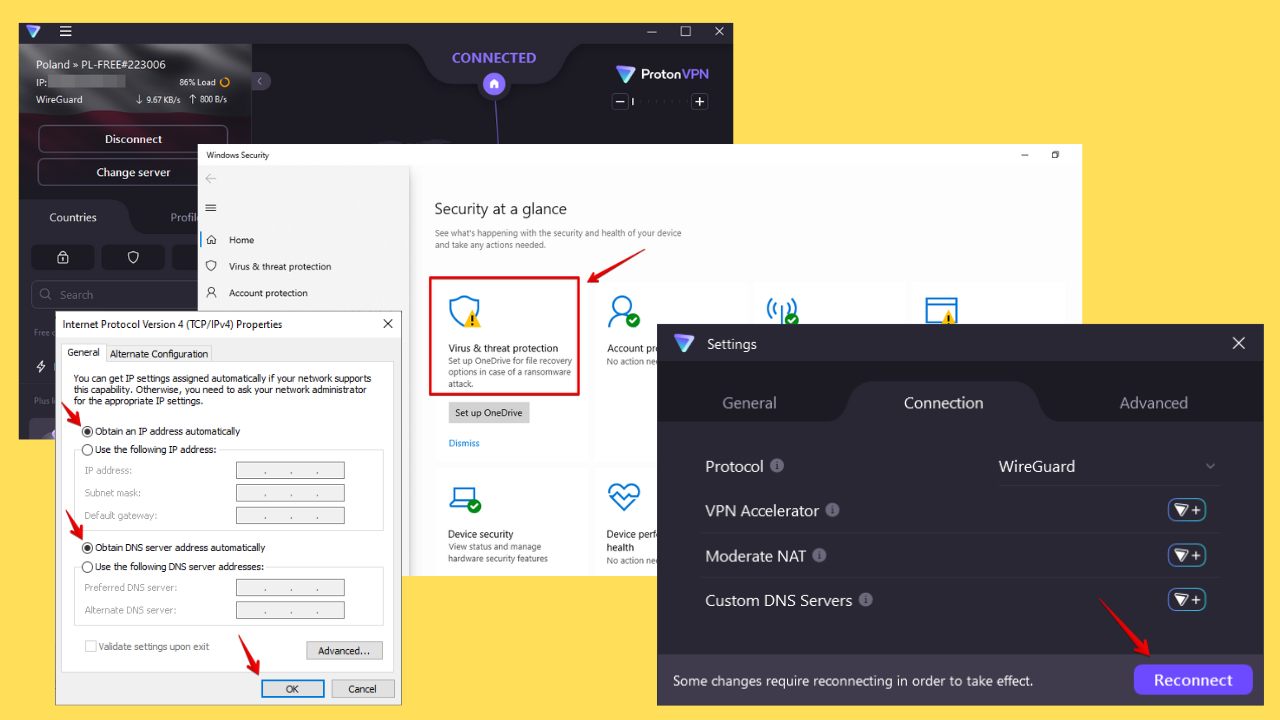
- Double-click Internet Protocol Version 4 (TCP/IPv4).
- In the General tab, select Obtain an IP address automatically.
- Switch to the Alternate Configuration tab.
- Select Automatic private IP address.
Your VPN client should automatically obtain the correct IP addresses for establishing the VPN connection (depending on which VPN server you connect to).
If you or someone else made any changes to the IPv4 settings before, it might be the reason why you keep seeing the unidentified public network message on Windows 10.
Learn more about why IPv4 doesn’t work on Windows to set the correct configuration.
Check for faulty DNS servers
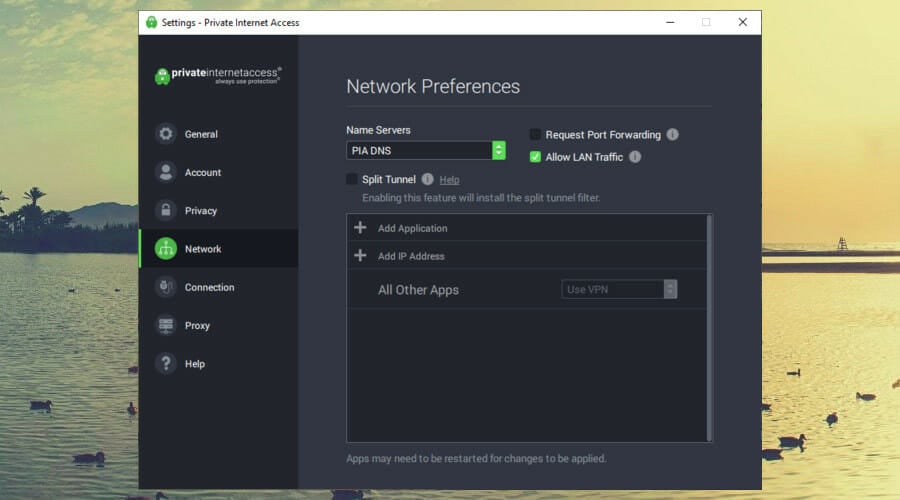
- If the VPN client has private DNS
- Right-click PIA’s icon in the systray.
- Go to Settings.
- Switch to the Network tab.
- Set Name Servers to PIA DNS.
- Or, if the VPN client doesn’t have private DNS
- Click the network icon in the systray.
- Go to Network & Internet settings.
- Click Change adapter options.
- Right-click the VPN connection.
- Go to Properties.
- Double-click Internet Protocol Version 4 (TCP/IPv4).
- In the General tab, select Use the following DNS server addresses*.
- Set Preferred DNS server to 8.8.8.8.
- Set Alternate DNS server to 8.8.4.4.
- Click OK.
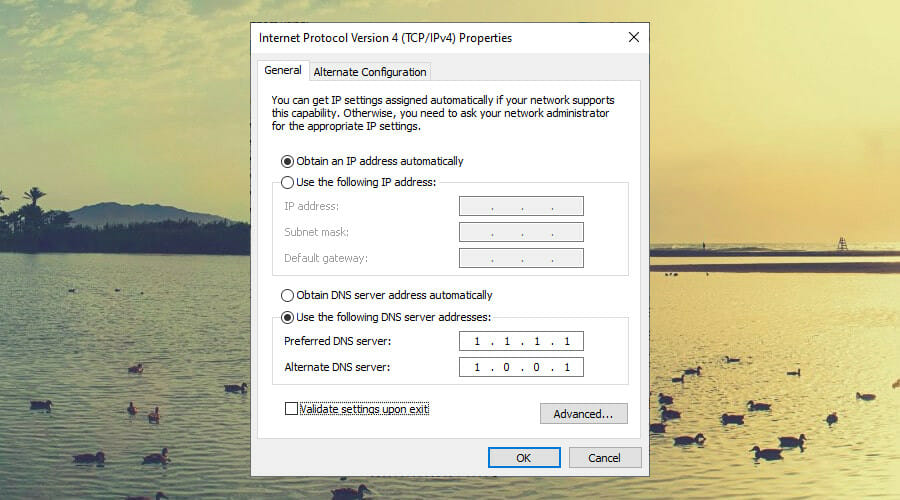
*These DNS servers belong to Google. They can be used by anyone for free to optimize the Internet connection. You can also try Cloudflare with 1.1.1.1 (preferred) and 1.0.0.1 (alternate), as well as OpenDNS with 208.67.222.222 (preferred) and 208.67.220.220 (alternate).
If your VPN client has exclusive DNS servers as Private Internet Access, make sure to force it to use them instead of your default DNS servers, which are assigned by your ISP.
Otherwise, you can use free and public DNS servers like the ones above to make Windows 10 VPN stop showing the unidentified public network message. Don’t hesitate to also apply those DNS servers to your Ethernet or Wi-Fi connection.
Find out more about Windows 10 DNS and how to use it correctly.
Remove any faulty proxy servers
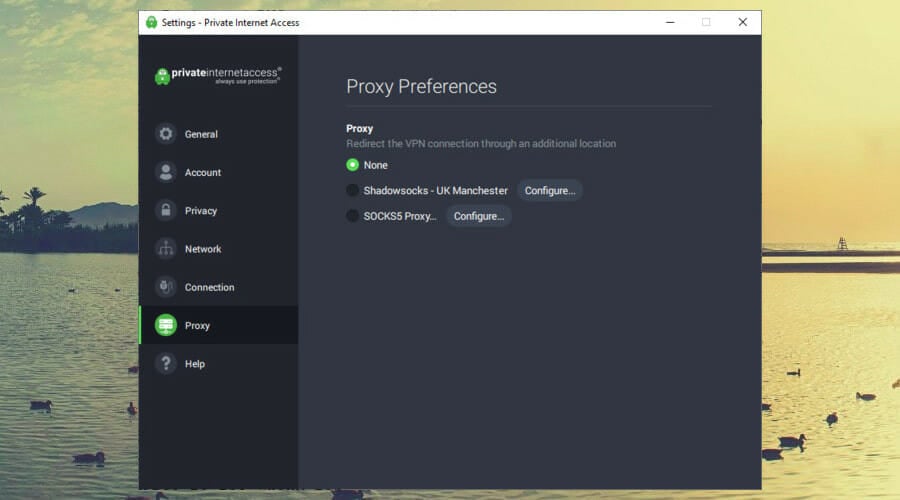
- Right-click the PIA icon in the systray.
- Go to Settings.
- Switch to the Proxy tab.
- Set Proxy to None.
If the proxy settings are not properly configured in the VPN client, this could cause an unknown network issue while staying connected to the VPN.
You should also check the Windows 10 proxy settings and make sure your Ethernet or Wi-Fi doesn’t have connectivity problems due to incorrect proxy setup. To check this, temporarily disable it and check the connection.
If your Windows 10 proxy won’t turn off, there are ways to get around this problem.
Add a line of code to the OVPN file
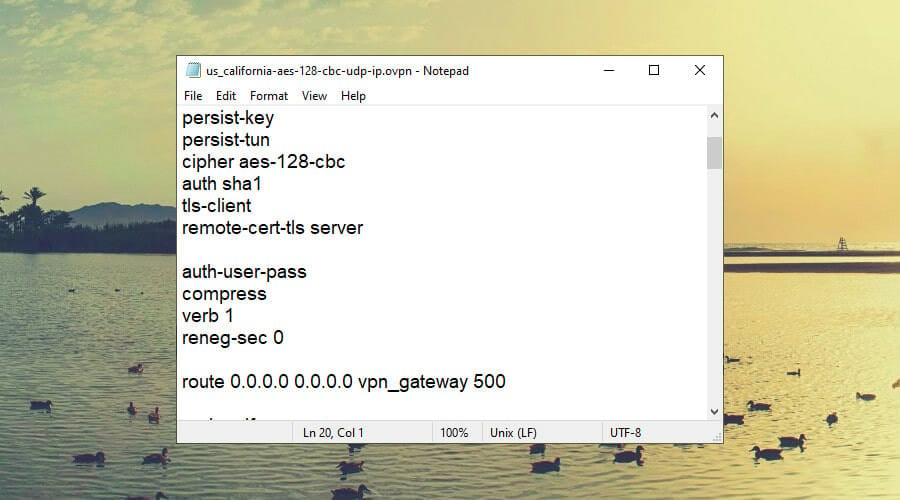
- Disconnect from the VPN.
- Locate the OVPN file used by your OpenVPN client.
- Open the OVPN file with a text editor like Notepad.
- Add the following line at the end:
route 0.0.0.0 0.0.0.0 vpn_gateway 500 - Save the file and exit.
- Connect to the VPN.
This solution works for OpenVPN client connections and makes a public unidentified network into a private identified network.
However, it doesn’t work if you attempt to modify the OVPN file of a VPN client. That’s because the VPN client auto-resets the OVPN file configuration to default on every connection.
Having trouble with OpenVPN on Windows 10? Check out our easy workarounds.
In conclusion, these 9 solutions should help you prevent your Windows 10 VPN from showing the unidentified public network message.
If your VPN connects but doesn’t work, there might be an underlying problem with your VPN client. In that case, we suggest ditching your old VPN and upgrading to a superior service like PIA.

We used Private Internet Access in all our examples above because it’s the best VPN for Windows 10. You can count it to create stable Internet connections without hampering your Internet speed.
PIA is a product owned by Kape Technologies, with a large network of high-speed servers, private DNS, OpenVPN and WireGuard protocols, SOCKS5 and Shadowsocks proxy servers, port forwarding, a kill switch, an ad and malware blocker, static and dynamic IP addresses, and split-tunneling mode.
More about PIA:
- +3,300 VPN servers in 48 countries
- 10 simultaneous connections
- No logs or leaks
- 24/7 live chat support
- 30-day money-back guarantee (no free trial)

Private Internet Access
Access blocked websites, defeat online censorship, unblock Netflix US, reduce your ping while gaming, and more.[wl_navigator]


User forum
0 messages