Full Fix: IPv4 properties not working in Windows 10, 7
Key notes
- Plenty of users complain about the fact that they cannot change IPv4 properties in Windows 10.
- If you’re one of them, don’t hesitate to check your computer for malware or try a different VPN.
- For a secure system, make sure to use one of these great system portable network scanner tools.
- It takes mere seconds to bookmark our Network & Internet Hub. You’ll find it useful in the future.

Windows 10 has a lot to offer to its users, but unfortunately, there might be some bugs here and there. Some users report that they cannot change IPv4 properties in Windows 10.
If you’re setting up a network, that can be a big problem, but there are a few solutions that you want to check out. They apply to those using Windows 7 as well.
What to do if IPv4 properties don’t work in Windows 10?
1. Check your system for malware
If IPv4 properties aren’t working, the issue might be caused by malware. The problem can be caused by various toolbars and browser extensions.
So, if you’re using any suspicious extensions in your browser, be sure to remove it as soon as possible. In addition, it’s also a good idea to scan your system for malware.
There are many great antivirus tools, but if you want maximum protection that won’t interfere with your system, we strongly advise that you consider using Eset HOME Security Essential.
Eset is one of the most popular antivirus software, and for good reason. It has multi-layered protection, advanced machine learning, and additional security features that enable you to safely make online purchases or set parental controls.
It is suitable both for home use and business use. It is compatible with Windows, macOS and mobile Android devices.
⇒ Get Eset HOME Security Essential
2. Change the rasphone.pbk files
- Navigate to the following:
C:\Users\yourusername\AppData\Roaming\Microsoft\Network\Connections\Pbkrasphone.Pbk\ - After you’ve found rasphone.pbk it’s a good idea to make a copy of this file and save it in a different folder in case you need to use it as a backup. This is entirely optional, but it doesn’t hurt to be a bit more careful.
- Right-click the rasphone.pbk and choose Open with. Then select Notepad from the list of suggested applications.

- After you’ve opened this file with Notepad find the IpPrioritizeRemote and set its value from 1 to 0. Some users advise to also set IPInterfaceMetric to 1, so if changing IpPrioritizeRemote doesn’t work try changing IPInterfaceMetric as well.
- Now, all that you have to do is to save the changes and IPv4 properties should be working as usual.
Properties for connections are stored in PBK files, and there is usually one PBK file per user available. To enable IPv4 properties you need to find and manually edit the PBK file, so let’s get started.
3. Use Powershell to enable Split Tunneling
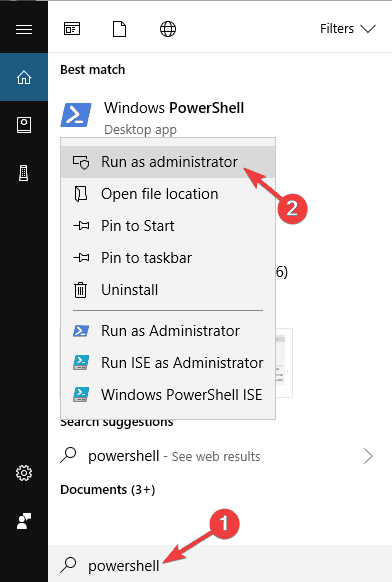
- Start Powershell. You can do so by typing Powershell in the search bar and right-clicking the Powershell icon and choosing Run as administrator from the menu.
- Enter the following command into Powershell and press Enter to run it (You should now get a detailed listing of settings for each VPN. Pay attention to the Name section and locate the name of your connection because you’ll need it in the next step):
- Get-VpnConnection

- Get-VpnConnection
- Now, enter this into Powershell (Remember to change myVPN to the name of your connection that you’ve found in the previous step)
- Set-VpnConnection -Name “myVPN” -SplitTunneling $True

- Set-VpnConnection -Name “myVPN” -SplitTunneling $True
- Run that command by pressing Enter, and that’s it.
4. Set IPv4 properties manually via Powershell
- Run Powershell as administrator. If you don’t know how to do it, have a look at Step 1 in the previous solution.
After the Powershell starts enter this:- set-DnsClientServerAddress -InterfaceAlias “My Connection” -ServerAddresses 208.67.222.222,8.8.8.8,208.67.220.220,8.8.4.4

- set-DnsClientServerAddress -InterfaceAlias “My Connection” -ServerAddresses 208.67.222.222,8.8.8.8,208.67.220.220,8.8.4.4
- It’s important to change My Connection to the name of your connection as well as IP addresses. Using the same IP addresses that we used in our example won’t work for you.
The next thing we’re going to try is another Powershell trick. Just use the above steps in that regard.
5. Use a different VPN client
This problem can occur while trying to configure a VPN. If IPv4 properties aren’t working with your current VPN, this might be a good time to consider switching to a different VPN client.
PIA is fully compatible with Windows 10, and it offers great features. So, if you’re having any problems with your VPN, we strongly recommend that you consider switching to this VPN service.
With encrypted Wi-Fi, P2P support, and SOCKS5 Proxy as part of the package, the connection is stable and you never feel a loss in bandwidth.
6 Install the missing updates
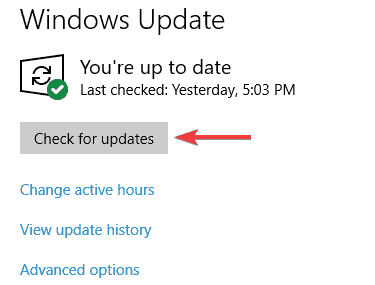
- Press the Windows Key + I shortcut to open the Settings app.
- Up next, go to the Update & Security section.

- In the right pane, click the Check for updates button.
According to users, sometimes problems with IPv4 properties can occur due to certain bugs on your system.
Microsoft is working hard to fix various issues, and they are frequently releasing Windows Updates, so if you want to be sure that your PC is error-free, it’s advised to keep your system up to date.
For the most part, Windows 10 automatically downloads the latest updates in the background, but sometimes you might miss an update or two.
However, you can always check for updates manually by doing as described above.
Windows will now check for any available updates and download them automatically in the background. Once the updates are downloaded, simply restart your PC to install them.
After your system is up to date, check if the problem is still there.
7. Disable Datamngr Coordinator service
- Press Windows Key + R and enter services.msc. Press Enter or click OK.

- Now look for Datamngr Coordinator service and double-click it to check it’s properties.
- Set Startup type to Disabled, and click the Stop button to stop the service. Now click Apply and OK to save changes.

According to users, if IPv4 properties won’t open, the issue might be the Datamngr Coordinator service. To fix the problem, it’s advised to disable this service completely.
After doing that, check if the problem is still there. Keep in mind that other services, such as Safety Nut Service, can cause this problem as well, so be sure to disable them.
8. Remove the problematic applications
According to users, sometimes a third-party application can cause IPv4 properties to stop working. To fix the problem, you need to find and remove this application from your PC.
Many users reported that applications such as Aztec Media caused this problem, so if you see any suspicious application on your PC, be sure to remove it and check if that solves the problem.
There are many ways to remove a problematic app, but the best one is to use one of these great uninstaller software tools.
In case you’re not familiar, uninstaller software is a special application that will completely remove the selected application, along with its file and registry entries.
As a result, there won’t be any leftover files or registry entries that can interfere with your system. There are many great uninstaller applications on the market, that’s true.
However, one of the best and simplest to use is Revo Uninstaller, so if you want to remove any problematic application from your PC, we suggest trying this tool.
9. Flush your DNS and reset your connection
- Start Command Prompt or PowerShell as administrator. To do that, press Windows Key + X to open Win + X menu and choose PowerShell (Admin) or Command Prompt (Admin).

- When Command Prompt opens, run the following commands one by one:
- netsh winsock reset
- netsh interface ipv4 reset
- netsh interface ipv6 reset
- ipconfig /flushdns
In some cases, issues with IPv4 properties can occur due to your connection. The simplest way to fix that is to reset your connection and check if that helps.
To do this, you just need to run a couple of commands by doing as described above. After running these commands, restart your PC and check if the issue is still there.
10. Modify your registry
- Press Windows Key + R and enter regedit. Now press Enter or click OK.

- When Registry Editor opens, navigate to this key:
HKEY_LOCAL_MACHINE\SYSTEM\CurrentControlSet\ControlNetwork - Right-click the Network key and choose Export from the menu.

- Enter the desired name, choose a save location, and click the Save button. If anything goes wrong after modifying the registry, simply run the exported file to restore it.

- Right-click the Network key again, and this time choose Delete. Click Yes to confirm.

In some cases, you might have to modify your registry if IPv4 properties aren’t working. To do this, you just need to follow the procedure described above.
After this key is deleted, the issue should be resolved and everything should start working again.
Getting an error while accessing the Registry? Count on us to solve the problem with the help of this quick guide.
Sometimes you might not be able to open IPv4 properties. This isn’t the only problem, and speaking of problems, here are some similar issues that users reported:
- Network properties not opening – Sometimes you might not be able to open network properties. To fix that, be sure to install the latest updates and check if that helps.
- IPv4 not working Windows 7, Windows 10 – This issue can appear on any version of Windows, and even if you don’t use Windows 10, you should be able to apply almost all of our solutions to other versions of Windows.
- Cannot access IPv4 properties – If you can’t access IPv4 properties, be sure to scan your PC. Sometimes malware can cause this issue to appear, so be sure to perform a thorough scan.
- IPv4 properties not opening, showing, enabled, available, detected, is disabled – There are various issues that can affect IPv4 properties, but you should be able to fix most of these issues by using one of our solutions.
We hope that these solutions were helpful to you and that you have managed to successfully set IPv4 properties in Windows 10.
If you are facing the IPv6 no internet access issue, check out this guide to learn the quick solutions.
If you have any questions, comments, or maybe some other solutions for this problem, just reach the comments section below.
Read our disclosure page to find out how can you help Windows Report sustain the editorial team. Read more


Improve this guide


User forum
4 messages