Mouse and Keyboard not Working in Windows 11 [8 Fixes]
If your peripherals aren't working, a driver update might help
7 min. read
Updated on
Read our disclosure page to find out how can you help Windows Report sustain the editorial team. Read more
Key notes
- Several users have reported that the mouse and keyboard are not working in Windows 11.
- This issue can occur due to problems with the driver, misconfigured settings, and conflicting apps, amongst others.

There are various hardware components that constitute a computer, some more important than others. But how would you react if the mouse and keyboard are not working in Windows 11?
If this happens, it’s possible that Windows 11 isn’t detecting keyboard. However, there are ways to fix keyboard and mouse issues with ease.
Why aren’t the mouse and keyboard working in Windows 11?
The mouse and keyboard could not be working in Windows 11 due to a bunch of reasons. Listed below are some of the prominent ones that are likely to cause the issue:
- Problems with the hardware – Make sure you check your connection and USB ports. Sometimes this error can occur if Windows 11 doesn’t recognize USB device.
- Corrupt or outdated drivers – Driver issues can cause these problems, so be sure to update your drivers.
- Power options – Sometimes, features such as Fast Startup can cause this issue, so be sure to disable Fast Startup.
- Conflicting third-party apps or programs – Certain applications can lead to issues with the keyboard or mouse, so be sure to remove them.
What can I do if the mouse and keyboard are not working?
Before we start, there are a few checks that you should perform:
- Check your connections – Make sure that your peripherals are properly connected. Check for switches on your mouse and keyboard and make sure they are in the On position. Also, try using different USB ports.
 NOTE
NOTE
1. Restart the PC
- Right-click the Start Menu button. Alternatively, press Windows + X.
- Expand the Shut down or sign out section with mouse or arrow keys.
- Select Shut down.
- Once your PC shuts down, turn it back on again.
Also, you could use the power button on the computer to turn it off. In case it’s built into the keyboard on the laptop, removing the battery with the laptop unplugged from the power source would help shut it down.
2. Reinstall mouse and keyboard drivers
- Press Windows + X or right-click on the Start button in the Taskbar to launch the Quick Access/Power User menu.
- Select Device Manager with your mouse or arrow keys.
- Locate and double-click on Mice and other pointing devices to view the devices under it. Alternatively, use the arrow keys and press the Right arrow key to expand the section.
- Right-click on the mouse that’s not working and click on Uninstall device from the context menu. You can also use the Menu key next to the right Ctrl to open it.
- Next, tick the checkbox for Attempt to remove the driver for this device, and click on Uninstall at the bottom. You can also use Tab key and Space to select the necessary options.
- Similarly, repeat the same step for Keyboards to view the devices under it and uninstall the malfunctioning keyboard.
- After you have uninstalled the drivers for both the mouse and keyboard, restart the computer.
3. Update mouse and keyboard drivers in Windows 11
- Right-click the Start button and choose Device Manager. You can also use Windows key + I shortcut and arrow keys to open it.
- Double-click on the Keyboard option listed here to view the devices under it. You can also use Tab and arrow keys. Just press the Right arrow key when you select Keyboard to expand it.
- Right-click on the malfunctioning keyboard and select Update driver from the context menu. You can use the Menu key next to the right Ctrl key and arrow keys to select this option as well.
- Next, click on the Search automatically for drivers from the two options that appear here in the Update drivers window. Use the arrow keys to select this option and press Space to select it.
- Windows will now scan for the best available driver on the system and install it.
- Similarly, double-click on Mice and other pointing devices, locate the malfunctioning mouse and update its driver as well.
Also, you can use Outbyte Driver Updater, a dedicated third-party tool that will automatically scan for updates and install them to keep the drivers up-to-date.

Outbyte Driver Updater
Try The Outbyte Driver Updater app to update your drivers with the newest versions thanks to its substantial database.4. Run the keyboard troubleshooter
- Press Windows + I to launch the Settings app. You can also click the Start Menu and select Settings from it as well.
- Next, select Troubleshoot on the right in the System tab. You can do it with your mouse or by using Tab, arrow keys and Space.
- Click on Other troubleshooters or select it with arrow keys and Space.
- Locate and click on the Run button next to Keyboard. You can achieve the same results with arrow keys, Tab and Space.
5. Disable fast startup
- Press Windows + S to launch the Search menu, enter power plan. Use the arrow keys to select Choose a power plan. Alternatively, you can click the search icon, copy and paste the search query and then select the desired option.
- Next, click on Choose what the power buttons do from the options listed on the left. You can achieve the same with Tab, arrow keys and Space.
- Click on Change the settings that are currently unavailable to proceed. Or you can use the keyboard keys to access it.
- Now, untick the checkbox for Turn on fast startup (recommended), and click on Save changes at the bottom. You can also do this with arrow keys, Tab and Space.
6. Scan for malware
 NOTE
NOTE
- Press Windows + S to launch the Search menu, enter Windows Security and select it with arrow keys and Space button. Alternatively, you can click on search, paste the search query and then select it.
- Click on Virus & threat protection from the options listed here. You can also navigate using arrow keys, Tab and Space.
- Next, click on Scan options. Alternatively, use arrow keys and Space.
- Select the Full scan option and click on Scan now at the bottom. You can achieve same results with arrow keys and Space.
- Wait for the scan to complete. It will take some time, depending on the files stored on the computer.
7. Uninstall recently added apps
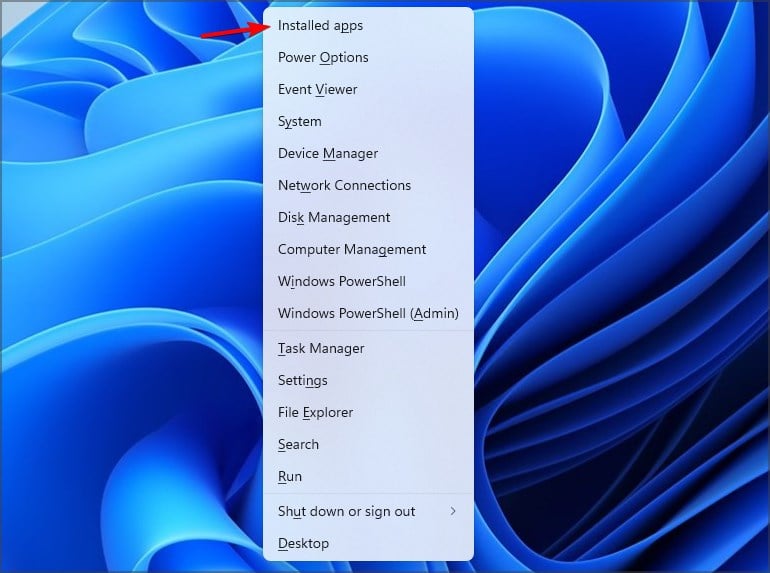
- Right-click the Start Menu and choose Installed apps. Alternatively, you can press Windows key + X and select it with arrow keys.
- Locate recently installed software that you want to remove. Click 3 dots next to it and choose Uninstall. You can achieve same results using arrow keys, Tab and Space.
- Follow the instructions on the screen to complete the process.
In case you started encountering the mouse and keyboard not working issue in Windows 11 after installing a program, it may very well be the real culprit here. There are certain apps that conflict with the functioning of the system and lead to the issue.
8. Remove recently installed Windows updates
- Press Windows + I to launch the Settings app. Alternatively, you can open the Start Menu and select Settings.
- Next, select Windows Update from the tabs listed in the navigation pane on the left. You can do that with Tab, arrow keys, and Space.
- Click on Update history from the options here. Once again, you can do the same with arrow keys, Tab, and Space key.
- Next, click on Uninstall updates. Alternatively, select it with arrow keys and press Space.
- Now, select the update that you want to remove and click on Uninstall at the top. Use Tab and arrow keys to select the update. Next, press Enter to remove it.
- Click Yes on the confirmation box that appears.
These are all the ways you can fix the keyboard and mouse not working problem in Windows 11. If nothing works, reset the Windows 11 PC to its factory setting.
Also, check our guide comparing Windows 10 and Windows 11, and how to revert to the previous version.
Tell us which fix worked for you in the comments section below. We’d be glad to hear from you.


User forum
0 messages