Fix: NAS Drive Not Showing in Windows 11
A quick policy change will fix things in no time
5 min. read
Updated on
Read our disclosure page to find out how can you help Windows Report sustain the editorial team. Read more
Key notes
- When the NAS drive doesn’t appear in Networks, check for misconfigured settings.
- For different NAS setups, you will have to enable specific settings or set dedicated policies.
- Keep reading to find out what worked for others!
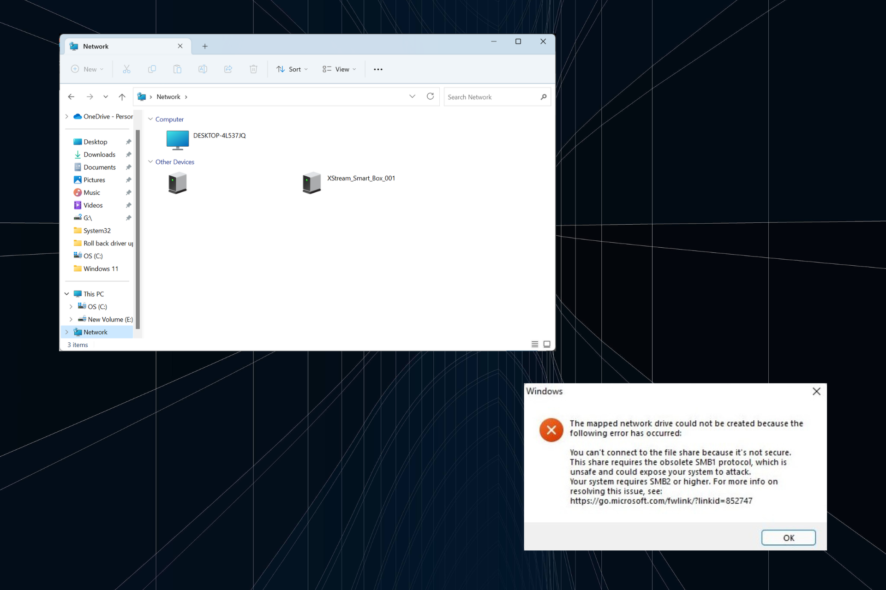
NAS or Network Attached Storage has long been a viable solution and an effective alternative for cloud storage in smaller setups. But many found that their NAS is not showing under the Network tab in Windows 11.
The problem is faced across operating systems and manufacturers, be it Synology, RasperryPi, or Iomega, amongst others, and on both office and home setups. Our research found that it was usually a fault at the user’s end.
Why is NAS not visible on the network?
- SMB1 is not enabled
- Network discovery is turned off
- Corrupt DNS or IP cache
- A Firewall or third-party app is interfering with the connection
What can I do if my NAS drive is not visible on network in Windows 11?
Before we move to the slightly complex solutions, try these quick ones first:
- Restart both the computer and the NAS setup, and make sure the two are connected to the same network.
- Check for any available NAS OS updates and install them.
- Disable Windows Defender Firewall or any similar security software installed on the PC.
- Update drivers for the network adapters. Make sure to check the manufacturer’s website for the latest version.
- Enter the NAS device’s IP address in the File Explorer’s address bar to search for it.
If none work, head to the fixes listed next.
1. Reconfigure network discovery settings
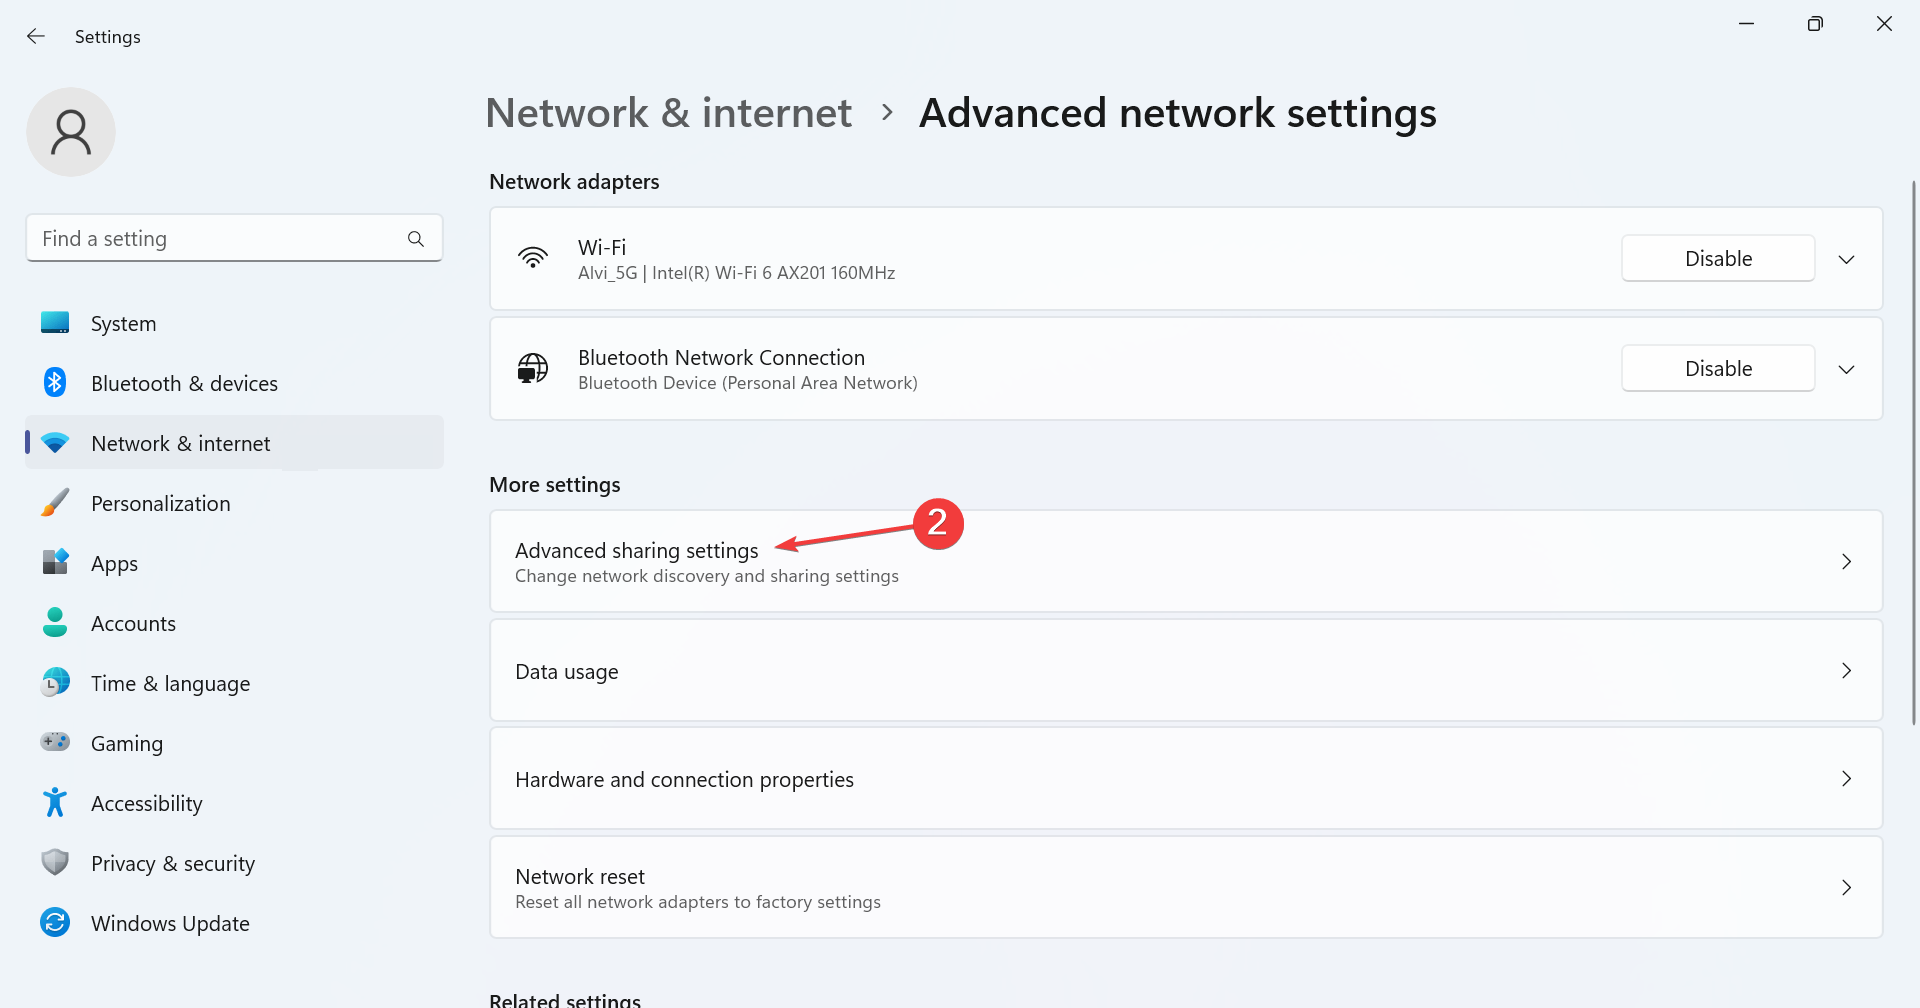
- Press Windows + I to open Settings, go to Network & Internet from the left pane, then scroll down to the bottom, and select Advanced network settings.
- Click on Advanced sharing settings.
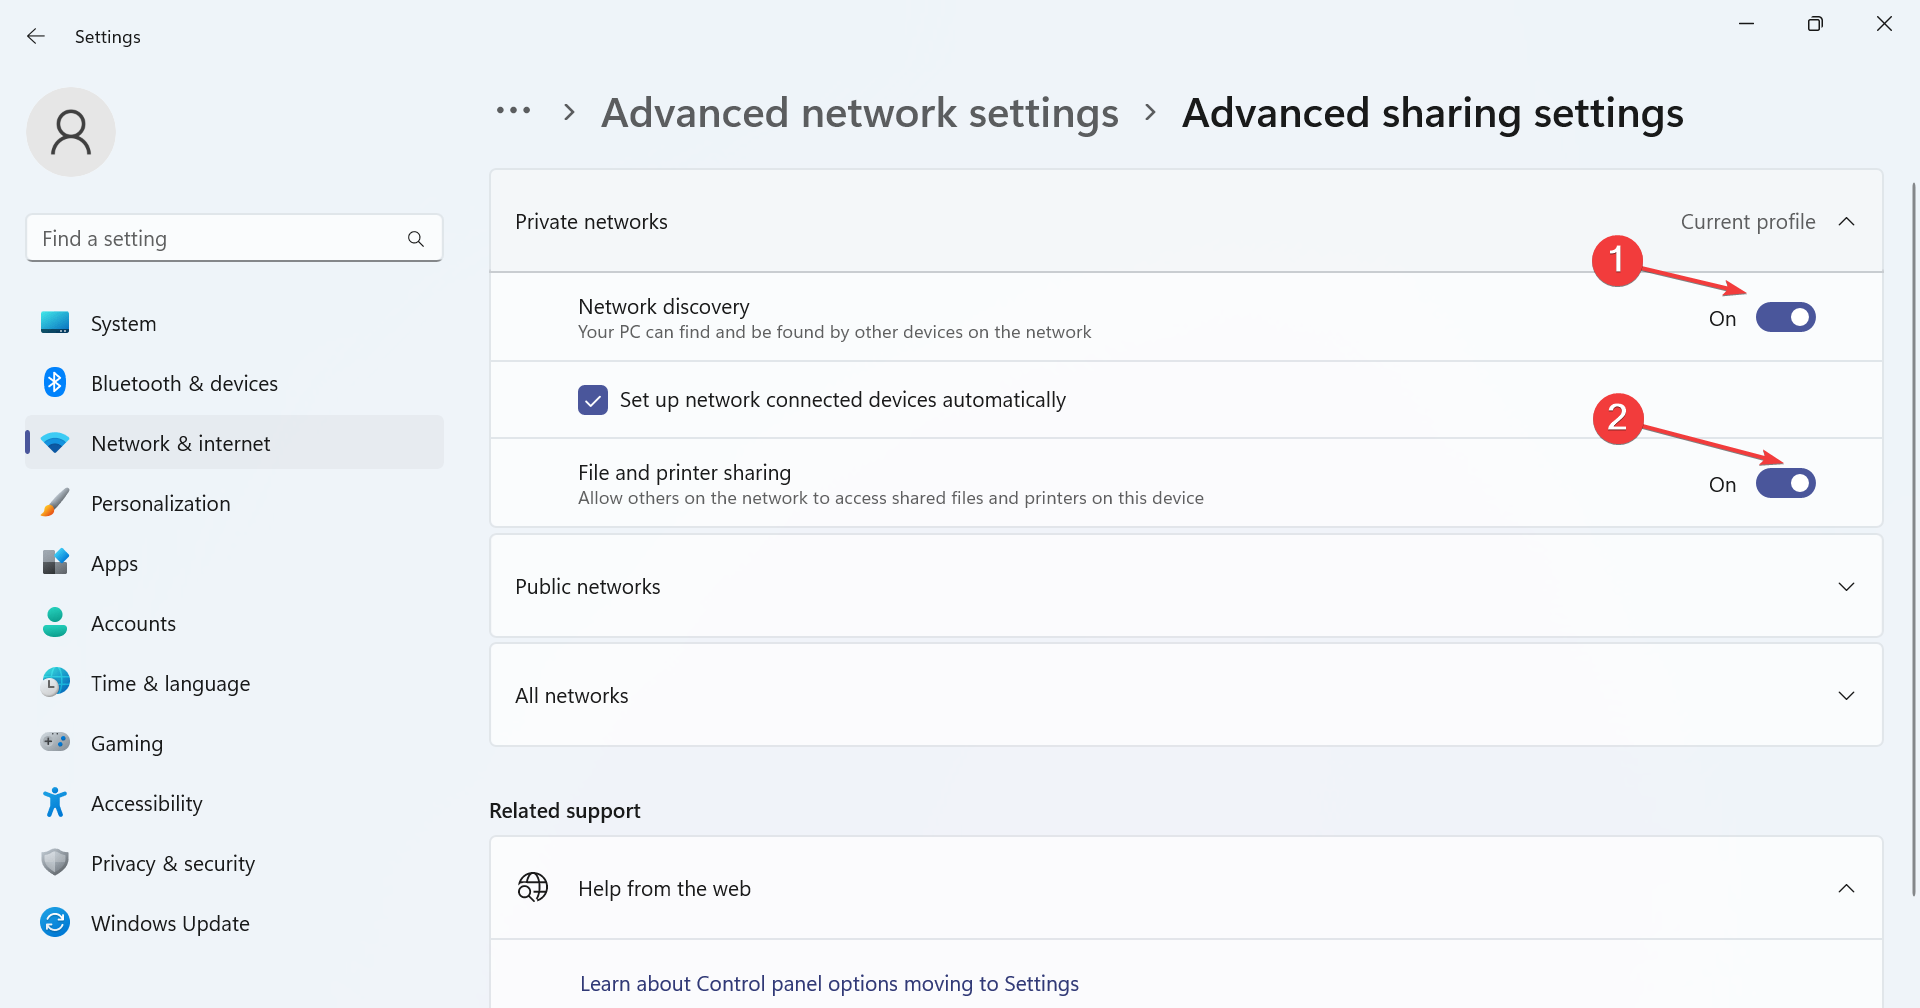
- Now, enable both Network discovery and File and printer sharing under Private networks.
When the NAS drive is not visible on Network in Windows 11, enabling the network discovery will do the trick. This will also help when you cannot access a shared folder.
2. Clear the cache
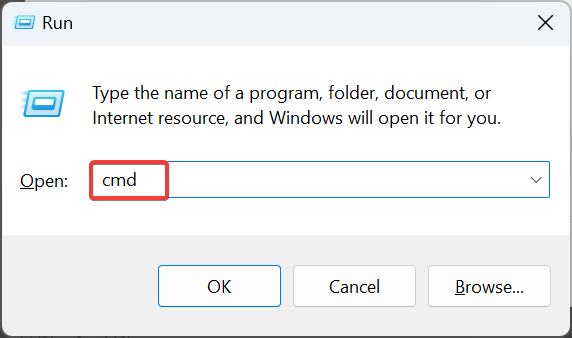
- Press Windows + R to open Run, type cmd, and hit Ctrl + Shift + Enter.
- Click Yes in the UAC prompt.
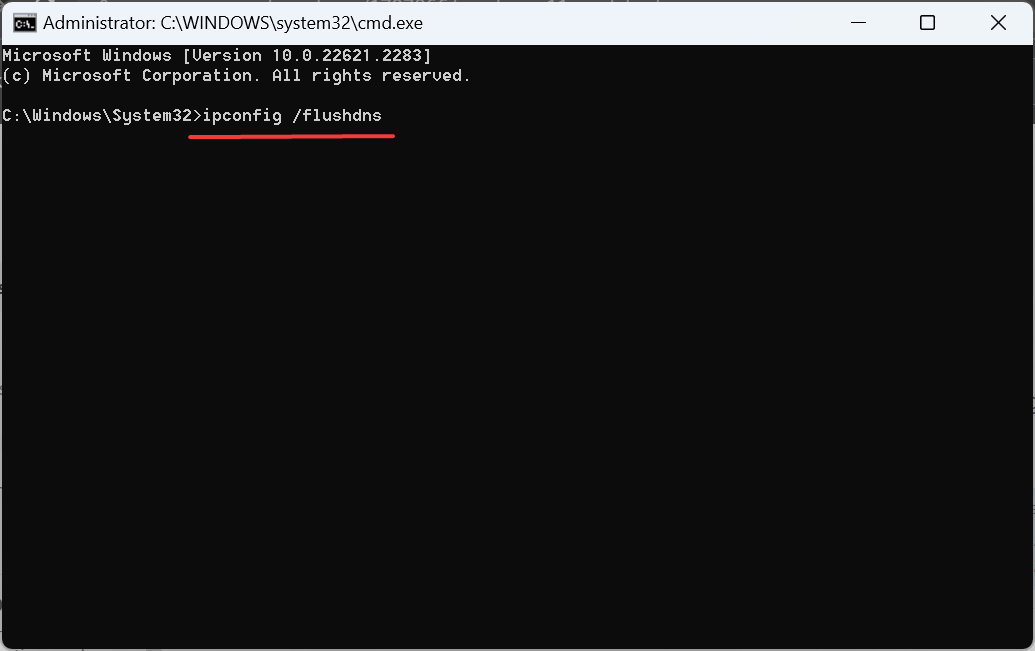
- Paste this command and hit Enter to clear the DNS cache:
ipconfig /flushdns - Similarly, execute this command:
netsh interface IP delete arpcache - Once done, verify whether the network drives reappear in Windows 11.
3. Install and enable SMB 1
- Press Windows + S to open Search, type Control Panel in the text field, and click on the relevant result.
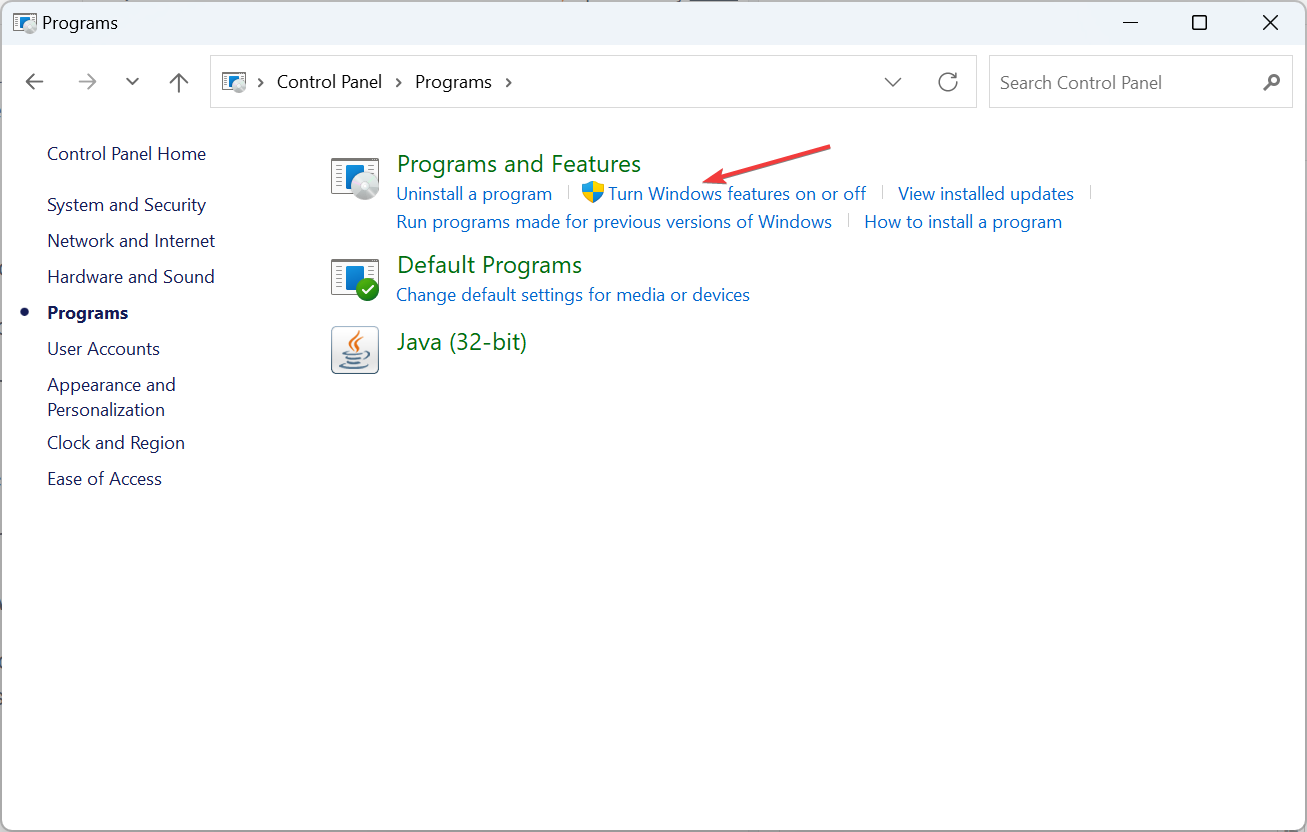
- Click on Programs.
- Click Turn Windows features on or off under Programs and Features.
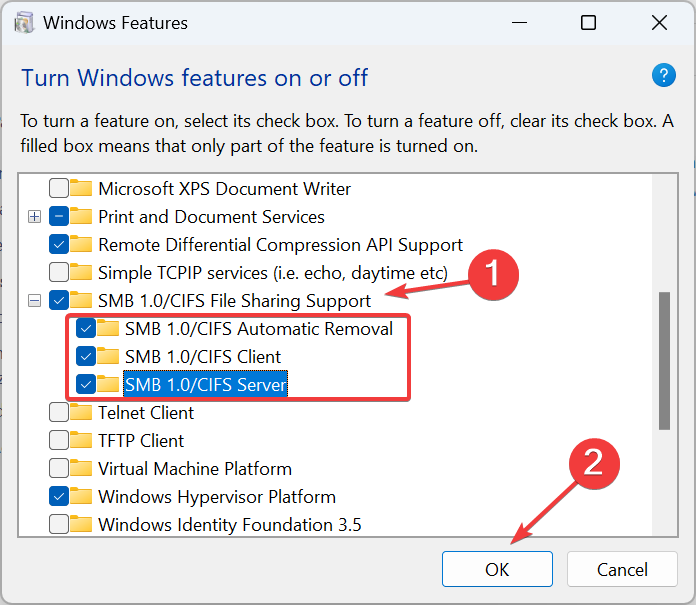
- Expand SMB 1.0/CIFS File Sharing Support, tick the checkboxes for SMB 1.0/CIFS Automatic Removal, SMB 1.0/CIFS Client, and SMB 1.0/CIFS Server, then click OK.
- Wait for Windows to find the required files and download them, then restart the computer.
When Windows 11 NAS is not showing in Network, reconfiguring the optional components will help! Besides, it will also fix things when you can’t map a Synology drive.
4. Change the local group policies
- Press Windows + R to open Run, type gpedit.msc in the text field, and hit Enter.
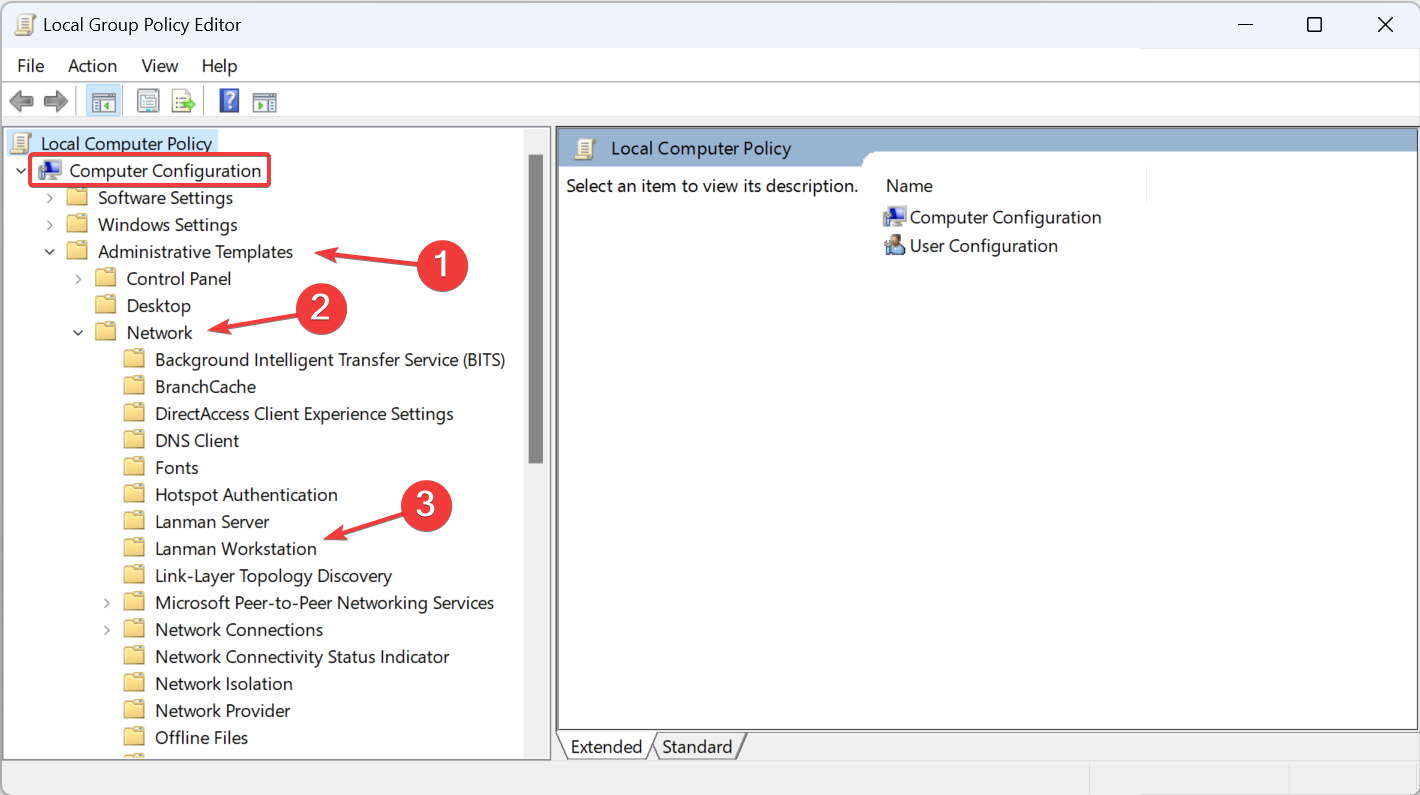
- Under Computer Configuration, expand Administrative Templates, double-click on Network, and then select Lanman Workstation.
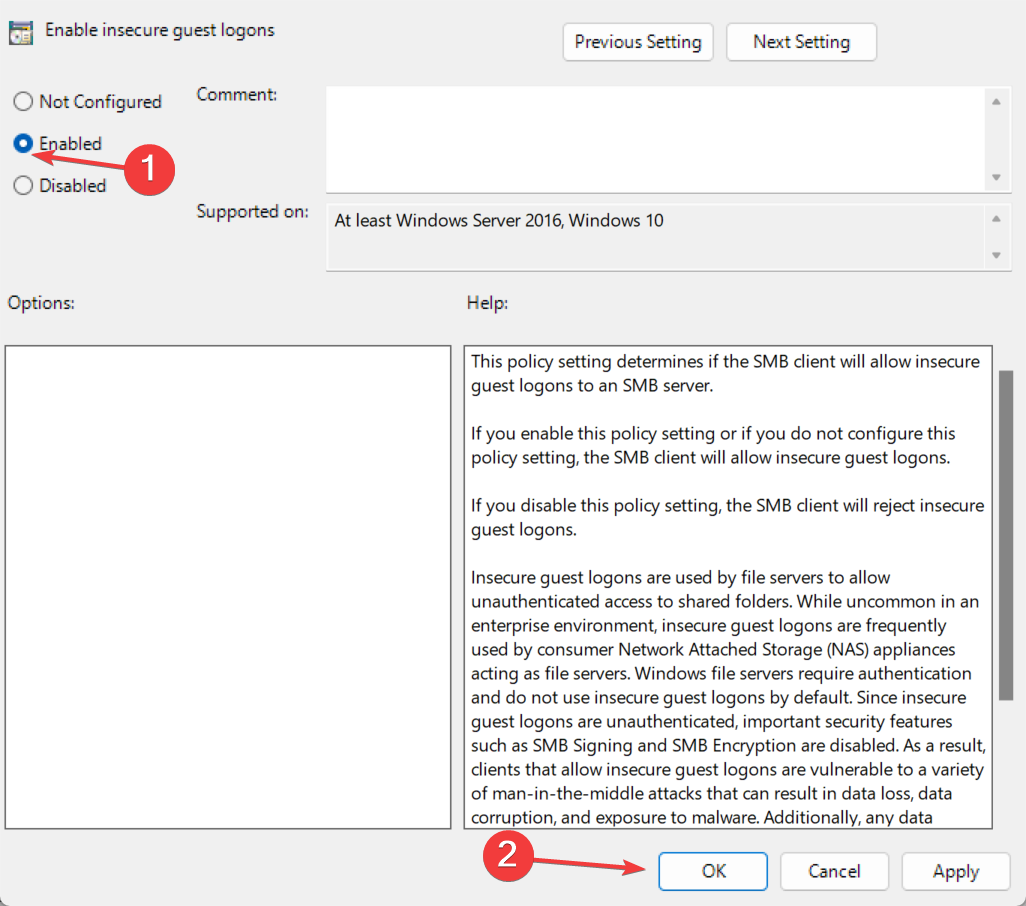
- Open the Enable insecure guest logons policy from the right.
- Select Enabled and then click Apply and OK to save the changes.
- Restart the computer for the changes to apply and check for improvements.
Modifying the policies will also work when NAS is not showing up on Network in Windows 10. Remember, the Local Group Policy Editor is not present on Windows 11 Home Edition by default. But you can always manually install gpedit.msc and make the changes.
5. Edit the Registry
- Press Windows + S to open Search, type Registry Editor, and click on the relevant result.
- Click Yes in the UAC prompt.
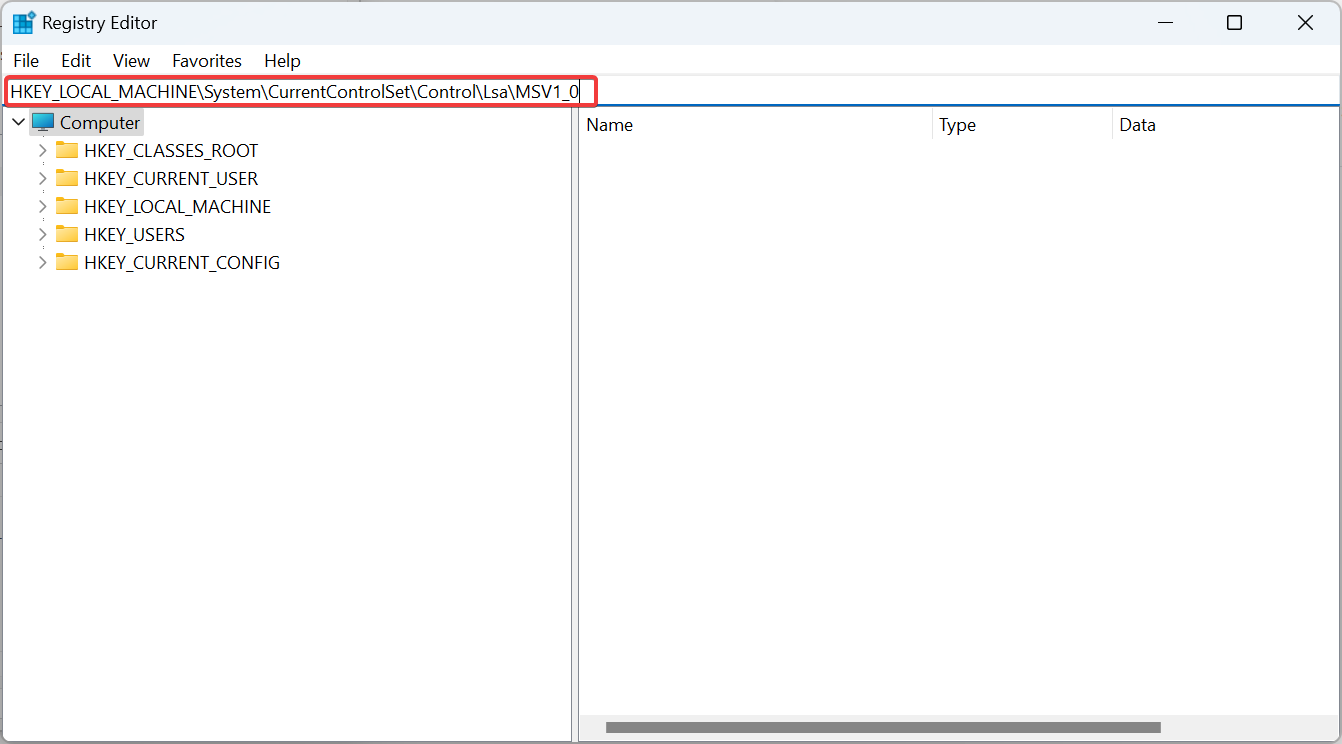
- Paste the following path in the address bar and hit Enter:
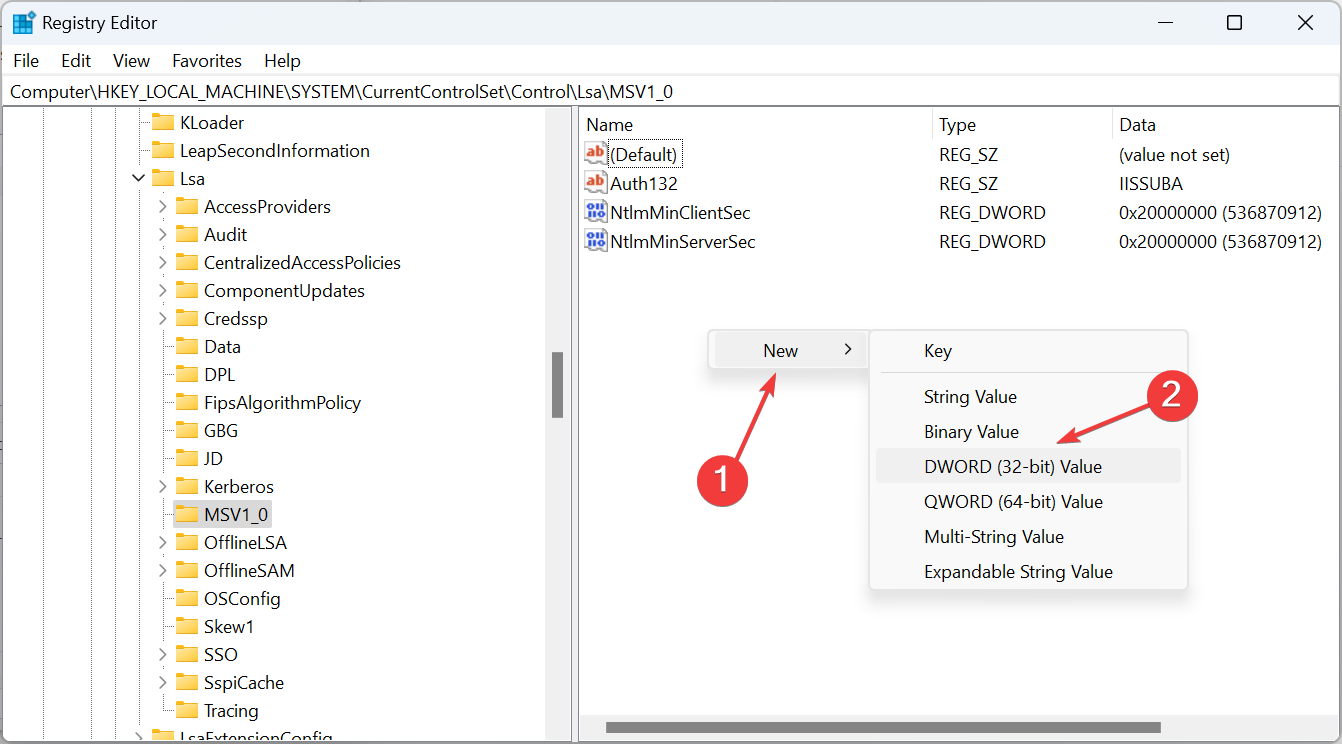
HKEY_LOCAL_MACHINE\System\CurrentControlSet\Control\Lsa\MSV1_0 - Right-click on the empty portion, hover the cursor over New, select DWORD (32-bit) Value, and name it ConnectedAccountSSO.
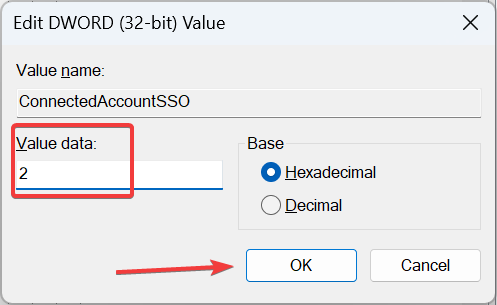
- Now, double-click the DWORD, enter 2 under Value data, and click OK.
- Finally, restart the computer for the changes to apply.
In the absence of the ConnectedAccountSSO DWORD in the Registry, the OS automatically sets the value to 0, which will deny SSO when the concerned network device is Public.
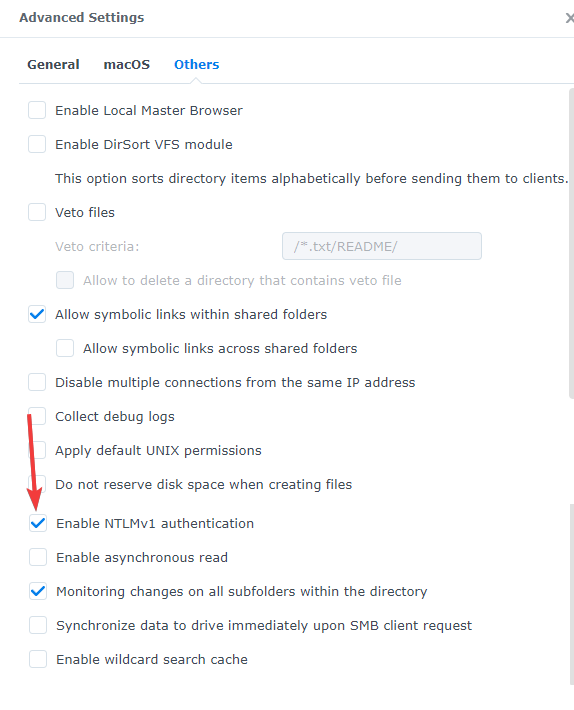
6. Enable NTMLv1 for Synology NAS
- Open the SMB settings and navigate to the Advanced tab.
- Go to Others, tick the checkbox for Enable NTMLv1 authentication, and save the changes.
When Synology NAS is not visible on the Network tab in Windows, check the configured settings, especially the NTMLv1 authentication. And do make sure that you have enabled the SMB service.
7. Create a new local user account
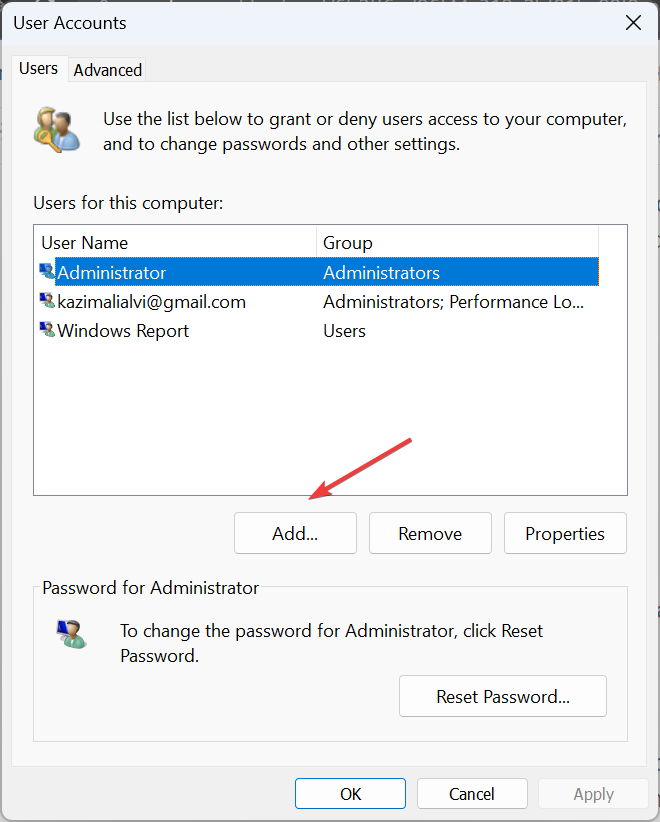
- Press Windows + R to open Run, type netplwiz in the text field, and click OK.
- Click the Add button.
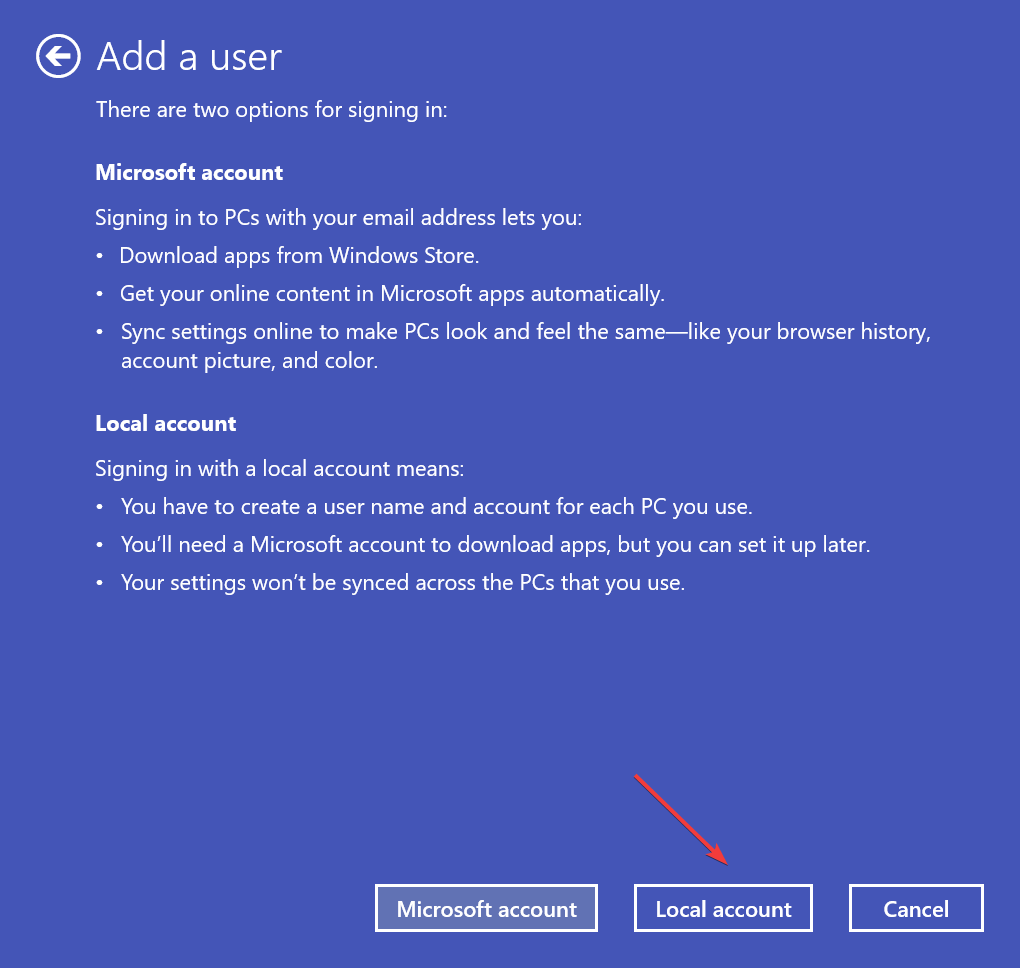
- Click Sign in without a Microsoft account.
- Now, choose Local account from the bottom.
- Enter the user name and password (optional), then complete the account creation.
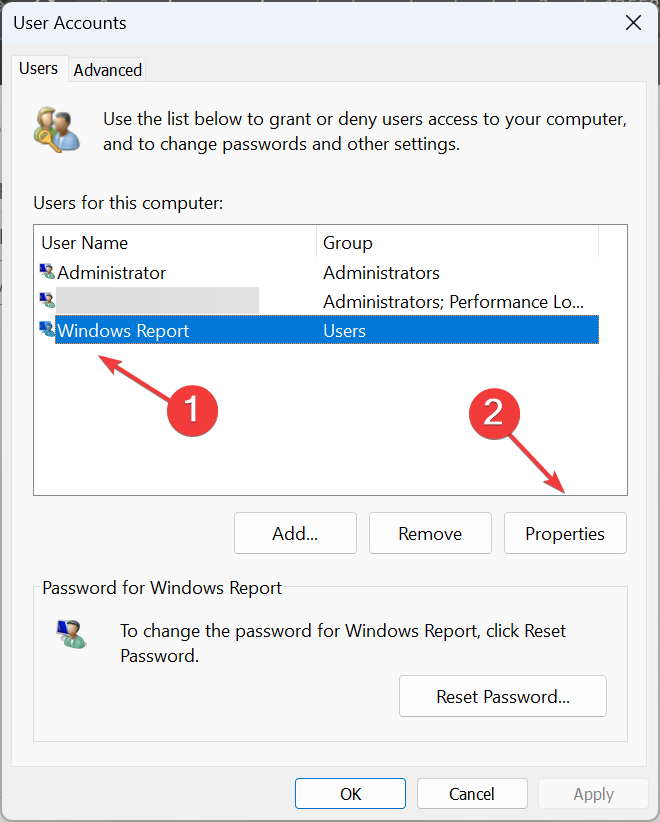
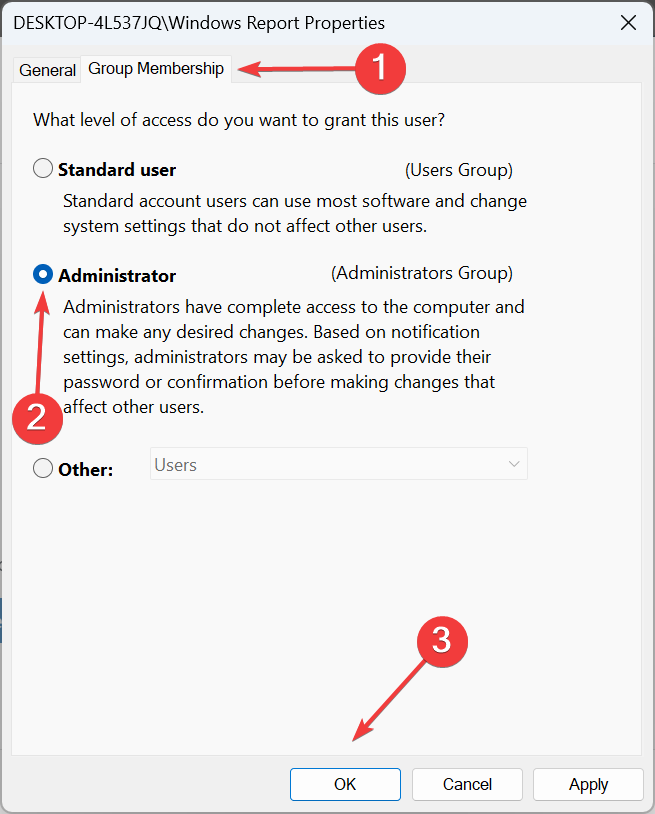
- Select the newly created user profile, and click Properties.
- Go to the Group Membership tab, select Administrator, and click OK to save the changes.
- Finally, grant permissions to the new account to access files and public folders on NAS, then sign in with it, and the storage should be listed.
Often, when a QNAP NAS is not visible on the Network tab, or even the other ones, creating a new local account will work. Make sure to grant it administrative privileges for an error-free experience.
Remember, when Windows 11 NAS is not showing in Network, quick changes to the network settings or the local policies will definitely fix things. But you may still find the Map network drive option missing, which can be fixed by a Registry edit.
All that’s left to do is get an effective antivirus for NAS storage and safeguard your data!
For any queries or to share more solutions with us, drop a comment below.


User forum
1 messages