Windows 7 to Windows 10 migration checklist and requirements
5 min. read
Updated on
Read our disclosure page to find out how can you help Windows Report sustain the editorial team. Read more
As you might have heard, Microsoft will stop supporting Windows 7 as of January 14, 2020. Millions of Windows 7 users are now contemplating upgrading to 10 before or after that date.
To avoid potential upgrade issues, however, you should check and do a number of things before jumping aboard the Windows 10 bandwagon. This Windows 7 to 10 migration checklist includes the essential things to check before upgrading.
The best Windows 7 to Windows 10 migration checklist you need
1. Does your PC match the minimum Windows 10 system requirements?
First, check that the desktop or laptop you intend to upgrade matches all Windows 10’s minimum system requirements. The Windows 10 system requirement page includes the system specifications for that platform.
- To check how your own system specs compare, click Windows 7’s Start button.
- Then input ‘system information’ in the search box.
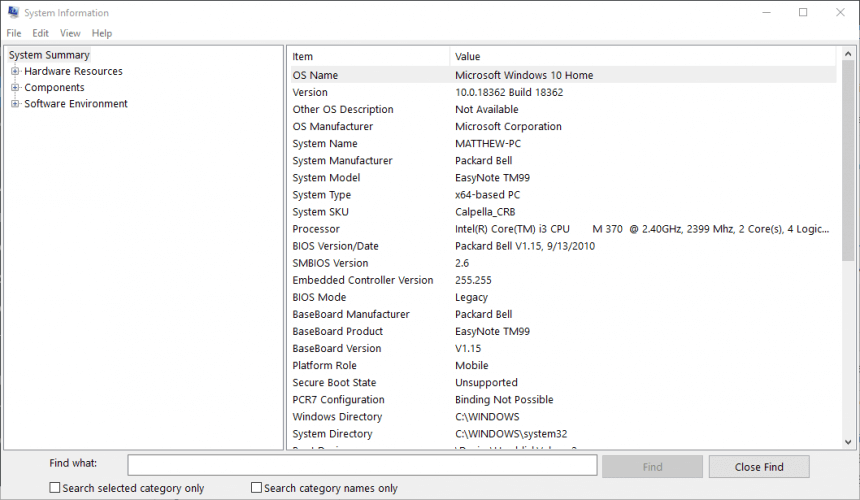
- Click System Information to open the window shown directly below.
- Click System Summary on that window for a basic system spec overview.
2. Do you have enough free hard drive space for an in-place upgrade?
As the system specifications highlight, users need a 32 GB hard drive for Windows 10. Most users will have bigger hard drives, but some might not have 32 GB of free storage space available for in-place upgrades.
If you intend to migrate to Windows 10 with an in-place upgrade, check that you have more than 32 GB of free space left on your hard drive.
To do that, open File Explorer (press the Windows key + E hotkey). Then click Computer on the left of File Explorer, which displays a bar that highlights how much storage the C: drive has.
If you don’t have more than 32 GB storage free, you’ll need to make some space for Windows 10. Uninstalling software is probably the best way to do that. Try uninstalling older software that might not be compatible with the new platform.
3. Do you have sufficient storage devices for a clean install?
If you’re going to do a clean Windows 10 install, you’ll need two external storage devices (if you also intend to back up data). A USB flash drive with at least four GB will be required for the Windows 10 ISO file. So, check that the flash drive you select is large enough and empty before upgrading.
As the clean install method will wipe the hard drive, most users will no doubt prefer to back up at least some of their files and software to external storage (but could also utilize cloud storage for files).
If you need to back up a lot of data, a big USB flash drive or an external hard drive should be sufficient for that. Check that the backup storage has a sufficient amount of space for your requirements.
4. Have you backed up all the software and files you need to keep?
It’s essential to back up data for the clean install method (unless you don’t need to retain any files or software). So, check that you’ve backed up everything that you wish to restore in Windows 10 before proceeding with a clean install. Files are the most essential thing as you can reinstall software.
It’s not so essential to back up anything for an in-place upgrade, which will preserve files and software. However, it might still be a good idea to do so just in case you can’t find something after upgrading.
Microsoft warns that “some applications or settings may not migrate” for an in-place Windows 10 upgrade.
5. Have you configured the BIOS or UEFI settings for a clean install?
If you choose to clean install Windows 10, you’ll need to check the PC is configured to boot from from removable media first via its BIOS or UEFI firmware.
To do that from the BIOS, you’ll need to go into the BIOS and select the Boot tab there. Then you can change the boot order to start from USB removable devices.
6. Do you have a Microsoft account?
The Windows 10 OOBE will ask you to sign in with a Microsoft account. Although you can select a Create an account option from there, it’s better to have an MS account to sign in with from the outset.
So, set up an MS account if you don’t already have one before upgrading. If you’re not currently signed in to your MS account, check that you can sign in to it ok before upgrading.
7. Have you checked your system architecture?
When you’re upgrading with a clean install, you’ll need to select the right 32 (x86) or 64-bit (x64) Windows 10 architecture option when setting up the installation media.
The Windows 10 you select to upgrade to needs to match your system architecture. Check what your system type is on the System Information window.
Those are the things you’ll need to check to ensure a straightforward and smooth upgrade to Windows 10 without any migration challenges. Those who clean install Windows 10 should check six things on the list (with the possible exception of HDD storage space).
However, users who opt for an in-place upgrade only really need to check system requirements, hard drive storage space, and if they have MS accounts. Thereafter, they can upgrade to Windows 10 or set up a bootable installation disk for a clean install with the Media Creation Tool.
RELATED ARTICLES TO CHECK OUT:



User forum
0 messages