How to Change Sound Settings in Windows 11 (Step-by-Step)
Windows 11 gives you full control over how your system sounds. Whether you want to switch between headphones and speakers, adjust microphone input, or set custom alert tones, you can easily change sound settings using built-in tools.
Follow this step-by-step guide to manage all your Windows 11 sound preferences.
Table of contents
How Do I Change Sound Settings in Windows 11?
1. Open the Sound Settings Menu
Start by opening the main sound configuration panel in Windows 11.
- Press Windows + I to open Settings.
- Click System from the left sidebar.
- Select Sound from the right pane.
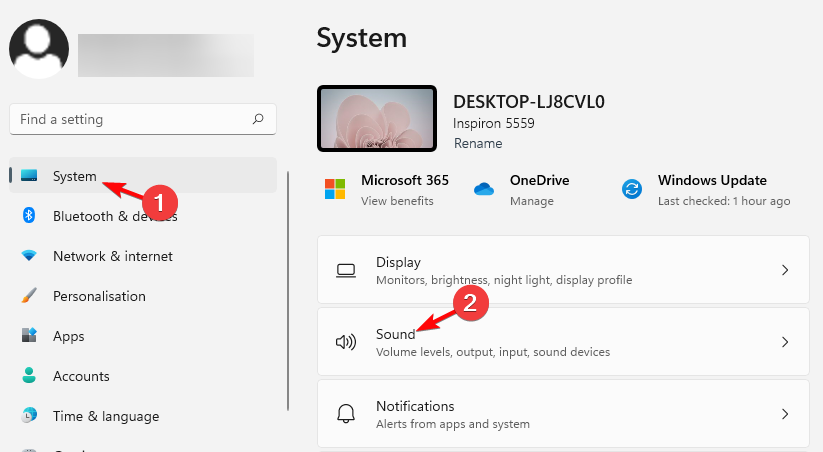
- Here, you’ll see options to adjust output, input, and advanced settings.
For more details on accessing this menu, check our full guide on how to open Sound Settings in Windows 11. You can improve clarity and boost overall sound output by enabling the Enhance audio option through this step by step Enhance audio guide.
2. Adjust the Output Volume
You can control your system volume from the Sound menu.
- Under the Output section, drag the Volume slider left or right to lower or increase the system sound.

- Click the Arrow ( > ) next to your selected output device.
- Scroll down and fine-tune the balance or audio enhancements if needed.
If the left or right channel sounds uneven, see how to adjust audio balance on Windows 11.
Learn how to change sound volume in Windows 11 with this quick guide by visiting how to change sound volume in Windows 11 for simple steps.
3. Switch Between Speakers or Headphones
If you use multiple devices, it’s easy to change your active output.
- Go to Settings > System > Sound.
- Under Output, choose the device you want to use (e.g., “Speakers,” “Headphones,” or “Bluetooth”).
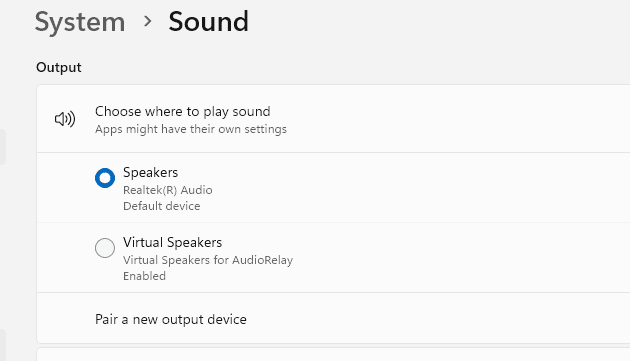
- Click Set as default if you want Windows to always use this device.
For more guidance, read how to change the output device in Windows 11.
4. Configure Input Devices (Microphones)
Manage your microphone and test its input levels here.
- In the same Sound window, scroll to Input.
- Select your microphone device.
- Click Device properties to adjust volume or rename the input.
- Use Test microphone to ensure it’s picking up your voice properly.
5. Customize System Sounds
You can set different tones for notifications, alerts, and events.
- Press Windows + R, type mmsys.cpl, and hit Enter.
- Switch to the Sounds tab.
- Under Program Events, select an event such as “Notification” or “Error.”
- Choose a sound from the Sounds dropdown list or click Browse to use your own WAV file.
- Click Apply, then OK.
To explore more system sound customization options, check our detailed guide on changing Windows sounds in Windows 11, including themes, notifications, and alert tones.
6. Manage Advanced Sound Settings
Access deeper controls for devices and enhancements.
- Scroll down in the Sound settings window.
- Click More sound settings under Advanced.
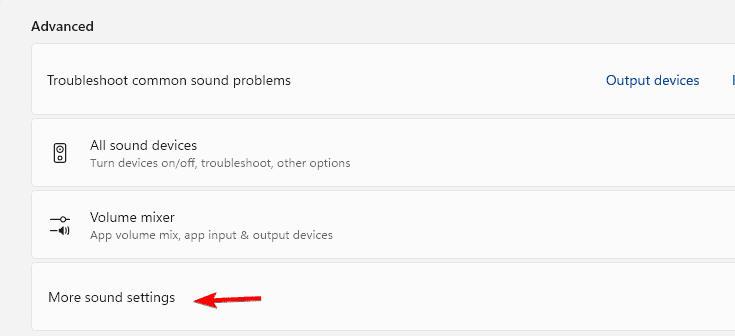
- Here, you can configure audio enhancements, spatial sound, and default communication devices.
- Select Properties for any device to open detailed configuration tabs.
Learn how to enable Windows Sonic surround sound for a more immersive audio experience.
FAQs
Go to Settings > System > Sound > Volume mixer, then click Reset at the bottom to restore defaults.
Ensure your audio drivers are updated. You can check by going to Device Manager > Sound, video and game controllers, right-clicking your device, and selecting Update driver.
Yes. Under Settings > System > Sound > Volume mixer, you can assign specific output devices to each app.
Go to Settings > System > Sound > More sound settings, open your playback device’s Properties, and under the Spatial sound tab, choose your preferred 3D audio format.
Conclusion
Changing sound settings in Windows 11 is simple and helps improve your overall experience. You can switch audio devices, adjust input and output levels, and personalize system alerts with just a few clicks.
You can also install audio driver and optional updates from Windows Update settings to resolve sound issues faster. You can also enable or disable sound devices to fix conflicts when audio still refuses to play correctly.
If you want even more control over your PC’s audio setup, check out our detailed guides linked above for managing balance, accessing sound settings, and changing output devices.
Read our disclosure page to find out how can you help Windows Report sustain the editorial team. Read more


Improve this guide


User forum
0 messages