Windows 10 Creators update causes battery drain [Fix]
For Windows-powered portable devices, the battery endurance has always been a touchy subject. Some users were satisfied, others, well, not so much. With Windows 10 Creators Update, the battery life should be improved or at least you’ll get to be more in control over main battery consumers.
However, it seems that some users encountered sudden battery leaks or reduced battery life after the upgrade. We certainly hope that some of the upcoming patches will address that. But, while we are at it, there are ways to troubleshoot battery issues and, at least temporarily, resolve battery drains.
So, if you have any battery issues in the Creators Update, look no further. We prepared a few workarounds below.
How to fix battery drain on Windows 10 Creators Update
- Check your Power plan
- Enable Battery Saver
- Disable large consumers
- Use 3rd-party tool to improve battery life
- Update drivers
- Reinstall Windows 10
1. Check your Power plan
The first thing you should check are Power Settings. On some occasions, Windows Update may change your custom settings. For example, your Power plan may be changed to High Performance instead of Power saver. And that is not only related to brightness or display settings, but covers a lot of advanced power options that impact battery life drastically.
So, what you need to do is to retrieve your old settings before moving on with additional steps. And this is how to do that:
- Right-click on Battery icon in the Notification area and open Power Options.
- Now, you can select either Balanced or Power saver plan.
- Select one and open Change plan settings.
- Click on Restore default settings for this plan.

- When prompted, click Yes and that should restore your settings to default.
Moreover, you can change the Advanced power settings to decrease battery drainage.
2. Enable Battery Saver
Another feature that is important but can somehow get displaced after the update is Battery Saver. Namely, this feature was one of the notable changes years ago. Battery Saver is Windows 10’s built-in feature that helps you manage your battery consumption while monitoring apps/programs.
This is how to enable Battery Saver:
- Open Settings app.
- Click on System.
- Select Battery Saver.

- Here you can turn Battery Saver on immediately or set an automatic start when battery level falls below designated percentage.
- Save your settings.
This should improve your battery life, at least marginally. But, it’s a good start, nonetheless.
3. Disable large consumers
Besides Battery Saver, you can use a specific tool that analyzes your system and list the programs/apps that are the largest consumers. That should give you the valuable insight and help you reduce the battery drain. Moreover, you can set the monitoring from last 24 hours up to 1 week.
With that detailed information, you’ll be able to find the possible culprits for battery drainage and stop their respective processes.
This is how you can use ‘Battery Use’ to your advantage:
- Open Settings app.
- Open System.
- Select Battery Saver.
- Click on Battery Use.
- There you can prevent the apps from working in the background. Have in mind that this works only with Windows 10 universal apps and not with the standard, desktop programs.
- Scroll down to find a list of apps and programs usage of battery.
- Click on the individual app to access the detailed application of battery usage.
That should give you enough insight to find and terminate power-hogging apps and programs.
4. Use 3rd-party tool to improve battery life
If you’re not satisfied with the built-in power-saving and monitoring tool, you can always try 3rd-party alternatives. Some of those are quite advanced in real-time monitoring, while others will control your system and offer automatic power saving features. Some OEMs offer their own solutions, like Samsung Life Extender, so if you own a Samsung laptop, you’re already good to go.
We have an article with a detailed explanation of tools that should help you to drastically reduce battery drainage. You can find it here.
5. Update drivers
One thing we can’t stress enough is an impact a faulty driver can have on all around PC performance. And, in this case, the unstoppable battery drainage. So, make sure that all of your drivers are up-to-date and functioning.
You can check and update your drivers this way:
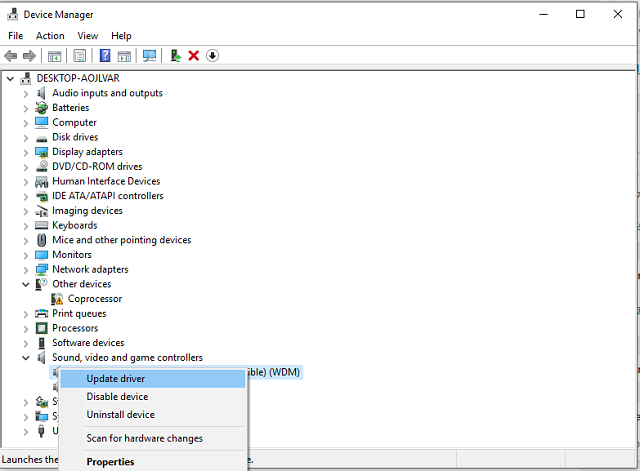
- Right-click the Start menu and open the Device Manager.
- If you find any drivers with an exclamation point, make sure to update them. Right-click and choose Update Driver
- However, if you’re unable to update drivers trough Windows Update, you should right-click the faulty device and open Properties.
- Now, open Details list and locate DriversId in the drop-down menu.
- Copy the first line of the driver’s identification and paste it in a web browser.
- Once you’ve found appropriate driver, download and install it.
We strongly advise you to use only trusted, official drivers issued by manufacturers. That should keep you off the malware and other possible issues.
6. Reinstall Windows 10
If you’re not sure what’s the culprit for this issue after all previous steps, your best bet to resolve the battery drainage is reinstallation. Namely, if your hardware (in this case battery) is in the good condition and the problems started after an upgrade to the Creators Update, you should easily resolve it by reinstalling the system and starting from the scratch.
To reinstall the system you’ll need the Media Creation Tool and USB/DVD for installation setup. You can get Media Creation tool here.
If you’re not sure how to perform a reinstallation, we have an explanatory article with the detailed step-by-step procedure. You can find it here.
After going through the list of workarounds, you should be relieved of any battery issues inflicted by the latest update. But, if there’s something you’ll add to the list of solutions or maybe a question regarding the subject, we look forward to hearing from you.
The comments section is just below.
RELATED STORIES YOU NEED TO CHECK OUT:
Read our disclosure page to find out how can you help Windows Report sustain the editorial team. Read more


Improve this guide


User forum
0 messages