Wi-Fi is Not Working on Your Dell PC? Fix it in 5 Steps
Update the network driver to fix this problem
Key notes
- You should try uninstalling the network driver to fix the Wi-Fi problem.
- Also, you can run the network troubleshooter and fix the glitch that is causing the issue.

Several of our readers have reported that the Wi-Fi isn’t working on their Dell computers. This problem is quite frustrating as this prevents them to connect to the internet.
In this guide, we will give you a list of solutions to help resolve the Wi-Fi not working on Dell computers. Let us go through each solution and hopefully fix the issue.
Why is Wi-Fi not working on my Dell computer?
We have deduced a list of reasons that could trigger the Wi-Fi not working on Dell computer problem. Some of the most common reasons are listed below:
- Router issue – Some underlying problem with your router or the router cable might be causing the Wi-Fi to not work on your Dell computer.
- The network driver is outdated – The Dell network driver might be outdated which is why there is a compatibility issue.
- WLAN AutoConfig service isn’t running – Chances are the important WLAN AutoConfig service isn’t running on your Dell computer.
- Incompatible programs are conflicting – Some incompatible programs are known to interfere with the Dell Wi-Fi driver thus causing such Wi-Fi issues.
Let us now apply the solutions and hopefully resolve the Wi-Fi not working on the Dell computer problem.
How can I fix the Wi-Fi on my Dell computer?
Before going ahead with the advanced solutions, we would suggest you apply the below fixes and check if this resolves your Wi-Fi problem.
- Restart your computer as the Wi-Fi issue could be a temporary problem.
- Check if your Wi-Fi router is working fine or not. Get in touch with your operator if you come across any issues with your router.
- Make sure that you have enabled the Wi-Fi option on your PC. Often, we neglect this basic thing and look for advanced solutions.
Now, let us jump to the advanced solutions and resolve the Wi-Fi not working on the Dell computer issue.
1. Update the network driver
- Press the Win key to open the Start menu.
- Type Device Manager and open it.

- Expand the Network adapter section.

- Double-click on your network adapter to open it.
- Switch to the Driver tab.

- Select Update driver.

- Choose Search automatically for drivers option.
- Install the latest update for your driver and check if this fixes the issue or not.
First of all, you should ensure that the network adapter driver on your Dell computer is up to date. This will negate any driver compatibility issues that might be causing the Wi-Fi not working on Dell computer problem.
Apart from updating the network adapter, you should also keep all of the PC’s drivers up to date. For that, we have a dedicated guide that lists some of the best driver update software that you can check out.
- Download and install Outbyte Driver Updater.
- Launch the software.
- Wait for the app to detect all faulty drivers.

- Now, it will show you all the malfunctioning drivers listed to select the ones to Update or Ignore.
- Click on Update & Apply Selected to download and install the newest versions.
- Restart your PC to ensure the applied changes.

Outbyte Driver Updater
Secure your Windows PC with Outbyte from various errors caused by problematic drivers.2. Run the troubleshooter
- Press the Win + I keys to open the Settings menu.
- Click on Troubleshoot on the right side.

- Select Other troubleshooters.

- Hit the Run button for the Network and Internet.

- Follow the on-screen steps to troubleshoot the Wi-Fi connectivity issue and apply the solutions.
Running the in-built troubleshooter will help you easily fix some underlying problems with the software or hardware of your PC. Some bugs might be causing the problem, which the troubleshooter will fix, by following the said steps.
3. Enable the WLAN AutoConfig service
- Press the Win + R keys to open the Run dialogue.
- Type services.msc and press Enter.

- Locate the WLAN AutoConfig service and double-click on it to open it.

- Make sure that the Startup type is selected as Automatic, and the Services status is set to Running.

- Click on OK and Apply for the changes to take effect.
- Restart your computer.
Some users have reported that because the WLAN AutoConfig service feature wasn’t enabled on their Dell computers, the Wi-Fi was malfunctioning and not working. Simply follow the above steps and enable the feature to fix the problem.
4. Uninstall incompatible programs
- Open the Start menu by pressing the Win key.
- Open Control Panel.
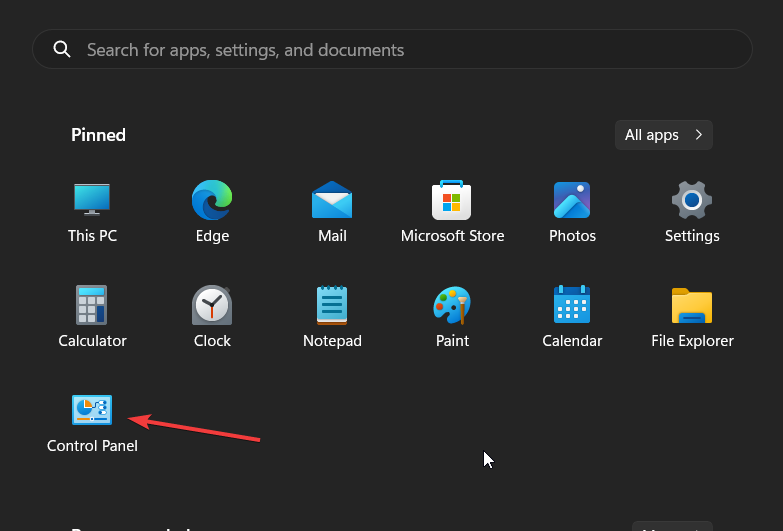
- Select Programs and Features.
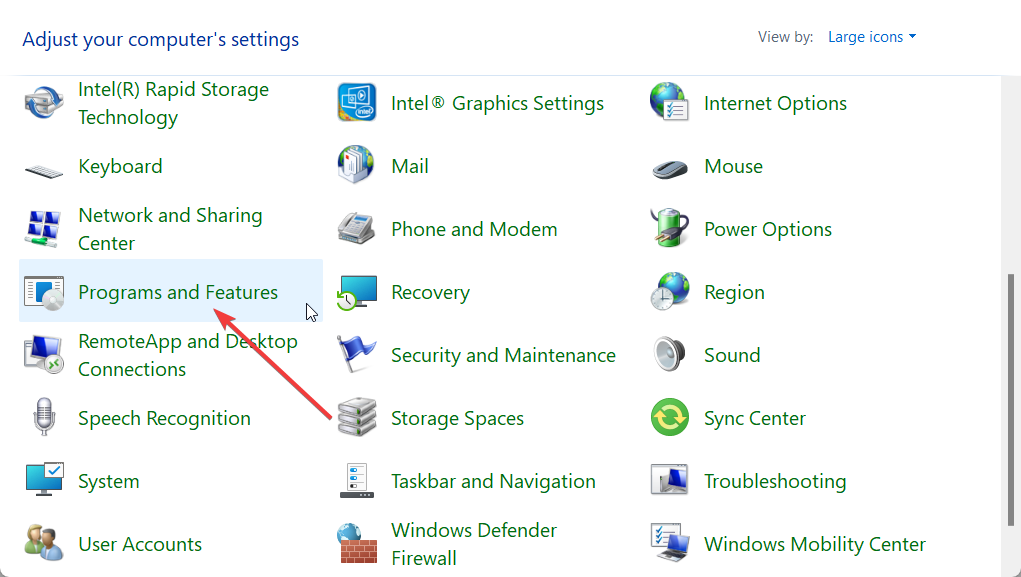
- Click the program that you have recently installed you think is the culprit and hit the Uninstall button at the top.

Some readers have reported that the SmartByte app was the culprit which is why the Wi-Fi on the Dell computer was not working.
If you have that app, we recommend uninstalling it and see if the issue is resolved. If not, try uninstalling the latest software you installed prior to this problem appeared.
5. Manually connect to Wi-Fi
- Open the Start menu by pressing the Win key.
- Open Control Panel.
- Select Network and Sharing Center.

- Click on Set up a new connection or network option.

- Choose the Manually connect to a wireless network option and click on Next.

- Enter the required information and click Next.
- Follow the on-screen steps to complete the process and hit Finish.
That is it from us in this guide. For users experiencing the Dell laptop not charging issue, we would suggest you apply the solutions mentioned in our guide.
Feel free to let us know in the comments below, which one of the above solutions resolved the problem for you.
Read our disclosure page to find out how can you help Windows Report sustain the editorial team. Read more


Improve this guide


User forum
0 messages