Fix: EMPTY_THREAD_REAPER_LIST on Windows 11
Ensure your Windows is up to date
Key notes
- To fix the EMPTY_THREAD_REAPER_LIST BSoD error, reset BIOS to default, update the corrupted driver, or uninstall the recent Windows updates.
- Keep reading to learn detailed steps for each method.
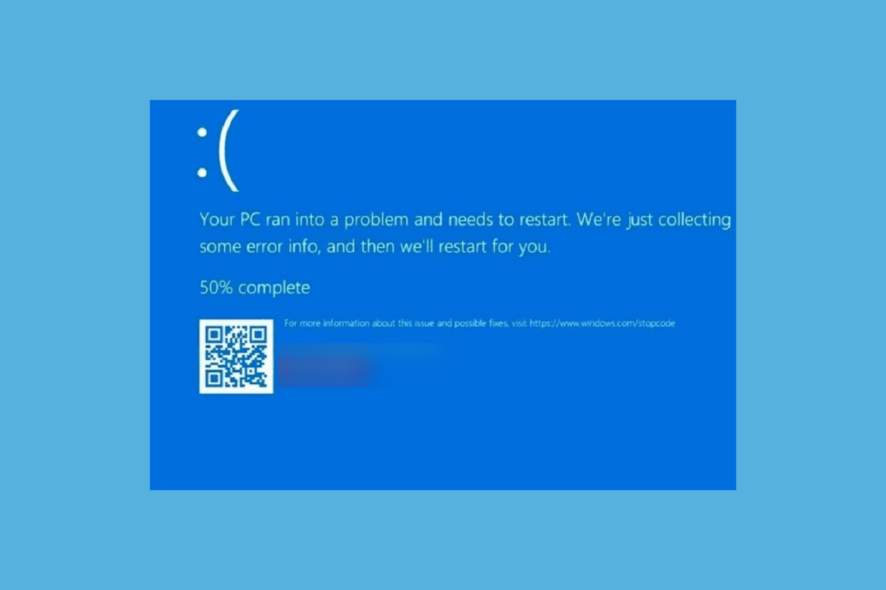
If you are stuck with a Blue Screen of Death with an error message EMPTY_THREAD_REAPER_LIST, then this guide can help.
We will discuss the reasons behind this blue screen error and offer WR-tested expert solutions to get rid of it.
What causes the EMPTY_THREAD_REAPER_LIST error?
- Outdated or corrupted drivers.
- Malware infection.
- Pending or bad Windows update
How can I fix the EMPTY_THREAD_REAPER_LIST error?
Before we go to the advanced fixes to get rid of EMPTY_THREAD_REAPER_LIST BSoD error, here are a few preliminary checks you should do:
- Ensure there are no pending Windows updates.
- Run a deep malware scan using reliable antivirus software.
- Remove all the external hardware except the Keyboard and mouse, then restart your computer.
 NOTE
NOTE
1. Run the Windows Memory Diagnostic tool
- Restart your computer, and when you see the manufacturer logo like Dell or HP, press & hold the Power button for about 5-7 seconds to turn off your computer.
- Press the Power button to start your PC.
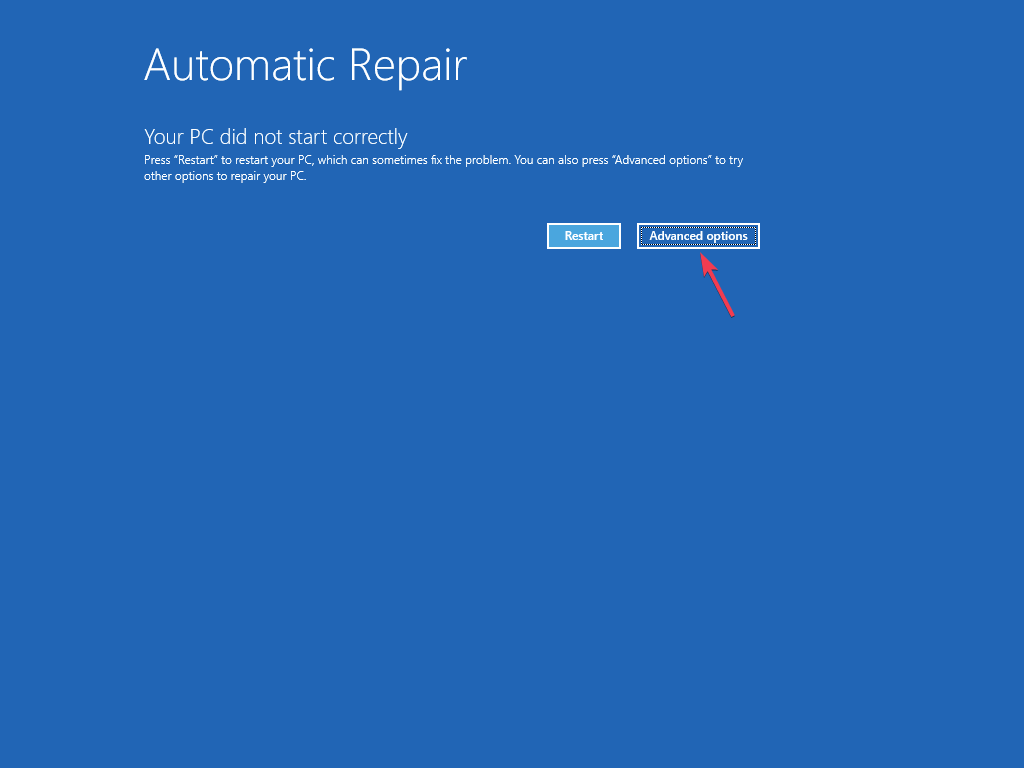
- When your computer restarts, as you see the manufacturer’s logo, press & hold the Power button again to restart. Repeat the steps twice until you see Windows Preparing Automatic Repair.
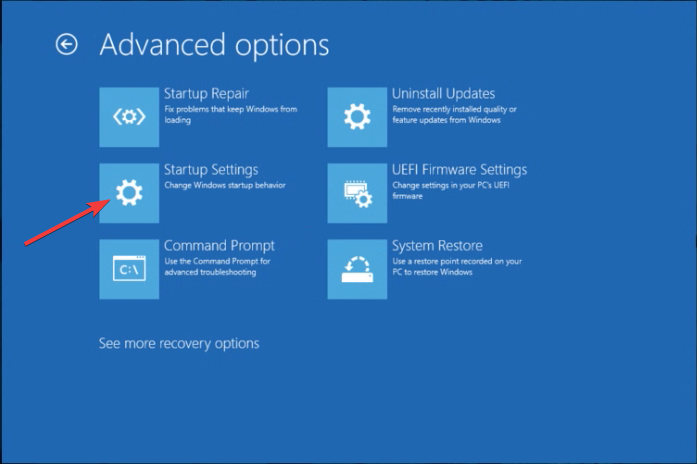
- Once you see the Automatic Repair page, select Advanced options.
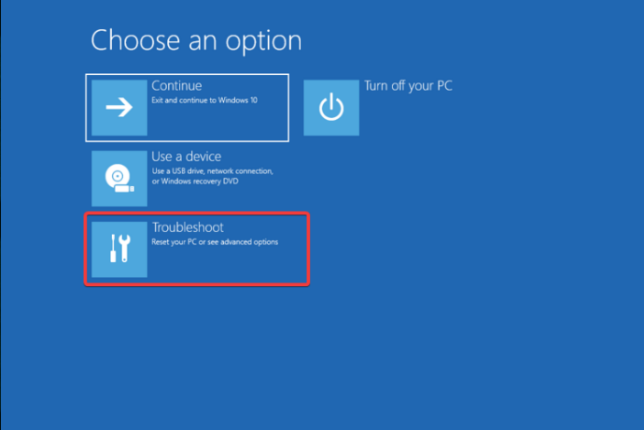
- On the Choose an option screen, select Troubleshoot.
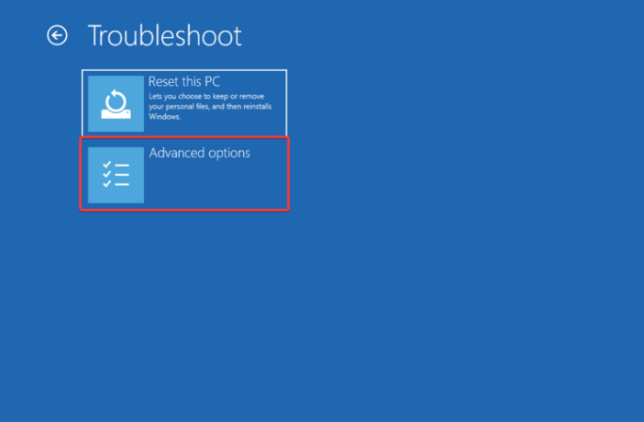
- Click Advanced options.
- On the Advanced options screen, choose Startup Settings.
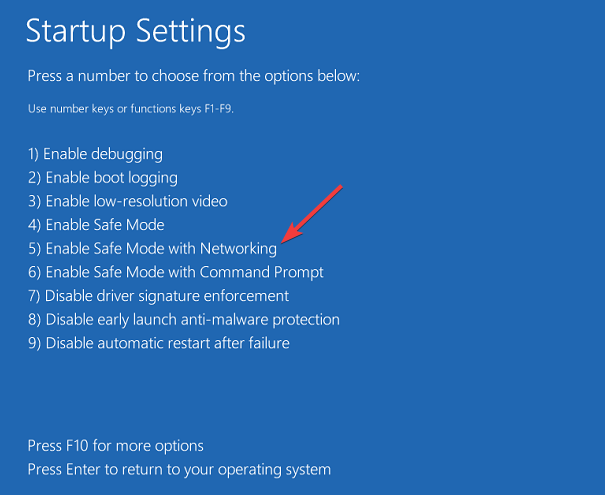
- To select Enable Safe Mode with Networking, press F5 and click Restart.
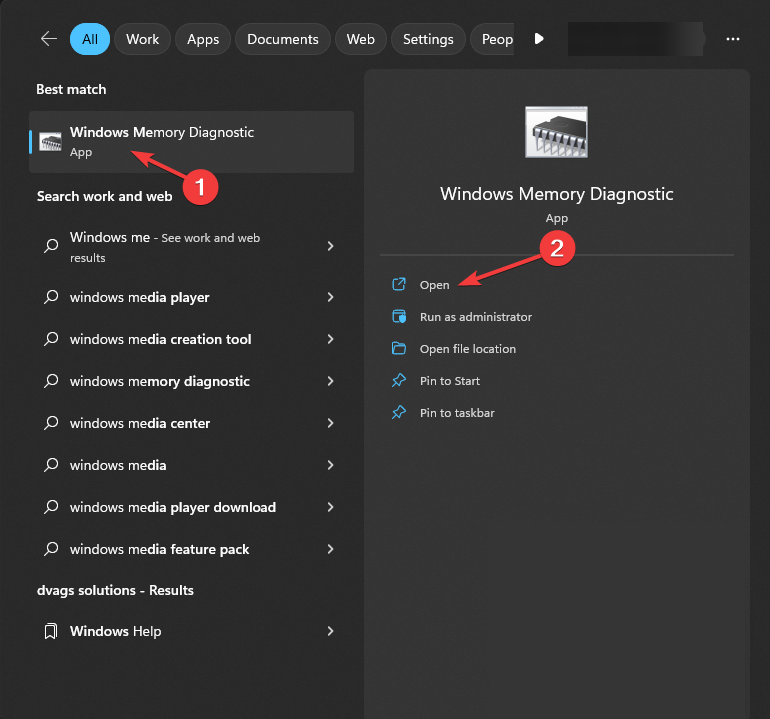
Your computer will reboot in safe mode, then follow these steps to run the diagnostic scan:
- Press the Windows key, type windows memory diagnostic in the search box, and click Open.
- Select Restart now and check for problems (recommended).
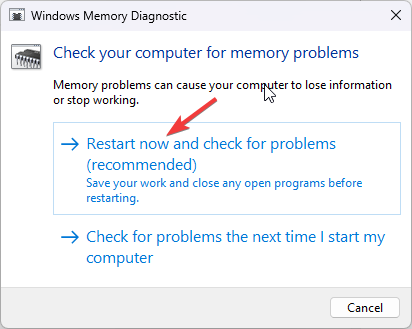
- Your computer will restart, and the tool will run the test.
Once the scan is complete, your PC will reboot and take you to the login screen. Once you sign in, you can see the scan results on the screen. If the results are not on the desktop screen, open Event Viewer to check the details.
If the test comes with an error there is a problem with memory modules, remove dust & debris, and reseat the RAM modules, then run the diagnostic check again. In case the scan results come up with errors again, you might have to replace one or more modules.
Running a memory diagnostic tool can also help you fix issues like the BSoD error 0x00000154; read this guide to learn about other solutions.
2. Run the CHKDSK command
- Restart your computer; when you see the manufacturer logo, press & hold the Power button for about 5-7 seconds to restart your PC.
- Press the Power button to turn on your computer.
- Repeat the steps twice until you see Windows Preparing Automatic Repair, then click the Advanced options.
- On the Choose an option screen, select Troubleshoot.
- Choose Advanced options from the Troubleshoot page.
- From the Advanced options screen, select Command Prompt.
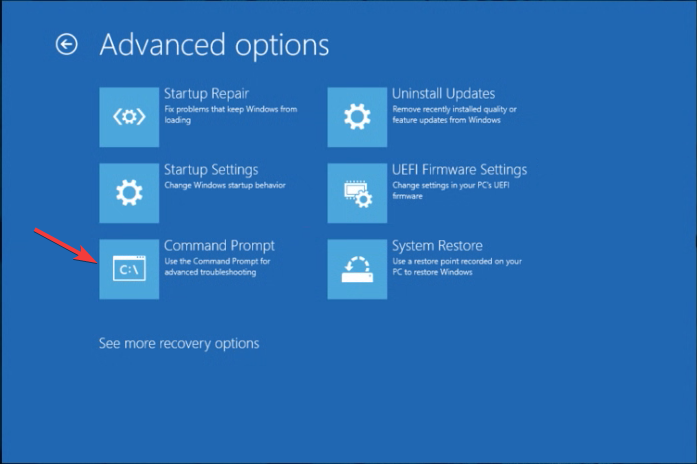
- Open the Command Prompt window, copy & paste the following command to check and repair the file system issues on the system drive of a Windows computer, then hit Enter:
chkdsk c: /f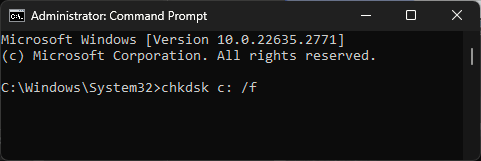
- Close the Command Prompt window, then reboot your computer.
3. Run SFC & DISM scans
- Open Command Prompt using the same steps mentioned in Solution 2.
- Copy & paste the following command to repair the corrupted system files and hit Enter:
sfc /scannow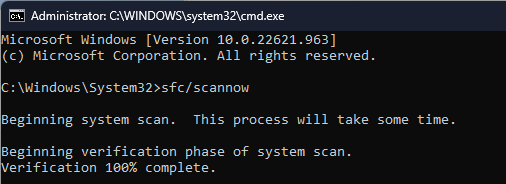
- Type the following command to restore your Windows image and press Enter:
Dism /Online /Cleanup-Image /RestoreHealth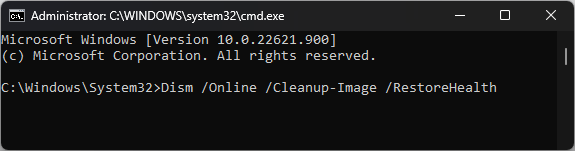
- Reboot your computer to let the changes take effect.
If you’re looking for an easier alternative, we suggest you try specialized repair software, as it will save a significant amount of time and effort.
4. Update/reinstall the affected driver
- First, check the code you received to understand which drive you need to update.
- Now, restart your computer in safe mode using the steps mentioned in Solution 1. Press Windows + R to open the Run window.
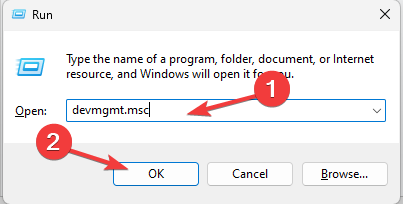
- Type devmgmt.msc and click OK to open the Device Manager app.
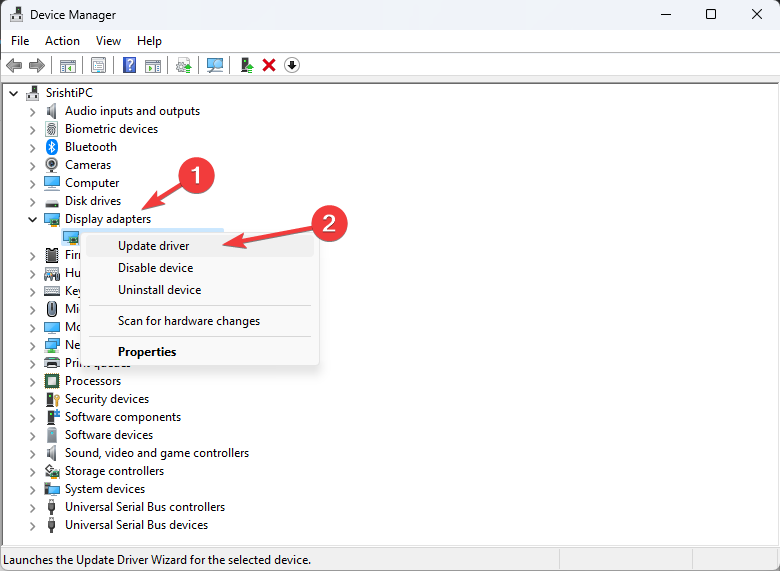
- Click the category to expand, then right-click the driver and select Update driver.
- Choose Search automatically for drivers.
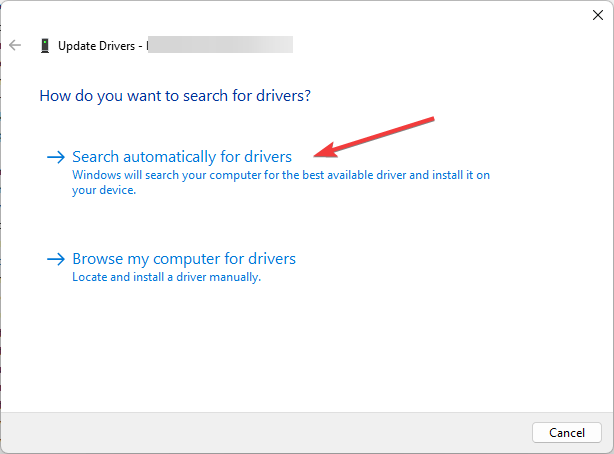
- Follow the on-screen instructions to complete the process.
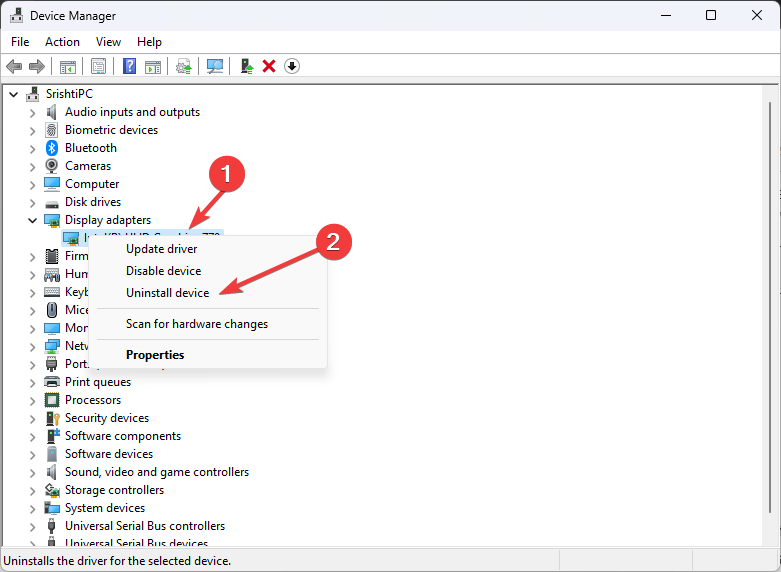
If there is no update available for the driver, follow these steps to reinstall the driver:
- Go to the category, expand it, then right-click the driver and choose Uninstall driver.
- Next, click Action, then select Scan for hardware changes from the drop-down menu.
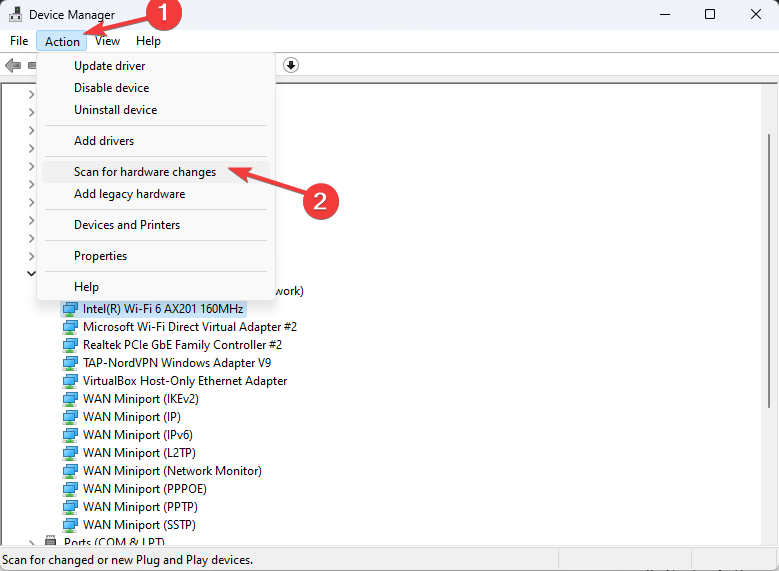
- Restart your computer to save the changes.
5. Modify the fast startup settings
- Restart your computer in safe mode using the steps mentioned in Solution 1.
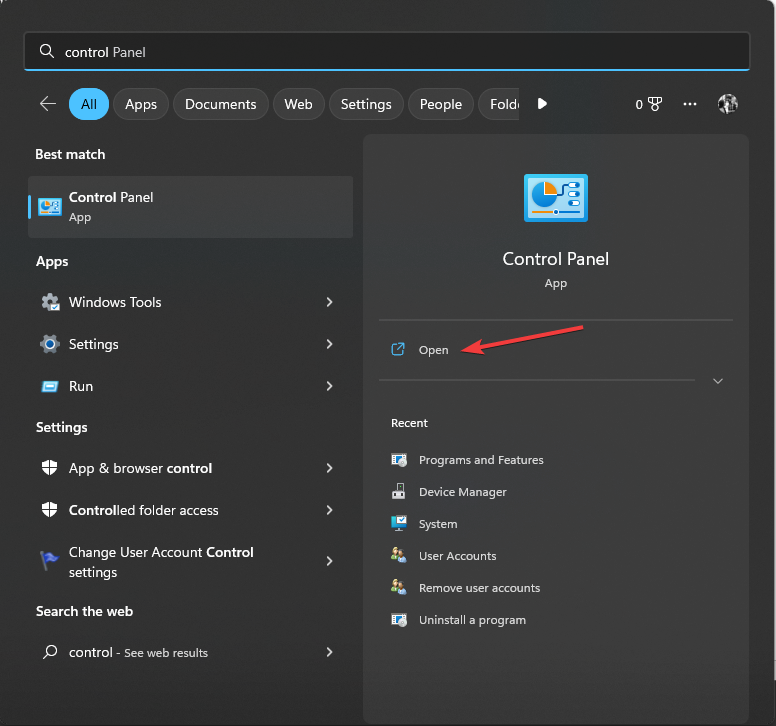
- Press the Windows key, type control panel, and click Open.
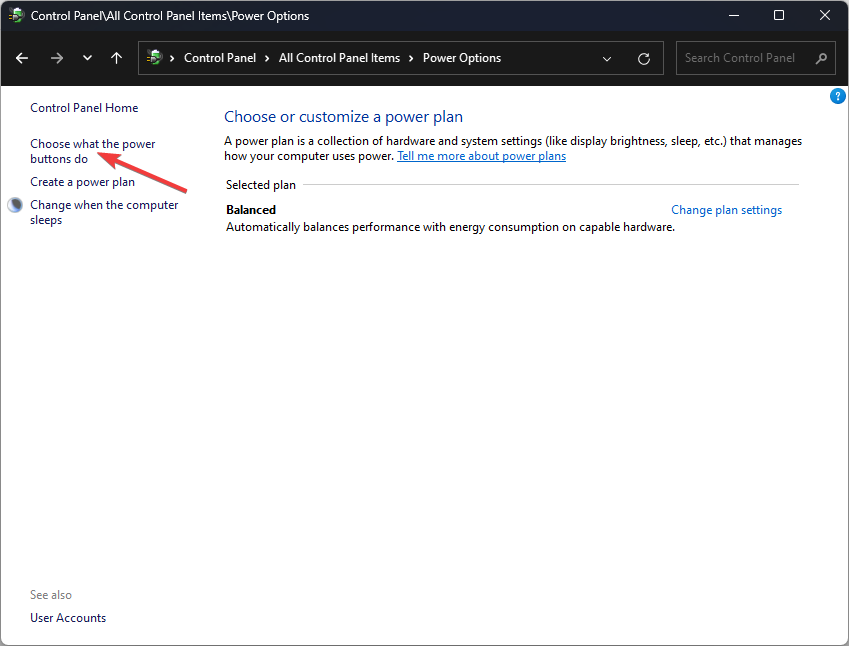
- Select Category as View by and click Hardware and Sound.

- Go to Power Options, then select click Choose what the power buttons do.
- Select Change settings that are currently unavailable.
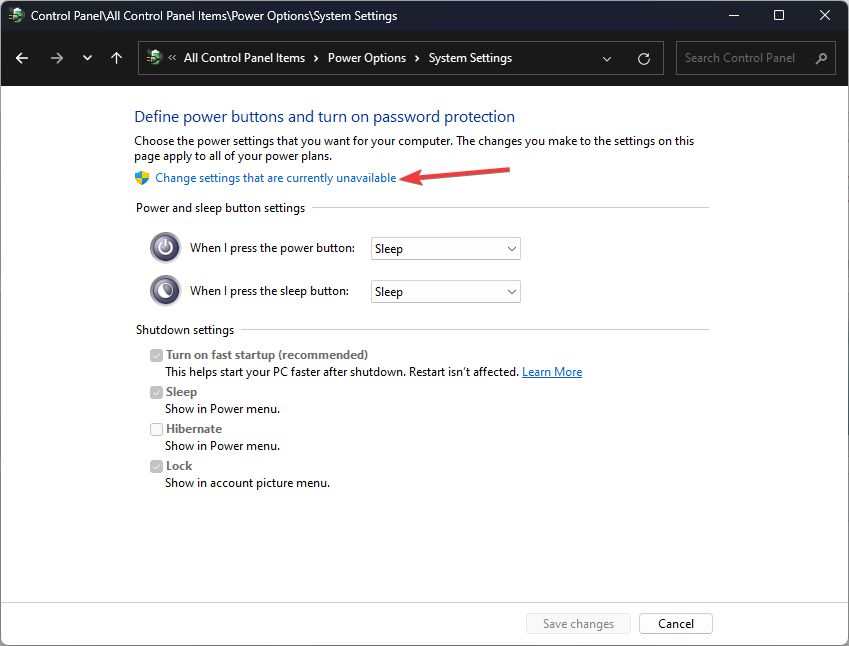
- Under Shutdown settings, check if Turn on fast startup (recommended) is selected. If it is selected, remove the checkmark or vice versa.
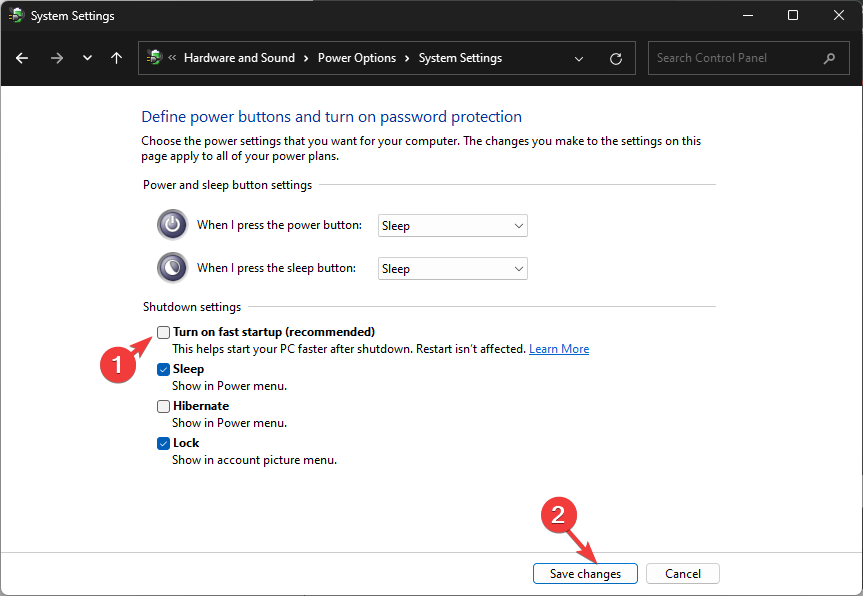
- Click Save changes.
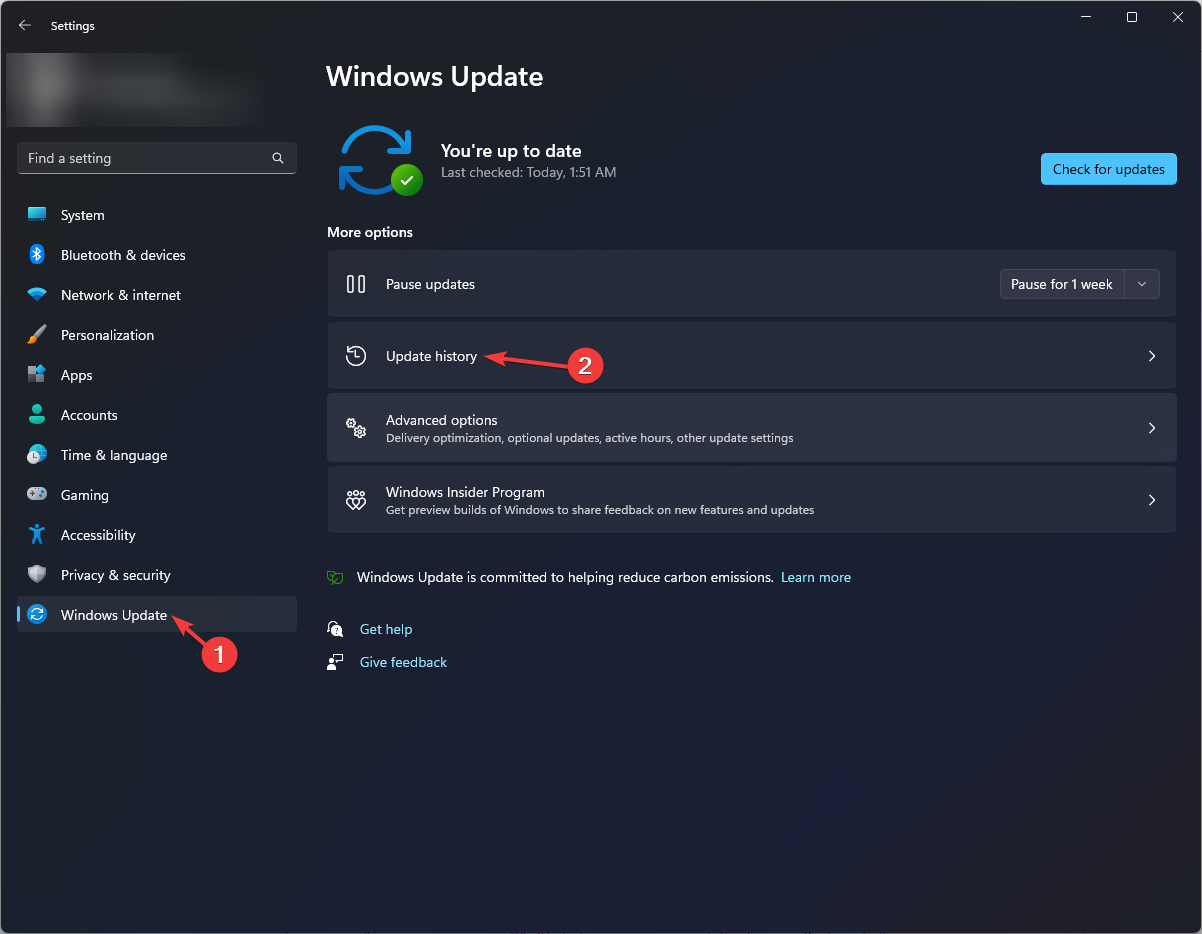
6. Uninstall the latest Windows updates
- If you can’t reach the login screen, restart your computer in safe mode using the steps mentioned in Solution 1.
- Press Windows + I to open the Settings app.
- Select Windows Update and click Update history.
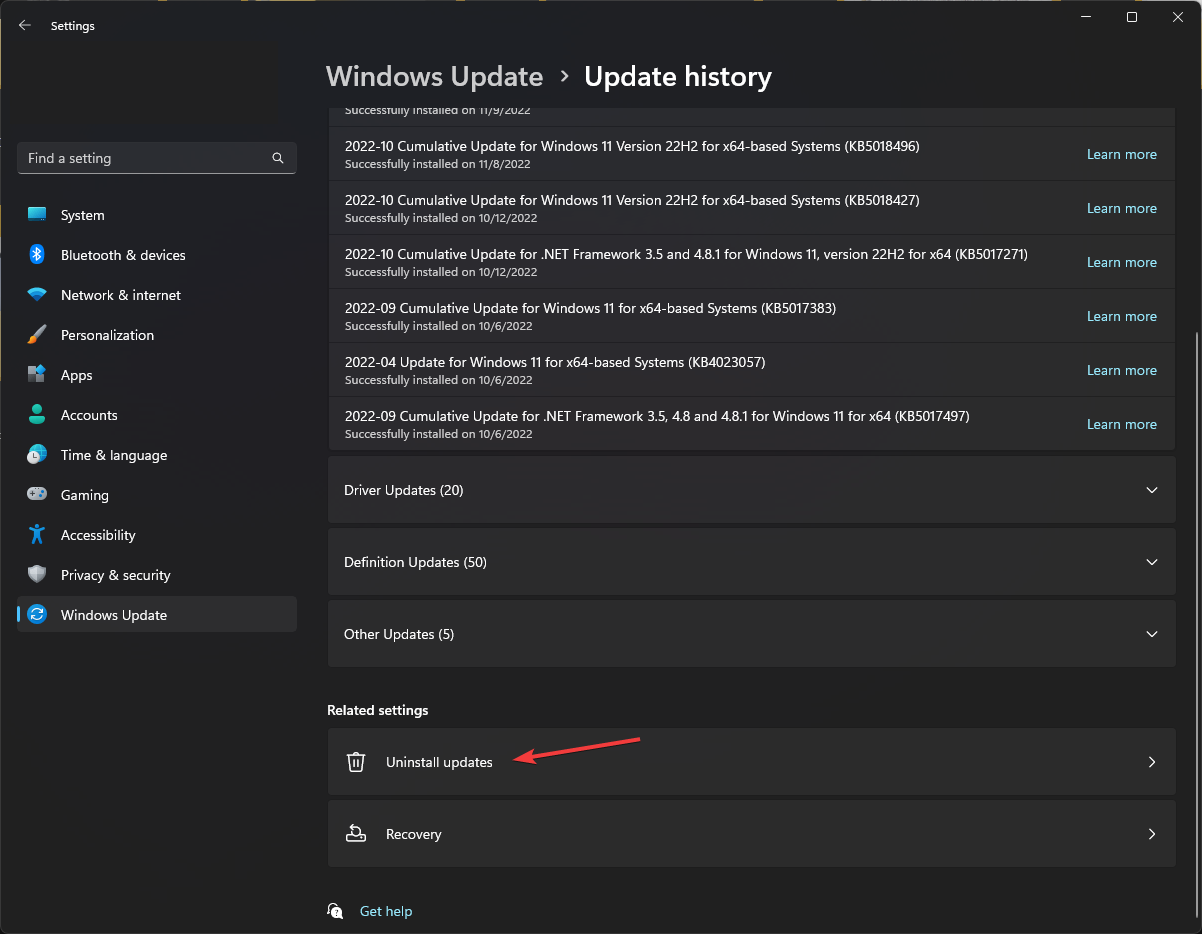
- Next, click Uninstall updates from the Related settings section.
- Locate the latest update, and click Uninstall to remove it from your PC.
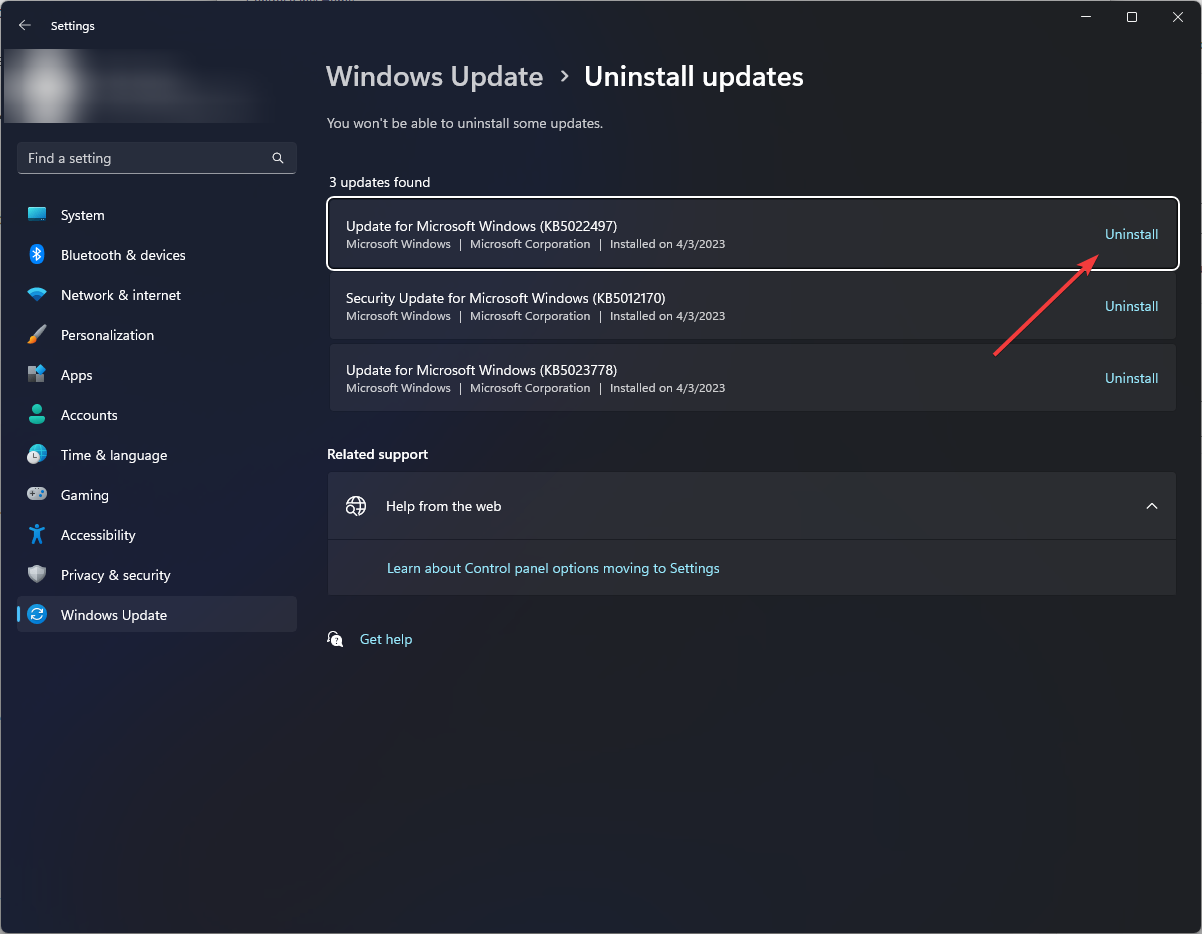
- Restart your computer to save the changes.
Uninstalling the updates can help you fix other BSoD errors like 0x00000078 BSOD in Windows 11; read this guide to learn about other solutions.
7. Reset BIOS to default settings
- Restart your computer as soon as you see the manufacturer logo; press & hold the Power button for about 5-7 seconds to restart your PC.
- Press the Power button to turn on your computer.
- Repeat the steps twice until you see Windows Preparing Automatic Repair, and click the Advanced options button.
- Select Troubleshoot from the Choose an option screen.
- On the Troubleshoot page, choose Advanced options.
- From the Advanced options screen, select UEFI Firmware Settings.
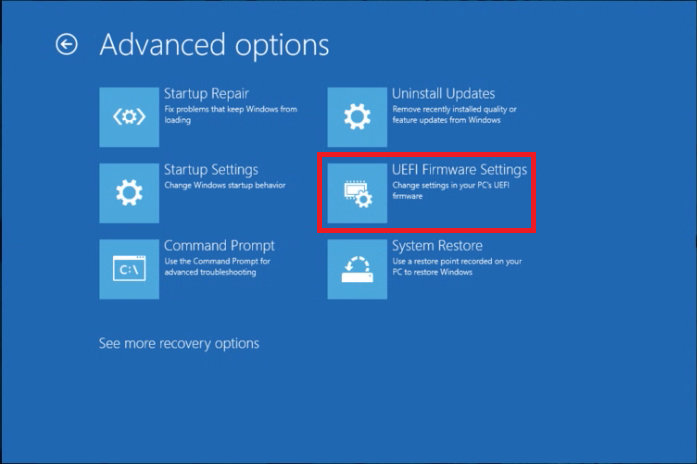
- Now, in the BIOS menu, go to File, then select Apply Defaults and Exit.
- Click F10 to save and exit the menu.
The BIOS settings are different for every computer, depending on the system manufacturer, so you need to find similar options in BIOS to reset it to default.
8. Perform a system restore
- Reboot your computer, then when you see the manufacturer logo, press & hold the Power button for about 5-7 seconds to turn off your computer.
- Press the Power button to restart your PC.
- Repeat the steps twice until you see Windows Preparing Automatic Repair, then click the Advanced options.
- Click Troubleshoot from the Choose an option screen.
- Select Advanced options.
- Choose System Restore from the Advanced options window.
- Now, select Choose a different restore point and click Next.

- Choose the selected restore point and click Next.
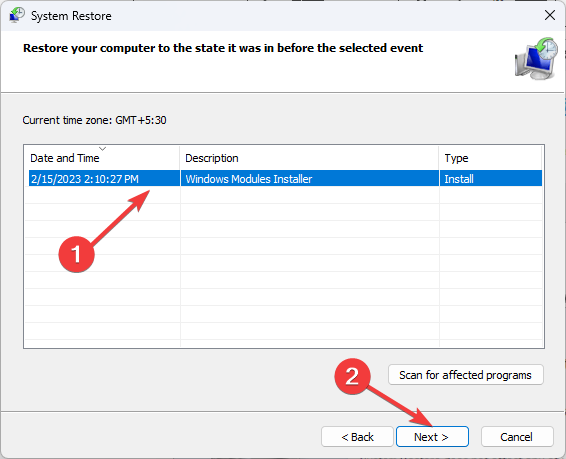
- Click Finish.
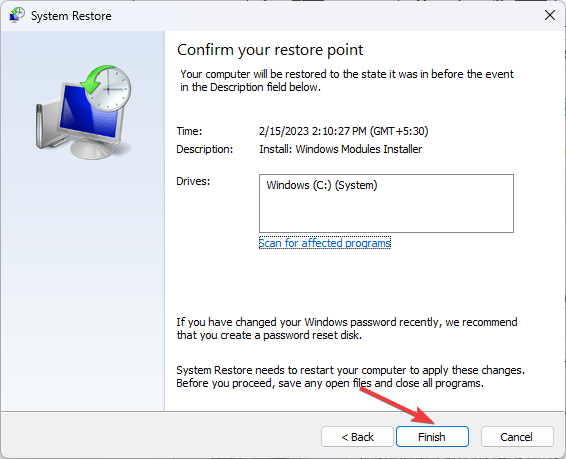
Your computer will restart and restore it to the chosen version. If you see the System Restore didn’t complete successfully message, it could be due to an outdated driver; read this guide to learn about the solutions.
If nothing worked for you, you might want to reset your computer to fix all the system inconsistencies once and for all.
To conclude, to fix the EMPTY_THREAD_REAPER_LIST BSoD error on Windows 11, update your Windows & system drivers to the latest version, run an SFC scan to repair corrupted files, or edit the power settings.
To learn more about the BSoD errors and causes to prevent them from interrupting your computing experience, read this guide.
If you have any questions or concerns about the subject, feel free to mention them in the comments section below. We will be happy to interact with you.
Read our disclosure page to find out how can you help Windows Report sustain the editorial team. Read more


Improve this guide


User forum
0 messages