Ethernet Doesn’t Have A Valid IP Configuration: Solved
To fix this issue, you'll need to adjust your network settings
11 min. read
Updated on
Read our disclosure page to find out how can you help Windows Report sustain the editorial team. Read more

Ethernet doesn’t have a valid IP configuration is a serious issue that will prevent you from accessing the Internet. However, you can fix it easily with our solutions.
What does Ethernet doesn’t have a valid IP mean?
This problem means that your PC cannot receive the IP address from DHCP. The issue occurs if your network adapter isn’t properly configured or if there’s a problem with your drivers
What can I do if my Ethernet doesn’t have a valid IP configuration?
Before we try more complex solutions, try restarting your router and using a different Ethernet cable. Restarting your PC or disabling third-party antivirus can also help. If possible, connect the PC directly to the router.
Disabling QoS feature can also help. If you use Powerline adapters, connect them to a different outlet or sync them one by one.
1. Reboot the system
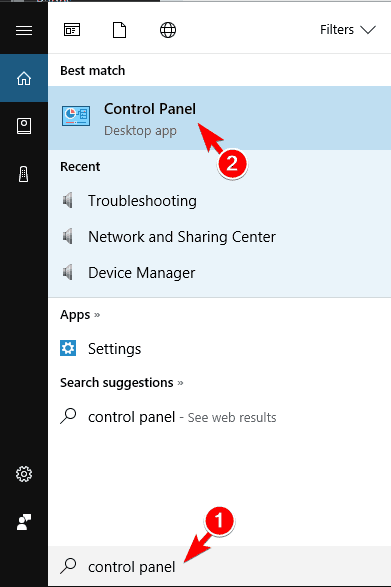
- Press Windows key + S and enter control panel. Now select Control Panel from the list of results.
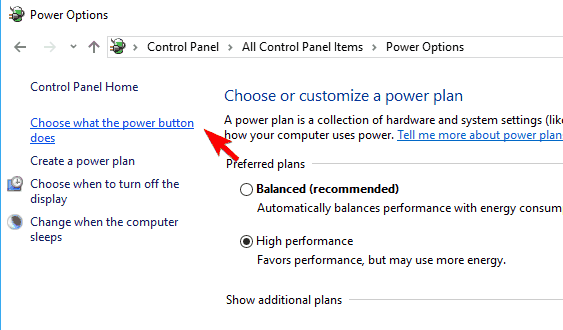
- Select the Power Options from Control Panel.
- In the left pane, click on Choose what the power button does.
- Select Change settings that are currently unavailable.
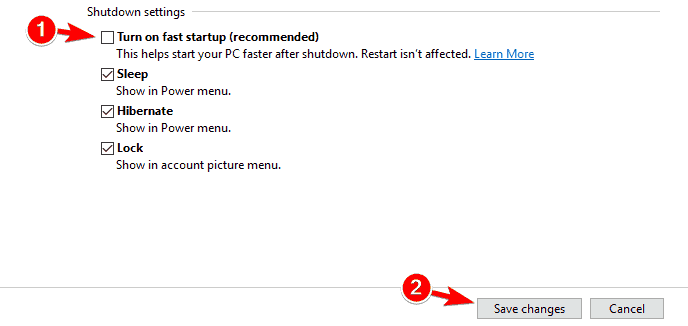
- Uncheck the box beside Turn on fast startup (recommended) near the bottom of the window to turn off Fast Startup.
- Select Save changes.
- Reboot your computer.
If you still can’t disable this feature after following these steps, we recommend reading can’t disable Fast Startup guide to get to the bottom of the problem.
2. Check the Network Adapter Settings
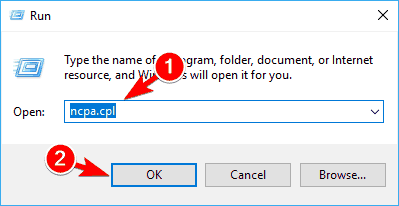
- Hold the Windows key and press R.
- Enter ncpa.cpl in the input field and click OK.
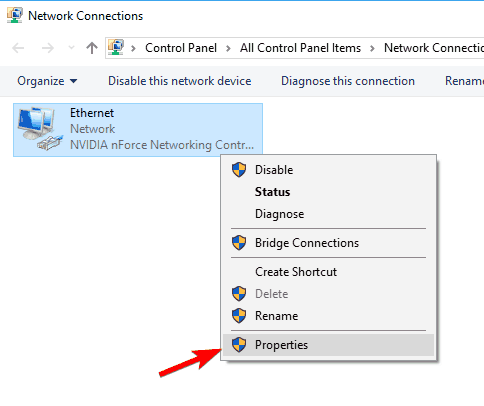
- Right click your Network Adapter in the Network Connections window and select Properties.
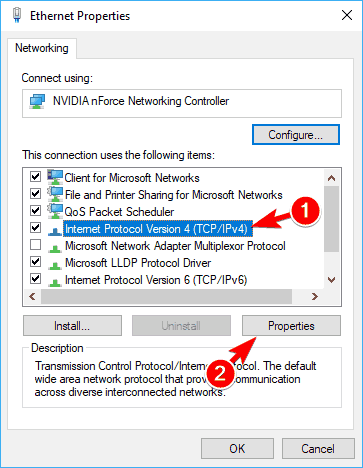
- From the Ethernet Properties window, select Internet Protocol Version 4 (TCP/IPv4) and click on Properties.
- You will then see the Internet Protocol Version 4 (TCP/IPv4) Properties window. Enable the following options:
If obtaining the IP address and DNS automatically doesn’t fix the problem, you might want to consider setting both your IP address and DNS manually. To do that, follow these steps:
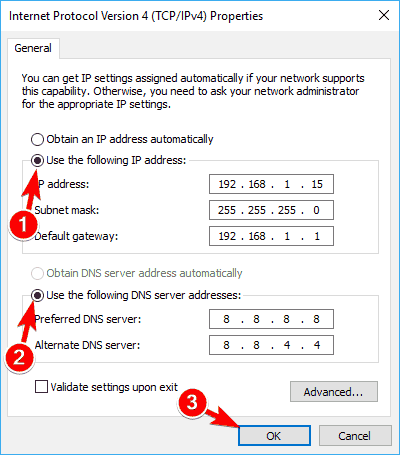
- Open your connection properties, select Internet Protocol Version 4 (TCP/IPv4) and click on Properties.
- Now select Use the following IP address and Use the following DNS server addresses. Fill in the data like on the screenshot below.
- After you’re done, click OK to save changes.
To see the necessary information such as Default gateway and Subnet mask, you can just check connection properties on any other device that can connect successfully to your network.
3. Install your drivers in compatibility mode
- Download the latest drivers for your network adapter.
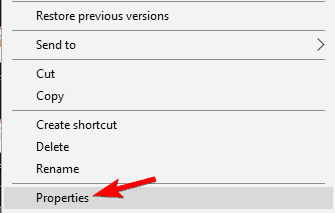
- Locate the setup file, right click it and choose Properties from the menu.
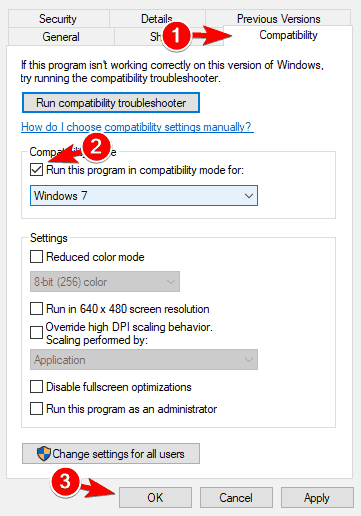
- When Properties window opens, go to Compatibility tab.
- Now check Run this program in compatibility mode for and select Windows 8 or Windows 7. Now you just have to click on Apply and OK to save changes.
In order to avoid network problems, it’s important to keep your drivers up to date. For more information on how to do that, visit our how to update drivers in Windows 10 guide.
To avoid issues such as these, it’s important to keep your drivers up to date, and there are multiple ways to do that. Downloading drivers manually can be a hassle, but luckily there are tools, such as PC HelpSoft Driver Updater, to help you out.
Using this tool you can update multiple drivers simultaneously, and fix corrupted drivers, with just a few clicks, so you might want to try it out.
⇒ Get PC HelpSoft Driver Updater
4. Reinstall your Network Adapter
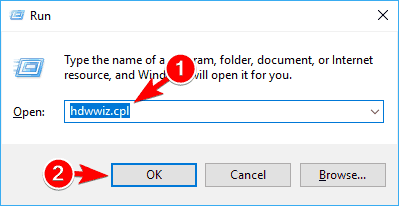
- Hold the Windows key and press R.
- Type hdwwiz.cpl in the input field and click OK.
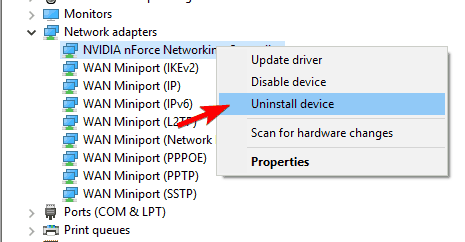
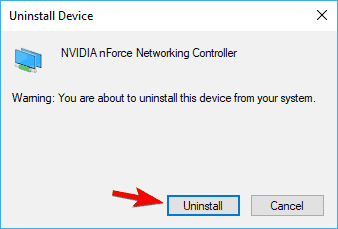
- Expand the Network Adapters, right click on your Ethernet card, and choose Uninstall device.
- When the confirmation dialog appears, click on Uninstall.
- Reinstall your network adapter using the driver accompanying the hardware.
If reinstalling the Ethernet card does not solve the problem, you should reinstall the network interface card using the latest version of the driver from the manufacturer’s portal.
5. Use Command Prompt
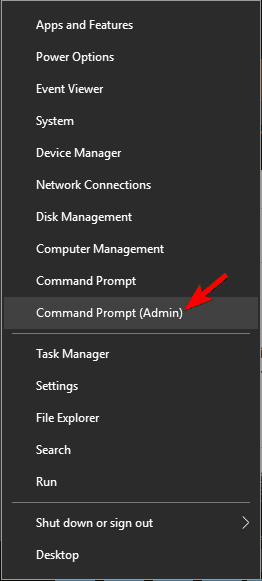
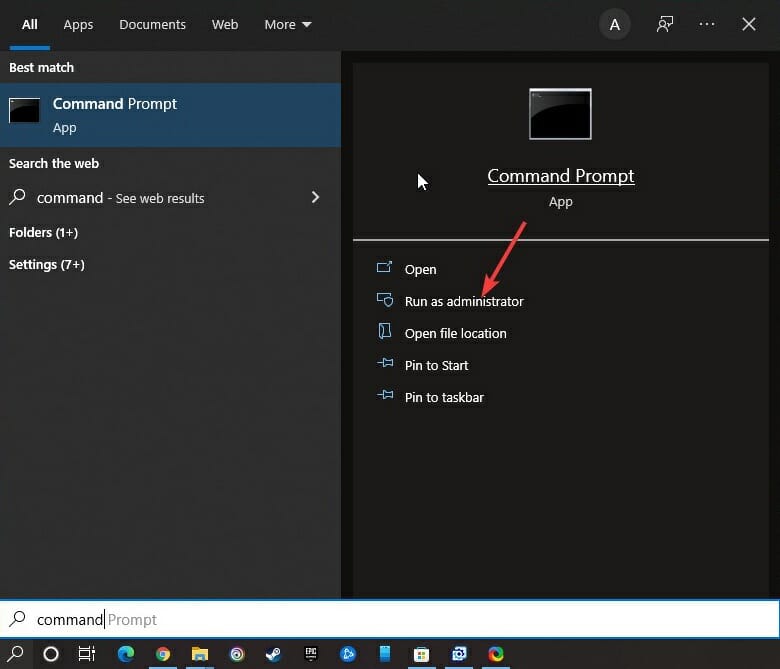
- Press Windows key + X and choose Command Prompt (Admin) from the menu. If Command Prompt isn’t available, feel free to use PowerShell (Admin) instead.
- When Command Prompt opens, enter the following commands:
- netsh winsock reset
- netsh int IP reset
After running these commands, you just have to restart your PC in order to apply the changes.
Many network issues are caused by malware, various scripts and bots. You can secure yourself by installing NordVPN, a leader in the VPN market. It protects your PC from attacks while browsing, masks your IP address and blocks all unwanted access.
6. Disable IPv6
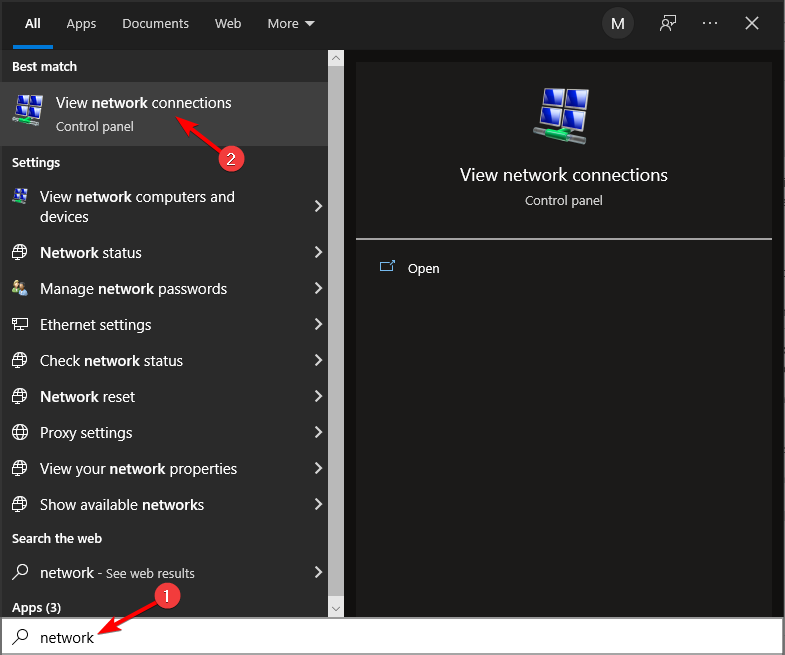
- Press Windows key + S and enter network connections. Select View network connections.
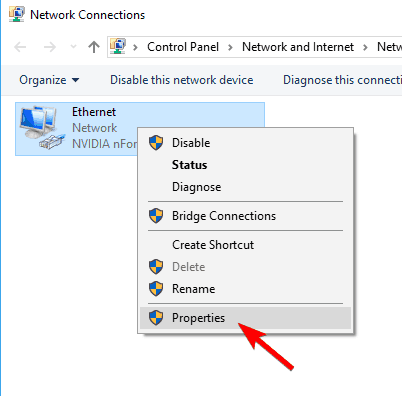
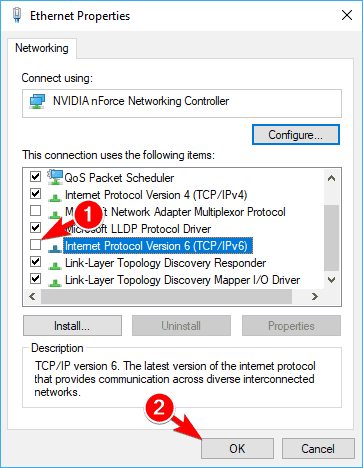
- Locate your network connection, right click it and choose Properties from the menu.
- Locate Internet Protocol Version 6 (TCP/IPv6) and uncheck it. Click on OK to save changes.
Several users are recommending disabling IPv6 using the Registry Editor. To do that, you need to follow these steps:
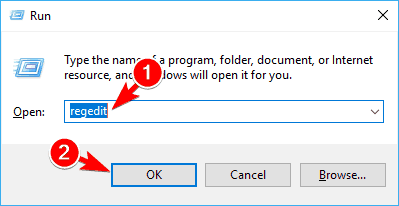
- Press Windows key + R and enter regedit. Press Enter.
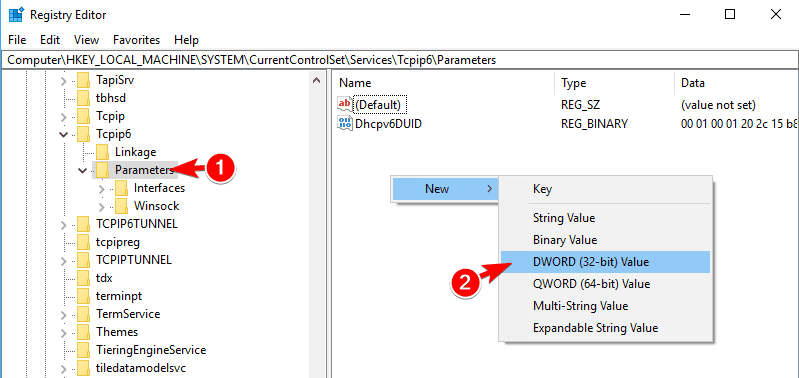
- When Registry Editor opens, in the left pane navigate to
HKEY_LOCAL_MACHINE\SYSTEM\CurrentControlSet\Services\TcpIP6\Parameters - Right click the empty space in the right pane and expand the New section. Now choose DWORD (32-bit) Value. Enter DisabledComponents as the name of the new DWORD.
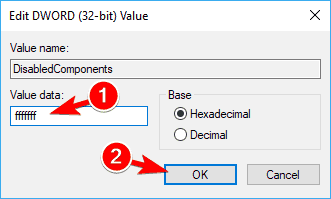
- Double click DisabledComponents to open its properties. Set Value data to ffffffff and click OK to save changes.
After doing that, IPv6 should be completely disabled on your PC. Now you just have to restart your PC in order to apply the changes. If you want to enable IPv6, just delete DisabledComponents DWORD from your registry.
If you don’t feel comfortable modifying your registry, Microsoft developed a tool that can disable IPv6 for you. Simply download Disable IPv6 tool and follow the instructions on the screen.
If you want to enable IPv6 again, you just have to download and use this tool.
7. Disable Microsoft Kernel Debug Network Adapter
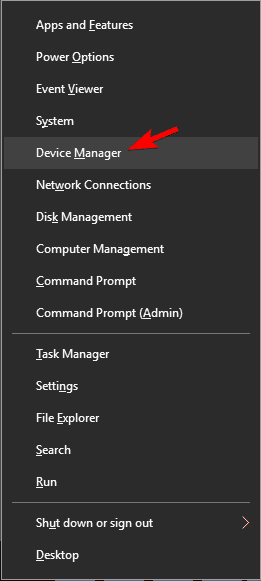
- Press Windows key + X and choose Device Manager from the list.
- When Device Manager opens, go to View and check Show hidden devices.
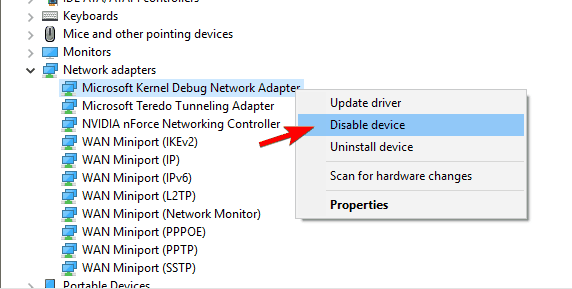
- Locate Microsoft Kernel Debug Network Adapter in Network adapters section. Right click the adapter and choose Disable device from the menu.
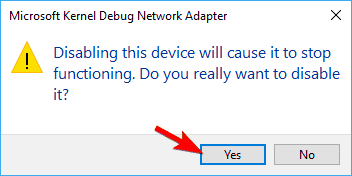
- A confirmation message will now appear. Click on Yes to disable the adapter.
8. Assign a MAC address to your network card
- Open Command Prompt as administrator.
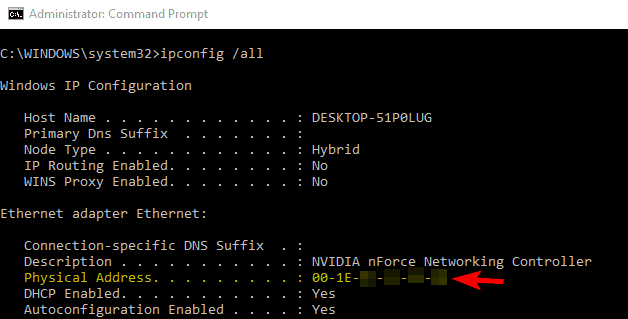
- When Command Prompt opens, enter IPconfig /all and press Enter to run it.
- List of information will now appear. Locate your network adapter and look for Physical Address value.
Now that you know your network address, you need to assign it to your network adapter. To do that, follow these steps:
- Open your network connection’s properties. We showed you how to do that in Solution 7, so check it for extra information.
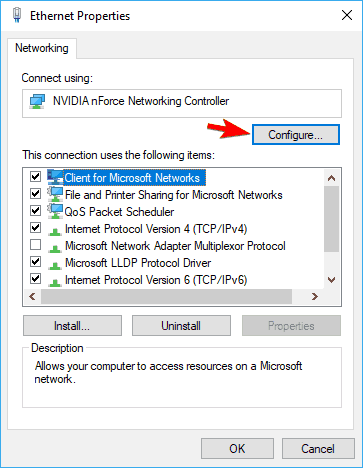
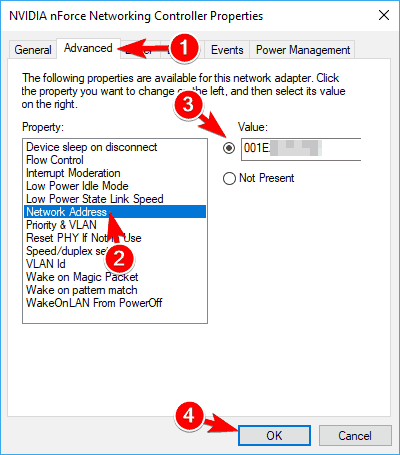
- When the Properties window opens, click on Configure button.
- Navigate to Advanced tab. Now you should see a list of properties. Select Network Address from the list.
9. Enable DHCP
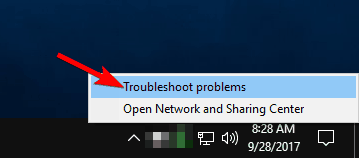
- Simply right click the network icon in your sysbar and choose Troubleshoot problems.
- Troubleshooting window will now appear and check for problems.
Users are also recommending to run additional troubleshooters. To do that, you need to follow these steps:
- Open the Settings app. You can do that quickly by pressing Windows key + I button.
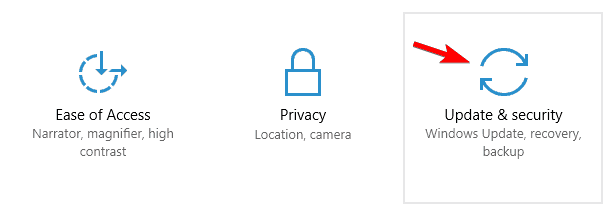
- When the Settings app opens, navigate to Update & security section.
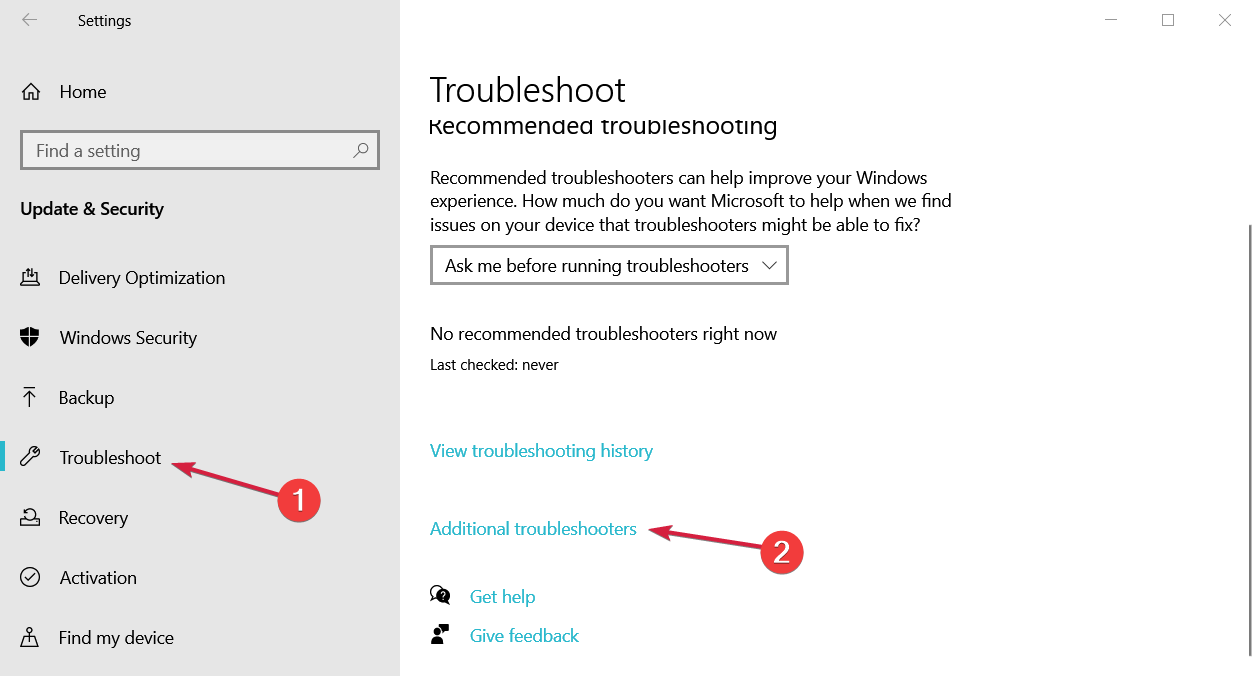
- Choose Troubleshoot and select Additional troubleshooters.
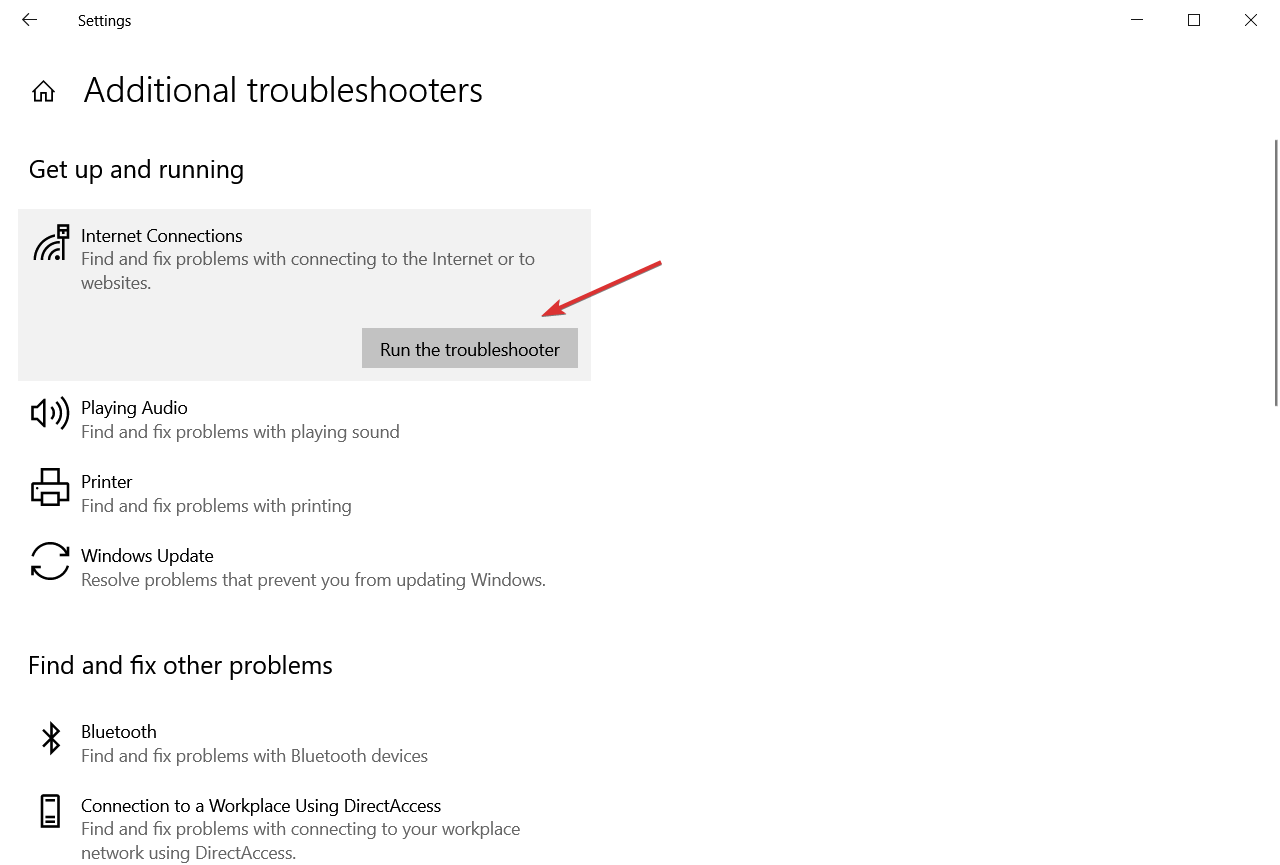
- Select Internet Connections and click on Run the troubleshooter.
- When the Troubleshooter window appears, follow the instructions on the screen to complete it.
If the troubleshooters can’t fix the problem, you might have to restart DHCP service manually from Windows.
To do that, follow these steps:
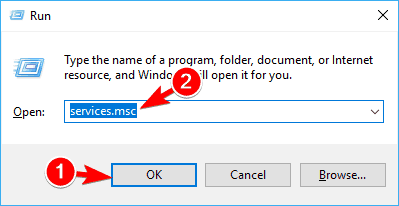
- Press Windows key + R and enter services.msc. Now press Enter.
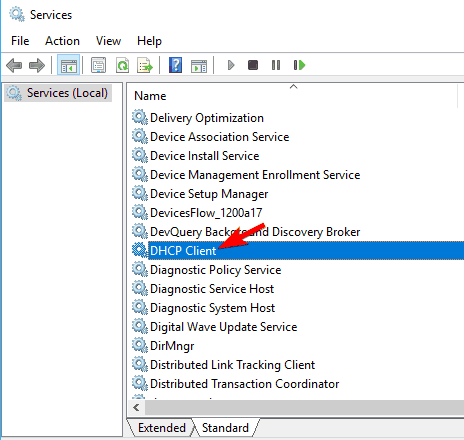
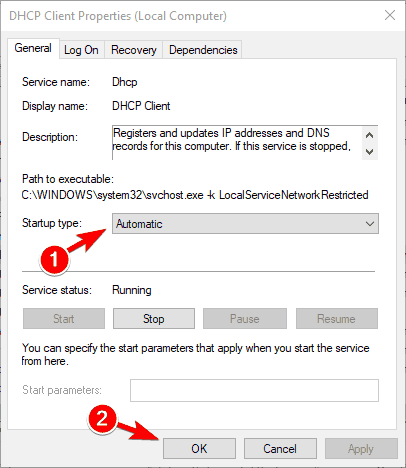
- When Services window opens, locate DHCP Client on the list and double click it to open its properties.
- Set the Startup type to Automatic and make sure that the service is running. Click on Apply and OK to save changes.
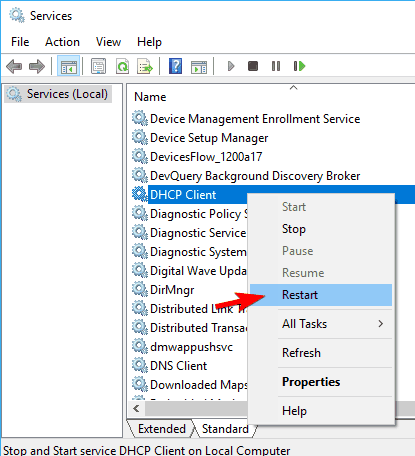
- Now right click DHCP Client and choose Restart from the menu.
- Confirmation message will appear. Click on Yes to proceed.
10. Perform a chkdsk scan
- Open Command Prompt as administrator.
- When Command Prompt opens, enter chkdsk c: /f and press Enter to run it.
- You’ll be asked to schedule disk checking. Type Y and press Enter.
11. Disable your network connection and change your adapter properties
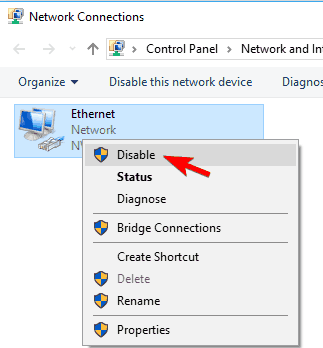
- Open the Network Connections window.
- Now locate your network connection, right click it and choose Disable.
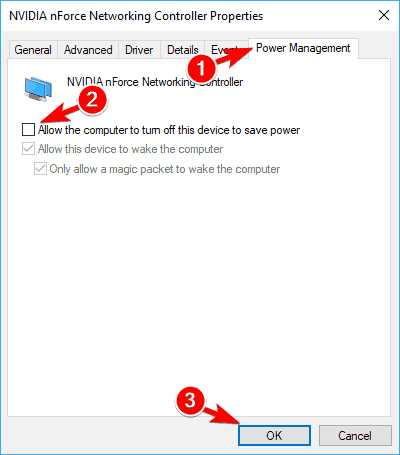
- Right click your network connection and choose Properties. Now click on Configure button.
- Navigate to Power Management tab and uncheck Allow the computer to turn off this device to save power option. Click OK to save changes.
12. Update firmware on your network devices
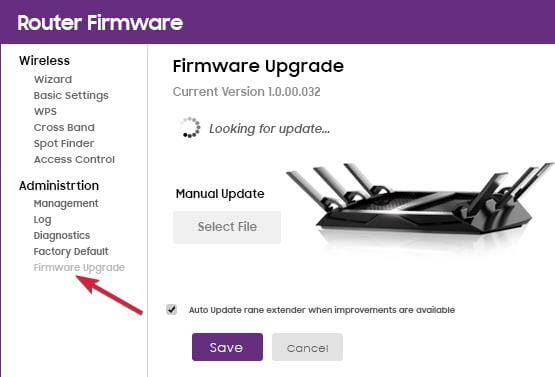
Several users reported Ethernet doesn’t have a valid IP configuration error due to problems with their firmware. Sometimes outdated firmware can cause the issue to appear, and in order to fix the problem, you need to update it.
We have a short guide on how to update your router firmware, so you might want to check it out for instructions.
13. Use IPconfig command
- Open Command Prompt or PowerShell as administrator.
- When Command Prompt starts, enter the following commands:
- IPconfig /release
- IPconfig /flushdns
- IPconfig /renew
If you can’t flush the DNS or IPconfig is causing you trouble, visit our IPConfig couldn’t flush DNS cache guide to see how to fix it.
14. Reinstall TPC / IP
- Open Network Connections window.
- Now locate your connection, right click it and choose Properties from the menu.
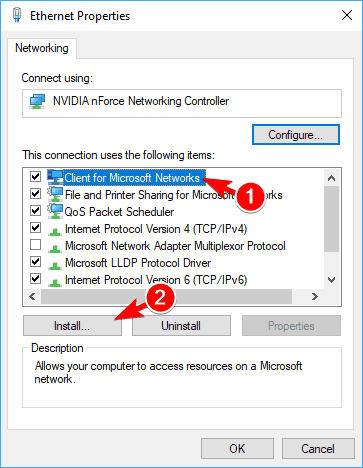
- Select Client for Microsoft Networks and click on Install.
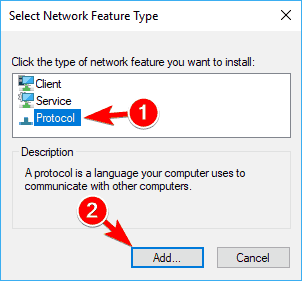
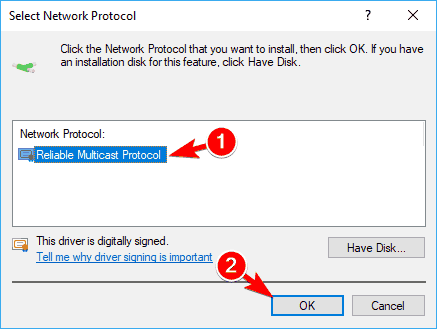
- Choose Protocol from the list and click on Add.
- Now you just have to select Reliable Multicast Protocol and click on OK.
15. Make adjustments to your registry
- Open Registry Editor.
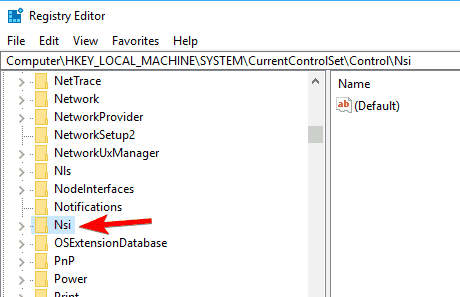
- In the left pane, navigate to
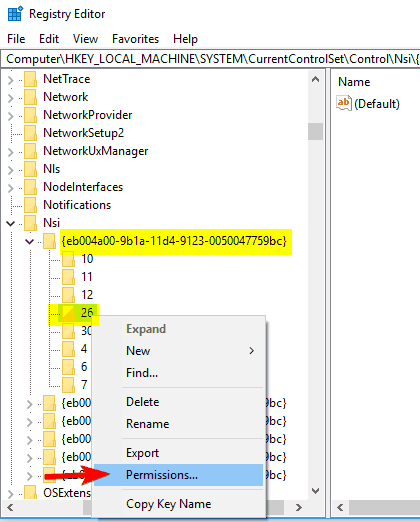
Computer\HKEY_LOCAL_MACHINE\SYSTEM\CurrentControlSet\Control\Nsi - Expand the Nsi key. You’ll see a several subkeys available. Expand the first subkey. In our example, the subkey was {eb004a00-9b1a-11d4-9123-0050047759bc}, but it might be slightly different on your PC. Now locate the 26 subkey, right click it and choose Permissions.
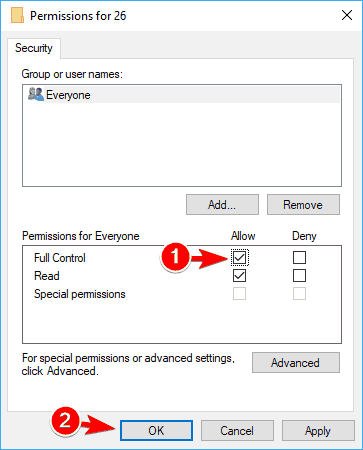
- When Permissions window opens, check Full Control in Allow column and click on Apply and OK to save changes.
- Optional: Some users are recommending repeating the steps from Solution 5 after making these changes, so you might want to do that as well.
16. Update your BIOS
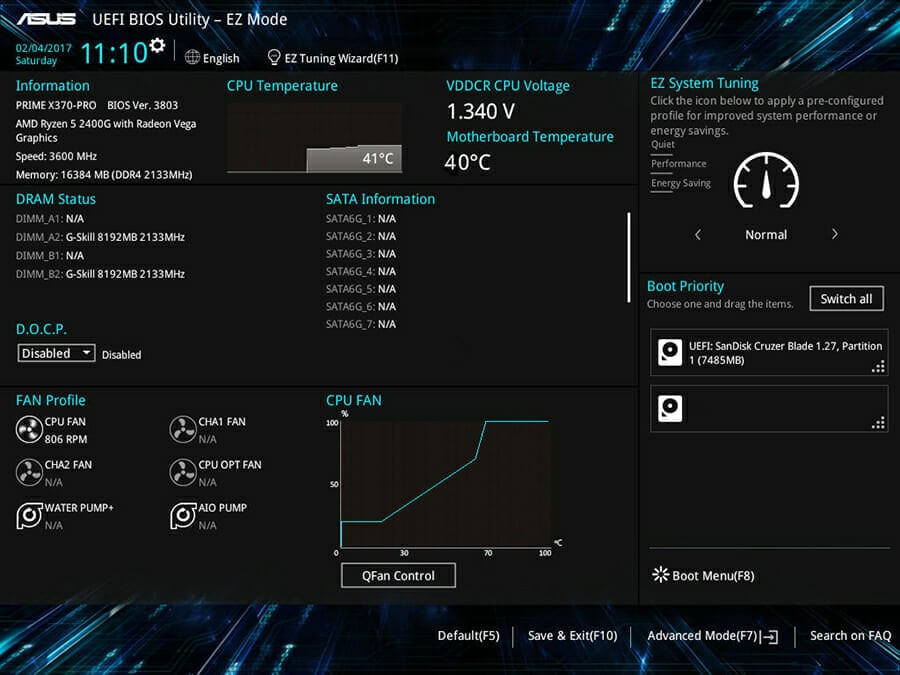
Several users reported they fixed this issue simply by updating their BIOS. Your built-in network adapter might not be fully compatible with your router or network hardware, and that can cause this issue to occur.
To fix the problem, you just need to update your BIOS. We have to warn you that BIOS update is an advanced procedure, and you can cause permanent damage to your PC if you’re not careful.
What can I do if Ethernet doesn’t have a valid IP configuration on Windows 11?
If you’re using Windows 11, you should know that you can use any of the solutions mentioned in this guide to fix the problem. This is a common issue, and the solutions are the same for all operating systems.
Since Windows 11 and Windows 10 are similar in terms of functionality, fixing this problem on both systems requires the same steps.
For in-depth solutions, visit our Ethernet doesn’t have a valid IP configuration in Windows 11 guide.
Before you update your BIOS, we strongly advise to check your motherboard manual for detailed instructions.
Ethernet doesn’t have a valid IP configuration error will prevent you from accessing the Internet, but we hope that you managed to solve this problem by using one of our solutions.
There are many network issues that you can encounter, and many reported that Ethernet keeps disconnecting, but that can be easily fixed.
We also have a guide on Windows has detected an IP address conflict message. This issue affects local networks, and we covered that in our local area connection doesn’t have a valid IP configuration guide.
If the problem is still there, check our dedicated Ethernet is not working guide to learn more.
Did you find a different solution to this problem? If so, let us know in the comments section below.







User forum
10 messages