How to Reset Excel to Default Settings: Quickest Ways
Reinstall Microsoft Office to troubleshoot this issue

If you’d like to reset Excel to default settings the process is pretty simple, especially if you don’t want to reinstall the app. However, we have the most effective solutions to do that below.
How can I reset Excel to default settings?
1. Reset individual menus
- Open Microsoft Excel.
- Click on the Tools menu and then click Customize.
- Right-click the menu you want to restore and then click the Reset button.
- This will restore the menu to its original settings.
- Repeat this procedure to reset all the menus which will restore Microsoft Excel to its default settings.
This is the most simple and quick option to reset Microsoft Excel. It is also the most convenient way since you might not want to reset all the Excel settings.
2. Reset the app using the Registry
- Press the Windows key + R to open the dialog box, type regedit in the search bar, and hit Enter to open the Registry Console.
- Navigate to the following registry path
HKEY_CURRENT_USER\SOFTWARE\Microsoft\Office\16.0\Excel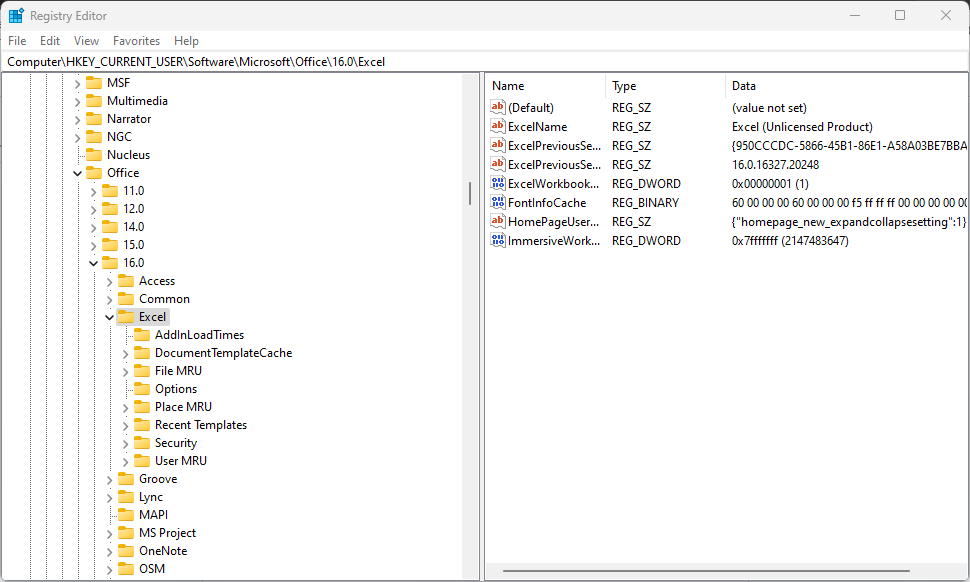
- It’s important to note that the version number (16.0) varies according to the Excel version installed on your PC. Sometimes, 12.0, 13.0, 14.0, or 15.0.
- On the left pane, click on the Excel registry key and locate the Options registry key.
- Right-click on the options registry key and select Delete.
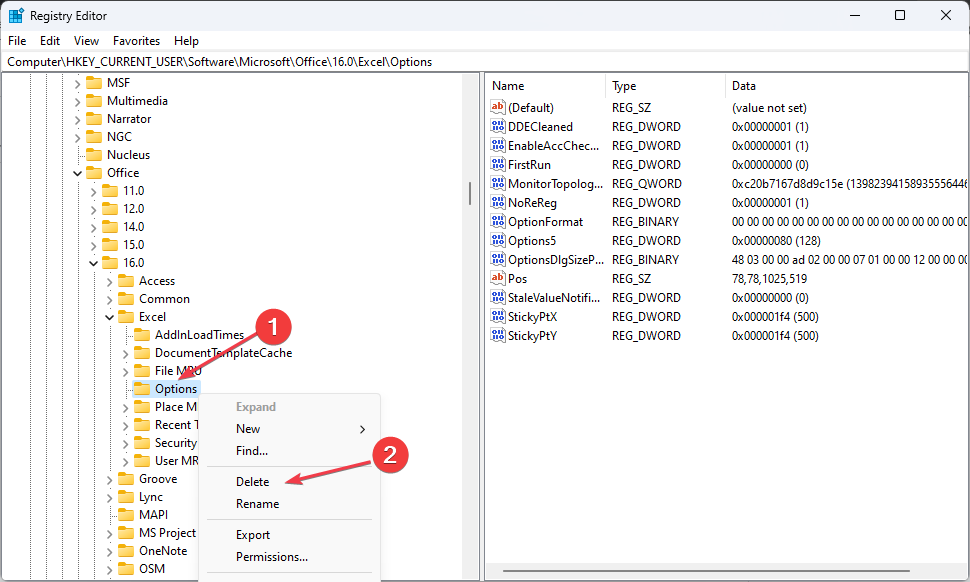
This registry key stores all the Excel customizations made by the user; deleting the key would remove all customizations made by the user and restore the application to its default settings.
3. Using PowerShell
- Press the Windows key, type PowerShell in the search bar, right-click on the result, and select Run as Administrator to open PowerShell in elevated mode.
- Copy and paste the following command in the PowerShell window and hit Enter:
Remove-Item -Path HKCU:\Software\Microsoft\Office\<Version>\Excel -Recurse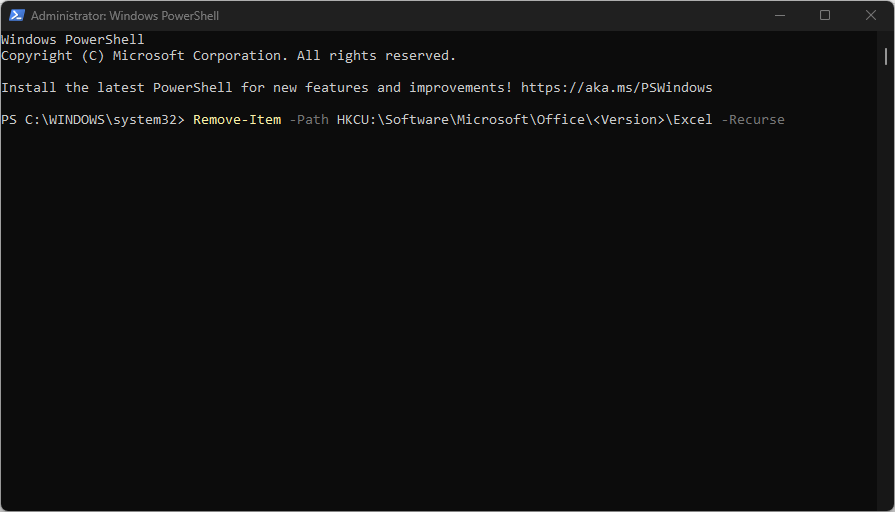
- However, you’ll have to replace the Version with the actual version of your Office 365 software, i.e., 16.0, 15.0, etc.
- Close the PowerShell window and check if Excel is back to default configurations.
4. Repair and Reset Microsoft Office
- Press the Windows key + R, type appwiz.cpl in the dialog box, and hit Enter.
- Under the Programs and Features section, locate MS Office, click on it, and select Change.
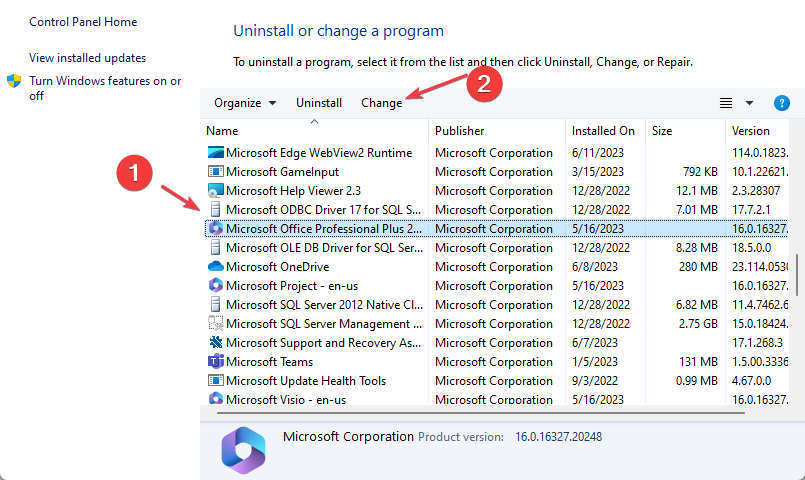
- In the popup window, click Quick Repair to restore Excel to default settings.
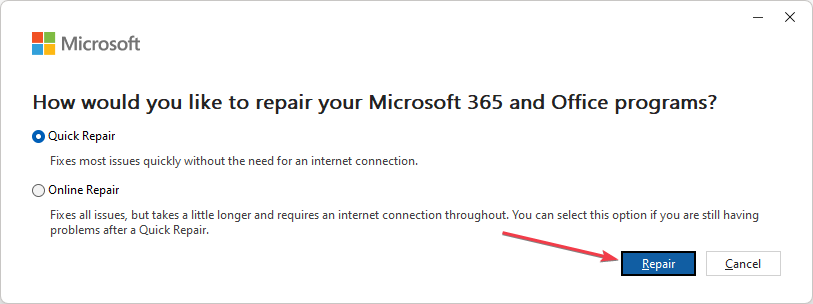
- If Quick Repair doesn’t fix the issue, select the Online Repair option and follow the onscreen instructions to complete the repair.
Another way to reset Microsoft Excel to default settings is to reset the Microsoft Office application. A reset will delete all the stored data and configuration and relaunch the app in its default state.
5. Reinstall Microsoft Office
- Press the Windows key, type the name of your browser, and hit Enter.
- Navigate to the Microsoft Support and Recovery Assistant (SARA) page and download the SetupProd OffScrub tool.

- Once the file is downloaded, double-click the SetupProd_OffScrub.exe file and follow the onscreen instructions to complete the installation.
- After the installation, click Yes in the user account control window. The tool will automatically start troubleshooting Microsoft Office in a new window.
- In the new window, click the checkbox next to Microsoft Office, and click Next to initiate the installation.

- Once the installation is complete, restart your PC.
- When your PC restarts, you’ll need to download the Office application from the Microsoft website.
- Once the file is downloaded, double-click the .exe file to run the installer and follow the onscreen instructions to complete the installation.
- Once the installation is complete, all Office applications will revert to default settings.
Reinstalling Microsoft Excel is usually the go-to option to reset an application to its default state. Once you uninstall the app, all the saved data and configurations are removed, at the next installation, the app will be installed in its default state.
Resetting Excel might be necessary, especially if you encounter larger issues, such as when Microsoft Excel cannot paste the data into the worksheet. You can also learn how to make an attendance sheet easily or turn off AutoSave.
If you’ve made customizations to the Excel app and want to remove them, you’d have to revert the Excel application to its default state. This article has provided the steps to reset Excel to default settings.
Read our disclosure page to find out how can you help Windows Report sustain the editorial team. Read more


Improve this guide


User forum
0 messages