Kernel Power 137: What is This Event ID & How to Fix it
10 min. read
Updated on
Read our disclosure page to find out how can you help Windows Report sustain the editorial team. Read more
Key notes
- The Kernel Power error 137 has affected several Windows users, restricting them from using their PCs optimally.
- This error pops up after random restarts or file corruption. It can also occur because of a hardware problem or a faulty driver.
- You can follow the guide below that includes some effective solutions that have helped users resolve the problem.
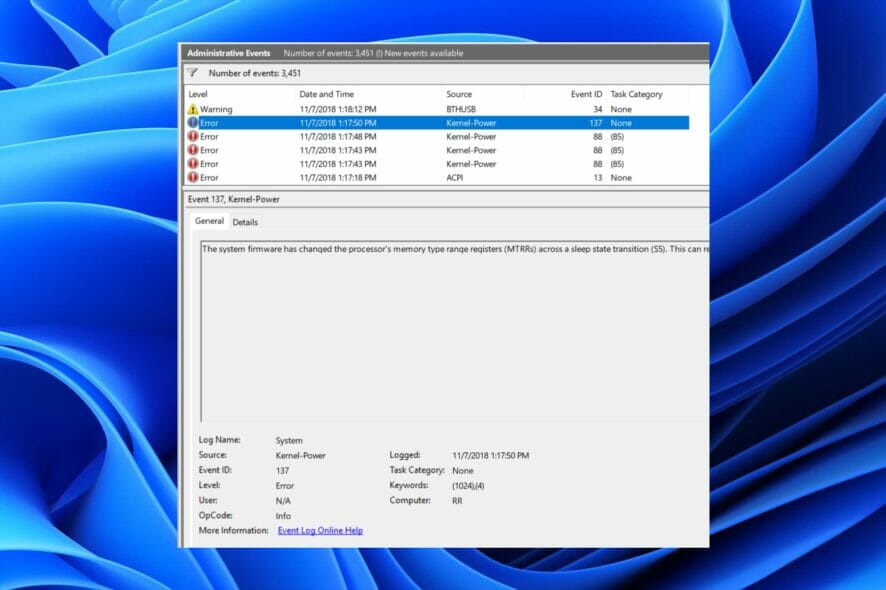
As a Windows user, you will come across multiple system-related issues. While some issues are normal and can be fixed by a simple restart, for some, you need to go a step beyond simply restarting your PC.
One such error is the Kernel Power error 137. Notably, this issue is a critical system error, and if you come across it, you need to apply some measures to cure it otherwise, your system will crash.
The Kernel Power error 137 can trigger multiple system problems. It is related to a power issue, but just like every other Windows error, it could trigger because of multiple reasons.
According to the user reports, Kernel Power error 137 isn’t always triggered because of a power supply issue. It can be related to your system hardware or some important system files.
While the exact reason isn’t known, there are a few solutions that you can apply and possibly resolve the issue.
In this guide, we will give you some effective solutions that will help you fix the problem. Let us check them out.
What is Kernel Power error 137 on Windows?
Before we go ahead and check out the solutions, let us first understand the reasons why Kernel Power error 137 pops up on Windows.
Although, after multiple bugfix updates, both Windows 10 and Windows 11 are termed as quite stable, you will experience multiple issues using the OS.
Kernel Power error 137 is considered to be one of the most critical errors that your Windows PC will throw up and the cause of it can be a variety of reasons.
The most common reason for this issue is a power supply failure. A power supply failure to the hardware attached to the system isn’t always the reason for this issue.
Reportedly, out-of-date Windows, corrupt system files, faulty PSU, etc., are some of the reasons that could trigger the Kernel Power error 137 on the Windows issue.
Moreover, the Kernel Power error comes attached with an Event ID. This Event ID accompanied by keywords makes it easier to pinpoint the bug and troubleshoot the process.
How can I fix Kernel Power error 137 on Windows?
1. Update drivers
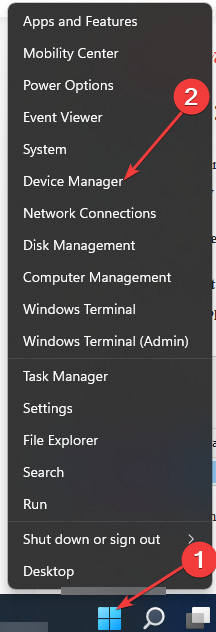
- Right-click on the Start menu icon.
- Select Device Manager.
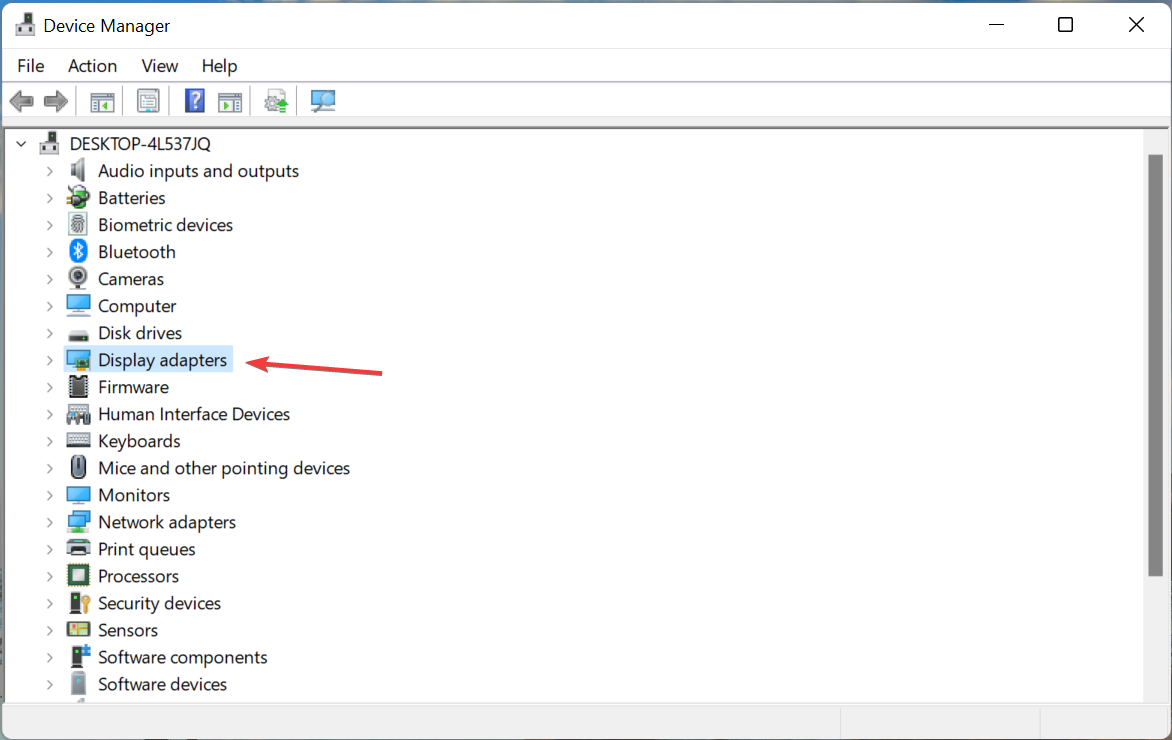
- Expand the Display adapters.
- Right-click on your graphics driver and choose Update driver.
- Chose the Search automatically for drivers option.
Your system will now search the official servers for a driver update and, if available, will prompt you to install it.
Updating the graphics driver has helped multiple users fix the Kernel Power error 137 on Windows. Although the above method is easy to follow, there is a better way of updating all of your device drivers in one go.
You can use a reliable all-in-one tool called PC Helpsoft Driver Updater. It is a multi-specialty tool for all your driver-related needs. This software scans your PC for all outdated drivers, displays the result, and prompts you to take the necessary action to fix the driver-related problems.
Some of the other notable features of the tool are fixing faulty or broken driver files, updating old device drivers, locating missing drivers, etc.
⇒ Get PC HelpSoft Driver Updater
2. Disable the fast startup option
- Open the Start menu.
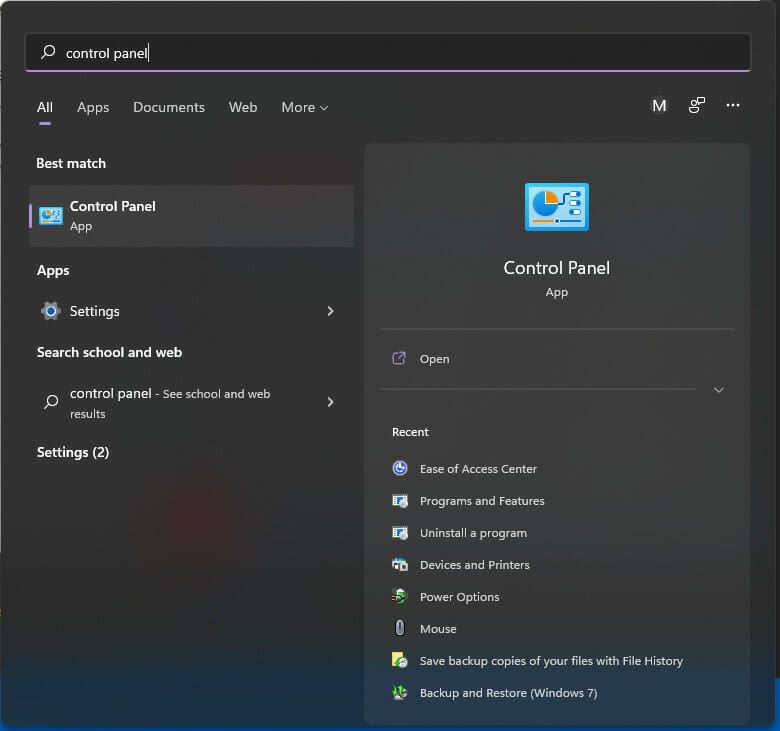
- Search for Control Panel and open it.
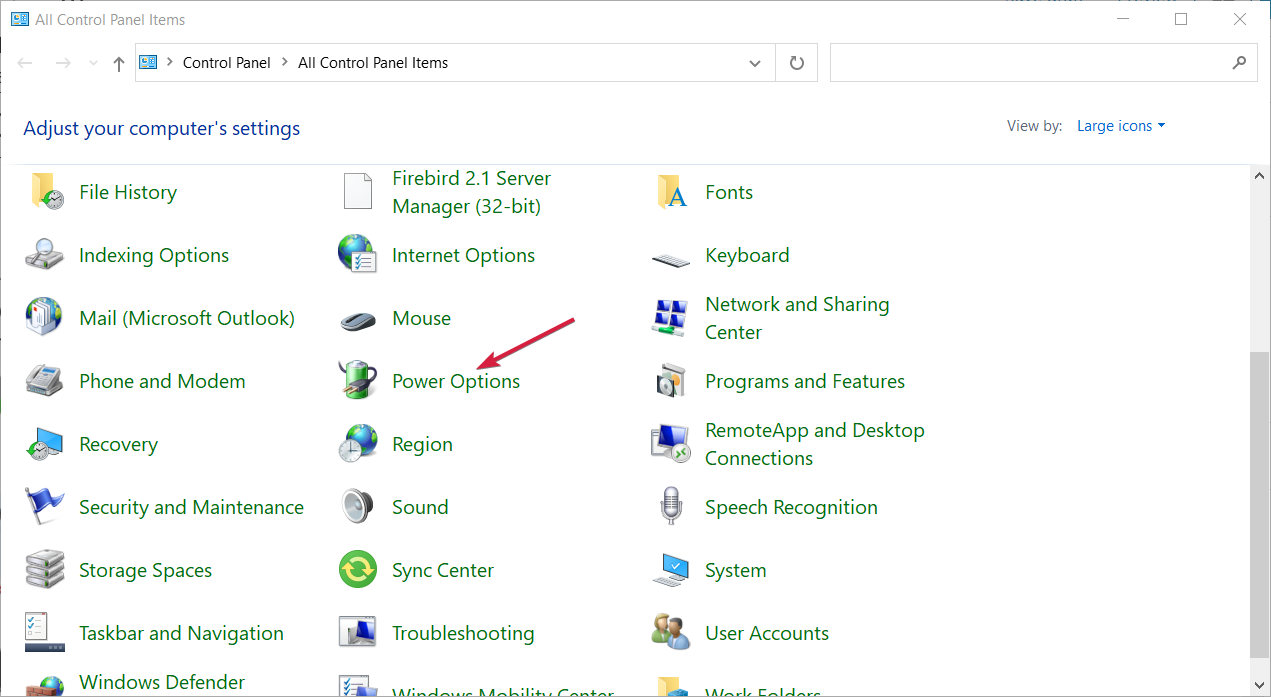
- Click on Power Options.
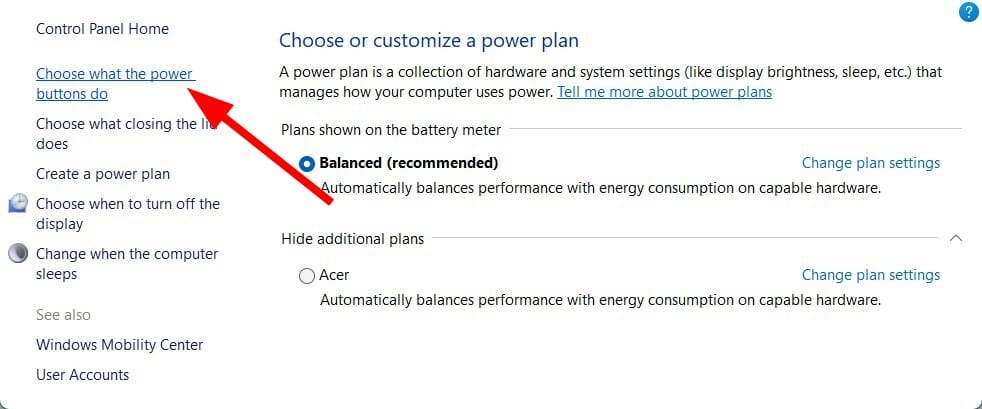
- On the right side, click on Change what the power buttons do.
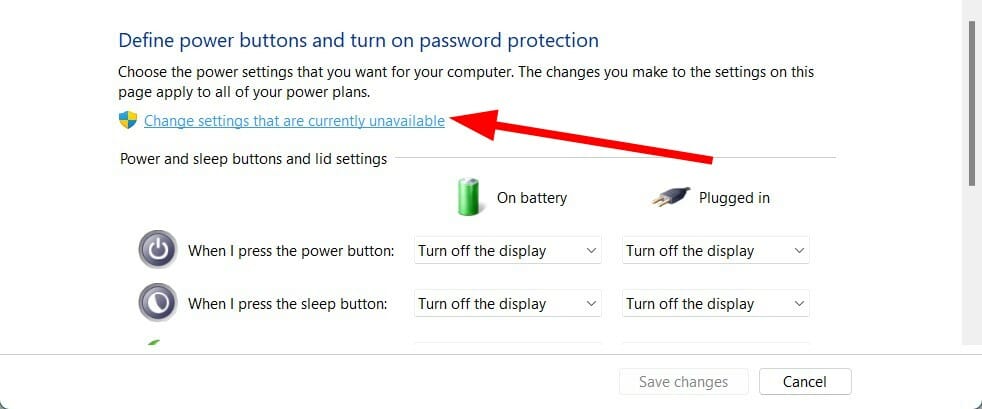
- Click on Change settings that are currently unavailable.
- Scroll down and uncheck the Turn on fast startup (recommended) option.
Turning off or disabling the fast startup option lets your PC startup take its own time loading all the necessary files, from scratch.
When this mode is turned on, while it won’t cause issues often, it does not shut down your PC completely. Rather, it puts your PC in a sort of hibernation mode.
You can follow the above steps and disable the fast startup option to see if this resolves the Kernel Power error 137 on Windows.
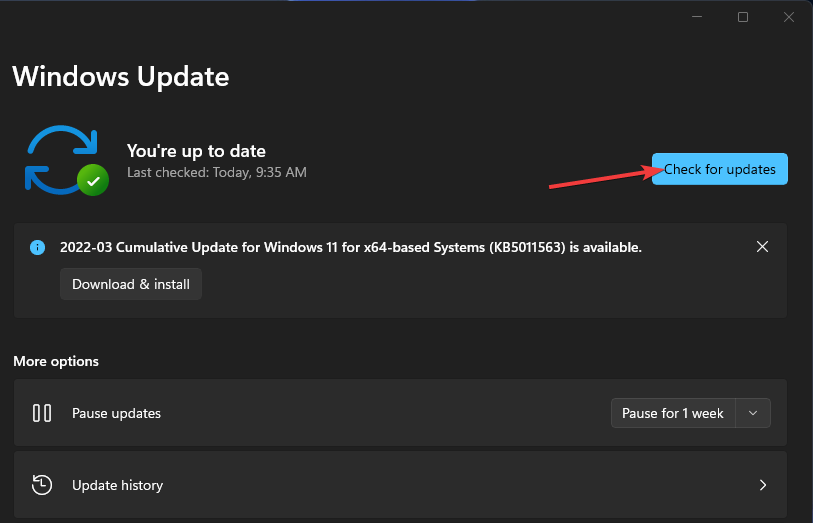
3. Update Windows
- Press the Win + I buttons to open Settings.
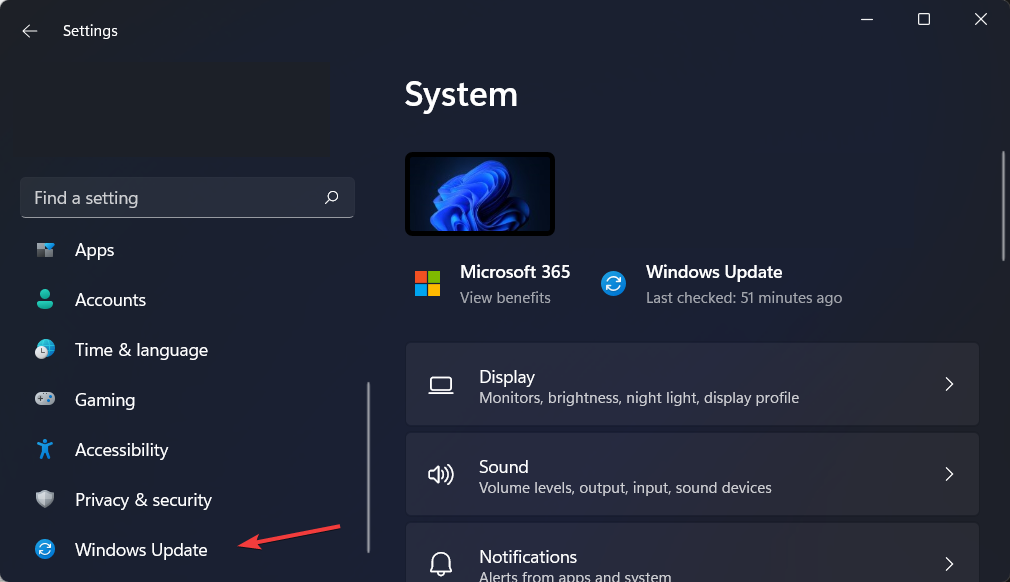
- Select Windows Update from the left pane.
- Click on Check for updates button.
Microsoft releases updates quite frequently, that not only add features but also multiple bug fixes. There are chances that a bug in the previous version of the update has triggered the Kernel Power error 137 on your Windows PC.
We recommend you keep your PC up to date, along with all the drivers, to enjoy the optimum performance from your drivers and PC.
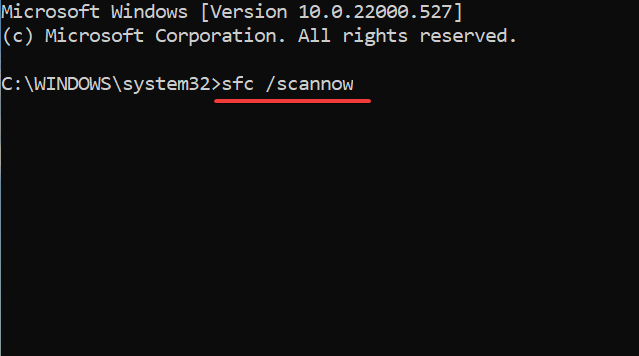
4. Run the System File Checker
- Search for Command Prompt in the Start menu.
- Run it as an administrator.
- Type in the below command and press Enter:
sfc/scannow
SFC scan command will check your PC for any corrupt or faulty drivers and system files. If it finds one, the System File Checker will automatically fix it.
Once the scan is completed, restart your PC and see if this fixes the issue or not. To take things a step ahead, you can use trusted third-party software that will help resolve the issues caused by corrupt system files. It is a known fact that corrupt system files can hamper the smooth functioning and stability of the PC.
In such a scenario, you can give a try to PC repair tool and see if it resolves your problem or not, which it probably should, because of all the features it packs.
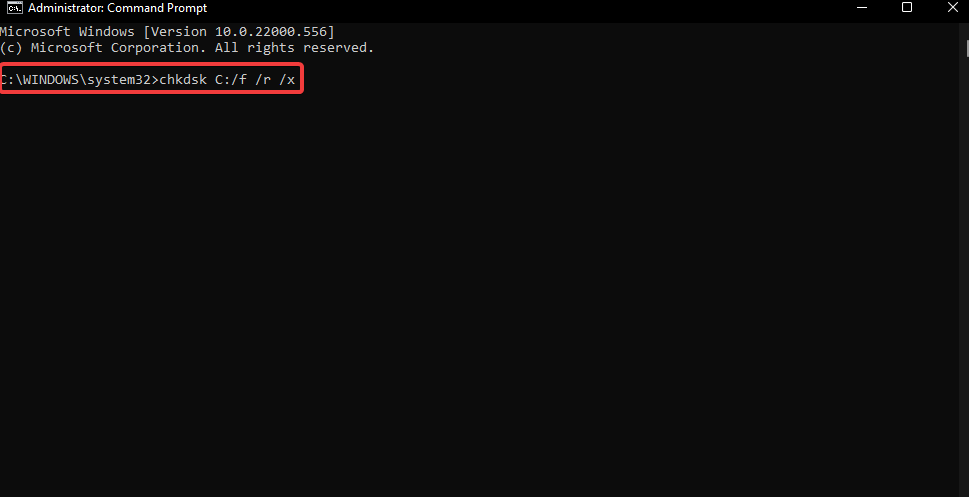
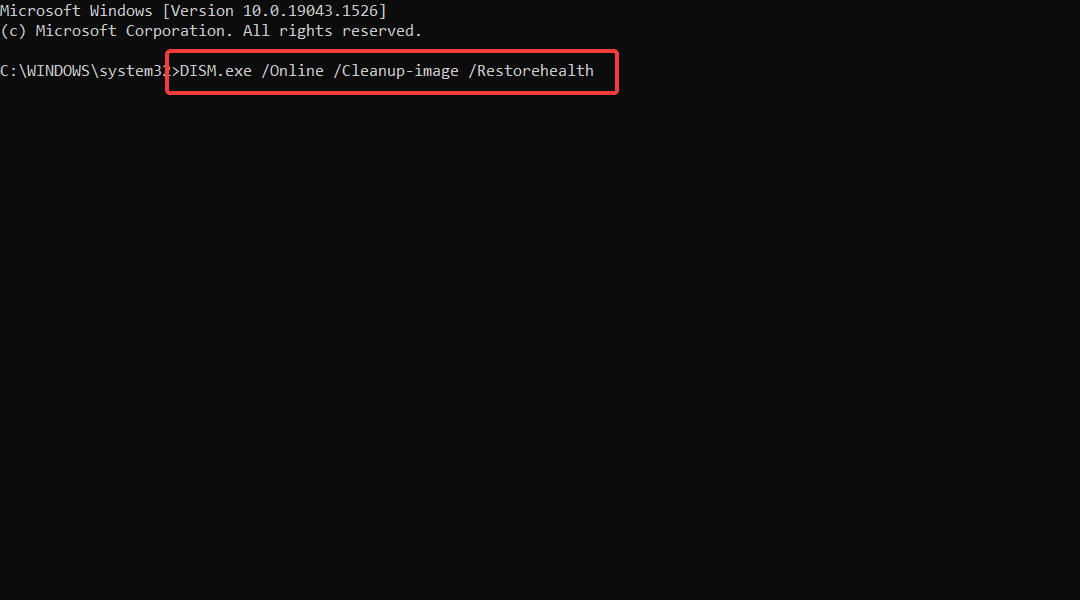
5. Run CHKDSK and DISM command
- Search for Command Prompt in the Start menu.
- Run it as an administrator.
- Type in the below command and press Enter.
chkdsk /r - Once the chkdsk process completes, type the below command and press Enter.
DISM /online /cleanup-image /restorehealth - The process can take up some time, but do not interrupt it.
- Restart your PC after the process gets completed.
6. Check for viruses and malware
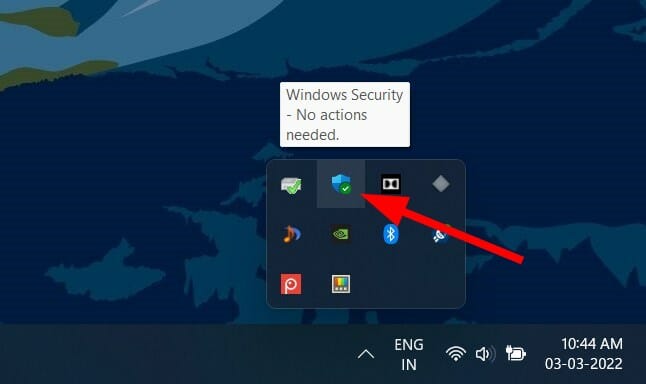
- Click on the upward arrow button on the bottom-right taskbar panel.
- Select Windows Security.
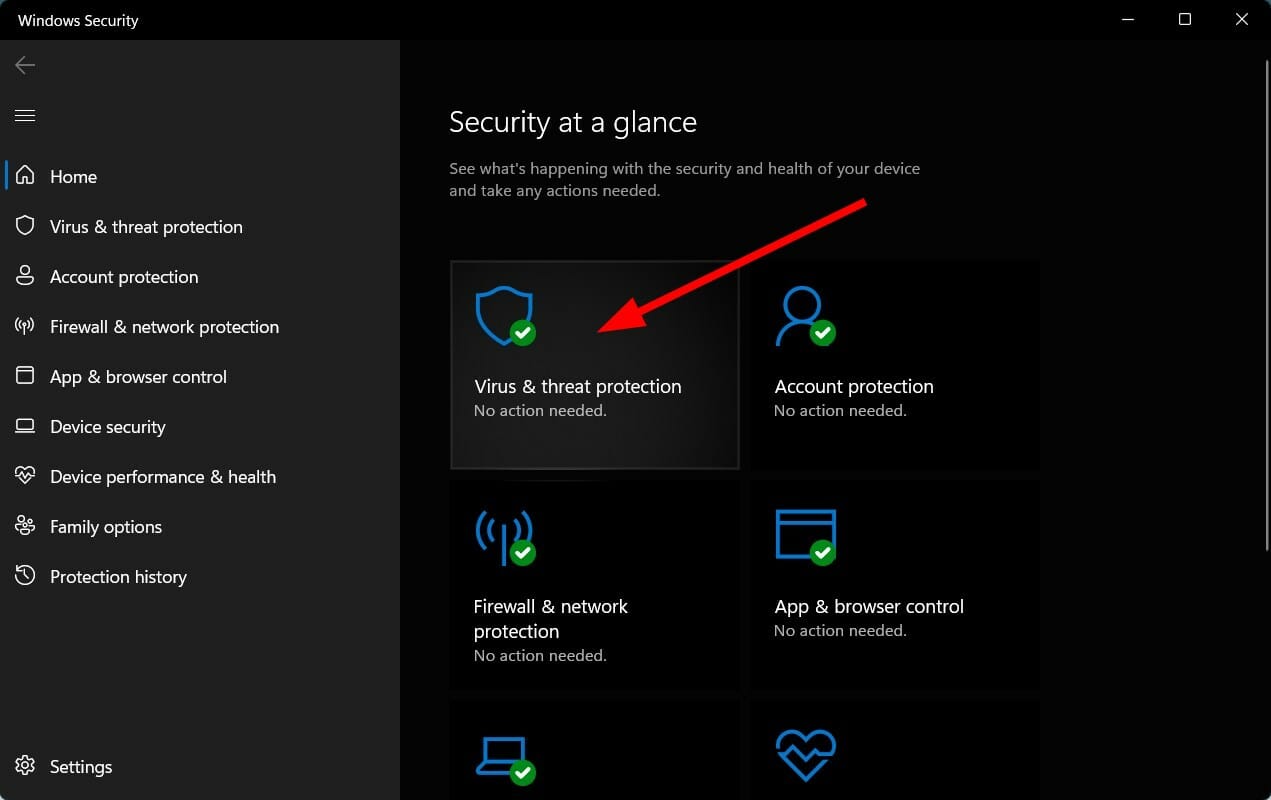
- Click on the Virus & threat protection option.
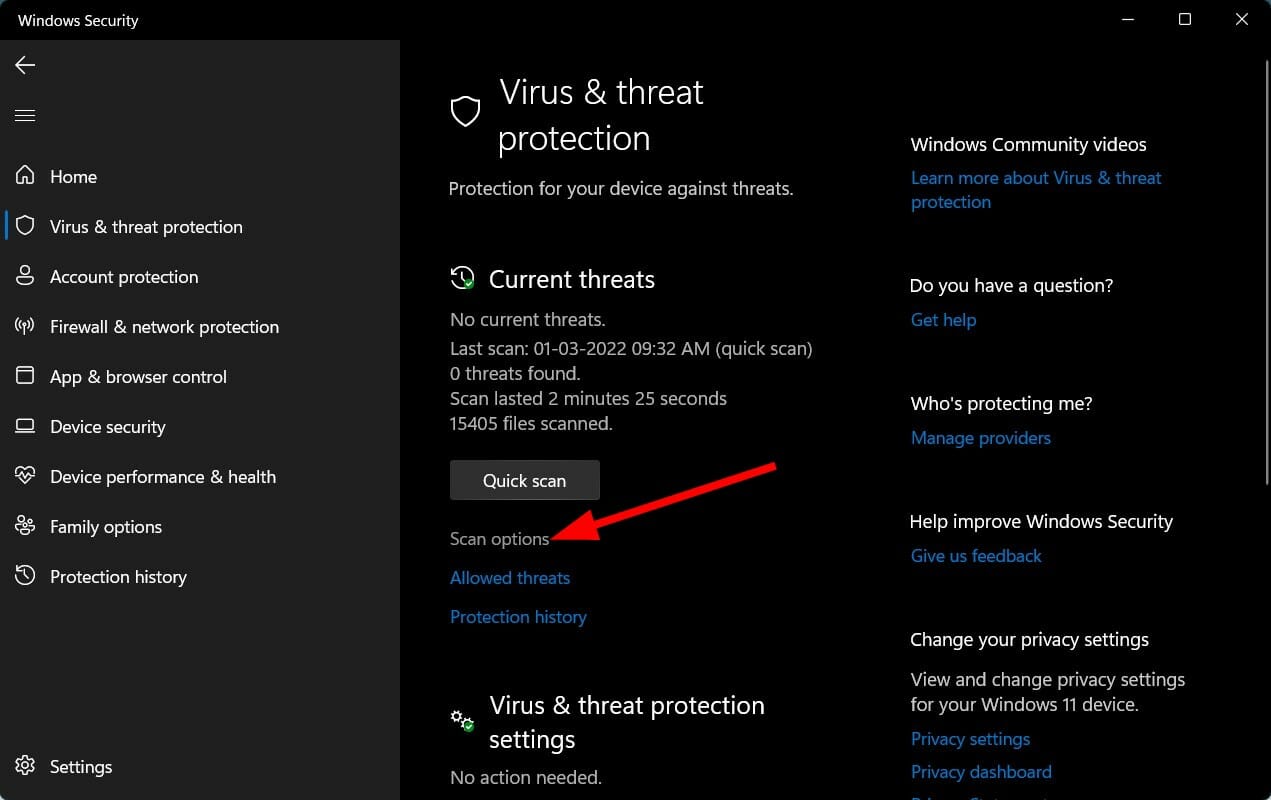
- Select Quick Scan.
- You can also select the Scan options button.
- Under Scan Options, choose Full scan to deeply scan your PC for viruses or malware.
There is no denying that presence of a virus or malware could interfere with the normal functioning of a PC. When your PC is infected by a virus or malware, you will experience multiple issues, including error messages, etc.
While Windows Security Essentials can be used, there is numerous multiple third-party antivirus software that can assist you in detecting and removing viruses or malware from your PC.
However, we would recommend that you use ESET HOME Security Essential. This antivirus software comes with payment protection, firewall, parental control, antivirus, anti-ransomware, anti-phishing, and much more. You can give ESET HOME Security Essential a try and scan your PC for viruses or malware.
If you use Norton antivirus software, then we’ve got a dedicated guide for Norton users. Moreover, if you’re using McAfee, you can check out our dedicated guide to learn how to use it and remove viruses or malware from your PC.
7. Change power plan
- Open the Start menu.
- Search for Control Panel and open it.
- Click on Power Options.
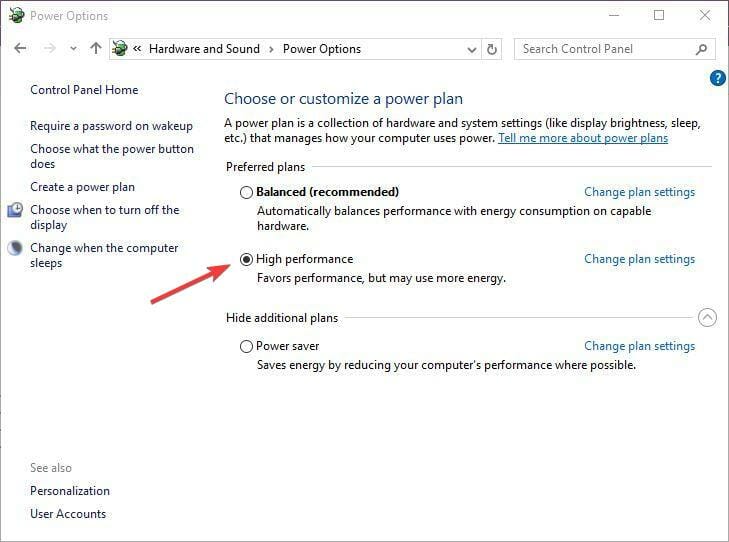
- On the right side, select Additional power settings.
- Select High performance, under Preferred plans.
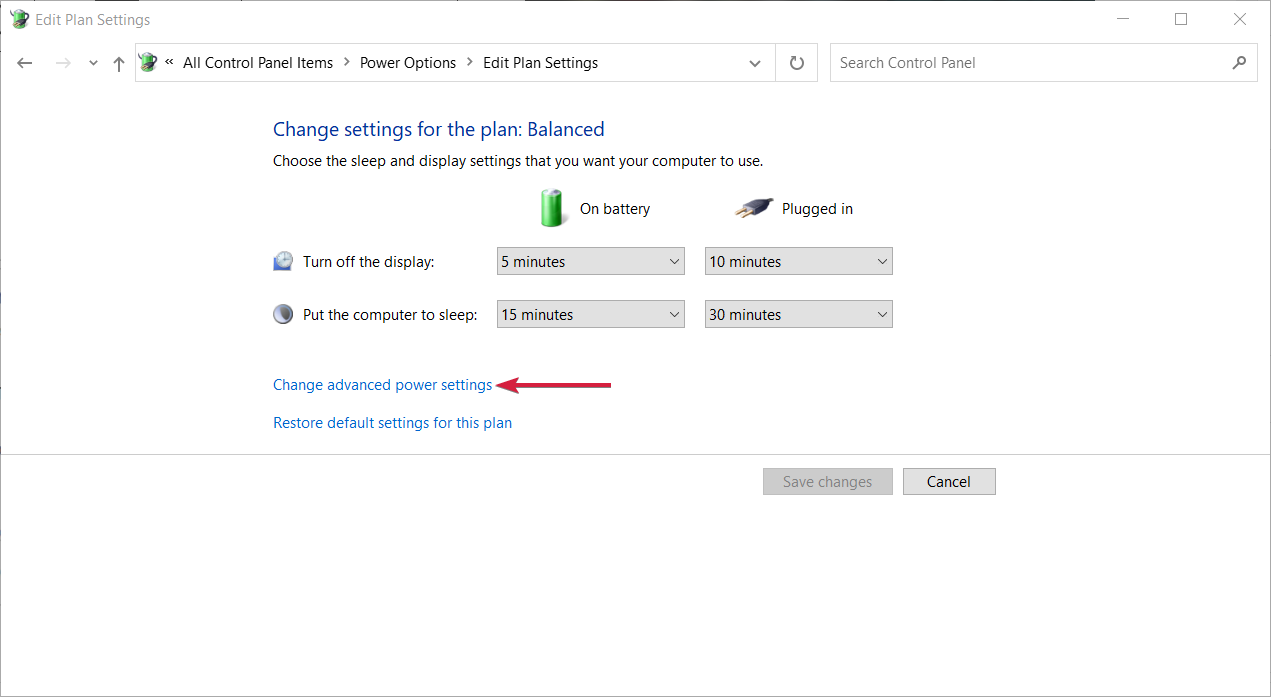
- Click on Change plan settings.
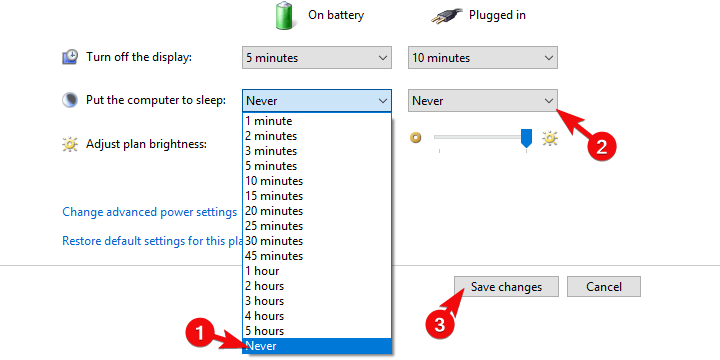
- Select Never from the drop-down menu for Put the computer to sleep.
- Click on Change advanced power settings.
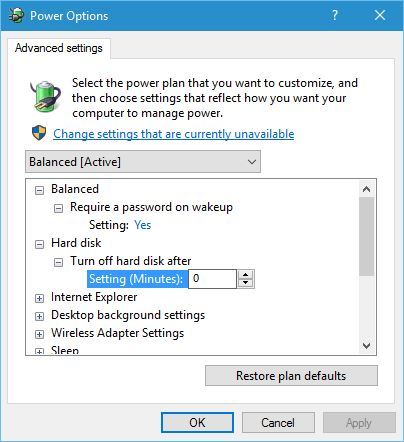
- Expand Hard disk.
- Expand Turn off hard disk.
- Change the Settings (Minutes) to 0.
- Click Apply and OK.
- Restart your PC and check if this fixes the issue or not.
It might be best if you could change or tweak your power plan settings, as several users have reported that tweaking the power plan of their PC helped them fix the problem.
If you cannot find the Power Plans option on your Windows PC, then you can check out our dedicated guide on it.
8. Turn off hibernation
- Open the Start menu.
- Search for Command Prompt and open it as an administrator.
- Execute the below command.
powercfg /hibernate off - Restart your PC and it should fix your problem.
9. Reset Windows 11
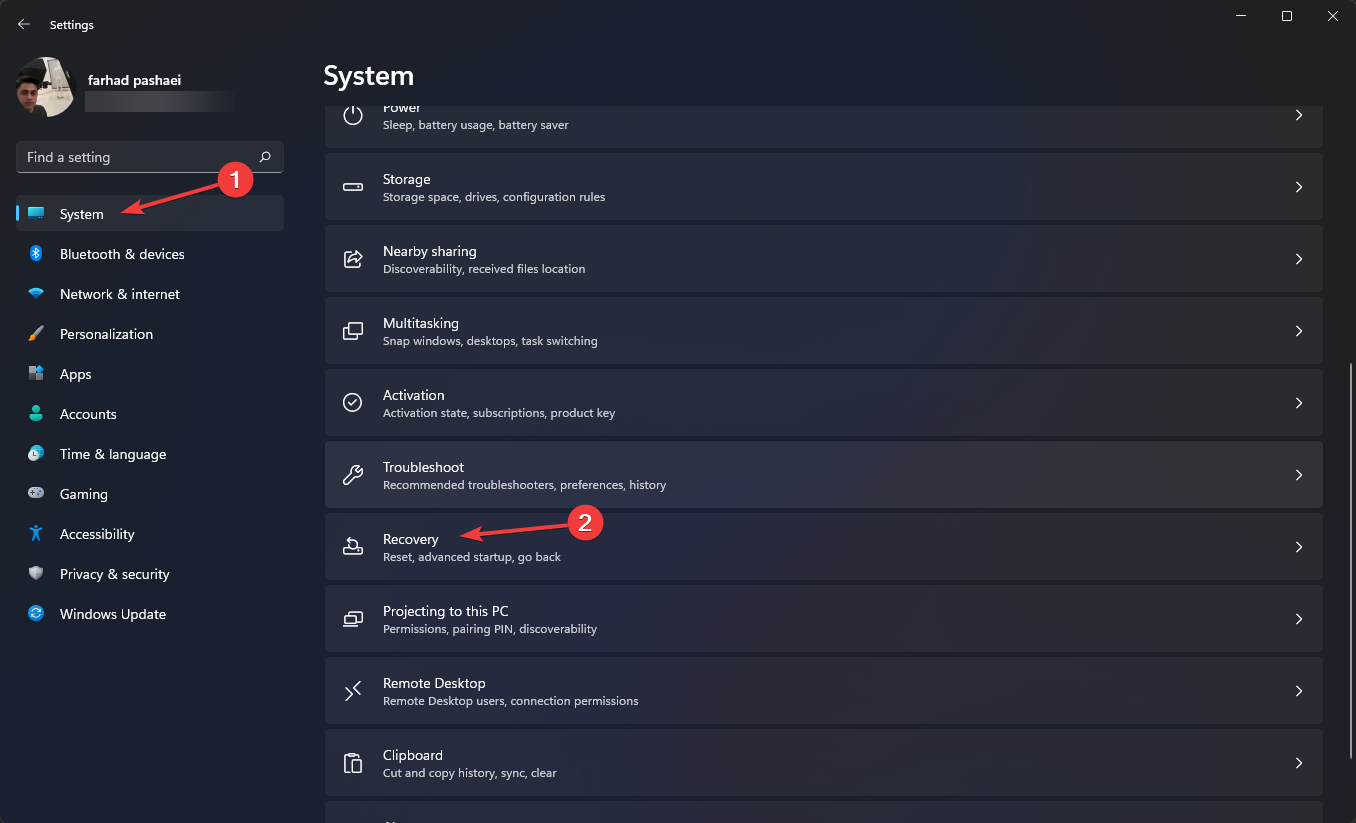
- Press the Win + I buttons to open Windows Settings.
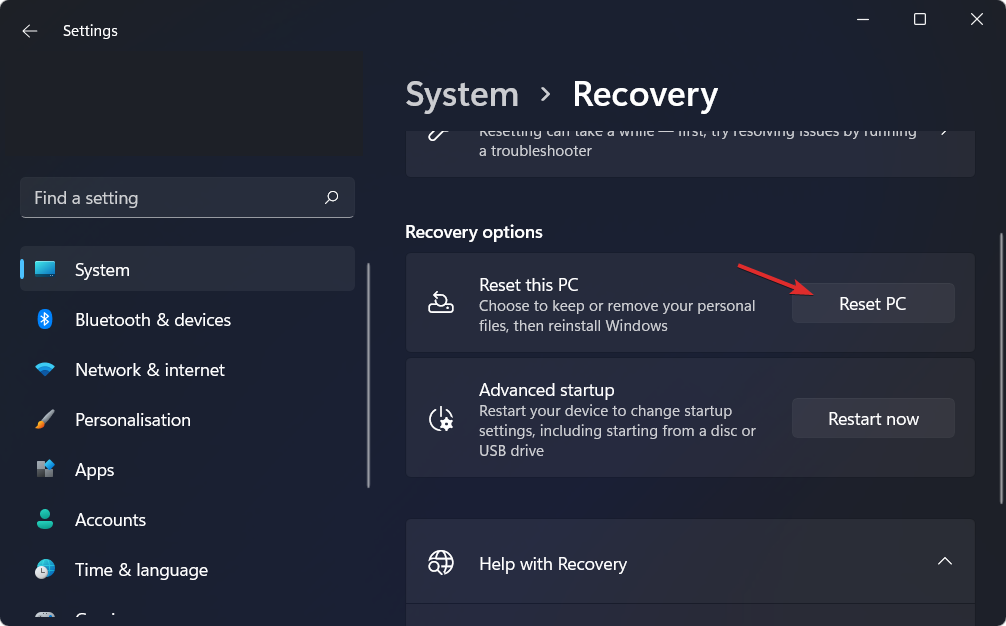
- Click on Recovery from the right side.
- Under Recovery options, press the Reset PC button.
- Select the type of factory reset your want to perform.
- Choose the option how you would like to reinstall Windows.
- Click Next.
- Hit the Reset button.
You should only use a factory reset if none of the other methods have worked for you. Resetting gives a clean slate for your PC to work on.
There are chances that some files went missing during the previous installation, and that is what is causing the Kernel Power error 137. You can reset your PC and check if this fixes the issue or not.
10. Replace the PSU
As a last resort, you can try replacing the PSU (Power Supply Unit) with a new one. It would be better if your PC is still under warranty, as you could get the PSU replaced for free.
If it isn’t under warranty, then you have to replace the PSU by yourself. However, before you buy a new PSU, it is recommended that you test it.
If you have no idea how to replace the PSU or which PSU to buy, you should seek the help of an expert or go to the computer repair store.
What else can I do to prevent or solve Kernel Power error 137?
Although the above methods or solutions should be sufficient enough to tackle and resolve the Kernel Power error 137 on Windows, if nothing helps you fix it, we have a bunch of other tips that you can apply and possibly fix the problem.
➡ Update the BIOS
If you have the technical knowledge and know the whereabouts of your PC, then you can go ahead with this method of updating your BIOS.
To safely update your BIOS, you need to refer to the manual for your motherboard. The instruction manual will include all the details about how you can update your BIOS without causing any damage to your PC.
If you aren’t comfortable doing this, then again, we would advise you to call or take your PC to a computer technician and let them update your BIOS.
➡ Check for faulty hardware
Faulty hardware is one of the main reasons you will come across Kernel Power error 137 on Windows. Below is a list of hardware problems that can cause this error.
- If any of your PC’s hardware is overheating or overclocking, this could put an immense load on the motherboard, causing it to restart multiple times. Ultimately throwing up the Kernel Power error 137.
- If your RAM has not been cleaned for years or the connectors have attracted dust, then your PC will have a hard time communicating with the RAM. Simply take out the RAM clean it with a soft, dry cloth, clean the connectors with a soft brush, and insert it back again.
- If the power connectors of the graphics card are full of dust, wrongly attached, or damaged, then also you will get Kernel Power error 137.
- If the power supply is faulty, damaged, or not connected properly to your PC, then it can cause multiple issues, including the one at hand.
Let us know which one of the above-mentioned solutions helped you fix the Kernel Power error 137 on Windows in the comments section below.
Feel free to share any other tips, tricks, or solutions that helped you get the job done. This might help others facing the issue resolve the problem.







User forum
0 messages