Your Linksys router is not resetting? Fix it with these steps
3 min. read
Updated on
Read our disclosure page to find out how can you help Windows Report sustain the editorial team Read more
As you may have noticed with most router fixing guides, the ultimate solution is usually to reset it and then re-do the settings. However, some routers have issues with this operation.
For example some, Linksys routers don’t seem to reset, even when you push the button in the back.
This is a rather common problem, so we’ve decided to create a step-by-step guide to show you how to reset your Linksys router with ease.
What can I do if my Linksys router will not reset to factory defaults?
1. Perform a 30/30/30 reset
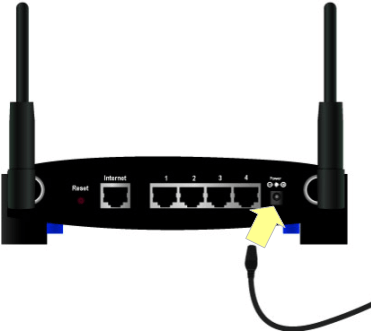
- While the router is plugged in and powered on, press and hold the Reset button for 30 seconds.
- Unplug the router from its power source, while still holding down the button for 30 seconds once more.
- Then, turn the power back on.
- Continue holding Reset for another 30 seconds.
- Release the Reset button and leave the router for about 10 seconds.
- Disconnect the power cord for another 10 seconds, then reconnect.
This option is pretty straightforward as all you have to do is to press and hold this button for about 10 seconds until the Power LED will start flashing.
When this doesn’t work, reset the device to the factory default settings using the 30-30-30 method. Your router should respond to the 10 seconds reset method, but this approach won’t do any harm either.
Note: once you have successfully reset your router, you will need to reconfigure its settings.
Don’t know how to configure your Linksys router? Check this useful guide for help.
2. Apply an alternative resetting procedure
- Disconnect the modem.
- Connect your Linksys router to the PC and port 1 on the router.
- On the computer, set IP Address to use specific IP. Set it to 192.168.1.101 (gateway needs to be set to 192.168.1.1).
- Press the Reset button on the router for a few seconds. The Ethernet light should go off, then back on.
- Unplug the router.
- Plug it back in, then immediately press and hold the Reset button.
- The power light should start blinking. Keep holding it until it stops doing so.
- The settings should now be reverted to factory defaults.
- Launch a web browser on your computer.
- Type in the router default IP 192.168.1.1.
- The management screen should appear without any login or password needed.
- Go to Setup > Mac Address Clone, and enable it.
- Press the Clone button.
- Next, hit Save settings.
- Go to Administration to set a new password.
- It will kick you out, so log back in with the username and your new password to make sure everything is correct.
- Close the browser.
- On the PC, set the IP back to Automatic, then repair the connection.
- Check the status to make sure you have an IP Address in the 192.168.1.xxx network.
After performing all the above steps thoroughly, open your browser for a quick Internet test. If you can’t connect, unplug both the modem and the router. Wait 30 seconds, then plug the modem in first.
Make sure the modem is ready to go before plugging the router back in too. Once the router is operating, repair your connection on the PC again. You should be able to access your Internet connection now.
If you have any other questions or suggestions, reach for the comments section below.

