Fix: NO MORE IRP STACK LOCATIONS error in Windows 10/11
Key notes
- To avoid any BSoD errors, you need to keep your Windows 10 up-to-date. So use the Windows Update regularly because Microsoft issues a lot of patches and fixes that might solve this kind of errors.
- The next thing to do is to update the drivers for your hardware. BSoDs signal problems with your hardware but a poorly written driver can also do that.
- We have a special section dedicated to Troubleshooting BSoD errors. Bookmark it because it can be a lifesaver in these delicate moments.
- If you're an adult, it's highly improbable that you didn't see a Windows 10 error. Check our Windows 10 errors Hub because it can be an important source of solutions.

We all encountered a computer error at least once, and while many computer errors are relatively harmless, BSoD errors are not.
In Windows 10 and in all other versions of Windows, BSoD errors will usually restart your PC in order to prevent damage, and that can disrupt your work and cause you to lose important data.
As you can see, BSoD errors can be problematic, therefore today we’re going to show you how to fix NO MORE IRP STACK LOCATIONS error.
How can I fix NO MORE IRP STACK LOCATIONS BSoD in Windows 10?
Table of contents:
- Keep your Windows 10 and drivers updated
- Run the BSOD Troubleshooter
- Run the SFC scan
- Run DISM
- Check the hard drive
- Uninstall your antivirus software
- Reinstall your audio drivers
- Check your hardware
- Reset Windows 10
How to fix NO MORE IRP STACK LOCATIONS error in Windows 10
Solution 1 – Run the BSOD Troubleshooter
If updating your drivers didn’t get the job done, let’s seek help from some troubleshooting tools. The first troubleshooter we’re going to try here is Windows 10’s built-in troubleshooter.
Here’s how to run the BSOD troubleshooter in Windows 10:
- Open the Settings app and go to Update & Security section.
- Select Troubleshoot from the menu on the left.
- Select BSOD from the right pane and click Run the troubleshooter.

- Follow the instructions on the screen to complete the troubleshooter.
Solution 2 – Keep your Windows 10 and drivers updated
In order to avoid BSoD errors, it’s important that you keep Windows 10 up to date with the latest patches.
Microsoft is constantly working on improving Windows 10, and many of these patches offer new features and security updates.
In addition, many patches are fixing issues with incompatible hardware and software.
And since many BSoD errors are caused by hardware or software incompatibility, you can see why it is crucial to use Windows Update regularly.
Bear in mind that updating Windows 10 regularly isn’t enough to prevent BSoD errors, and in addition to downloading updates, it’s also important to keep your drivers up to date as well.
Downloading the latest drivers is relatively simple, and you need to do is to go to your hardware manufacturer’s website and download the latest drivers for your hardware.
In addition, you can also use Device Manager to download all the necessary files. To do that follow these steps:
- Press Windows Key + X to open Power User Menu. Select Device Manager from the list.
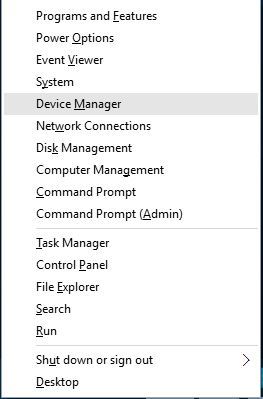
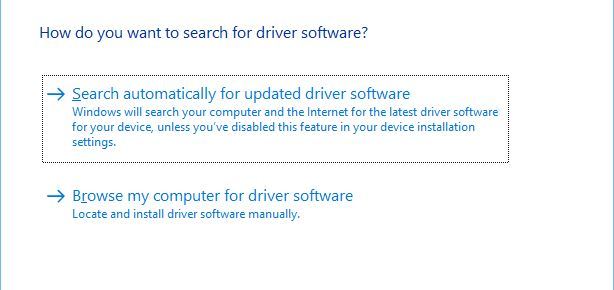
- Once Device Manager opens, locate the driver you wish to update, right-click it and choose Update Driver Software.
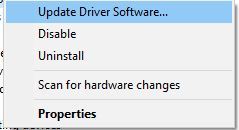
- Select Search automatically for updated driver software and wait for Windows 10 to download the driver.
- Repeat this process for all the devices you want to update.
Update drivers automatically
Searching for drivers on your own can be time-consuming. So, we advise you to use a tool that will do this for you automatically.
Using an automatic driver updater will certainly save you from the hassle of searching for drivers manually, and it will always keep your system up to date with the latest drivers.
A dedicated third-party tool will help you update drivers automatically and prevent PC damage caused by installing the wrong driver versions.
After several tests, our team concluded that this is the best-automatized solution.
You can prevent these problems by using an automatic tool that will search and install the correct drivers on your computer with just a few clicks. That's why we recommend you use Outbyte Driver Updater. Here's how to do it:
- Download and install the Outbyte Driver Updater app.
- Launch the software.
- Wait for the app to detect all incompatible drivers.

- Afterward, it will show you a list of the drivers found to select the ones to Update or Ignore.
- Click on Update & Apply Selected to download and install the newest versions.
- Restart your PC to ensure the applied changes.

Outbyte Driver Updater
Use this software and solve all driver-related issues from your PC.Solution 3 – Run the SFC scan
The next troubleshooting tool we’re going to try is the SFC scan. This is a command-line tool that scans your system for broken files and resolves them (if possible).
Here’s how to run the SFC scan in Windows 10:
- Right-click on the Start Menu button, and open Command Prompt (Admin).
- Enter the following line and press Enter: sfc/scannow

- Wait until the process is done (it may take a while).
- If the solution is found, it will automatically be applied.
- Now, close the Command Prompt and restart your computer.
Solution 4 – Run DISM
DISM is the third command-line troubleshooter we’re going to try here.
Deployment Image Servicing and Management (DISM), as its name, says, re-deploys the system image all over again, which might be helpful when resolving issues like NO MORE IRP STACK LOCATIONS.
We’ll walk you through both standard and the procedure that utilizes the installation media below:
- Standard way
- Right-click Start and open Command Prompt (Admin).
- Paste the following command and press Enter:
- DISM /Online /Cleanup-Image /RestoreHealth

- DISM /Online /Cleanup-Image /RestoreHealth
- Wait until the scan is finished.
- Restart your computer and try updating again.
- With the Windows installation media
- Insert your Windows installation media.
- Right-click the Start menu and, from the menu, choose the Command Prompt (Admin).
- In the command line, type the following commands and press Enter after each:
- dism /online /cleanup-image /scanhealth
- dism /online /cleanup-image /restorehealth
- Now, type the following command and press Enter:
- DISM /Online /Cleanup-Image /RestoreHealth /source:WIM:X:SourcesInstall.wim:1 /LimitAccess
- Make sure to change an X value with the letter of the mounted drive with Windows 10 installation.
- After the procedure is finished, restart your computer.
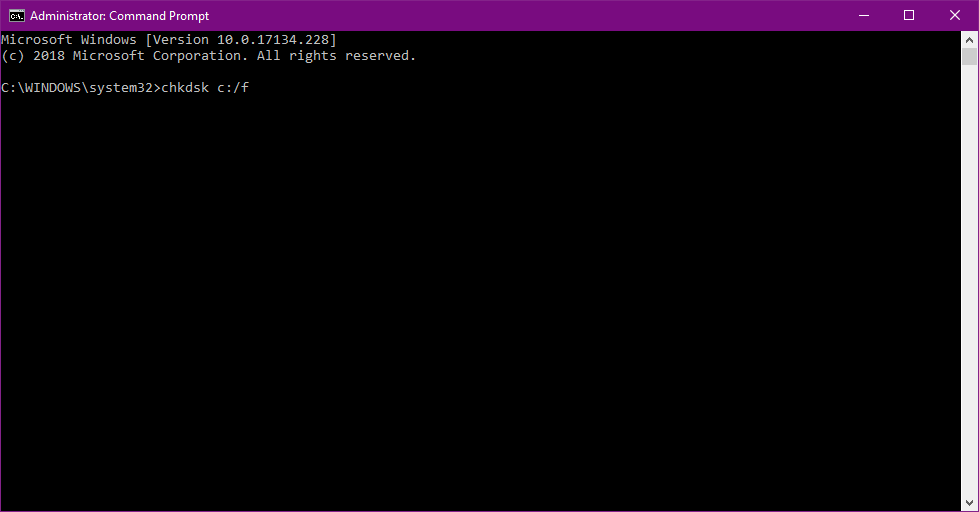
Solution 5 – Check the hard drive
If there’s something wrong with your hard drive, BSOD issues are quite possible. So, go and run a command that will test the state of your hard drive, and provide a solution (if possible).
Here’s how to run the chkdsk command in Windows 10:
- Enter the Advanced Startup (Restart your computer while holding the Shift key).
- Choose Troubleshoot > Advanced Options.
- Select Command Prompt from the list of options.
- When Command Prompt appears, enter the following lines and press Enter after each line in order to run it:
- bootrec.exe /rebuildbcd
- bootrec.exe /fixmbr
- bootrec.exe /fixboot
- Some users are also suggesting that you need to run additional chkdsk commands as well. To perform these commands, you need to know drive letters for all your hard drive partitions. In Command Prompt you should enter the following (but remember to use the letters that match your hard drive partitions on your PC):
- chkdsk /r c:
- chkdsk /r d:
This is just our example, so keep in mind that you have to perform chkdsk command for every hard drive partition that you have.
- chkdsk /r c:
- Restart your computer and check if the issue is resolved.
Solution 6 – Uninstall your antivirus software
It’s not uncommon for antivirus software to cause a BSoD error such as NO MORE IRP STACK LOCATIONS.
Many users confirmed that after uninstalling their antivirus software the BSoD error was completely resolved.
According to users, Total Defense, Avast, Kaspersky, and Norton can cause this error to appear, and in order to fix this problem, you’ll have to remove the aforementioned software.
Bear in mind that antivirus software sometimes leaves certain registry entries and files behind, and even those files can cause BSoD errors to manifest.
In order to completely remove antivirus software, it’s recommended to use the dedicated uninstaller tools.
Many security companies offer dedicated uninstallers for their software, and you can download these tools for free.
Few users complained that they are unable to access Windows 10 at all due to NO MORE IRP STACK LOCATIONS error.
And if you can’t access Windows 10, you’ll have to remove your antivirus by using Safe Mode. To access Safe Mode, follow these steps:
- Restart your computer a few times while it boots to start the Automatic Repair process.
- Choose Troubleshoot > Advanced options > Startup Settings. Click Restart button.
- When your computer restarts again you’ll see a list of options. Press F5 or 5 to select Safe Mode with Networking.
- After you enter Safe Mode try to remove your antivirus software.
If the problem is fixed after uninstalling your antivirus software, you might want to install the newer version or try a different antivirus program.
We covered the best Windows 10 antivirus programs not that long ago, so you might want to check them out.
Solution 7 – Reinstall your audio drivers
Few users reported that NO MORE IRP STACK LOCATIONS error was caused due to audio drivers, and in order to fix this error, users had to remove and reinstall the audio driver.
To uninstall an audio driver you need to do the following:
- Start Device Manager. You can do that by pressing Windows Key + X and choosing Device Manager from the list.
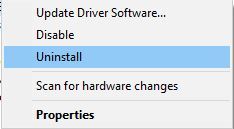
- Once the Device Manager starts, locate your audio driver and right click it and choose Uninstall from the menu. If available, check Delete the driver software for this device and click OK.
- After the driver is uninstalled, restart your computer.
- If the PC is stable and BSoD error is fixed you can continue using the default driver, or you can try and download the latest audio driver for your device.
Solution 8 – Check your hardware
If the problem still persists, you might want to check your hardware. The most common cause of BSoD error is your RAM memory, and you can test it by using MemTest86+.
Keep in mind that in order to get accurate results you need to keep the testing process running for a couple of hours.
If your RAM is working properly, the problem might be caused by your hard drive, motherboard, or any other hardware component.
In addition to checking hardware, we strongly advise you to check if your hardware is properly connected and to make sure that there are no loose contacts.
If your computer is filled with dust, it’s also a good idea to clean it by using a pressurized can of air.
Solution 9 – Reset Windows 10
If the NO MORE IRP STACK LOCATIONS error is caused by a software problem, resetting Windows 10 will probably fix it.
Keep in mind that resetting Windows 10 will delete all files and folders from your C drive, so make sure that you create a backup. To perform a Windows 10 reset, do the following:
- Restart your computer few times while Windows 10 boots. This will start Automatic Repair.
- Choose Troubleshoot > Reset this PC > Remove everything > Only the drive where Windows is installed.
- Follow the instructions in order to complete the reset process.
If the problem still persists even after you performed Windows 10 reset, the error is most likely caused by faulty hardware or hardware incompatibility.
NO MORE IRP STACK LOCATIONS error can cause you a fair amount of problems, but this error can be usually solved by removing your antivirus software.
If that solution doesn’t work for you, feel free to try any other solution from this article.
Read our disclosure page to find out how can you help Windows Report sustain the editorial team. Read more


Improve this guide


User forum
0 messages