Error While Processing Command on Printer: 4 Ways to Fix
Clear the printing tasks or update the drivers to fix this issue
Key notes
- If you get a print queue error while processing the command, end current print tasks.
- Outdated drivers can sometimes cause this and many other errors to appear, so keep them updated.

Printing errors are common and many reported Error processing command on their printer. This can be a big problem and prevent you from printing documents.
This isn’t the only issue and many reported error printing message on Windows, but we covered that in a separate guide, so you’re welcome to visit it.
Today we’re going to show you how to fix this problem, so let’s get started, shall we?
What causes an Error processing command on the printer?
- Pending printer tasks can interfere with the process and that can result in this error.
- Issues with your printer drivers can cause various errors to appear.
- In some rare cases, a damaged Windows installation can be the culprit.
How do I fix error processing command on my printer?
1. Close pending printer tasks
- Press the Windows key + R on your keyboard and type services.msc in the Run box and press Enter.

- Search for the Print Spooler service in the right pane, right-click on it, and select Stop. After that, right-click on it again and select Start.

- Close the Services Window.
- Open the Control Panel and select View By Large icons.

- Click on Devices and Printers.

- Open your printing device, and if you have any pending documents, select them and delete.
- Close all the open windows and restart your PC to see if this fixed the issue.
2. Reinstall the printer drivers
- Open the Control Panel and select View By Large icons.
- Click on Devices and Printers.
- Right-click on your printer and select Remove device.

- Confirm the device removal and restart your computer.
- After the PC reboots, it should automatically detect and install your printer, if not, unplug it and plug it back again.
After doing that, check if the error message is gone.
3. Update the printer driver
- Go to your printer manufacturer’s official website.
- Find your device on the website and check if there are any available updates.

- Download and install the latest drivers.
4. Perform an automatic repair
- Click the Start button and open Settings.
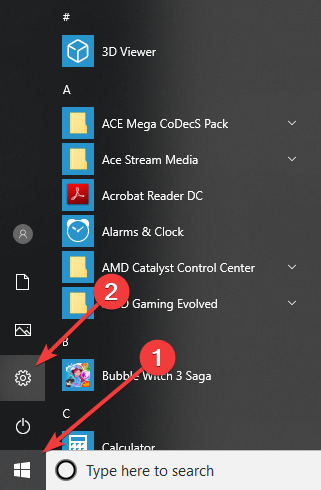
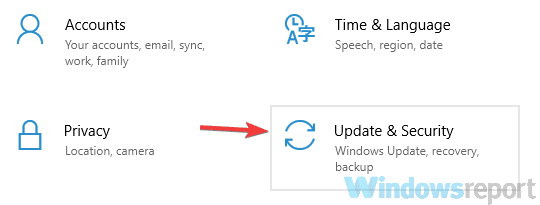
- Go to Updates & Security.
- In the Recovery tab, select Advanced Startup and choose Restart now.

- At the Choose an option screen, select Troubleshoot and click Automated repair.
- Choose the account you want to log in with.
- Wait for the Automated repair process to take place.
- Your computer may restart during the process.
- After the repair is finished, check to see if it fixed the issue.
In case the problem is still there, we have a great guide on how to fix printer in error state, so we suggest you check it out.
We hope that our solutions helped you to fix this issue. If you liked this article, leave a comment in the comment section below.
Read our disclosure page to find out how can you help Windows Report sustain the editorial team. Read more


Improve this guide


User forum
0 messages