SOLVED: Windows 10/11 Quick Access error
5 min. read
Updated on
Read our disclosure page to find out how can you help Windows Report sustain the editorial team. Read more

Quick Access is a new feature that replaced what was previously known as Favorites, and in Windows 10, this feature can be found in the File Explorer navigation pane.
The good thing about this feature is you can navigate faster to locations you frequent the most, as well as those you recently visited. In fact, by default, File Explorer launches into Quick Access, though you can change this to suit your preferences.
This feature’s convenient way of accessing folders helps a lot especially when some folders or files cannot be easily located or you cannot remember how you saved the file as.
But there are times when Quick Access may not work, either it gets stuck or you cannot remove or unpin it, and other times it loses track of target folder(s), while still pointing to the old location.
If you encounter a Windows 10 Quick Access error, try the solutions below to resolve it.
FIX: Windows 10 Quick Access error
- Preliminary troubleshooting
- Disable Quick Access and then reset the data
- Perform a system reset for your PC
- Customize the folder options
1. Preliminary troubleshooting
The first thing to do is restart your computer, but if that still doesn’t help, try running the Windows built-in troubleshooter on your computer, which can automatically fix some common problems like the Windows 10 Quick Access error, and others like networking, hardware and devices, and program compatibility.
Here’s how to run the troubleshooter:
- Click Start and select Control Panel
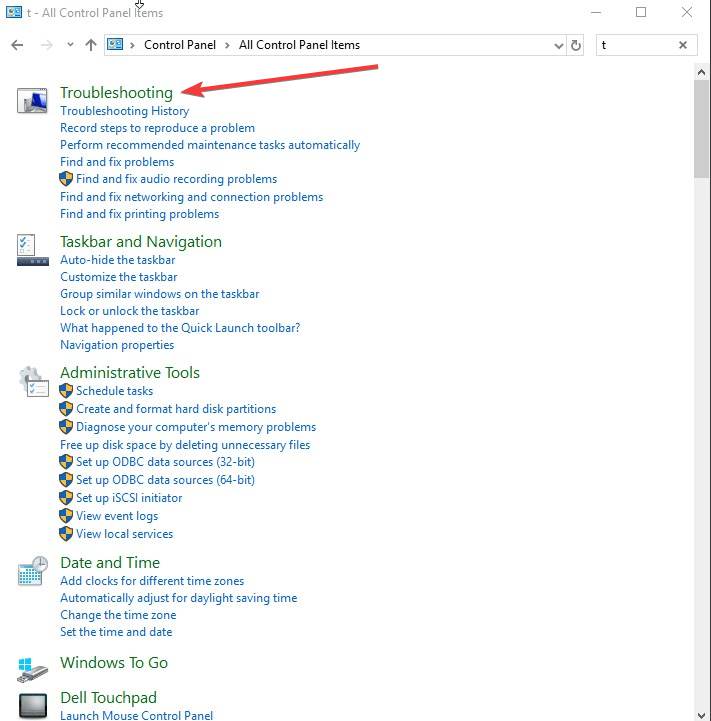
- Type Troubleshooting in the search box of the Control Panel, and select Troubleshooting
- Go to System and Security
- Click System Maintenance
- Click Next
You can also perform an SFC scan by using Command Prompt as Administrator, then check whether there are any corrupt files that may be causing the problem.
- Right click Start and select Command Prompt (Admin)
- Type the commands below:
dism /online /cleanup-image /restorehealth
sfc /scannow
- Close the window once you’re done
If this doesn’t help, try the next solution.
2. Disable Quick Access and then reset the data
In order to disable Quick Access, you can disable showing of recent and frequently used files and/or folders. If you want to remove the frequent or recent files/folders, open File Explorer, click View tab, click Options and then click Change folder and search options to open the Folder Options.
Next, uncheck the Show recently used files in Quick Access box, and the Show frequently used folders in Quick Access boxes, under Privacy, then click Apply and exit. This removes the two sections from Quick Access in File Explorer.
The Windows 10 Quick Access error may come up due to corruption among data which your system stores for frequent folders record. So you need to reset the data to resolve the issue, after disable Quick Access by doing the following:
- Right click Start and select Command Prompt (Admin)
- Type the following command:
del /F /Q %APPDATA%\Microsoft\Windows\Recent\AutomaticDestinations\*
- Press enter
- Close Command Promptand reboot your system
If this doesn’t help, try the next solution.
3. Perform a system reset for your PC
Performing a reset allows you to choose which files you want to keep, or remove, and then reinstalls Windows.
Here’s how to get started:
- Click Start
- Click Settings
- Click Update & Security
- Click Recovery on the left pane
- Click Reset this PC
- Click Get started and choose an option either Keep my files, Remove everything, or Restore factory settings
Note: all your personal files will be deleted and settings reset. Any apps you installed will be removed, and only pre-installed apps that came with your PC will be reinstalled.
If this doesn’t help, try the next solution.
4. Customize the folder options
Sometimes, folder locations on remote file system files may find their way into the Quick Access cache, thus the remote systems may become inaccessible so File Explorer waits for them to time out before rendering.
One way to deal with this is to delete them from the Quick Access panel but you can also customize the folder by doing the following:
- Open File Explorer
- Right click Downloads folder and select Properties
- Click Customize tab
- Choose Optimize this Folder for
- General Items
- Click Also apply this setting to subfolders
- Click OK. Do the same for your Documents folder.
This will let File Explorer handle files without trying to generate snapshot images for them.
Did any of these solutions help? Let us know by leaving a comment in the section below.




User forum
0 messages